BMW E3 2500 restoration from Argentina

Update #2
-Cleaning, organizing, and reassembly
The first month with the car basically consisted of organizing, cleaning, and putting away the various parts that were scattered around the interior and trunk.

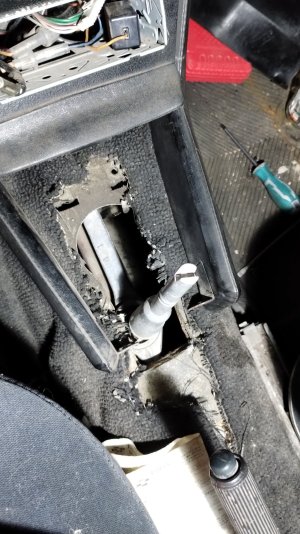
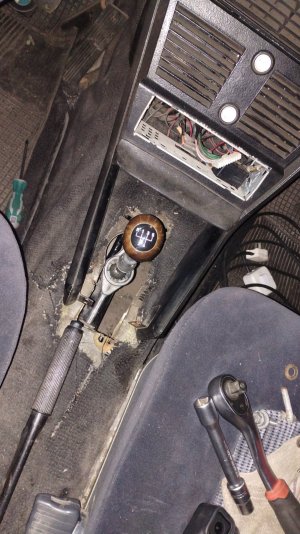
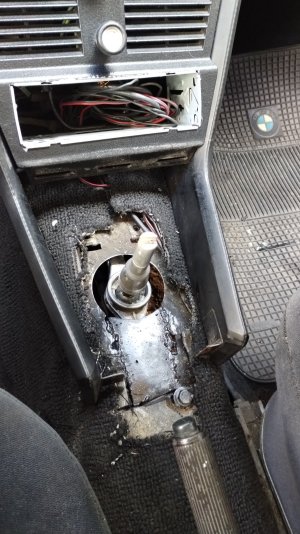
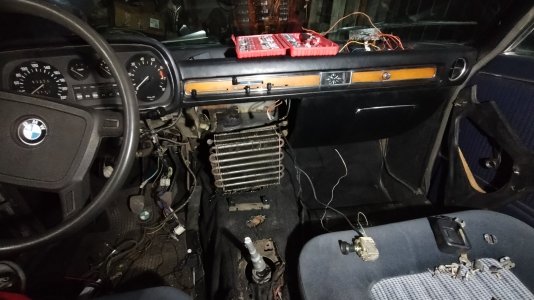
As you can see in the previous photos, the interior was quite disassembled in the center console area, presumably due to the replacement and adaptation of the manual gear selector.
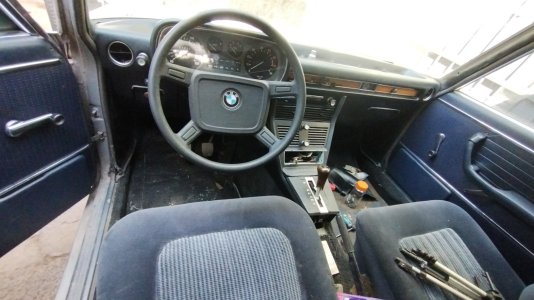
Knowing myself, I couldn't resist organizing and reassembling this interior, taking the opportunity to clean it, and surprisingly, it was complete! Only a side air vent was missing (I'll probably have it 3D printed later).

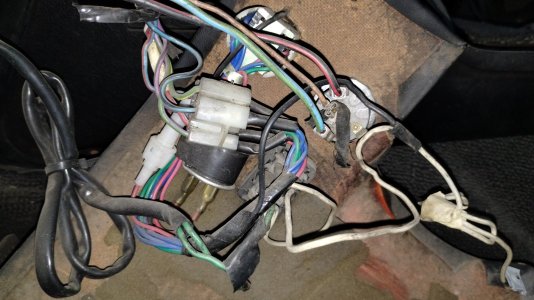
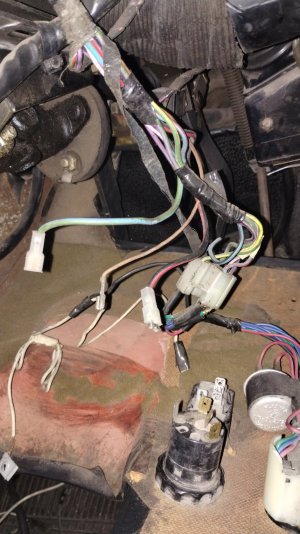
Now, while I was reassembling this glorious interior, I came across many extra wires, but luckily, there was little human intervention in the wiring. I found three main electrical modifications:
*Replacement of the hazard light switch: I believe the original one broke, and they adapted a generic one (which is working).
*Horn activation via a push button on the steering column: I discovered that at some point, the copper contact connecting the steering wheel to the column wiring, which provides the ground signal when the steering wheel buttons are pressed, broke and was replaced with a red button in the middle of the steering column. Unfortunately, this required drilling into the aluminum housing. (I've since managed to get the horn working correctly; future update).
*High/low beam activation via a button: I found the lever that switches between low and high beams broken, and in its place was a light switch on the lower panel that covers the column. Interestingly, I was surprised to learn that the left lever controlled the headlights and the right one was for the turn signals. I think it's super cool (keep in mind I was born in 2000, don't judge me, haha).

Once the wiring was sorted (a task I thoroughly enjoy), I was able to reassemble the rest of the interior, and it was definitely very gratifying to see it completely put back together (although it didn't last long). Luckily, everything was in excellent condition, except for the headliner, which was somewhat deteriorated over time. On the other hand, the seats had been reupholstered at some point, and the floor mats had been redone in black; I believe the original was blue, like the rest of the interior, so they were also in excellent condition.

The only limitation I encountered inside was related to the gear selector. They adapted a long linkage system, and for some reason, instead of shortening it or finding a suitable model, they CUT THE CAR FLOOR to fit it. This clearly had consequences, not only for the floor, but also because the console couldn't be assembled properly, and when shifting gears, it would hit the handbrake. The solution was simple for me: find someone who could weld aluminum and have them shorten the piece. Fortunately, I found someone, and shortening the piece was the right approach. I was able to weld a small patch on the floor where they had cut it, and everything looked much better. It was my excuse to start welding, so you won't see any professional-looking welds. It was the first piece I welded, and I swear I improved as the project progressed. Now, the interior had a much more harmonious feel.

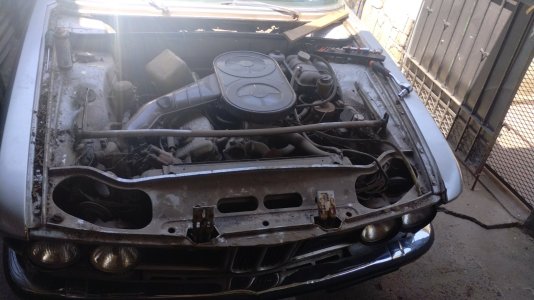
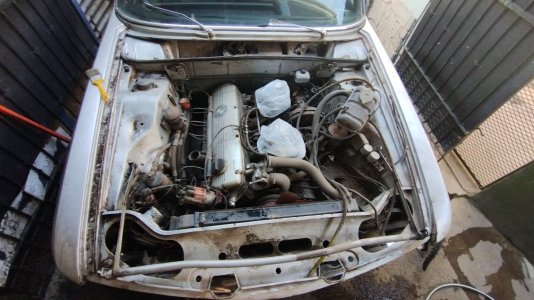
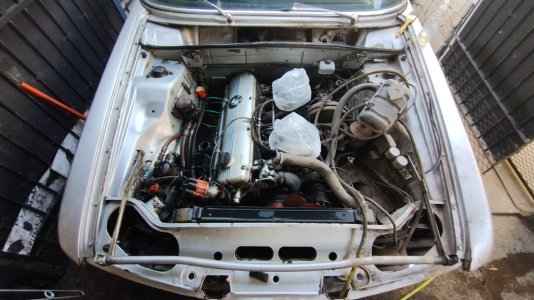
While I started reorganizing the interior, I couldn't resist and removed the hood to begin tidying up and checking for missing engine parts, as I had some disassembled components and screws scattered everywhere.

I started with a clean, and fortunately, just like inside, I had all the essential parts; not a single screw was missing. I even had the wiring for the automatic transmission, which I was later able to remove, taking care to leave the starter relay functional for the automatic model (thanks to the forum threads).

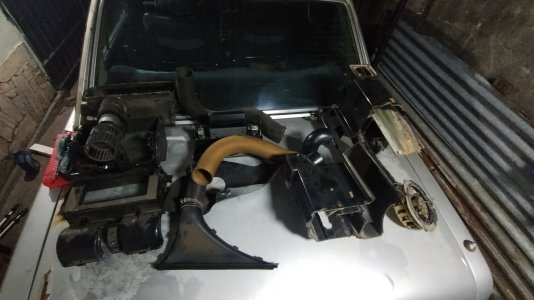
To wrap things up, already thinking about the next steps, I disassembled part of the interior again to clean the heating system, both the radiator and the air vents. Nobody wants to turn on the heat and be greeted by a ball of years-old dust! Luckily, everything was in good condition; I only found dust, old coins, and a dead ant nest inside the radiator, but nothing a quick cleaning couldn't fix!

Now, with much more order, cleanliness, and a clearer idea of what was missing, I could begin the mechanical work—that is, the starting process!
 

Attachments

  • IMG_20260105_194338329.jpg
    IMG_20260105_194338329.jpg
    254.2 KB · Views: 59
  • IMG_20260117_224906841.jpg
    IMG_20260117_224906841.jpg
    269 KB · Views: 47
  • IMG_20260106_094823267.jpg
    IMG_20260106_094823267.jpg
    215.7 KB · Views: 41
  • IMG_20260106_210235373.jpg
    IMG_20260106_210235373.jpg
    307.2 KB · Views: 37
  • IMG_20260118_202751015.jpg
    IMG_20260118_202751015.jpg
    340.8 KB · Views: 42
  • IMG_20260216_150200847.jpg
    IMG_20260216_150200847.jpg
    316.9 KB · Views: 36
  • IMG_20260111_140740688.jpg
    IMG_20260111_140740688.jpg
    229.4 KB · Views: 36
  • IMG_20260111_172035348.jpg
    IMG_20260111_172035348.jpg
    258.8 KB · Views: 38
  • IMG_20260111_173455294.jpg
    IMG_20260111_173455294.jpg
    253.5 KB · Views: 34
  • IMG_20260129_001017946.jpg
    IMG_20260129_001017946.jpg
    181 KB · Views: 34
  • IMG_20260129_212113280.jpg
    IMG_20260129_212113280.jpg
    225.3 KB · Views: 43
Last edited:
I noticed a number of your body panels could have fairly significant rust.

If you need to purchase a replacement hood, trunk, fenders, etc, this vendor in the Los Angeles area has seven E3 vehicles ("parts cars") you can get parts from:

2002AD
 
I noticed a number of your body panels could have fairly significant rust.

If you need to purchase a replacement hood, trunk, fenders, etc, this vendor in the Los Angeles area has seven E3 vehicles ("parts cars") you can get parts from:

2002AD
Hi!

Yes, rust isn't uncommon on cars of this age in my country, and this one, having been abandoned for so long, was no exception.
While I plan to restore most of the body panels, this contact will help me try to find parts in better condition.
I plan to buy any spare parts that others might have and possibly ask them to cut them and send me the pieces I need to repair my panels, such as the front of the hood or the holes where the front turn signals go. The rest is quite repairable, at least at first glance.
Thanks for the contact!
 
Really nice to see E3 going back to life.

Still a lot to do, but the progress is visible.

With your motivation makes the process very fast.

Keeping for regular progress!
 
Really nice to see E3 going back to life.

Still a lot to do, but the progress is visible.

With your motivation makes the process very fast.

Keeping for regular progress!
Thanks, Kris!

I really think I should have taken it easy, but I was so excited about the new project, hahaha. I was able to make the most of those long summer nights.
I have a lot to tell you, but I don't want to overwhelm you too quickly, although I plan to post more updates this week ;).
Luckily, everything is photographed and recorded (because of the videos I upload to YouTube weekly).

Thanks for following the project!
 
Update #3
-The Mechanics Begin

Well, once we organized, cleaned, and reassembled the loose parts, everything was much clearer.

As I mentioned before, the reason the car was no longer used was the automatic transmission failure and the subsequent incomplete or poorly executed manual transmission swap.
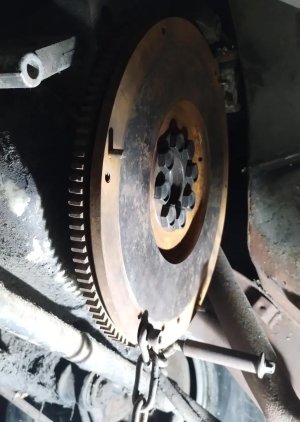
Talking with the previous owner, he told me there were problems with the flywheel, which had been installed incorrectly, and therefore the starter didn't align and couldn't turn the engine over.

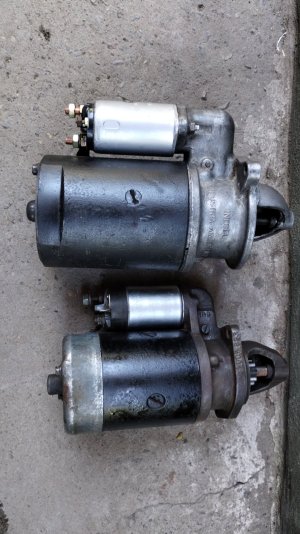
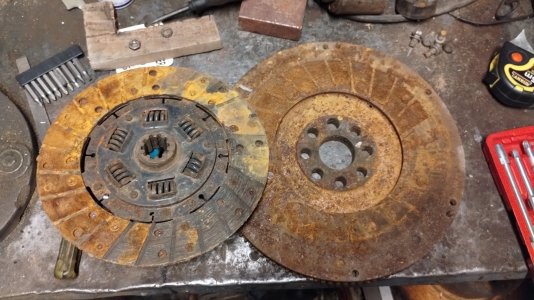
Luckily, along with the parts he gave me from the car, he gave me a flywheel, clutch, and pressure plate set that were the correct ones for the M30. The bad thing was that they had been exposed to the elements and deteriorated quite a bit (as you can see in the photos). In addition to that, I found a starter in the trunk, which didn't look like a BMW part, but I assumed it would fit. The good thing was that while I was cleaning the engine, I noticed a strange lump under the carburetors and the coolant reservoir, and yes, it was the original starter! It immediately looked familiar (thanks to the E23) and I assumed it was the one to go with.
I figured that if there was another starter in the trunk, the original wasn't working or had some kind of problem, but motivated, I set about disassembling it, cleaning it, painting it, and lightly sanding all its contacts. Once reassembled, I tested it and IT WORKED PERFECTLY!
It was definitely the sign I needed to finalize my decision that my first mechanical task on the car would be to replace the clutch assembly and install the correct one.

Now, before tackling the awkward gearbox removal, I had to verify that the existing assembly would work, as it was quite rusty. Luckily, the clutch shop told me to thoroughly clean the flywheel and pressure plate, and they recommended rebuilding the clutch. So, with everything clean (I only made sure to get the contact area perfectly clean) and the new clutch in place, it was time to begin the adventure.

I lifted the car as high as I could and started disassembling. I had previously done the same thing with my E23, so it was just a matter of reliving those tense and agonizing moments of removing the gearbox and praying it wouldn't fall to the ground. Fortunately, everything went well, and I was able to reveal the completely new (and incorrect) clutch assembly they had previously installed.

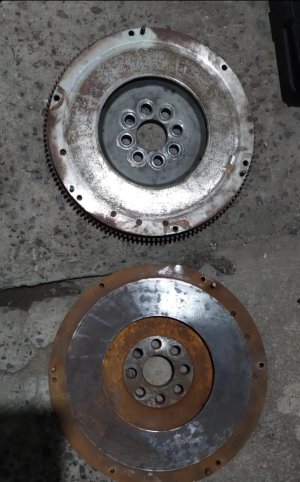
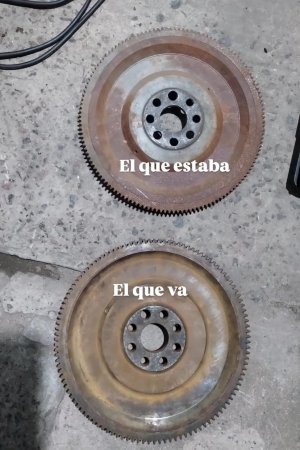
Everything was going smoothly until it came time to remove the flywheel, which, as you know, is very tight, and with the car only raised about 75 cm, it wasn't an easy task. A little creativity with the right lever solved the problem. Now, with everything out, the difference was obvious. The installed flywheel was smaller and had many more teeth. Conclusion: it was an M20 engine assembly.

Now, it was all fun and games until it came to reassembling this whole thing. After a couple of curses, the correct flywheel was finally installed and torqued. Luckily, the gearbox went back into position without much trouble. I did use my homemade clutch plate alignment tool to prevent it from being in the wrong position and complicating things (don't ask me how I figured it out, thank goodness for the E23).

After three days of working nights after office hours, I finally had the problem that had caused this car to stop working!

Unfortunately, during my exploration of the car's undercarriage, I found a lot of rust on the chassis rails, a serious problem but I don't think it's uncommon in these cars. It will be a problem for later.

In the attached images, I show you:
-The original condition of the M30 clutch assembly
-The restored starter (along with one from a Ford 6-cylinder engine, part of another project)
-A comparison between the installed flywheel (from an M20) and the correct one.
-A victory photo of the fully torqued flywheel.

Now, with this big step taken, the real and dreaded challenge for me began: cleaning and refining the Zeniths.
Small spoiler: thanks to the wealth of information on the forum, everything went well.
 

Attachments

  • IMG_20260218_194277777.jpeg
    IMG_20260218_194277777.jpeg
    172.1 KB · Views: 34
  • IMG_20260218_194299999.jpeg
    IMG_20260218_194299999.jpeg
    136.9 KB · Views: 33
  • IMG_20260218_194288888.jpeg
    IMG_20260218_194288888.jpeg
    173.4 KB · Views: 31
  • IMG_20260214_150157962.jpg
    IMG_20260214_150157962.jpg
    300.8 KB · Views: 31
  • IMG_20260212_215959474.jpg
    IMG_20260212_215959474.jpg
    288.8 KB · Views: 36
I see very creative way to block the flywheel, not to turn. :cool:

Ethanol in the fuel is not acting nicely for the zinc, copper or aluminum.
 
I see very creative way to block the flywheel, not to turn. :cool:

Ethanol in the fuel is not acting nicely for the zinc, copper or aluminum.
Yes, it is! I had to get creative because I couldn't stop the motor from spinning or lifting up. Luckily, a chain and some screws solved my problems, haha.

I'll keep the fuel thing in mind! Anyway, ethanol isn't common in fuels here; as far as I know, it's only used in racing. Personally, I usually use 95-octane fuel. Sometimes I use 98-octane, but it's more expensive, and with vehicles that consume that much, it makes a noticeable difference to daily economy, haha.
 
I see the difference in the fuel reactivity even for E5 (which means up to 5% bio components). Currently we have 95octane as E10 (up to 10% bio...) and 98octane as E5. Many classic cars users switched to 98 due to that fact.

In the past old fuel was not causing oxidation. Current one is hydrophobic which is causing rust and even biological organisms growing there (there are some papers describing that in details). It is not only problem for cars but also planes or boat's engines.

I see rubber turning into plastic.
ZAMAC is oxidizing, steel gets rusty etc ... for carburetor with delicate mechanical parts it's just lethal.

Probably it would be the best to switch to silicon and inox for the fuel components which means change to fuel injection system in place of Zeniths or Webers etc. Together with modern engine management it should help to make our classic cars robust and reliable for the future. It is not cheap but it will pay-back for some using cars irregularly. For daily drivers, bio-components are not so dangerous as there is no water build-up in the fuel system.
 
I see the difference in the fuel reactivity even for E5 (which means up to 5% bio components). Currently we have 95octane as E10 (up to 10% bio...) and 98octane as E5. Many classic cars users switched to 98 due to that fact.

In the past old fuel was not causing oxidation. Current one is hydrophobic which is causing rust and even biological organisms growing there (there are some papers describing that in details). It is not only problem for cars but also planes or boat's engines.

I see rubber turning into plastic.
ZAMAC is oxidizing, steel gets rusty etc ... for carburetor with delicate mechanical parts it's just lethal.

Probably it would be the best to switch to silicon and inox for the fuel components which means change to fuel injection system in place of Zeniths or Webers etc. Together with modern engine management it should help to make our classic cars robust and reliable for the future. It is not cheap but it will pay-back for some using cars irregularly. For daily drivers, bio-components are not so dangerous as there is no water build-up in the fuel system.
Thanks for all this information, Kris.

Unfortunately, I've been reading several local articles from carburetor enthusiasts describing problems with our current fuels, and your words add weight to these claims. It seems that some oil companies have more of an effect on our carburetors than others, since several vehicles with this system are still on the road in my country. I've also noticed a certain type of sediment inside the carburetor after leaving it unused for a few weeks, and now everything makes more sense.

Once I have the car running and using it regularly, I'll switch to higher-quality fuel and see if it has a positive impact on the Zenith engines.

I also have several injection components from an M30, such as manifolds, fuel rail, throttle body, etc, which I acquired in batches of parts.

I think that with some adjustments, I might be able to make them work in the 2.5 of the E3. I currently have my E23 running with a programmable ECU, so I wouldn't need anything from the original ECU, just the mechanical parts to perform the conversion. It would be an interesting project for the future.

Again, thanks, Kris!
 
Update #4
-The Double Zeniths

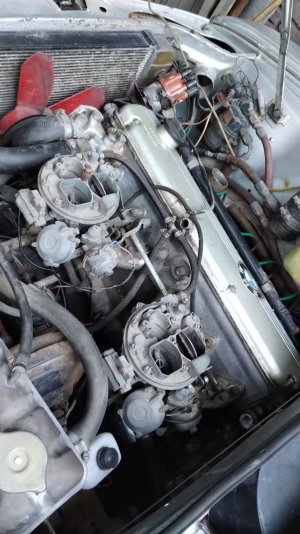
Even without testing it, but having sorted out the starting issue and the correct sprocket, it was time to embark on the next adventure: tackling the dreaded twin-barrel Zeniths.

While I love mechanics and have practically disassembled my entire E23 for various repairs (and other vehicles), carburetors were an area where I hadn't had much experience before. I only had experience with a single-barrel carburetor from a Ford inline-6 engine, similar to the one that came in the early Mustangs and Falcons in the US, but compared to the Zeniths, it felt like a carburetor from a Model T, haha. The thought that with my limited knowledge I was going to go from manipulating a simple single-barrel carburetor to having to work on two twin-barrel carburetors with automatic chokes was quite a challenge, but I knew that with patience and determination, they wouldn't be able to resist.

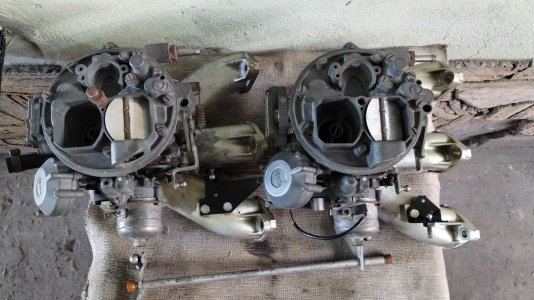
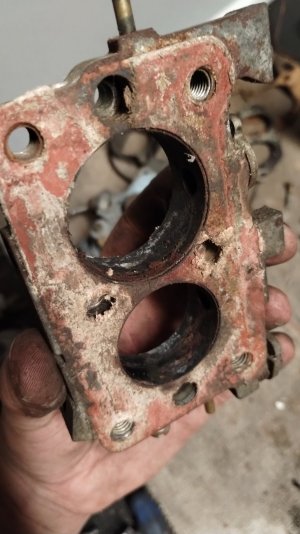
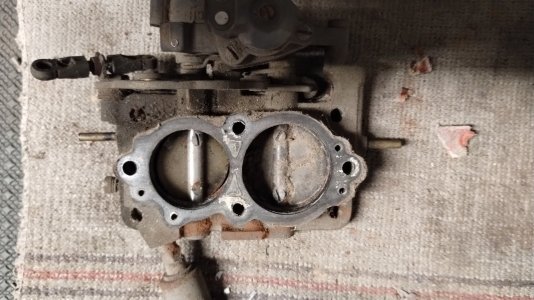
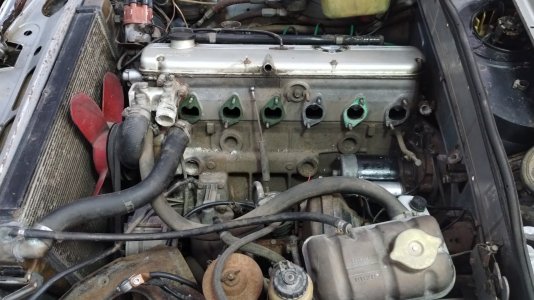
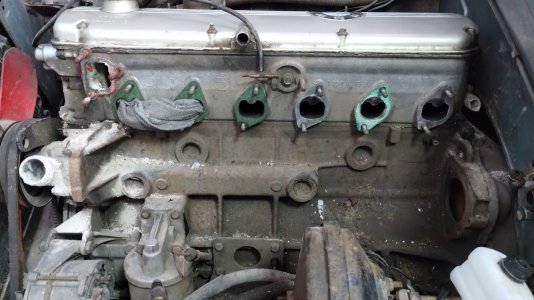
So I began the disassembly. The first step was removing them from the M30. I decided the simplest approach would be to remove them along with the intake manifold, which would allow me to examine the block and everything below the intake manifolds more thoroughly. It was a wise decision, because upon removal, in addition to finding a lot of gunk, I discovered incorrect gaskets installed on the intake manifolds for cylinders 4, 5, and 6. They had round gaskets that were obstructing part of the fuel-air mixture flow to those cylinders.

Now, returning to the carburetors, I always had a feeling that the car had actually stopped with its engine running correctly and that, therefore, neither the Zenith carburetors nor the rest of the engine had any problems. This made me confident that their settings would be adequate, or at least a baseline for them to start without issue. Therefore, my objective was simply to clean them of all the dust they had accumulated while their filters weren't installed.

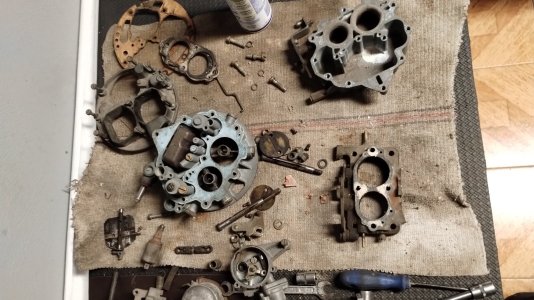
So, with this in mind, I began disassembling the first carburetor. The idea was simple: one at a time, using the other as a guide.
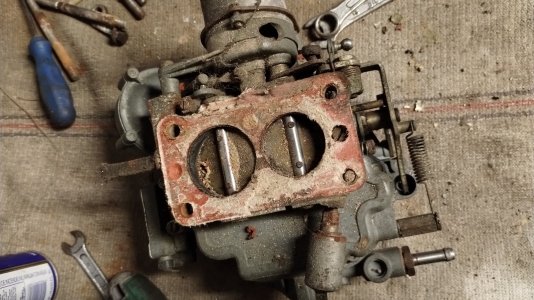
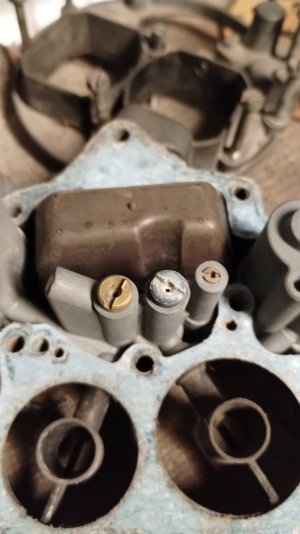
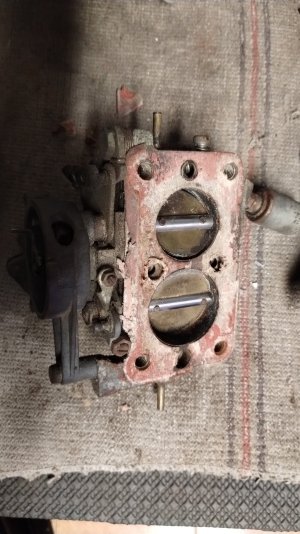
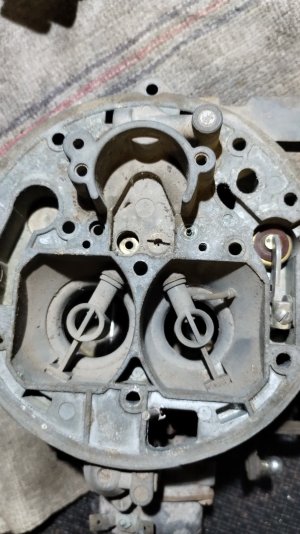
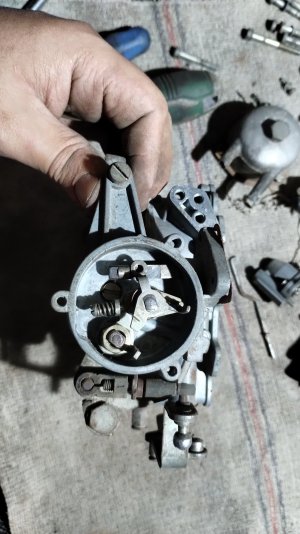
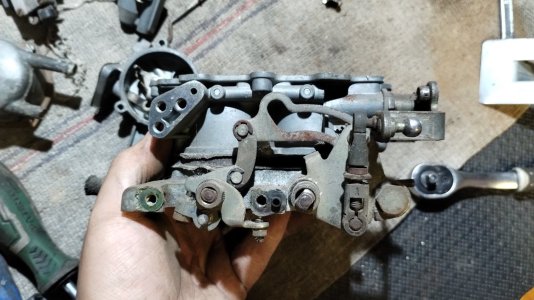
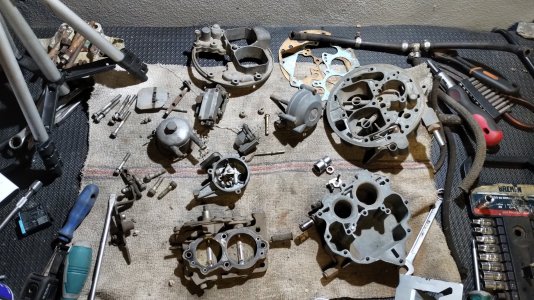
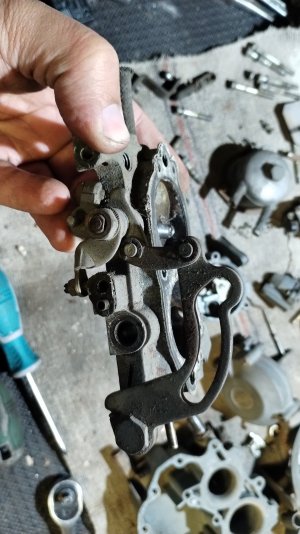
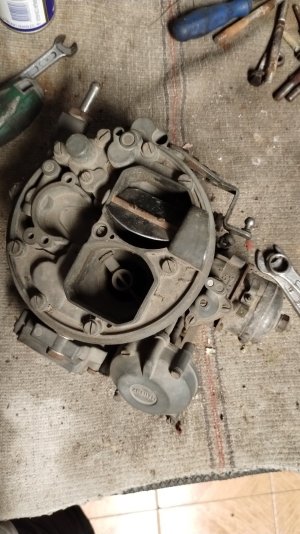
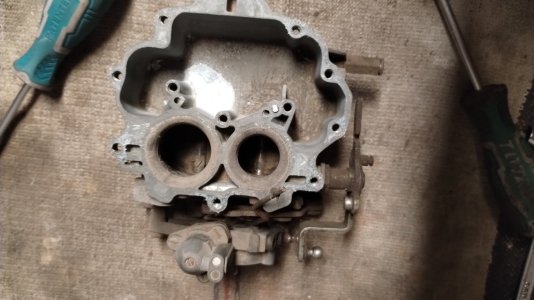
The process of disassembly and parts identification (guided by various forum threads) took me approximately one hour (photos 2-6). So, all that remained was to patiently clean everything and reassemble it. Once everything was clean, I could see that the first carburetor was in good condition, at least visually, and even its gaskets were in good shape, so I proceeded with reassembly. While cleaning and reassembling, I lubricated all the moving parts. This made a big difference in the end, as several components were stuck or moved with difficulty.

First mission accomplished! The first carburetor was reassembled, and there were no leftover parts! Now it was time for the second carburetor, which took me just as long as the first since it was much dirtier. You can judge for yourselves in photos 7 through 15. The most striking thing was the white liquid inside the float bowl of the second carburetor. We'll never know what it was.

Now, with both Zenith carburetors clean, it was time to move on to the intake manifolds, which weren't in much better condition than the carburetors.
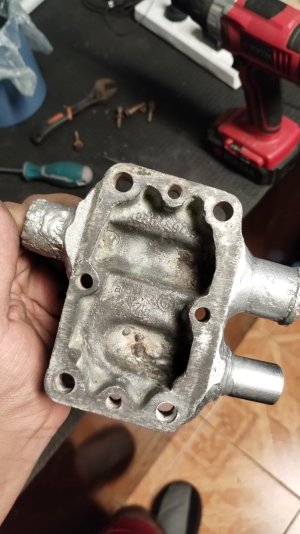
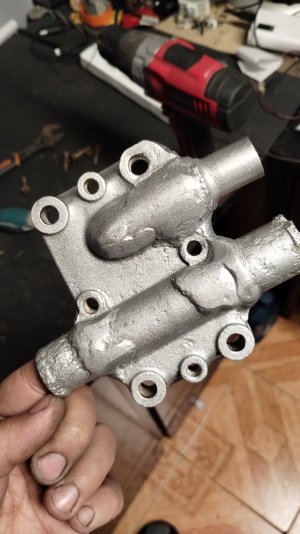
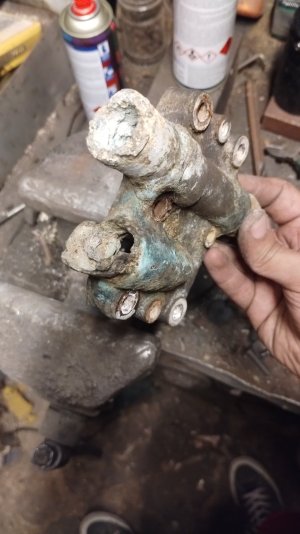
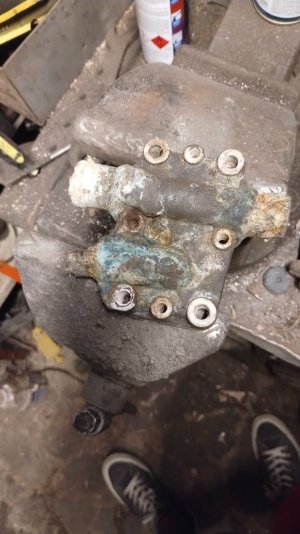
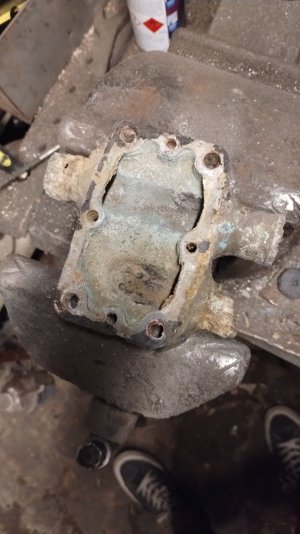
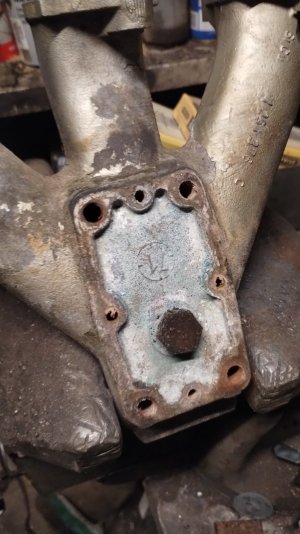
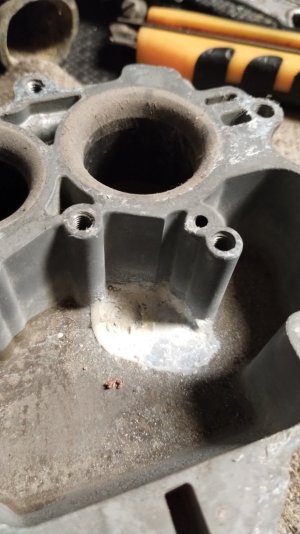
A very bad habit in my country was using tap water in vehicles instead of coolant or distilled water. Accustomed to indestructible iron engines, vehicles with engines that included alloy or aluminum parts in their cooling system suffered the consequences, and this M30 was no exception.

As you can see, the connections on the cooling manifolds were highly corroded and practically unusable. Fortunately, everything improved with a cleaning, painting, and rebuilding of one of the connections.

Now, all that remained was to reconnect the carburetors to their corresponding manifolds. I usually restore and repaint parts like the manifolds, but in this case, I felt that the wear and the faded paint added "something" to the engine that I liked, so I decided to keep it as is; they were just cleaned.

Now, both carburetors were ready to be installed and tested!

P.S.: I hope the order of the photos isn't lost when the thread is published. I think you can reinstate the order based on their numbering.
 

Attachments

  • IMG_20260223_223717625.jpg
    IMG_20260223_223717625.jpg
    318.3 KB · Views: 22
  • IMG_20260228_114031487.jpg
    IMG_20260228_114031487.jpg
    322 KB · Views: 24
  • IMG_20260227_015406173.jpg
    IMG_20260227_015406173.jpg
    206.7 KB · Views: 24
  • IMG_20260227_015356398.jpg
    IMG_20260227_015356398.jpg
    231.8 KB · Views: 25
  • IMG_20260225_232945033.jpg
    IMG_20260225_232945033.jpg
    170.6 KB · Views: 27
  • IMG_20260225_232940241.jpg
    IMG_20260225_232940241.jpg
    221.2 KB · Views: 29
  • IMG_20260225_232933552.jpg
    IMG_20260225_232933552.jpg
    197.8 KB · Views: 22
  • IMG_20260225_211553584.jpg
    IMG_20260225_211553584.jpg
    226 KB · Views: 23
  • IMG_20260223_231753132.jpg
    IMG_20260223_231753132.jpg
    190.3 KB · Views: 24
  • IMG_20260223_231743704.jpg
    IMG_20260223_231743704.jpg
    187.5 KB · Views: 24
  • IMG_20260223_231739037.jpg
    IMG_20260223_231739037.jpg
    138.8 KB · Views: 26
  • IMG_20260223_225648167.jpg
    IMG_20260223_225648167.jpg
    259.6 KB · Views: 21
  • IMG_20260220_192500657.jpg
    IMG_20260220_192500657.jpg
    263.9 KB · Views: 23
  • IMG_20260220_214400371.jpg
    IMG_20260220_214400371.jpg
    227.3 KB · Views: 20
  • IMG_20260220_215354399.jpg
    IMG_20260220_215354399.jpg
    218.5 KB · Views: 22
  • IMG_20260220_215649251.jpg
    IMG_20260220_215649251.jpg
    231.6 KB · Views: 23
  • IMG_20260220_220206379.jpg
    IMG_20260220_220206379.jpg
    426.5 KB · Views: 25
  • IMG_20260220_230259036.jpg
    IMG_20260220_230259036.jpg
    229.3 KB · Views: 21
  • IMG_20260223_223730664.jpg
    IMG_20260223_223730664.jpg
    254.8 KB · Views: 21
  • IMG_20260223_225311691.jpg
    IMG_20260223_225311691.jpg
    187.2 KB · Views: 22
  • IMG_20260223_225640656.jpg
    IMG_20260223_225640656.jpg
    252.8 KB · Views: 26
  • IMG_20260223_231732973.jpg
    IMG_20260223_231732973.jpg
    310.3 KB · Views: 29
Update #5
-Turning the Engine Over for the First Time

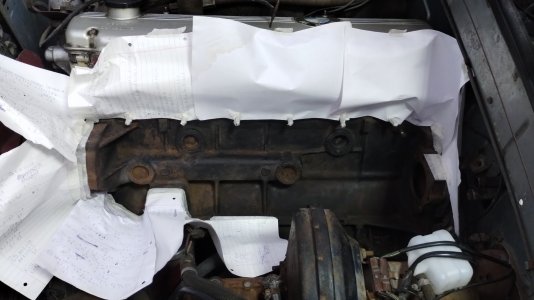
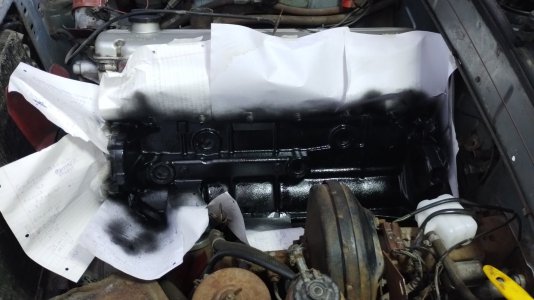
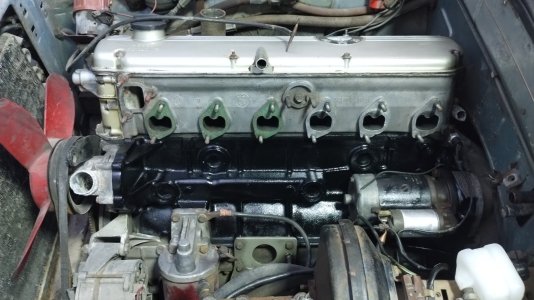
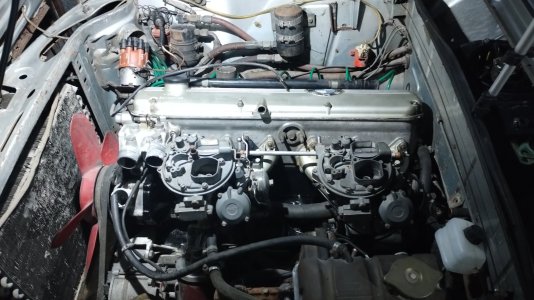
Given the apparent success of my cleaning of the Zeniths, it was time to move on and install them in the M30. But I really felt like a criminal if I didn't give that poor engine a thorough cleaning. So, taking advantage of having the whole area clear, I cleaned the block and repainted it with engine paint. As you can see, the difference was total!

While I was cleaning the engine before painting it, I took the opportunity to run water inside the block and clean the rust that had formed on the aluminum water pipes. Luckily, it worked and it seemed to be only superficial. You can also see that difference in the photos.

Now, with everything cleaner, I felt more at ease about starting to reassemble and prepare everything for the first start. But before reassembling everything and testing it, I wanted to make sure the clutch and starter work had been done properly.

First of all, I decided to remove the spark plugs to inspect them, and surprisingly, I found six seemingly new NGK spark plugs with a good color at their tips. With the spark plugs out, I decided to add some oil to the cylinders in case anything was stuck (I knew that wasn't the case since the car had been in gear when we moved it from its previous owner's house, so we had been turning the engine without realizing it). Now, with the starter, battery, and electronics in place, and without the spark plugs installed, it was the perfect time to test if it would turn over properly with the key.

Sitting in the driver's seat, I turned the key, the oil and alternator lights came on, and I proceeded to the start position. The engine turned over beautifully! It's a documented moment, so I'll leave the link below.


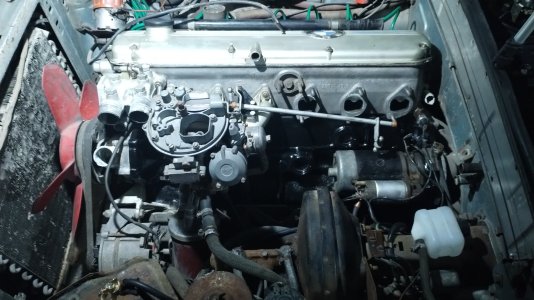
Now, with everything in order, the next step was to install the Zenith headlights and listen to this M30 roar! (Literally, because the car came without an exhaust).
 

Attachments

  • IMG_20260228_114205808.jpg
    IMG_20260228_114205808.jpg
    260.5 KB · Views: 15
  • IMG_20260228_142420663.jpg
    IMG_20260228_142420663.jpg
    242.8 KB · Views: 14
  • IMG_20260228_161352993.jpg
    IMG_20260228_161352993.jpg
    168.8 KB · Views: 14
  • IMG_20260228_165608015.jpg
    IMG_20260228_165608015.jpg
    192.4 KB · Views: 15
  • IMG_20260228_174032627.jpg
    IMG_20260228_174032627.jpg
    244.9 KB · Views: 18
Update #6
-First start, the hood didn't cooperate

Knowing the engine was in good condition, I couldn't stop there, and that same day I moved on to assembling the next parts. I put the spark plugs back in along with their wires and started reinstalling the Zenith headlights. Luckily, I had a set of intake gaskets that fit perfectly to replace the gaskets the car didn't come with.

A few minutes later, I had both Zenith headlights in place with their linkages attached. I had to use an electronic fuel pump to fill the Zeniths since the one it came with wasn't working, and there was no mechanical one available.

Now, the moment had arrived. I sat back in the driver's seat, and when I turned the key... it started instantly! Never in my life has my E23 with electronic fuel injection started as fast as this M30 that had been neglected for years. It was incredible! Although the joy was short-lived, since the hood latch wasn't working correctly, and after a few seconds, it slammed shut. It's all recorded, so here's the first start!


Now, knowing about the hood issue, we propped it up with a piece of wood and tried starting it again, because you can never get enough of hearing a 6-cylinder engine without an exhaust! This time, we were able to keep it running for a few more seconds and rev it slightly until the fuel ran out.
I don't know what you all think, but to me it sounds fantastic!


And yes, the car's exhaust wasn't part of the purchase, haha. I suppose they cut it off during the gearbox conversion, and it only came with a small section of exhaust up to the passenger's feet.

Now, knowing we had a working engine and that the starter and clutch replacement was a success, all that was left was to celebrate and think about the next steps. We had solved the problem that had kept the car parked for so long!
 

Attachments

  • IMG_20260302_003611413.jpg
    IMG_20260302_003611413.jpg
    242.4 KB · Views: 14
  • IMG_20260302_012921860.jpg
    IMG_20260302_012921860.jpg
    262.7 KB · Views: 16
Back
Top