BMW E3 2500 restoration from Argentina

When I bought my coupe, it had running issues. It would barely start and would quickly die. Replacing the points with a Pertronix got it running, but it would still backfire out the carb occasionally. I got a timing light and the timing was very erratic, it was impossible to see the timing marks. I'm surprised it ran as well as it did. I might have been able to clean and lubricate the internal parts of the distributor, but rebuild parts are now hard to find. I was able to find a rebuilt one to replace it.
Hi!

Yes, I plan to buy a timing light to check this. The strange thing is that the car was running perfectly until it was out of service for about a month for repairs, and then I started having these backfiring problems. But it never hurts to check the timing.

Thanks for the suggestion!
 
Update #7
-It moves!

Well, now that I knew the engine seemed to be in good condition and our starting efforts were successful, several tasks remained before I could take the next step: getting the car to move on its own.

For this, I needed to resolve a few things. First, I had to check and bleed the hydraulic clutch circuit and install a fuel pump to feed the carburetors.

I started with the first task, checking the clutch circuit. Luckily, I had both new hydraulic cylinders already connected and even with a fluid reservoir! The downside was that it looked quite ugly and generic, so before starting to bleed the system, I opted to use one from an E23 that I had lying around. I like how it looks, or at least it clashes less with the car. I know that originally the fluid comes from the brake fluid reservoir, but since it's an automatic car, it didn't have that reservoir, and getting one locally was impossible.

After adding the fluid, the arduous task of relentlessly pumping the pedal began until everything was in order! Surprisingly, it wasn't as difficult as it was with my E23 when I had to replace both cylinders.

With that, the first task is complete!

IMG_20260303_212336838.jpg
IMG_20260303_221858728.jpg


Now, the second task was to install a fuel pump. I know that the M30 originally came with a mechanical pump in the cylinder head, but in my case, that pump wasn't included. It already had an electric pump installed, but unfortunately, it wasn't working. I did some research and bought a suitable electric pump for a carburetor and proceeded to install it near the intake manifolds, in a position similar to the original. This allowed me to check for leaks, connect both carburetors, and avoid potential problems with the rest of the fuel lines (not to mention that the old electric pump was mounted using the brake master cylinder bracket, so all the hoses and electrical wiring were quite close to the intake manifolds).

Luckily, it wasn't a difficult task. I installed new hoses, and it was working quickly! (Although this pump was going to cause me problems later on :c)

IMG_20260305_213347183.jpg


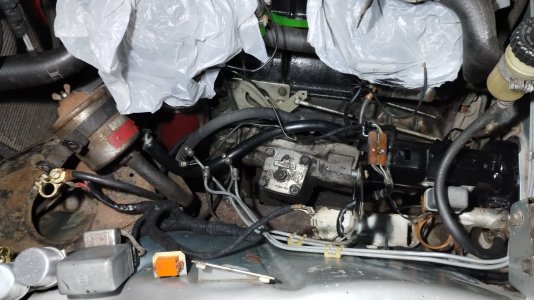
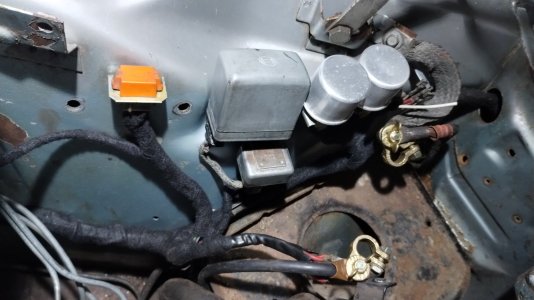
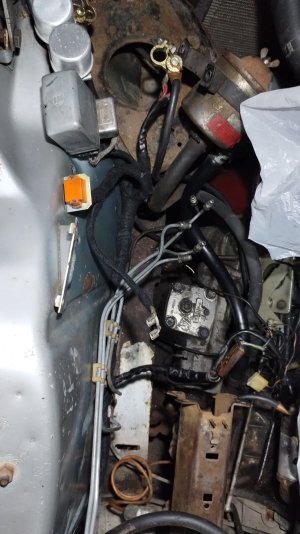
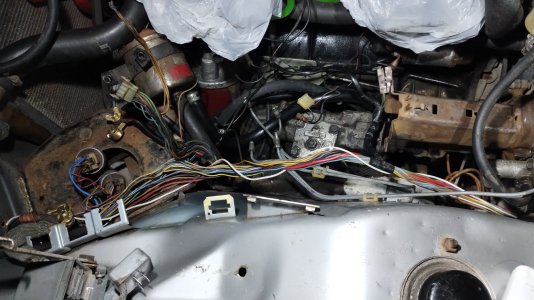
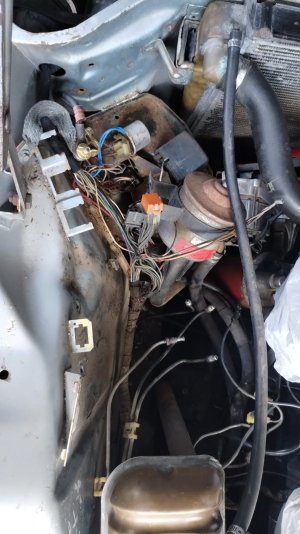
Since these tasks were relatively straightforward, I took the opportunity, before starting to assemble the water circuit, to check and tidy up the wires that run behind the radiator and connect to the right-side lights, ignition coil, etc. I love working on the electrical systems of cars, and this case was no exception. Doing this inspection, besides improving the engine's appearance, helped me understand why I don't have a horn in the car. It seems that at some point there was a problem with the wires, and they got stuck together. Some wires were melted, and even the relay socket was melted (you can see it in the photos), so it was the perfect time to replace these wires and improve the relay connection (I also need to check the steering wheel contact to get the horn working).

IMG_20260304_210440446.jpg
IMG_20260303_224142700.jpg
IMG_20260304_214846155.jpg
IMG_20260305_002256970.jpg


Now, with everything reconnected, it was time to test if the car could move on its own.
It was simply a matter of starting it (testing the new fuel pump), pressing the clutch (a little stiff for my liking), shifting into first gear, and slowly releasing it... IT MOVED!
Just a few centimeters forward and backward were enough to confirm that the automatic-to-manual transmission conversion was correct and working!
Let's consider for a second that the car stopped because the automatic transmission failed, and although they converted it to manual, they never got around to testing it, so we were the ones who did!

Here's a video of those first few centimeters of the car's movement. Keep in mind that the first 30 seconds are for warm-up and nerves.


Thank you all for reading my thread and giving me advice. I'm sorry I haven't been able to post updates these past few weeks; they've been very busy.
 
Update #8
- Getting ready for the first road trip: water circuit

Once we got it moving on its own, I was already dreaming of taking it out for a spin, but there were still several things to check on the car before I could do so.

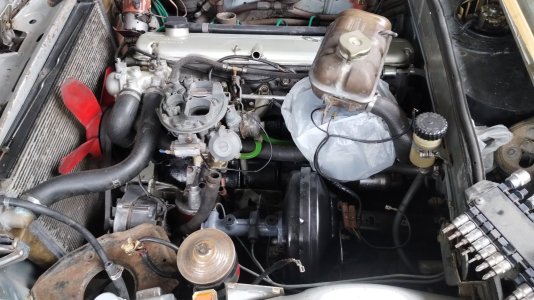
One of these essential things was connecting everything related to the water circuit, which, to no one's surprise, didn't have a single hose in place and several connections were disabled.

Luckily, by reading various threads and looking at photos, I'm starting to understand the logic of the connections and how everything works together.

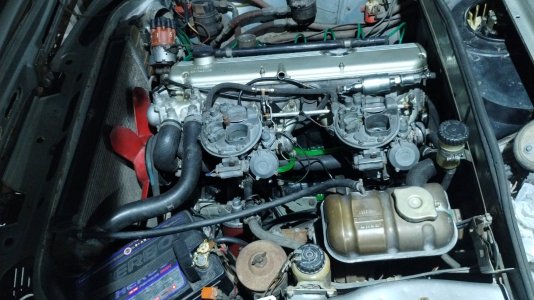
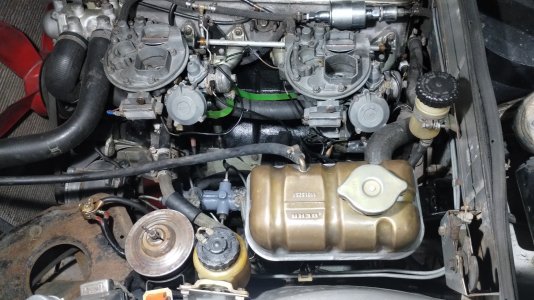
Once I had the entire circuit clear, I checked all the hoses I had from the car to identify any missing ones. Luckily, only the ones that connect the carburetor glow plugs and the one that goes from the coolant reservoir to the base of the rear carburetor were missing. Since the latter required some special bends, I reached for my stash of E23 parts to find one that would fit, and with a few adjustments, I found one that's a perfect fit. As I continued, I also noticed I didn't have the hose that runs from the thermostat housing to the bottom of the radiator. Looking through my things, I found that E23 hose, but unfortunately, the radiator had a different inlet, so it wouldn't work. I ended up improvising some hoses along with a galvanized metal pipe for the straight section. For the heater hoses, I got some clear ones. At first, I wasn't keen on the idea, but then I thought, "It could be really cool to see the coolant flowing through them, plus I can see any bubbles that get trapped."

Now, with all the parts in hand, it was time to start assembling. I began at the back with the heater hoses. I discovered that the fitting coming from the cylinder head and going to the heater core inlet was badly corroded at the end, but luckily I was able to push the hose in far enough so it wouldn't leak. The outlet fitting successfully into the base of the rear carburetor.

Heater hoses: successfully connected.

I continued with the awkward carburetor choke hoses. Several fittings were deteriorated, not to mention the awkward connection coming out of the block above the starter. With great care and patience, I was able to work on them one by one. From the block to the rear carburetor -> from the rear carburetor to the front carburetor -> from the front carburetor to the base of the front carburetor.

Automatic choke hoses: successfully connected.

We continue with the thermostat housing. Here, I also adapted the hose coming from the carburetor base to the thermostat housing. Luckily, I found one with the perfect curve. I continued with the hose going to the water pump and finally to the radiator. All easy up to this point.
The hose coming from the thermostat and going to the lower part of the radiator was more of a challenge until I could connect it. I also had to find the right angle because it passed very close to the fan blade (which, by the way, doesn't have a clutch; it's fixed to the water pump pulley, which makes it even closer to this hose). Now, everything's done up to this point.

Radiator hoses and thermostat housing: successfully connected.

Now, all that was left was the reservoir hose, which I realized had a rather unusual curve. I had to combine two hoses, and I was able to replicate it quite well.

Water reservoir hose: successfully connected.

Now for the moment of truth: starting to add coolant and fix the leaks. It was literally the most stressful time I'd ever experienced with the car up to that point; literally every hose was leaking. Some were leaking from loose clamps, some from worn clamps, others from damaged fittings, and still others from the intake manifold mounting bolts. It was a two-day job and several liters of wasted coolant, but after a lot of patience, some repairs (and a bit of sealant on some fittings), we were finally able to get the system leak-free!

Unfortunately, I don't have many photos of this process, just a before and after.

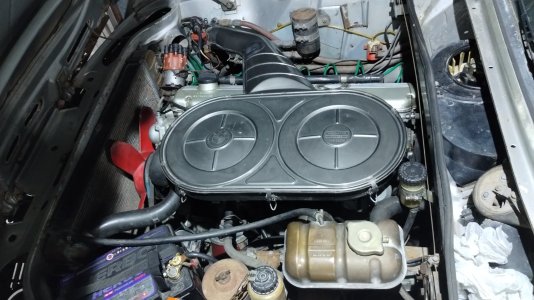
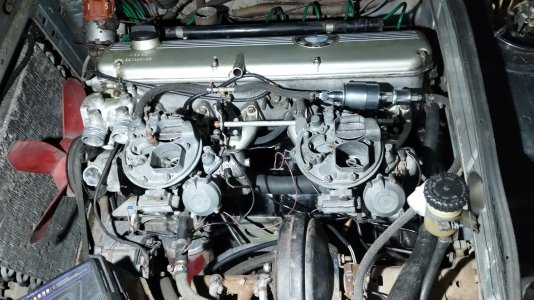
Without realizing it, while reassembling the water circuit, I saw the E3 engine completely assembled for the first time. It had several adapted parts, of course, but it was complete at last. I can only say, what a beautiful engine the M30 is.

After a little over two months of owning the car, we were almost ready to test it on the road! But there was one final step left: the brakes.
 

Attachments

  • IMG_20260318_213030563.jpg
    IMG_20260318_213030563.jpg
    254.6 KB · Views: 19
  • IMG_20260318_211118461.jpg
    IMG_20260318_211118461.jpg
    284.8 KB · Views: 21
  • IMG_20260305_213347183.jpg
    IMG_20260305_213347183.jpg
    322.1 KB · Views: 19
Update #9
- The brake odyssey

Well, now that we were done with the engine and were sure it was cooling properly (aside from knowing I hadn't checked our gas tank, I didn't mind doing our first lap with a jerrycan of gas instead of the tank. I knew it was going to be in bad shape, so it wasn't a priority right now), it was time to take the next step and make sure we could stop the car.

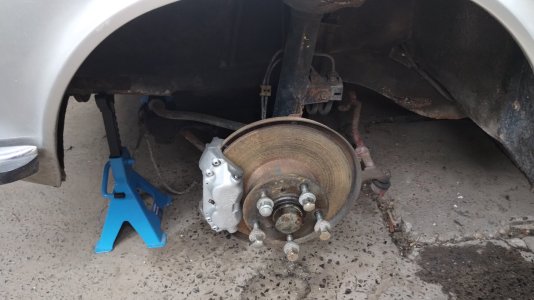
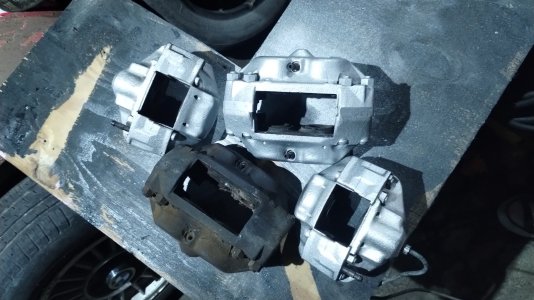
The car arrived with no brake fluid in the reservoir, and removing the cap revealed a lot of gunk, which already gave me an indication of what I might find in the rest of the system. My plan was simple: remove the calipers, clean them, paint them, and also remove the master cylinder to send it for inspection to ensure everything would work correctly.

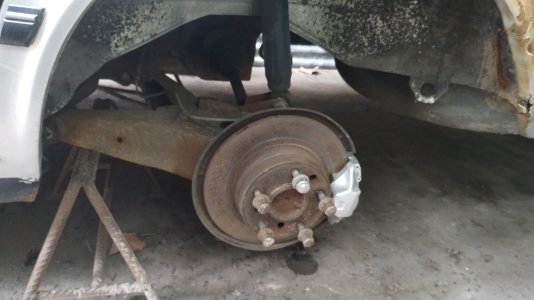
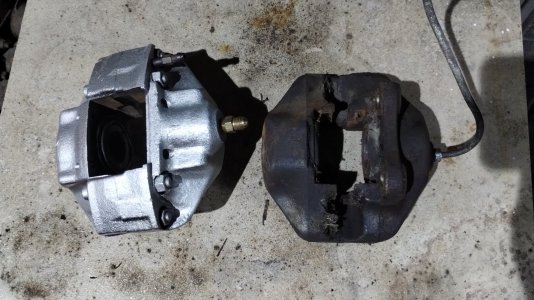
So we got started. I disassembled the calipers, and to my surprise, it seemed the brakes were one of the things checked before the car was stopped. The rotors, pads, and hoses were new. That gave me a lot of peace of mind. With this line of work, I decided to clean and paint the calipers. I chose a silver-gray for the repaint, and at first glance, it seemed like a good color choice.

I found it very curious that the front calipers had dual brake lines.

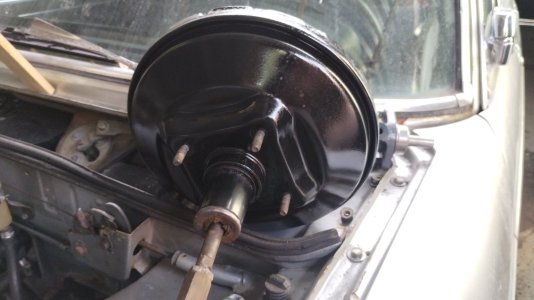
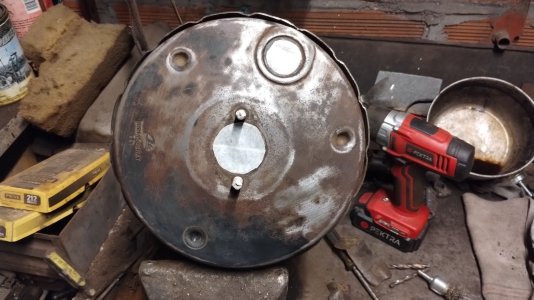
Knowing that the calipers would be an easy task (only one connection was difficult to remove), I decided to remove the brake master cylinder and the servo to paint them more easily. I separated the master cylinder from the servo and decided to remove the servo first. When I removed it, I encountered an unpleasant surprise... the inside was full of fluid, but... RED FLUID. Yes, there was hydraulic fluid inside the servo. That couldn't be good under any circumstances. How had it gotten there? That was my first thought. I would find the answer by removing the master cylinder.
When I disassembled the lines, the front circuit of the master cylinder was leaking yellow fluid (old, dirty brake fluid), and the rear circuit started leaking the reddish, dirty fluid. So my theory was that someone made a mistake when filling the reservoir with fluid; they drained it, but it was too late. The fluid entered a circuit and ended up breaking a seal in the pump (or it was already broken) and leaked into the brake booster.

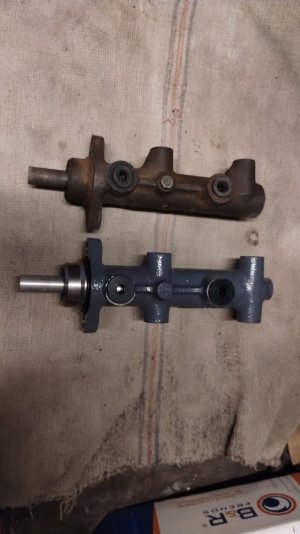
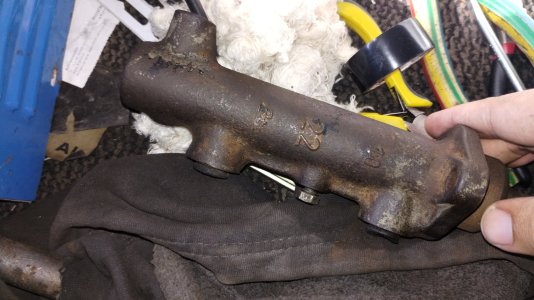
With this in mind, I took my master cylinder to a brake shop for inspection, but unfortunately, they gave me the worst possible diagnosis: it was beyond repair. Disappointed, I looked for used master cylinders on eBay and the forum, but the prices weren't particularly attractive. I looked for similar BMW parts being salvaged, but to my surprise, it wasn't normal for them to have five outlets.

I didn't give up and searched on Argentina's most popular online store (Mercado Libre, similar to eBay in the US) and only found two types of brake master cylinders with five outlets and the same internal diameter as mine. One was from a Renault van and the other from a VW Kombi. I tried buying the Renault one, but it was considerably larger and didn't quite fit the brake booster. I swapped it and went all in with the VW Kombi one, and to my surprise, they were practically identical! Only the position of the rear brake outlets was different, but the rest was very similar. Then I reasoned and remembered that the Kombi is from a similar era and also German, so it wasn't surprising that they shared some brake parts (just as the rear brake pressure regulator is similar to that of some Porsches).

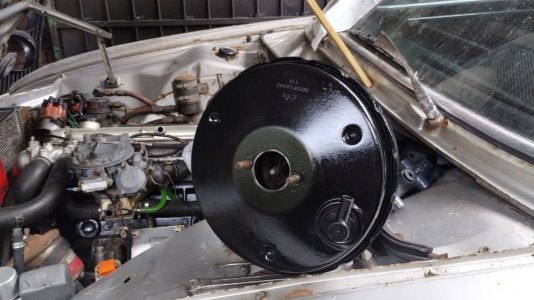
Before installing the master cylinder, I wanted to repaint the brake booster, but I was worried it might be in bad condition due to the fluid inside. So I did a couple of tests. I installed the new pump on the servo and connected it to the engine to see how it worked, mainly to see if I felt any changes in the pedal when starting the engine. To my surprise, when I started the engine, the pedal became incredibly soft and felt practically disconnected (yes, I know there wasn't a wheel connected to the pump, but there was still a difference in pedal feel). I also listened for any air leaks or hissing sounds when pressing the pedal, but everything was fine.

With that confirmed, it was time to prepare and paint it. An afternoon of sanding and a coat of satin black spray paint completely transformed the servo. While it was drying, I took the opportunity to finish tidying up the wiring in the engine bay that I hadn't yet done. Without the pump and servo, I had enough space to inspect and organize all the wires coming out of the engine compartment.

The next day, with everything dry, it was time to start reassembling, and I must admit I was very pleased with how the new master cylinder looked. But all this was just the beginning of the odyssey. I still had to bleed the entire brake system.

Logically, you should start by bleeding the brakes from the wheel furthest from the master cylinder, and I tried, but no fluid was reaching that rear wheel. Thinking about it, I realized that perhaps the new master cylinder was faulty, so I proceeded to bleed a front wheel to rule out any problems. As soon as I opened a front bleeder valve, jets of fluid came out, which suggested that at least one circuit was working. I tried the other bleeder valve, and it worked perfectly as well. I thought, "Okay, the master cylinder seems to be working, let's try another wheel." I went to the other front wheel and was able to bleed it perfectly too. It seemed strange, but I decided to try the other rear wheel; perhaps my problem was just a clogged brake line. I tried the other rear wheel, and to my surprise, not a drop of fluid came out either.

Upon closer inspection, I saw that the rear brake regulator acts as an intermediary and fluid distributor for both wheels. I carefully disconnected one of the lines to see if there was fluid there, and to my surprise, it was completely dry. I tried the other line, also dry. Going all in, I tried the inlet line to the regulator, and bingo! This one had fluid. Therefore, my problem was the regulator.

I proceeded to remove the regulator and carefully disassemble it. I had read that they operated under high pressure, so I didn't know what might leak out. Sure enough, I found a lot of dirt inside. I carefully cleaned everything and reassembled it. I reinstalled it in the car, and still no fluid came out, not a single drop from the outlets.
I disassembled it again and began examining the piston inside. It appeared that the internal passages were clogged, but I saw a threaded brass piece that could be removed. "I'll try it," I said, thinking that this would give me better access to clean the inside, but it was very... very tight, and something unfortunate happened. This cylinder broke in half...

I could only sigh... I knew it would be impossible to find this part in my country, let alone a replacement, and the prices for used ones were also way out of my budget. I couldn't do anything at that moment, so I proceeded to do the most sensible thing I could think of: reassemble the regulator housing, but without this piston. Looking at the broken part, it might not be a challenge for a machinist who wants to replicate it. Anyway, I just wanted to test the car; I wasn't going to drive it as a daily driver or anything like that, and this way the regulator would simply act as a T-fitting distributing the fluid to both rear wheels.

Now all that was left was to reinstall it and finish bleeding the rear brakes. Luckily, it went well, but I knew I'd have to deal with this problem later.

At least I was sure the front brakes would work fine, and the new master cylinder should do its job.

With some ups and downs, we finished checking the E3's brakes. At least temporarily, it would be enough to test drive the car around the neighborhood once and satisfy our urge to really get to know it.

PS: I'll update the photos soon with the broken regulator part. Anyway, if anyone has one for sale, let me know.

PS 2: At this stage of the car project, I started working on several things simultaneously, so there will be several updates coming together, and you'll notice this in the dates in the photo titles.

 

Attachments

  • IMG_20260419_213253538.jpg
    IMG_20260419_213253538.jpg
    302.8 KB · Views: 14
  • IMG_20260419_162335896.jpg
    IMG_20260419_162335896.jpg
    279.9 KB · Views: 13
  • IMG_20260419_145700318.jpg
    IMG_20260419_145700318.jpg
    162 KB · Views: 11
  • IMG_20260419_145352026.jpg
    IMG_20260419_145352026.jpg
    166.5 KB · Views: 12
  • IMG_20260419_145021181.jpg
    IMG_20260419_145021181.jpg
    235.2 KB · Views: 12
  • IMG_20260418_220909049.jpg
    IMG_20260418_220909049.jpg
    230 KB · Views: 13
  • IMG_20260410_111516075.jpg
    IMG_20260410_111516075.jpg
    260.3 KB · Views: 10
  • IMG_20260403_202012498.jpg
    IMG_20260403_202012498.jpg
    259.1 KB · Views: 11
  • IMG_20260403_192613035.jpg
    IMG_20260403_192613035.jpg
    180.3 KB · Views: 12
  • IMG_20260403_192559416.jpg
    IMG_20260403_192559416.jpg
    235.5 KB · Views: 11
  • IMG_20260403_185825369.jpg
    IMG_20260403_185825369.jpg
    261.1 KB · Views: 12
  • IMG_20260403_135430950.jpg
    IMG_20260403_135430950.jpg
    237.4 KB · Views: 12
  • IMG_20260405_115631827.jpg
    IMG_20260405_115631827.jpg
    138.4 KB · Views: 14
  • IMG_20260405_115624878.jpg
    IMG_20260405_115624878.jpg
    202.3 KB · Views: 11
  • IMG_20260330_202523467.jpg
    IMG_20260330_202523467.jpg
    266.1 KB · Views: 13
  • IMG_20260326_225944437.jpg
    IMG_20260326_225944437.jpg
    295.5 KB · Views: 13
Back
Top