Caliper Failure and Rebuild

Messages
20
Reaction score
1
Piston Removal
If you were unable to move the pistons in the previous steps and you want to carry on, hang in there. Here’s where we’ll explain some drastic bench top measures to get them free. Again, your calipers will fall into two categories; 1) pistons that are moving freely and 2) pistons that are going to give you trouble. Let’s get the easy stuff out of the way first.

I like to remove the inside piston first. This is the piston that is in the ½ with the mounting ears. Put a c-clamp on the outboard piston to hold it in place, make sure your bleeder valve is secure and pad the bore with a shop towel. Using compressed air, insert the nozzle in the fluid inlet and gradually squeeze until you see the piston start to move out of the bore. Try to feather it out and by all means KEEP YOUR FINGERS AWAY FROM THE BORE. When these pistons come out using compressed air they can be traveling at bullet velocity. This is why you pad the bore. You can very easily damage the piston tops and the opposing bore this way. In fact, if you "can" use fluid, I recommend it over any method.

1486778_10152391575183193_7959745251716352470_n.jpg


Once the inboard piston is out you can put a larger rubber stopper in the bore and cap it off with a steel plate. I like to use a long steel plate that extends into the jaws of the vise so the vise can hold the bottom portion while the top is held in with your c-clamps. An alternative is to use the old brake pad backing plate and strategically place your c-clamps so the plate will hold the stopper in. This is more critical on pistons that are stuck vs. free moving pistons. Using the compressed air and padding the cavity again, pop the other piston out of the bore. Rinse and repeat for your remaining calipers. Count your blessings that you had pistons that were fairly free in their bores. Don’t worry about bore positions and which pistons came out of which caliper, it will al be self-explanatory upon re-assembly.

Stuck Piston Removal
If you were able to get your pistons to move while they were still on the car, we’re headed in the right direction. At this point, try the compressed air method described in the paragraph above. You “might” get lucky but, I wouldn’t plan on it. The only way to get these stubborn pistons out is with fluid. As mentioned earlier and in your Jr. High physics class… fluids don’t compress so they will blow out just about any stuck piston. The problems will be a ) getting the fluids into the caliper and b ) maintaining pressure on the caliper once you get one of the pistons out.

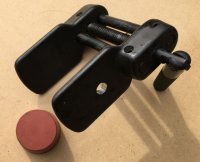
Let’s start with getting fluid into the caliper. Water is a fluid and that’s what we use at the shop. Cleanup is a snap but configuring a water pump can be troublesome. If you’ve searched the internet boards a popular procedure is an air powered grease gun. It is an attractive option because most of them have a 10x1 fitting hiding underneath the zerk tip or… you can easily get a zerk adapter with a 10x1 male end that will screw right into your caliper fluid inlet. The only problem is… clean up. Clamp off the outer pistons and start pumping the fluid of choice into your caliper. The nice thing you’ll notice with this method is the pistons will come out in a very slow controlled fashion. There’s no need to pad the bore.

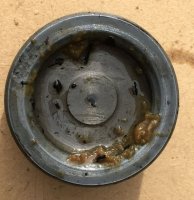
Here's a shot of the rear piston after it plopped out with water. You cal also see here why I confess my love for painted calipers almost daily (yes, I'm a smart@$$ sometimes... well, most of the time):

10369693_10152391576733193_1872214126982032012_n.jpg


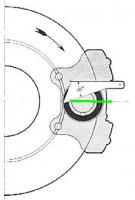
If they’re “still” not moving, here are a few tips. Some say heat, I’ve never seen a tremendous return on this investment but, it really can’t hurt at this point. You can get out the MAPP torch and heat up the caliper casting to possibly expand the metals and help break a bond. The “best” method I’ve found is to move the piston inward using a large c-clamp. The point isn’t which direction you move the piston; it’s that you need to break the bond. By applying pressure on the piston top and moving the piston in you should be able to break that bond and get it out. Using a large c-clamp, screw it in until you hear the “snap”, at this point you should be good to go.

A final note on stubborn pistons; watch for the pistons “c-o-c-king” in the bore as they come out. With these stuck pistons, a lot of times they will want to bind on one side or another causing it to c-o-c-k in he bore. Take a large screwdriver from the low side, place it in the dust boot groove and correct the angle (you should feel a little snap as it goes back into alignment) and keep pumping. Do not attempt to pry the piston out with the screwdriver. Just position it against the wall of the pad cavity and use it more as a pry bar to position the piston properly in the bore.

As mentioned earlier, getting the second piston out can be troublesome. Often, with these stubborn pistons, the pressure needed to get the out will be immense (remember the cracked flange picture in the previous post). Your success will be determined by how well you can use the stoppers and the metal plates to keep that pressure contained in the caliper body.
 
Last edited:
Messages
20
Reaction score
1
Removing the Fasteners
I hope you’ve had much success up to this point. Next we’re going to move on to the fasteners and splitting the caliper halves. Speaking of which; there’s another Internet myth we need to explode.

• “You can’t split the caliper halves”. You can and you should.

The problem fasteners will be the larger M9 fasteners on some of these calipers with the smaller Ribe R6 bit heads. These are a very problematic fastener. The first step in all of these fasteners is getting the bit to seat properly so we can begin the disassembly process. Make sure there is no rust or paint in the head of the Ribe fasteners. Insert the bit all the way in for full engagement and, as a good measure, tap the bit in with a hammer to fully seat it in the fastener head. This will assure maximum grip on the fastener head (more on this below). For the M7 fasteners and the M8 fasteners we simply use an air wrench at this time with a suitable six-sided socket. IMPORTANT: Some of Jon's fronts have hex head fasteners. Some have the M9 fasteners with the Ribe R6 head, I like to do all of those fasteners by hand so you can “feel” what’s going on. In taking them apart by hand we’re going to do the following; 1) Make sure you seat the wimpy Ribe R6 bit in the fastener head with a hammer. Don’t slam it in but tap it and make sure it’s in there. 2) Only use the Ribe bit to “hold” the fastener, NEVER attempt to turn the fastener with this bit. 3) Use a long breaker bar and a 14mm deep well socket, the depth of the nut and length of the faster will usually not fully engage a standard socket. 4) Shoot for a “burst” of power on the breaker bar to break the nut free. 5) STOP! If it does not come loose, you’re in trouble. Get out the MAPP torch and crank up your favorite song. The two minutes (average) it takes to complete the tune should have the nut heated sufficiently. Now try it again. If you’re still having trouble, use penetrating oil and more heat and tap the end of the fastener with a smaller hammer to break things free. Be patient or, you “will” be purchasing a core caliper to get more fasteners.

Again, some of these calipers were of a later design and some were of the earlier design. ATE figured out they could machine the nose section of the caliper (the half without the mounting ears) and they would save millions on nuts. Here's a shot of us simply powering out the late model fasteners...

10659159_10152391575948193_3774825548802349324_n.jpg
 
Last edited:

Nicad

Well-Known Member
Site Donor
Messages
3,525
Reaction score
545
Location
Toronto
I took apart some 4 Piston Brembos a few days ago and what worked for me for getting all 4 pistons out was to start with a large block of wood in between the 4, then add air. All the pistons moved out a little and evenly. then I reduced the size of the wood block with narrower ones till the pistons were mostly out. For one final stubborn one, I covered some large Vise Grips in several layers of rubber and grabbed it by the top edge and twisted it out. (no damage) These were pretty easy compared to anything as old and stuck as an E9 Caliper might be. Liked the tips from PMB .
 
Last edited:
Messages
20
Reaction score
1
Thanks for the note Bob.

Your block of wood method is outlined in the old Porsche factory manuals as well. Brembo caliper have anodized bodies (underneath that paint) and hard anodized pistons. You can see the bodies anodizing when the pistons come out. Most are black or dark grey inside. The pistons are usually a unique darker grey because of the hard anodizing. They're also fairly new so, we usually don't see any gunk issues and, as you pointed out, there are usually no rust issues because of the aluminum. When we restore those, we simply wipe those pistons off with a rag and put them in the customers bin for reassembly. Funny story (well, not really funny); we developed out "DuroAno" S-Caliper pistons after seeing this with the brembos. Every piston was basically like brand new when they popped out. What was it? Well, it was the hard (duro) anodized finish and the fact that you had aluminum on aluminum. S-Calipers were notorious for having B-A-D pistons. This cured that issue and, they are our number one selling SKU in both volume and revenue.

Bleeder Removal
Now that the fasteners are out of the way, it will be easier (on some of these calipers... rears especially) to get a grip on that bleeder. These calipers all use M7 bleeders. These are very delicate and they can easily round off and/or break. There are two ways to deal with these bleeders. First off is to use a deep well 7mm socket. The only problem is, most deep well 7mm sockets are not really "deep well" and they can strip the bleeder because they don’t fully engage with the hex. If yours slides all the way on it should be good to go. If you don’t have a deep well 7mm, use a pair of small Vise-Grips and get a “very” tight grip on the bleeder. Apply even and increasing pressure on the bleeder until you feel it give way. Once the bleeder has loosened, you can use an open end 7mm wrench to finish the job and, you should still have a usable bleeder when you’re done. Some of the other BMW models have M8x1.25 and M10x1 bleeders. Most of these bleeders can be removed with a 9-10 or 11mm socket rather easily. It's the M7x1's that we have to worry about.

Removing the Seals and Final Prep
This is fairly straight forward. Get a dental pick and reach under the bore seal and pry them out. Throw everything away and prep the calipers for plating. If you used grease to get the pistons out, now would be a great time to make sure all of the grease is out of the fluid bores and journals in the caliper. Blow compressed air down the caliper forcing the grease into the piston bore where you can scrape it out. Next using brake cleaner, clean the journals and the bores and have everything as clean as possible for the plater. IMPORTANT: You cannot have any grease residue left in the caliper fluid bores. It will not come out during the plating process and it will harden in the bore making bleeding your new caliper impossible.

10252049_10152391575663193_3299957240243550045_n.jpg


Off to the Metal Finisher
You should have your caliper bodies plated in “yellow” zinc and the fasteners re-plated in “black” zinc. If your plater does not do black zinc, see if they have a more common black oxide treatment and then oil the fasteners. Your springs and pins should be yellow zinc. The plater should prep the caliper bodies properly before plating. A body that has not been prepped properly will have spots shortly after the plating as the zinc goes to work trying to protect the caliper from the contaminants. A good solid 100 grit sand media blast is in order to cut the rust. Do not worry too much about the bores. They will only need light media blasting and they should be fine. You will want them plated as well.

10606060_10152391576458193_2432892124022332070_n.jpg


1891165_10152391576853193_6203995503407863347_n.jpg


Your calipers were finished in yellow zinc which is a clear zinc with a short yellow dichromate bath. This is a question we get often as well; “weren’t my calipers clear zinc?” All ATE calipers were yellow zinc. After you split the caliper ½’s you should be able to clearly see the yellow zinc on the mating surfaces (easiest to see in these pictures with the front caliper above). Over the years, the yellow dichromate can wash off the caliper making them appear to be clear (silver). The actual factory finish is a light yellow with a dip of about 20-25 seconds in the yellow dichromate. Imagine a factory assembly line process with an automatic dip tank. It’s your call on the finish but, the more dichromate dip the slightly better the protection is.

Let’s send them off for plating and get to work on your pistons.
 
Last edited:
Messages
20
Reaction score
1
Processing the Pistons
With steel calipers you will rarely need to replace the pistons. Some early (60's era) models and "some" of the later pistons are starting to show up with rust issues and, a decent number of them needing to be replaced. My guess is your pistons look awful right now. All is not lost! This is probably what I've coined as "caliper shellac". Basically old rust combined with fluid. It's rarely though the plating on the side of the piston. Those pistons I used in the first few posts were from a Sumitomo caliper (240-280Z cars). While they had great steel and they plate up really nice, the plating on the pistons is bad some almost all of them are throw away items.

10603417_10152393140633193_3083845936839358538_n.jpg


The best method we've found for a nice factory finish is to vibratory polish the pistons. We've torn apart quite a few NOS calipers and that is the process used after the plating. (Quick Note: if you have a pair of NOS calipers you've been saving for that white glove project, you'll want to tear them apart using the methods described herein. The assembly lube used on the calipers back in the day has probably dried by now making them a prime candidate for sticking etc. Carefully take them down. Clean everything and re-assemble) This is one of those areas where the average DIY mechanic may not have a vibratory polisher so we will recommend some substitutes that should work just as well. Regardless, the vibratory polisher at about 30 minutes with a mild cleaner (Simple Green type solutions) should net you perfect results for cleaning up your pistons. If not, the next best thing would be a tumble polisher. Nothing more than the rock polisher you had as a kid. With the proper media (we like ceramic) and a mild cleaner your pistons should look great in about 1/2 hour. Finally, 0000 steel wool can clean up the sides of your pistons while a wire brush can handle the task of prepping the tops. I don't like fine grit sandpaper on the side as it can cause an out of round situation on the piston.

I'm sure some of you are looking at this thinking about a different car etc. The process is the same so, we'll address some thinigs you'll see there as well. For early model calipers (pre-1975) you will probably have knock-back mechanisms in your pistons. These were used before the booster circuits were developed to maintain a high pedal. All but the very early cars will have these stamped in the piston (front calipers) so they will be impossible to remove without damaging the pistons. The rears should all be removable with a small c-clip inside the back of the piston. Regardless, clean these up with brake cleaner and compressed air. If you can remove them, do so and make sure that are as clean as possible. Later calipers (like these) did not have these mechanisms and they will have a simple “cup” type piston design that allows for more surface area for better cooling with less mass. The “Knock-Back Mechanism” is simply a ratcheting design to help keep the pistons and pads out closer to the rotor giving the car a higher pedal feel. Many people mistake caliper flex for what is happening inside these knock-back mechanisms. If you want to remove them you can simply snap off the pins or remove the mechanism from the piston and… move on with life. No big deal either way. The only word of caution here would be, do on to others. If you do this to the front, do it to the rear as well. Do not have a mismatch of early and late style pistons in your calipers.

Once the sides and insides are done, we like to prep the tops. We tape them off with some 3M Blue tape and glass bead blast the top. You can wire brush the tops if you do not have a bead blaster. Once that’s done, spray the tops with high temp paint (muffler paint or BBQ paint). Gray is the factory finish. Remember, pistons get hot, this small step will help them stay in good shape.

Here's a batch of pistons fresh out of glass (none of them are BMW -gasp- but a piston is a piston... so to speak). This picture brings about some interesting talking points that we get often. You can see the chips on top of a few pistons. These come from the "air" removal method we mentioned early -or- the screwdriver and vise-grip method. Is it bad? Well, for the most part (99.9% of the time) no. If your "sides" are damaged, that's bad. A small nick out of the top, in an area designed to hold the dust seal? naaa. Pads will cover them and nobody but you will know they're there.

10541987_10152393140658193_1116423386180655777_n.jpg


Coated pistons:

1920452_10152393140693193_5053077638214197597_n.jpg


Ready to go back to work:

10703570_10152393140728193_6862403477382698115_n.jpg
 
Messages
20
Reaction score
1
Ready for a sneak peek of things to come? :shock:

10624876_10152391577133193_7141728116371498038_n.jpg


I came in a 6:30 this morning to feed you vintage car nuts... I need to go back to may day job and get busy getting calipers out the door. More later.
 
Last edited:

sfdon

Well-Known Member
Site Donor
Site Donor $$
Messages
8,301
Reaction score
4,658
Location
sfbay area
Very nice- question for you, if the bleeder snaps off at the base is it a throwaway?
 
Messages
20
Reaction score
1
Very nice- question for you, if the bleeder snaps off at the base is it a throwaway?

"Good" question.

On "some" calipers it is. Let your wallet be your guide. EDM is about the only "good" solution there. DO NOT waste your money on the small easy-outs. They do not have enough strength to overcome the force needed to break the bond that broke your bleeder (rusted 7x1 threads in the caliper). You will end up with a hardened steel easy-out broken off inside your broken bleeder. I'll guarantee it.

EDM - Electric Discharge Machining is about the only way to go and, Jim's Tap Extracting is the only shop I would ever use.

http://www.extractit.com/

The cost is around $40.00.
Shipping "to" them is about $12-13 using a USPS flat rate box.
Shipping "back" is usually around $15-20.

Can you get a core without a broken bleeder for less than $70-80?

That's how I think.

P.S. Your calipers are not married to your car. There are no serial numbers for calipers on the birth certificate. ATE calipers carry casting numbers. The casts have a limited shelf life and this is their way of tracking how many units were cast before tossing the cast and moving on. On Porsche 914-6 model cars, their rear calipers were rather unique to them and the limited run of Dino's of the era. Those casting numbers started at 1 and ended around 7-8. That was around 3,300 cars so a good estimate is roughly 1,000 castings per cast (2 per car, 500 vehicles with Dino's per casting). All that to say, don't worry about getting a different caliper for your car if you have to.
 
Last edited:
Messages
20
Reaction score
1
Placing the Seals in the Bore
Once you get your bits and pieces back from the plater there is really not too much to do other than to re-seal everything and bolt it all back together. As discussed earlier, we hear this a lot; “You must hone the bore”. To reiterate; you “should not” hone the bore. You want a nice coating of zinc on the bores to prevent future rust from building up and causing your rebuilt calipers to seize prematurely.

Here's Jon's calipers back from plating:

1959431_10152393257228193_5952645314538339934_n.jpg


Installing the seal is fairly straightforward; walk the seal around until it comes to a head and push it into place. Repeat on all caliper bores and you’re ready for the pistons.

10606021_10152393257258193_726154467854151635_n.jpg


Piston Prep and the Angle
Put the seal around the top of the piston before you push the piston back into the caliper. Set these pistons aside and let’s talk about the next internet myth. This one is:

• “You have to make a 20 degree angle tool to set the piston position.”

You do not need a 20 degree angle tool. I’m not saying you don’t need to set the proper 20 degree angle, you just don’t need a tool to do it. The piston is already notched for this 20 degree angle you just need to know the trick on how to set the piston prior to pressing them in. It’s easier than you would think:

1. Bleeders up. Air has to escape which is why we have bleeders on our calipers and air bubbles travel… “up” so, your bleeders go up.
2. Your rotors need to travel into the face of this notch or, your notch needs to be placed at a 20 degree angle facing the oncoming rotor. This notch allows your pads to angle into the oncoming rotor making for a much quieter operation. Bleeders will give you the hint on which way to place the notch in “most” cars. The real factor is which side of the axle the caliper is mounted on. In front of the axle = Notch up facing the bleeder. Behind the axle = Notch down, away from the bleeder. Bleeders “always up”.
3. Simply draw an imaginary line down the center of the pad cavity and place the bottom notch on this center line. As stated previously, your pistons are already cut for the 20 degree angle so, if your bottom notch is in the center of the pad cavity, your top notch is set perfectly at 20 degrees. The center line is highlighted in green in the below example (in the thumbnails at the bottom).

This notch allows the pad to dip down into the face of the oncoming rotor. This allows a smoother engagement with the pad and less squeal. Most BMW's with the steel calipers have the calipers in front of the axle up front and the back or rear of the axle in the back.

For these cars with the 4 piston front calipers and the 2 piston rear calipers, only the rear calipers will have this notch on the piston.

Here's a front piston ready to go back in:

1014384_10152393257118193_2134452574890745413_n.jpg
 

Attachments

  • 20 Degree Angle 012.jpg
    20 Degree Angle 012.jpg
    16.8 KB · Views: 147
Last edited:
Messages
20
Reaction score
1
Piston Installation
Now that we know about the notch, it’s time to place the pistons into the caliper bores. I like to liberally lubricate the bore with Permatex Ceramic Lube. This is a brake caliper lubricant that will not damage and swell the factory rubber seals. Once you’ve lubricated the bores and positioned the pistons in place you simple press them in. At the shop we use a bench top arbor press to apply even pressure and press the piston into place. In the garage, a padded bench top vise and some various sized sockets should do it. The trick here is “even” pressure putting the piston in the bore. If the pistons is not sliding down into the bore, you’re pressure is c-o-c-ked to one side or the other. Reposition the caliper body slightly until the piston slides right in with little effort. If you are working on these later model caliper with the “cup” style pistons, you should be able to simply press the pistons in with the pressure of your thumbs.

Assembly Lube:

10649435_10152393257378193_7432871377719293668_n.jpg


Ready to go:

10001514_10152393257418193_180401447631572192_n.jpg


Arbor press:

10632789_10152393257478193_201793740530501858_n.jpg


In!

10626540_10152393257513193_2021099515656678882_n.jpg


Once the pistons are in, finish everything off with the dust boot clips. Do this now as it’s much easier than trying to do it once the caliper has been assembled.

10640996_10152393257543193_7791125335817483632_n.jpg
 
Messages
20
Reaction score
1
Caliper Assembly
Starting with the nose section (this is what we call the outer section that hangs over your rotor), place the outer (shorter on some models) fastener into the nose section and turn it over in the palm of your hand. Hold the solo fastener in place with your index finger as you place the EPDM square cut o-rings into their special grooves. If you have spacers (like these calipers, balance them on top groove side up and place the second set of o-ring on top of the spacers. Now bring the caliper back half down over the fastener and align it with the nose section. The weight of the offset back half should keep the fastener in place and allow you to install the nut finger tight on the fastener.

10409522_10152393257658193_6232742630706203904_n.jpg


10676331_10152393257703193_2871987153433724336_n.jpg


10553356_10152393257743193_6464976300984719447_n.jpg


Next install the other outer fastener and nut and cinch them up finger tight. Follow this up with the middle two fasteners and nuts. Using a 3” 3/8” drive extension and the appropriate sized socket, hand tighten the nuts and get the caliper ready for the torque sequence. The extension will allow you to tighten the caliper halves enough so the seals will stay in place. At this time you should be able to manually adjust the caliper halves and spacers to make everything line up as best as possible. Note: These have never been and never will be a precision fit. Do your best and tighten them up as tight as possible.

10645249_10152393257853193_2912217234780015485_n.jpg


1619111_10152393257773193_9111455559092615811_n.jpg
 
Messages
20
Reaction score
1
Torque the Caliper
Mount the caliper in the bench top vise and have the proper Ribe bit in a breaker ready to secure the fastener from the back as you torque to spec. Torque in the following sequence to the following specs:

M7 Fastener Specs (rear calipers):
Torque One: Set to 7ftlb. and number the fasteners from left to right 1-2-3-4
Torque as follows: 2-3-1-4
Torque Two: Set to 17ftlb.
Torque as follows: 2-3-1-4

M9 Fastener Specs (front calipers):
Torque One: Set to 17ftlb. and number the fasteners from left to right 1-2-3-4
Torque as follows: 2-3-1-4
Torque Two: Set to 29.5ftlb.
Torque as follows: 2-3-1-4

**IMPORTANT** only use the Ribe bit to hold the fastener. Use the torque wrench to do the turning. Here we're working on fastener #2 (the starting point)

10405328_10152393910443193_6192912048236899058_n.jpg


Guess what? We're done...

10701989_10152393910233193_1368441964314638742_n.jpg


1014375_10152393910128193_640441181230525145_n.jpg
 

Ives

Well-Known Member
Site Donor $
Site Donor $$
Messages
287
Reaction score
99
Location
Healdsburg, Ca.
Great Caliper Post

Eric,

Outstanding detail and presentation. I do about 30-40% of my own Coupe work but would never tackle this task. Very glad I sent my calipers to you and it is a real reward to see them come together as a post on our Board.

Thanks and Regards, Jon
 

Stevehose

Well-Known Member
Site Donor $$
Messages
13,032
Reaction score
5,725
Location
Sarasota, FL
Do you use any antiseize on the bleed screw threads or is that really verboten like I've read about due to possible contamination?
 

sfdon

Well-Known Member
Site Donor
Site Donor $$
Messages
8,301
Reaction score
4,658
Location
sfbay area
Nicely done ....
You have one set of mine now, and am sending you another soon.
Don
 

Nicad

Well-Known Member
Site Donor
Messages
3,525
Reaction score
545
Location
Toronto
I might get mine plated locally, but if the cost is on the high side, I am shipping my calipers to PMB. Always great to have a Pro share information with enthusiasts. A bit like Kris Kringle sending those folks over to Gimbels as they have better skates.

On my Brembos I have an aluminum specific question. The internals looked very nice (Same as you described) but I found some severe corrosion near where the brake line hooks up. To the point that quite a bit of material was just crumbly stuff with no strength. I have ground out the bad stuff and bead blasted down to clean metal, plan on acid etching it and coating in Alodine before painting. I was toying with the idea of getting a skilled Tig welder to build up more material where I lost it. (Or maybe use JB weld) Would adding this much heat to a caliper perhaps distort the Aluminum??

Anyway, even used and worn out those Brembos cost a fortune. Wish I'd got mine from Georgia rather than Quebec.
 
Messages
20
Reaction score
1
Thanks guys. Happy to help out.

Bob, with those Brembos, I would glass bead blast the bodies and then re-anodize vs. alodine. Anodizing is a "much" stronger finish and it will last much longer. Alodine is fairly benign and won't offer much protection in the long run.

It's hard to tell from the description but, I think I might leave them as is and reanodize and repaint. If there's enough of the 10x1 thread to hold the fluid line, you may be better than trying to weld etc. It depends on the caliper as well. Some of these Brembos we call "throwaway calipers". Brembo is asking $18.50 for a rubber bore seal (yes, that would be one). Then there's $36 for a wiper seal. Now add it all up and times that by four. Now times that by two and, then by two again if you want to do the rears. Wait! They kind of insist that you buy a bottle of "seal conditioner" if you want to buy their seals. Ummm Okay...

Add to that odd pad plates that have small M4 hex head M6 fasteners that have been loctited into place. These steel fasteners in the aluminum bodies with the smaller hex head are almost always a disaster. Strip a head and you won't be able to get the calipers apart. Then you'll have to grind the head and send them off to Jim for EDM. This is why the other companies simply spray them with paint and put Centrix seals in them. Then the pads don't fit right. And... The aluminum can corrode under those plates making them impossible to get pads out... Heard enough? These can be very difficult and expensive calipers to fix properly. Especially if they're corroded.

Can you post a picture? If so, I can give you a better opinion and try to steer you toward some best options.

Steve, I'd say the anti seize would be fine. You're going to bleed the right afterward anyway so, fluid will push any contaminants out. I understand the reticence but, I think people make a bit too much a big deal out of these small things.
 
Last edited:

fredp

Well-Known Member
Messages
132
Reaction score
0
Location
Sydney
Many thanks for the wonderful write up, I was just about to start rebuilding my calipers and, after a google search, found the info posted on your website. And now this great diy "how to" guide.

I pulled apart the first rear caliper today and it all came apart relatively easily. I just had to slightly modify a caliper "opening" tool to hold a big rubber plug so I could use compressed air to push out the pistons.

I did find a bit of milky sludge inside the base of the pistons, so it was probably a good idea to do the rebuild.

All the parts will be off to the platers on Monday and when the o-rings ordered from PMB arrive I'll find out if I can put it all back together.
 

Attachments

  • IMG_0780.jpg
    IMG_0780.jpg
    46.2 KB · Views: 134
  • IMG_0783.jpg
    IMG_0783.jpg
    71.7 KB · Views: 134

TodB

Well-Known Member
Messages
1,273
Reaction score
324
Location
Saint Augustine, FL
Its too bad this post doesn't have more detail :)

Seriously, this should end up in the tech section of the site. Its invaluable.
 

deQuincey

Quousque tandem...?
Site Donor
Messages
8,437
Reaction score
2,460
Location
BIO - 43°15'46.5"N 2°56'03.7"W
a fascinating thread

as all other bits of our beloved cars, this is not rocket science, but this thread is so well detailed that gives anyone the chance and willing to attempt, otherwise you will never even dare to start this job,...congratulations

excellent tips and reccommendations, something to thank, very generous

i would like to ask a couple of questions if you are so kind to answer, it is about the platting:
1- when you sand blast the calipers, do you protect any áreas, holes, and so on ?
2- if not, how do you clean the interior passages after sand blasting ? is this critical ?
3- do you introduce the whole piece into the platting bath without any protection, mask, or cover ? i mean do you let the fluids enter all passages ?
4- as in every platting process time means microns of covering product, so may i ask how many minutes you keep them in the bath ?

thanks again

this shoud be fixed thread, but i propose that title is changed first to incorpórate: DIY step by step

regards
 
Top