Front speakers

Wow, amazing work and I’m impressed at how quick your turnaround is! Can’t wait to get home and see what modifications I (you :)) would need to make for the planar speaker option.
I think the primary change will be to go to the two piece approach, and to add the oval filler on the back
 
OK, JC. Here is your new part. I'll be expecting a discount on my next brain surgery! :p

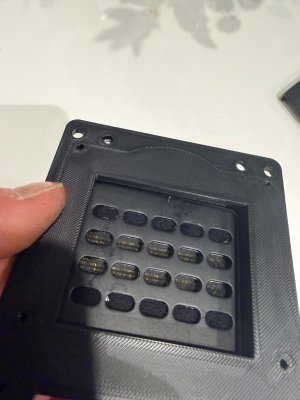
This is the two-part unit that I mentioned above. It also has the oval filler bit.

The idea is that the speakers mount to the baffle from the back, using small sheet metal screws. The baffle with speakers mounts to the dash using flat head machine screws that engage small blind nuts (T-Nuts) in the back of the dash.

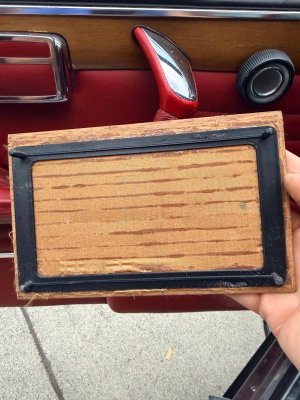
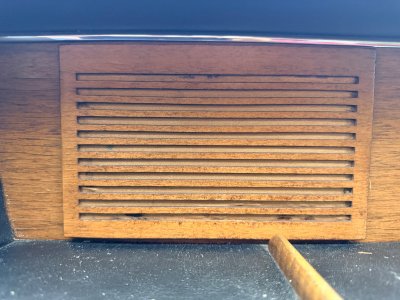
The plate replaces the plywood plate behind the wood grille (with a piece of suitable thin cloth sandwiched between the plate and the grille). That assembly then attaches to the baffle using the blank holes. I did not do anything to try to get the posts to flex because the entire plate is pretty fragile. I added some strengthening ribs that fit into slots on the front of the baffle to add a bit of strength. I figure you can use some of that earthquake putty to secure the grille.

Screenshot 2026-07-10 at 7.02.14 PM.png

Screenshot 2026-07-10 at 7.01.24 PM.png

Screenshot 2026-07-10 at 7.00.36 PM.png

Screenshot 2026-07-10 at 7.00.58 PM.png
 
OK, printed them off. I think that we are almost there, but some issues.
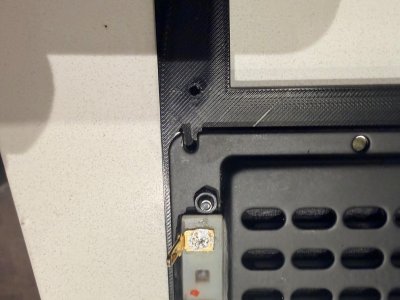
First off, I am confirming that the thin plate gets attached to the front wooden grille with the speaker cloth sandwiched between, and that combo is pressed onto the baffle. Currently the pins on that thin plate have a rib about halfway down their shaft that means they can only push in halfway. I don't necessarily see that rib on the model when I look at it in the slicing software, but it's odd that it printed at exactly the same height on all 4 pins and its exactly halfway down the shaft. With that rib there the front grille stands off the baffle assembly by about 3-4 mm, which I don't think was your intention. This may be a printing error, but it happened on both thin plates I printed. I can sand the shafts down to smooth if that's what is intended.
Second, the baffle openings aren't correct for the speaker. As I understand it, the speakers are back-mounted so that the majority of the speaker sits in the well behind the dash. The speaker is attached to the backside of the baffle with 4 screws, one for each corner. I see the screw holes there. Screw holes are in the correct position, and I assume that you flared the area out from the front of the speaker to sort of "open up" the sound. Problem is that the opening on the backside is too small for the speaker to fit. Interestingly the front side (flared out) is almost exactly perfect, would need to be about 2mm wider. When I measure the opening that the speakers would sit into on the backside, it's 5 cm wide by 6 cm tall. I think the graphic you found online led you astray. The size of the extruded portion of the speaker is 58 mm x 67 mm, so that should be the opening on the backside, then can flare outwards towards the front from that point.
Lastly, my assumption is that the baffle is pushed in to the opening from the front with speakers attached. The pin holes in the outer corners line up with the holes in the plywood on the back of the dash opening, and then I would attach some speed nuts or something similar to the "inner" holes in the plywood so that I can screw the baffle onto that plywood backing to hold it in place. Let me know if that's correct.
Overall this is amazing - the detail is perfect, the print looks great. If you can change the sizing of the opening I'll reprint the baffle and try to mount it in the next day or two. Nicely done!

 
OK, printed them off. I think that we are almost there, but some issues.
First off, I am confirming that the thin plate gets attached to the front wooden grille with the speaker cloth sandwiched between, and that combo is pressed onto the baffle. Currently the pins on that thin plate have a rib about halfway down their shaft that means they can only push in halfway. I don't necessarily see that rib on the model when I look at it in the slicing software, but it's odd that it printed at exactly the same height on all 4 pins and its exactly halfway down the shaft. With that rib there the front grille stands off the baffle assembly by about 3-4 mm, which I don't think was your intention. This may be a printing error, but it happened on both thin plates I printed. I can sand the shafts down to smooth if that's what is intended.
Second, the baffle openings aren't correct for the speaker. As I understand it, the speakers are back-mounted so that the majority of the speaker sits in the well behind the dash. The speaker is attached to the backside of the baffle with 4 screws, one for each corner. I see the screw holes there. Screw holes are in the correct position, and I assume that you flared the area out from the front of the speaker to sort of "open up" the sound. Problem is that the opening on the backside is too small for the speaker to fit. Interestingly the front side (flared out) is almost exactly perfect, would need to be about 2mm wider. When I measure the opening that the speakers would sit into on the backside, it's 5 cm wide by 6 cm tall. I think the graphic you found online led you astray. The size of the extruded portion of the speaker is 58 mm x 67 mm, so that should be the opening on the backside, then can flare outwards towards the front from that point.
Lastly, my assumption is that the baffle is pushed in to the opening from the front with speakers attached. The pin holes in the outer corners line up with the holes in the plywood on the back of the dash opening, and then I would attach some speed nuts or something similar to the "inner" holes in the plywood so that I can screw the baffle onto that plywood backing to hold it in place. Let me know if that's correct.
Overall this is amazing - the detail is perfect, the print looks great. If you can change the sizing of the opening I'll reprint the baffle and try to mount it in the next day or two. Nicely done!
The grille pins should be smooth. They are just a friction fit into the mating holes on the baffle and the slot/holes on the dash. The ridge you have may be some sort of slicing anomaly. You can probably sand or scrape them to fit.

I'll re-do the opening. Does the front side of the speaker protrude from the mounting flanges? The opening was based on that online diagram, which was not very clear... but I made the opening to match the baffle holes on the speakers.

How fragile was the thin plate? I made a ridge on it that fits into a groove on the baffle to try to strengthen it..

And yes, the idea for mounting the baffle is that you insert the empty baffle into the dash, mark where the countersunk holes are, and then remove the baffle. Drill appropriate sized holes for some shallow T-nuts (the kind with a barrel and a flange that has barbs - see link below). You stick those into the dash from the back, creating threaded holes in the wood. Then attach the speakers to the baffle using sheet metal screws (I tried threaded holes, but they just pulled out). With the speakers attached and wired up, install the baffle and screw it to the dash using flat head screws. Then slide the grille and grille plate onto the baffle. I am hoping the friction of the posts on the grille plate will hold the grille in place, if not , use some sort of putty or a small dab of silicone caulk.

T-Nuts
 
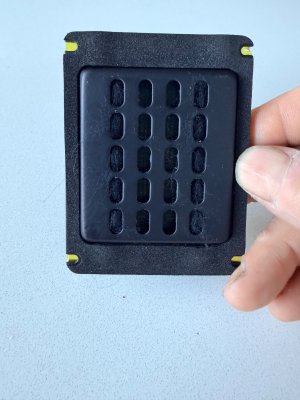
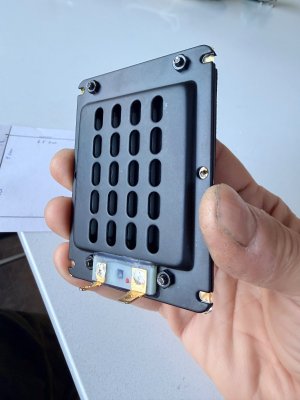
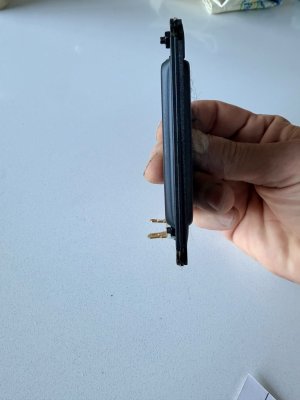
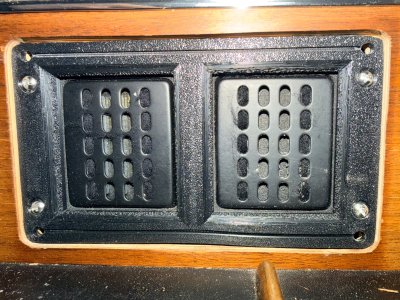
Ok we are all on the same page then. Here are some pictures of the speakers. The “speaker” portion does protrude slightly from the mounting flange by about 3 mm but the measurements I gave you are from the outside of that protrusion so an opening that size should work fine. These photos show the backside protrusion but the front is the same (minus the spade connectors)
 

Attachments

  • IMG_9821.jpeg
    IMG_9821.jpeg
    455.1 KB · Views: 24
  • IMG_9819.jpeg
    IMG_9819.jpeg
    445 KB · Views: 22
  • IMG_9713.jpeg
    IMG_9713.jpeg
    512.9 KB · Views: 22
  • IMG_9718.jpeg
    IMG_9718.jpeg
    358.5 KB · Views: 19
  • IMG_9714.jpeg
    IMG_9714.jpeg
    379.6 KB · Views: 22
OK. here is the revised file. I figured out how to go in and edit the forms, so making changes is pretty fast now.
Screenshot 2026-07-14 at 9.40.04 AM.png
Screenshot 2026-07-14 at 9.39.43 AM.png
Screenshot 2026-07-14 at 9.39.25 AM.png
Screenshot 2026-07-14 at 9.39.04 AM.png
Screenshot 2026-07-14 at 9.38.29 AM.png
 
here is my version.... left and right side the same..... and before someone ask me > yes there is enough space for the feet on the drivers side
 

Attachments

  • IMG_6243.JPEG
    IMG_6243.JPEG
    756.8 KB · Views: 27
no, it was a hard way to built them.....
first step was bring the gfk directly on the car inside to have a ground plate
second step to find the right position for the wood rings
third step looking how ist the open position for the gloves left and right side, of course its importand that you can open them,for sure ....
IMG_5976.JPG
IMG_5987.JPG
IMG_5993.JPG
IMG_5998.JPG
IMG_6009.JPG
IMG_6133.JPG
IMG_6137.JPG
IMG_6233.JPEG
IMG_6243.JPEG
 
as you see really lot of work, but to have only small speakers in the middle was no option for me..... rear speakers i have under the the rear seats
 
Ok, update based on Scott’s great CAD work. Speakers are mounted and fit very nicely. Sound quality is really quite good. I’m happy. Looks completely stock and is accessible if needed. With two speakers also doesn’t require any rewiring for mono. Although planar speakers have some downsides in terms of off-angle listening, they are basically at ear height here so are perfect. I suppose one could rework the frame to have them angle slightly outwards but I’m not sure that would get much - stereo separation is more two disparate sources reaching your ears from different angles rather than one source emitting in different angles.
Total cost is probably about $250, mainly for the speakers and then if you don’t have a 3-d printer I suspect it might be $20 or so to have the parts printed. It all goes together with some M3x8mm screws to hold the speakers in and then rubber cement to attach the plate to the inside of the wooden grille. You do need to carve out a bit more of the wood that’s on the inside shelf of the opening that used to hold the speaker ears but easy to do.
Scott, the only modification that I made is that the “pins” on the bottom of the plate needed to be shortened a bit (by about 40%) to allow the bottom edge of the grille to slip behind the wood strips on the dash. At their full length I couldn’t get them into position to drop into their holes without the bottom edge of the grille getting in the way.
 

Attachments

  • IMG_9917.jpeg
    IMG_9917.jpeg
    960.8 KB · Views: 15
  • IMG_9918.jpeg
    IMG_9918.jpeg
    790.9 KB · Views: 12
  • IMG_9914.jpeg
    IMG_9914.jpeg
    639.7 KB · Views: 13
Last edited:
Ok, update based on Scott’s great CAD work. Speakers are mounted and fit very nicely. Sound quality is really quite good. I’m happy. Looks completely stock and is accessible if needed. With two speakers also doesn’t require any rewiring for mono. Although planar speakers have some downsides in terms of off-angle listening, they are basically at war height here so are perfect. I suppose one could rework the frame to have them angle slightly outwards but I’m not sure that would get much - stereo separation is more two disparate sources reaching your ears from different angles rather than one source emitting in different angles.
Total cost is probably about $250, mainly for the speakers and then if you don’t have a 3-d printer I suspect it might be $20 or so to have the parts printed. It all goes together with some M3x8mm screws to hold the speakers in and then rubber cement to attach the plate to the inside of the wooden grille. You do need to carve out a bit more of the wood that’s on the inside shelf of the opening that used to hold the speaker ears but easy to do.
Scott, the only modification that I made is that the “pins” on the bottom of the plate needed to be shortened a bit (by about 40%) to allow the bottom edge of the grille to slip behind the wood strips on the dash. At their full length I couldn’t get them into position to drop into their holes without the bottom edge of the grille getting in the way.
Good to hear, and great to see!!
 
Just a tip: I have 6,5" speakers in my kick panels. I was very disappointed with the sound the first time I tested them. The cavity behind thee kick panels are very limited (especially with additional insulation) is so i drilled a port in the panel so the speakers could "breath" more easily. The sound where radically improved.
 
Just a tip: I have 6,5" speakers in my kick panels. I was very disappointed with the sound the first time I tested them. The cavity behind thee kick panels are very limited (especially with additional insulation) is so i drilled a port in the panel so the speakers could "breath" more easily. The sound where radically improved.
Yes, that's called a "bass reflex" cabinet. There are many books and calculators available on how to design them.

Speakers have a resonance point where the cone motion peaks. At that point the impedance of the voice coil also peaks. To compensate for that (so you don't have a one note boomy speaker, like some kids like to have), you allow some portion of the wave that comes off the back of the speaker to come around to the front.

Sounds like you lucked out, since the "port" between the front and back is usually tuned to get the best response.

Here is a brief article that summarizes the basic types of speaker cabinet.

Speaker Enclosures
 
Last edited:
With the limited space available behind the dash speakers then, what are the options for cabinet vs port? Scott, you had mentioned creating some sort of cabinet behind the speakers to cut down on out of phase cancellation effect.
 
I have been watching this discussion with interest.

The only aftermarket speakers installed in my coupe are two small speakers to replace the perished mono speaker in the dash and a set of "undercover II" speakers on the floor of the back seat area (they can be tucked under the front seat as well). I replaced the original Blaupunkt AM/FM mono radio with a Retrosound radio which is okay I guess, but the entire set-up is really sub-par.

My coupe has never been cut up for speakers, the door panels and parcel shelf are uncut and I would like to keep it that way. I think the planar speakers that @e9Leveque is installing may be a nice option and I may well go down that route.

I am also intrigued by the tweeters in the ash tray that @rsporsche is doing. What are the options for the rear seat area since I will not cut holes in the parcel shelf? I have though about removing the original padding there and adding some surface mount speakers, but look forward to thoughts on other options.

I do not really listen to the radio at all, just need a Bluetooth option and have also been thinking about the installation of an Out of sight audio unit as recommended by Andrew and Chris and then installing a vintage Becker Europa that I have sitting on a shelf just to return to a more vintage look
 
Back
Top