Head replacement

autowerks

Well-Known Member
Site Donor
Messages
561
Reaction score
82
Location
Dallas, Texas
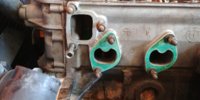
Removing the Thermostat Housing,
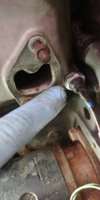
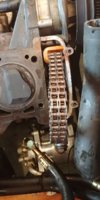
There are 4 coolant lines going to thermostat housing, lower radiator hose, water pump hose, coolant reservoir hose and upper radiator hose.
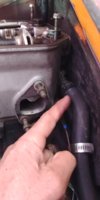
With the hoses off there are three bolts that holds the T housing to the head.
 

Attachments

  • 20180309_110328.jpg
    20180309_110328.jpg
    187.1 KB · Views: 163

autowerks

Well-Known Member
Site Donor
Messages
561
Reaction score
82
Location
Dallas, Texas
With the Carburators and Tstat housing out of the way the front cam gear cover is ready to come off.
It is held by 8, 10mm bolts.
 

Attachments

  • 20180309_124624.jpg
    20180309_124624.jpg
    156.5 KB · Views: 161
  • 20180309_131303.jpg
    20180309_131303.jpg
    202 KB · Views: 176
Last edited:

autowerks

Well-Known Member
Site Donor
Messages
561
Reaction score
82
Location
Dallas, Texas
Now, back of the head,
The Oil sending unit wire connection and the head coolant hose needs to be disconnected.
 

Attachments

  • 20180309_113148.jpg
    20180309_113148.jpg
    157.8 KB · Views: 163
  • 20180309_124746.jpg
    20180309_124746.jpg
    135.8 KB · Views: 156

autowerks

Well-Known Member
Site Donor
Messages
561
Reaction score
82
Location
Dallas, Texas
Time to take the head off;
The Cam gear needs to be taken off and its held by 4 size 10mm bolts.
Once the Cam gear is off the Held is Held by 14 bolts and the head is off!
Last pic shows the crack in the head!
 

Attachments

  • 20180309_134251.jpg
    20180309_134251.jpg
    230.1 KB · Views: 169
  • 20180309_164017.jpg
    20180309_164017.jpg
    193.4 KB · Views: 161
  • 20180309_163657.jpg
    20180309_163657.jpg
    228.6 KB · Views: 164
  • 20180309_134344.jpg
    20180309_134344.jpg
    185.2 KB · Views: 172

JFENG

Well-Known Member
Site Donor
Messages
3,182
Reaction score
1,398
Location
Bahston (Boston)
If you aren’t doing anything to the bottom end and you’ve got it all at TDC, suggest you safety wire the chain to the sprocket so you don’t lose cam to crank timing.
 

autowerks

Well-Known Member
Site Donor
Messages
561
Reaction score
82
Location
Dallas, Texas
Done that and thank you guys, please keep the comments coming for the next guy doing the head replacement, Thank you
 

Drew20

Well-Known Member
Site Donor
Messages
465
Reaction score
136
Location
Beaconsfield
one tip I picked up was to use one of the old head bolts to get the oil/ water out of the blind head bolt holes in the block. Take your bolt and cut a groove in the threaded bit with a grinder, then screw the modified bolt into the blind holes in the block, and any fluid in them is forced up and out via the groove you cut in the bolt threads
 

autowerks

Well-Known Member
Site Donor
Messages
561
Reaction score
82
Location
Dallas, Texas
Great Idea Drew, will do and Thanks.
Today I am planning to clean the Carbon build up on the pistons and install upgraded oil filter designed by Bert on the forum!
 

JFENG

Well-Known Member
Site Donor
Messages
3,182
Reaction score
1,398
Location
Bahston (Boston)
You guys should have a set of metric thread/hole chasers that are made for this purpose. That plus a long needle tip for your blow gun. $50 gets you a set that covers both metric and coarse/fine SAE
 

autowerks

Well-Known Member
Site Donor
Messages
561
Reaction score
82
Location
Dallas, Texas
I cleaned the carbon build up today, it is looking a lot better!
Sorry, but can not load pics don't know why?
 
Last edited:

Drew20

Well-Known Member
Site Donor
Messages
465
Reaction score
136
Location
Beaconsfield
How did you stop the carbon going down the bores?

I had terrible trouble with this on my old E24 a few years back. I sorted it in the end but I got gunk in the rings = compression issues
 

autowerks

Well-Known Member
Site Donor
Messages
561
Reaction score
82
Location
Dallas, Texas
Mine was not that bad it seems to me like the head was recently done on my car, used razor blade and vacuum and shop rag to clean up!
 

autowerks

Well-Known Member
Site Donor
Messages
561
Reaction score
82
Location
Dallas, Texas
Thanks to sfdon, he shipped the parts on friday, can't wait to drive the car again!
I will be posting the progress and thanks for all the help and guidance.
 

autowerks

Well-Known Member
Site Donor
Messages
561
Reaction score
82
Location
Dallas, Texas
All the parts are checked, coolant line and Cam cover plate is installed, ready for the head to go in!
 

Attachments

  • 20180423_114028.jpg
    20180423_114028.jpg
    164.1 KB · Views: 152
  • 20180423_121802.jpg
    20180423_121802.jpg
    164.5 KB · Views: 140

autowerks

Well-Known Member
Site Donor
Messages
561
Reaction score
82
Location
Dallas, Texas
All the parts are checked, coolant line and Cam cover plate is installed, also the Oil sending unit!
 

autowerks

Well-Known Member
Site Donor
Messages
561
Reaction score
82
Location
Dallas, Texas
Guys, not a lot of Mechanical knowledge here but I was able to get the head in place and get the car running ( thanks to the forum, SFDon and you all)
I strongly suggest replacing the tensioner and Cam gear,
make sure the short block and the head are timed ( very important)
Head gasket and head went in and torqued per SFDon specs 20, 30, 50, 68ftp with 30 minutes wait between each torque sequence.
the Cam Gear will go in next easily, the chain is not that hard to work with, cam gear is held in place with four size 10mm bolts.
"The cam shaft turns once when the crank shaft turns twice"
Install the tensioner.
Turn the engine by crank shaft to make sure the timing is correct!
 

Attachments

  • mark.jpg
    mark.jpg
    161.1 KB · Views: 122
  • cam mark.jpg
    cam mark.jpg
    185.9 KB · Views: 135
  • crank mark.jpg
    crank mark.jpg
    175.5 KB · Views: 143
  • pic cam.jpg
    pic cam.jpg
    173.9 KB · Views: 132
  • tensioner.jpg
    tensioner.jpg
    133.7 KB · Views: 128
Last edited:
Top