Here again for a bit of help...

Neoparoykos

Active Member
Messages
53
Reaction score
6
Location
Orlando, FL
We are RUNNING! Not well, rough, but running!

I am embarrassed to admit that it was likely the plug sequence on the distributor cap. Despite everyone's recommendation to insure I got it right, I arrogantly and stupidly didn't confirm the sequence. I don't know what I was thinking. :\

Nevertheless, we are running. Very poor at this moment so a proper timing episode will be necessary. Maybe time to buy a timing light...
 

Dick Steinkamp

Well-Known Member
Site Donor $
Messages
2,425
Reaction score
2,849
Location
Bellingham, WA
Congrats! :cool:

Set the dwell with a dwell meter before you set the timing. Then be sure to use the procedure for setting the timing that is in the shop manual. The procedure is different than for most other cars.
 

HB Chris

Well-Known Member
Site Donor $$
Messages
19,418
Reaction score
8,757
Location
Huntington Beach, CA
Loosen dizzy nut just a bit and rotate dizzy just a bit counter clockwise to advance, see if it helps or go the other way.
 

dang

Administrator
Site Donor
Messages
4,247
Reaction score
3,262
Location
Rocklin, CA
You can also look for #6 cam loves at 11 o'clock and 1 o'clock. That's the exact opposite of #1 at TDC and easier to see.
 

E3_UK

Well-Known Member
Messages
229
Reaction score
55
Glad you got it running. Regarding your fault finding i don't think you had a short with the points wire on the new points, the points were just not fully closed. Points open =12v, closed =0v (between coil neg and ground). The lead sequence has thrown you off completely. As others have said if you are replacing ignition components and are not familiar with it just replace one part at a time and check it runs. Do the points last as these are the only adjustable item so can affect how it runs. A dwell meter and timing light should be next on your shopping list. Set the dwell first then check the timing. If you ever alter the dwell always recheck the timing. When you adjust the points you are changing the point at which they open (the dwell angle is basically how much the rotor arm rotates between cylinders while the points remain closed) and this is what initiates the spark. So you can't accurately set the timing until the points are correct. You will get it, this is the fun part with working on old cars, you begin to understand how it all works, far better than having a computer throw a code at you :). Good luck.
 

E3_UK

Well-Known Member
Messages
229
Reaction score
55
By the way when i mentioned the insulating bush on the points i didn't mean the grommet that passes thru the body, it's the plastic bush that fits over the post that the points are mounted to. This ensures the feed wire doesn't earth. Maybe the bush isn't a seperate part on these, i don't remember, but it is on Lucas distributors on British cars and often causes loss of ignition when assembled incorrectly.
 

Neoparoykos

Active Member
Messages
53
Reaction score
6
Location
Orlando, FL
Welp, timing is set and points have been adjusted. Car is running as it was before the tuneup, with one caveat; the head gasket is blown.

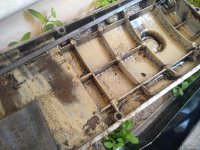
I discovered the milky oil in the roof of the valve cover when removed. Was optimistic that it wasn't what it appeared to be, but it's obvious given the performance.

Question is, is it doable? I'm not new to a head gasket job, but first time on a vintage BMW. Haynes discusses cylinder head removal, but it seems to include steps that MAY not be necessary. Camshaft removal, rockers, etc. Would be great to remove the head without all the other items.
 

Stevehose

Well-Known Member
Site Donor $$
Messages
12,934
Reaction score
5,598
Location
Sarasota, FL
It's pretty easy, the head comes off as a unit, no need to mess with the cam etc. Unless you want a hotter cam and have the head rebuilt while you're in there. Otherwise post here and we can chime in with tips.
 

Neoparoykos

Active Member
Messages
53
Reaction score
6
Location
Orlando, FL
It's pretty easy, the head comes off as a unit, no need to mess with the cam etc. Unless you want a hotter cam and have the head rebuilt while you're in there. Otherwise post here and we can chime in with tips.

Glad to hear that! Can the head bolts be reused or should they be replaced?
 

Dick Steinkamp

Well-Known Member
Site Donor $
Messages
2,425
Reaction score
2,849
Location
Bellingham, WA
A common cause of that milky oil on the roof of the valve cover is running the engine for short durations. The engine never really gets to temperature long enough to evaporate off the condensation that can get in the oil. What tests have you done to confirm the head gasket is blown?
 

Neoparoykos

Active Member
Messages
53
Reaction score
6
Location
Orlando, FL
A common cause of that milky oil on the roof of the valve cover is running the engine for short durations. The engine never really gets to temperature long enough to evaporate off the condensation that can get in the oil. What tests have you done to confirm the head gasket is blown?

I read that here on E9 as well, but the amount of coolant is significant. A compression test netted 150psi+ across all 6. I didn't have tools for a coolant pressure test unfortunately. Very little smoke (steam?) from the exhaust beyond what it has always done. Very poor low RPM performance.
 

Attachments

  • IMG_20200607_151337609.jpg
    IMG_20200607_151337609.jpg
    444 KB · Views: 181

Dick Steinkamp

Well-Known Member
Site Donor $
Messages
2,425
Reaction score
2,849
Location
Bellingham, WA
Do you have to put coolant in the car often?
When you pull the dipstick are there bubbles on it and/or is the oil on it milky?
If you pull the oil drain plug after the car has not run for a few hours does water come out?
How are you determining that is coolant on the valve cover and not condensation?

All cars will emit some steam out the tail pipe immediately after start up for a few minutes under the right temp and humidity conditions until all the condensation evaporates out of the exhaust system.

I'm not saying it couldn't be a blown head gasket, or a cracked block or head, but I'd be darn sure before I tore it apart.
If you are not constantly adding coolant, and the dip stick does not show milky oil, I'd drain the oil looking for water coming out in the first few seconds. If things look good at that point, I'd finish the oil and filter change, clean the valve cover, and run it on the highway for a half hour or so. Then take another look at the inside of the valve cover.
 

m5bb

Well-Known Member
Site Donor $
Messages
2,081
Reaction score
909
Location
Peachtree Corners, GA
I would not use a Haynes manual for anything. They are so full of errors. They are like the books for dummies. They made one for every car imaginable and the person writing may be ok but the person proof reading didn't know what it meant. So error!
You'll get it. Very good tips by many folks here.
 

duct-tape

Well-Known Member
Site Donor
Messages
519
Reaction score
151
Location
Atlanta, GA
Youre also in the most humid ass crack of the country. lol. I'd blame the atmosphere way before assuming the gasket is done.
Dick is right, check all the things before tearing it down
 

Neoparoykos

Active Member
Messages
53
Reaction score
6
Location
Orlando, FL
Do you have to put coolant in the car often?
When you pull the dipstick are there bubbles on it and/or is the oil on it milky?
If you pull the oil drain plug after the car has not run for a few hours does water come out?
How are you determining that is coolant on the valve cover and not condensation?

All cars will emit some steam out the tail pipe immediately after start up for a few minutes under the right temp and humidity conditions until all the condensation evaporates out of the exhaust system.

I'm not saying it couldn't be a blown head gasket, or a cracked block or head, but I'd be darn sure before I tore it apart.
If you are not constantly adding coolant, and the dip stick does not show milky oil, I'd drain the oil looking for water coming out in the first few seconds. If things look good at that point, I'd finish the oil and filter change, clean the valve cover, and run it on the highway for a half hour or so. Then take another look at the inside of the valve cover.

-It has seemed like it is eating coolant.
-Despite that, I did not notice milky oil on the dipstick.
-I'll be checking the oil from the pan in the next day or two.
-I'm assuming by the amount of fluid and the apparent loss of coolant it is, in fact, coolant. Not conclusive though

Thanks for the tips, Dick. I really appreciate the more nuanced approach instead of, "Sounds like the head gasket. Change it." Will report back asap.

I would not use a Haynes manual for anything. They are so full of errors. They are like the books for dummies. They made one for every car imaginable and the person writing may be ok but the person proof reading didn't know what it meant. So error!
You'll get it. Very good tips by many folks here.

I appreciated the manual so far. What kind of errors are typical? It seems to be quite detailed and systematic in its approach to problem solving.

Youre also in the most humid ass crack of the country. lol. I'd blame the atmosphere way before assuming the gasket is done.
Dick is right, check all the things before tearing it down

Thanks for this! I appreciate the approach versus "Tear it down!"
 

Neoparoykos

Active Member
Messages
53
Reaction score
6
Location
Orlando, FL
Drained the oil today and there were no signs of water besides a very small amount in the drain bolt. I'm puzzled. It seems like there was such a large amount in the head, but nothing in the oil pan. Could it be leaking into the head in some other manner?
 

Dick Steinkamp

Well-Known Member
Site Donor $
Messages
2,425
Reaction score
2,849
Location
Bellingham, WA
If it is getting into the head (or anywhere else for that matter) it will go straight to the bottom of the pan. Oil floats on water.

Was there actual water/coolant in the head...or just the milky oil on the inside of the valve cover?
 
Top