Hotrodded Coupe Project

Malc

Well-Known Member
Messages
1,179
Reaction score
10
Location
The Garvock, Scotland
Doug B
You say NW CT, are you up near Winsted? I visit that part of the world from time to time. Would love to see it in the flesh as it were.
Cheers
Malc
 

TrackRat

Member
Messages
34
Reaction score
26
Location
Mid-coast Maine and Connecticut
ThreeWebers asked: 2600lbs?How much gutting have you done?

Short answer is: lots of gutting. There is no interior, the door windows are removed and the rear quarter windows are 1/4" clear polycarbonate. Wherever I could remove weight I did, within certain limits ( read cost). The rear backlght and windshield are both still orignal glass. I had a set of Fiberglass doors, but I opted to use the original steel doors for ease of installation and nicer panel fit and a bit more side protection. If I were doing a full-on racecar, I would use the fiberglass doors in a hearbeat. THey would save a lot right there over the steel. ...'Course, if you had the original CSL alloy doors....hmmm. I also selected 1.5" DOM tubing for the cage instead of 1.750". The smaller section is quite a bit lighter than the big stuff per foot. It all ads up.

THe hood and decklid are single fiberglass skins. (Thanks Dan K) The hood is hinged at the front , attached to a simple aluminum frame that is boldted to the drilled stock hinges. This front frame also holds down the entire front edge of the hood when the hood is down in the driving position- I didn't want air to get under the front and center of the hood at speed. I have five 10-32 screws reataining the hood to this frame. I have held down the edges of the hood with 5 flush fitting quarter turn Dzus fasteners on each side. I did not want to have the hood "oilcanning" due to the airspeed as I thought it might with a 4 or 5 point traditonal hoodpin hold down. The combination of the front hingemout/brace and the Dzus fansters holds everything down quite well. The hood has stayed in place very nicely as I have hit the magic "ton" (100mph) as they say. No oilcanning/distortion or appearance that the hood might rip off. that saved lots of weight, - especailly off the front of the car, yet still gives good panel lines and a more tradional syle of hood opening.

Doug B
'Rat
 

TrackRat

Member
Messages
34
Reaction score
26
Location
Mid-coast Maine and Connecticut
Hello Decoupe, Thanks for the question. I thought pretty carefully about how to set-up the brakes so that I could have those sidedraft Webers hang out unfettered by the big power-brake booster. I constructed a mount for and adjustable dual M/Cyl mount from aluminum plate and thick walled aluminum tubing. THis mount bolts to the 4 bolt flange on the end of the stock pedal box/ master cylinder mount. I found a Wilwood/tilton 60 degree master cylinder mount, but I had to cut and re-weld it to make it an opposite hand if you will. This picture below was taken before the motor went in. it shows the vertical flange of my fabricated mount bolted to the stock BMW mount at the left, with two big 1" square alumimum tubes coming off of this flange. the reveresed wilwood 60 degree mount with the twin M/C' are bolted through these two big square tubes, and then through to the fenderwell. I needed to brace the entire mount against the inner fenderwell in order to keep flex down and a firm pedal when I'm "standing" on the brakes. Pedal feel is good and it keeps the entire brake set up "low and away" from the carbs, venturi stacks and filters.


06206dualm-cyl.jpg


THis photo shows the Power-steering box and the brake mount flange. I used the stock power steering box because it had a quicker ratio than anything I could find. (15 to 1 or nearabouts If I recall correctly) I hooked up the banjo fittings that connect to the box to a gravity fed power steering fluid reservoir- jut to keep out moisture and keep the box lubricated with p/s fluid. I don't believe this is a mechanical "no-no" i.e. running a p/s box without a pressurized feed of fluid, but so far so good.

Oct28051.jpg


Regards, Doug B
'Rat
 

TrackRat

Member
Messages
34
Reaction score
26
Location
Mid-coast Maine and Connecticut
You say NW CT, are you up near Winsted? I visit that part of the world from time to time. Would love to see it in the flesh as it were.
Cheers
Malc

Malc, and anyone else "in the neighborhood"... Consider this an open invitation. send me an email or PM when you're around. Winsted is a 35 minute drive from my door; either at work or home. I can almost always take some time during the workday or evenings. swing on by: the door is open and the coffee is hot. Love to talk cars and coupes....

Doug B
'Rat
 

TrackRat

Member
Messages
34
Reaction score
26
Location
Mid-coast Maine and Connecticut
I constructed the wing from a model airplane foam cored wing blank, with balsa and carbon fiber spars nested within it. The ends of the wing are made from 1/4" plywood , and have maple epoxied in there to support accept heli-coils. The wing is held on with four 1/4-20 bolts passing through the uprightsand into the ends of the wing. The wing core was planked with 3/32 balsa "wing skins" and then finished with 1/4 oz glass cloth and resin. Total weight of the wing itself is 1.5 lbs +/-. light, strong and stiff. the hood strakes are cut from balsa, with maple blocks "let into" the balsa. same glass cloth and resin finishas used elsewhare. the maple blocks are tapped to accept 1/4-20 screws. I used 1/4-20 nylon bolts , run into the strakes from the underside of the fender to hold them onto the front fenders. they weigh maybe 6 oz. per each after the glass cloth and resin finish.
strakesonwingwithcell.jpg


The uprights to support the wing were fabbed with 1" square aluminum tubes, with balsa cut and glued to form the shape. I have carbon fiber strips glued in there to strenghten the form, then evreything was planked with balsa, and finished with glass cloth and resin. (I got my chops regularly and seriously busted by the guys that saw my Balsa-wood construction techniques. until I reminded them that the DeHavilland Mosquito and other "High Zoot" machines used balsa as a regular means of construction....Now the ZO 6 corvette uses balsa... 8) Anyway I am very comforable working with that material, and I know the strength to weight ratio can't be beat.
winguprightstructureview2.jpg


photo below shows the first fitting of the uprights to the aluminum tube. the front end of this tube is bolted to the trunk hinges. I wanted to be able to lift the hinged decklid for access to the tank-


uprightmount.jpg


THe final rear wing, decklid and supoport structure looks like this. I used two of the rubber "tee handle things to hold down the rear of the decklid.

Decklidwing1.jpg


regards,

Doug B
'Rat
 

shanon

Well-Known Member
Messages
2,033
Reaction score
564
Location
NorCal
Just awesome! Thanks so much for taking the time to write up & post your build.

Can't wait to hear you compare the Coupe to the rest of your 'stable', which would make a vary entertaining 'grid' by itself..
8)

-shanon
 

gazzol

Well-Known Member
Messages
466
Reaction score
113
Location
Preston, England
TrackRat I love this car, very very nice, some serious work gone in to this and I appreciate the hours you must have put in as I just completed my own car earlier this year. Not quite as extreme as yours CSL doors bonnet (hood) and boot (trunk) lid, no interior save for ally door cards but kept 4 X electric windows as mine is primarily a road car, got mine down to 1300 Kgs or 2860 Lbs.
 

decoupe

(deceased)
Messages
1,333
Reaction score
16
Location
Alberta, Canada
Hi Doug B:

Couple of questions about your car and how you have set it up.

I've been looking for the bellows type transition between the steering wheel and steering column housing on your coupe - what is it from? Can't find it through Realoem.com.

24b4c2b81227d839dc6a03d529421e0e.jpg


The banjo bolts you used to convert the PS box to manual - are they a BMW part (doubt it)? Did you have to have them fabricated? Subjectively, at what speed does this stop feeling like arm wrestling and more like driving? On my 320i, it doesn't take more than barely moving. Thought I'd try this before hunting for a manual box.

Lastly, have you installed a wide band o2 meter to help set up the jetting. I changed over to a WMS ( www.wmswideband.com/ ) and it has been a huge help - very precise. No affiliation but definitely a recommendation.

Great car, thanks for sharing your ideas.

Doug C
 

TrackRat

Member
Messages
34
Reaction score
26
Location
Mid-coast Maine and Connecticut
Hello Gazzol, Sorry I havent been on this site in a while.. Thanks for the compliment. These cars are fairly heavy, and to bring yours down to 2860 takes a lot of gutting work. I understand the need to keep the windows and their electric lifts-Especailloy if you street drive it a lot wside windows are a very nice convenience. Door Panels: I am cutting some 20 gauge aluminum sheet for the inner door panels-I believe like what you have done to your doors as well. I'll pop rivet them in place and spray them with the satin black lacquer that covers the rest of the interior.

I now have approx 500 miles on the car,and still sorting things out. I changed to Wilwood Polymatrix A pads, from Polymatrix D pads, and love the torquier feel of these "A" pads. Brake balance is good, and braking abilityis limited by the relatively smallfootprint of the front tires (205 16's ) Yesterday afternoon I took my friend Steve for a "rip" in the car. He loved it and asked how many problems I had following the assembly and shakedown.. I opened my big mouth and said "suprisingly few problems, Steve..." The "Gremlins" were listening... Well, Yesterday evening I went out in the car for a quick testing of a different set of air correctors installed in the Weber carbs. I was driving when I saw the fuel pump pressure go to zero - the fuel pump failed.. I quickly turned around and started heading home... whatever gas was in the carb bowls was what I had to get home on. I managed to go approx 1 mile being very careful with the throttle- but I got stranded about about a mile from my house before the last "gasp" of fuel ran out. I had to call my Daughter to come give me a rope-tow home. She was not particularly happy about that, though...

I had hoped to run the car at a three-day track event at Pocono starting Friday of the coming week. However the fuel pump problem, added to all the prep work I had to do anyway, kinda pushed me over the edge and made me change to another car. I don't want to be rushed for its first event. I am now shooting for the Coupe's first track day at Lime Rock in early August. Regards,

TrackRat

gazzol said:
TrackRat I love this car, very very nice, some serious work gone in to this and I appreciate the hours you must have put in as I just completed my own car earlier this year. Not quite as extreme as yours CSL doors bonnet (hood) and boot (trunk) lid, no interior save for ally door cards but kept 4 X electric windows as mine is primarily a road car, got mine down to 1300 Kgs or 2860 Lbs.
 

TrackRat

Member
Messages
34
Reaction score
26
Location
Mid-coast Maine and Connecticut
Hello Decoupe,

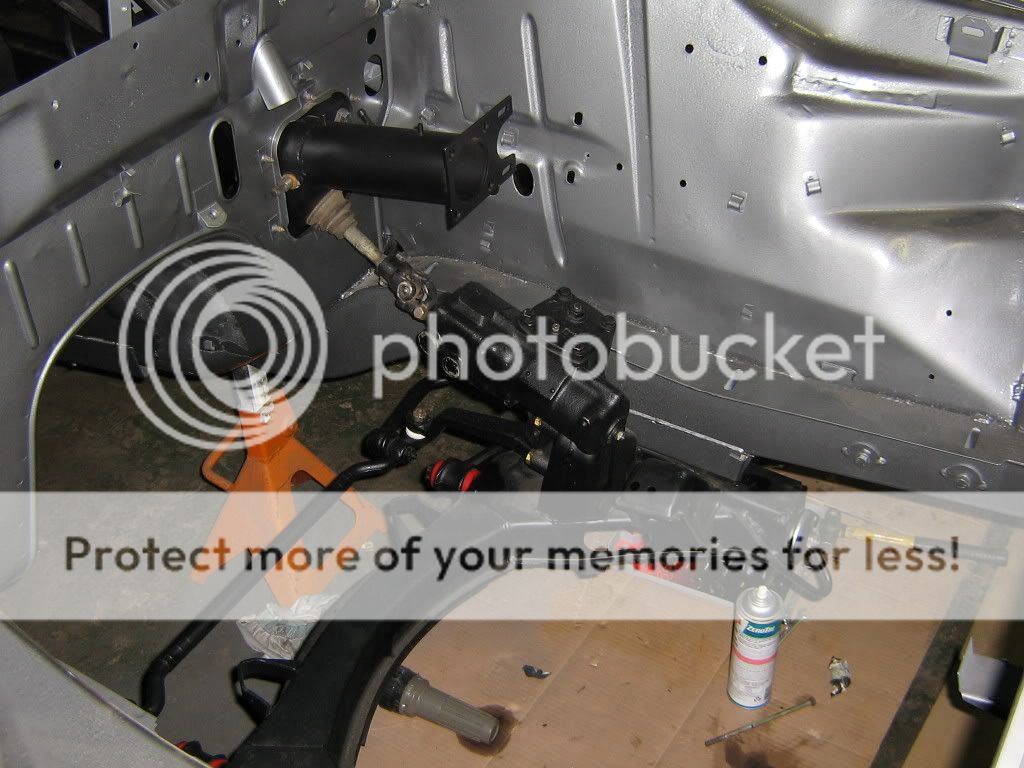
The bellows was included with a steering wheel hub extension. It is an aftermarket part for sure. I believe I got both the extension and the bellows from Momo, but that was back in 2002- I don't believe I have the reciept for it to tell you where it came from. I used a Momo Prototipo wheel Try their website to see what they have.

I've been looking for the bellows type transition between the steering wheel and steering column housing on your coupe - what is it from? Can't find it through Realoem.com.

24b4c2b81227d839dc6a03d529421e0e.jpg


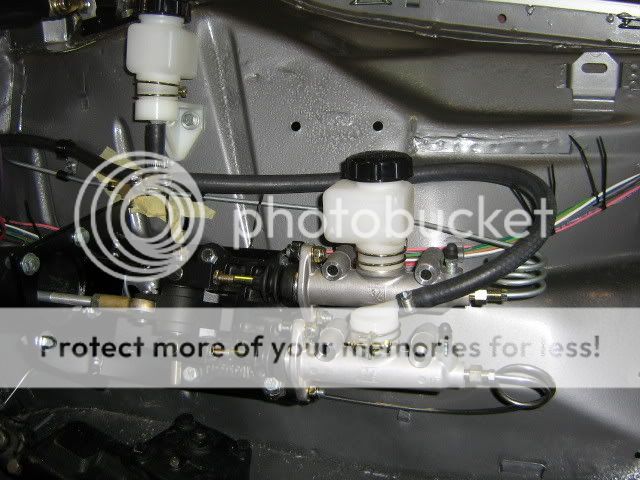
The banjo bolts were taken /cut from the original PS hoses. I silver- soldered some brass barbed fittings in each banjo bolt in order to be able to install simple rubber hoses (3/8" IIRC) over the barbed fittings, retained with a hose clamp.

As far as the steering load, it is very manageable at anything other than stopped. The steering is still pretty slow in terms of the ratio, but I find it to give a good "feel".

I am not runnig a wide-band O2 sensor. I am running an older Autometer AFR gauge, whihc gives more aof ageneral indication as opposed to a real AFR number. The leaded race gas "poisons" the o2 sensor over time , but you can clean it with a torch- or so I understand. That gauge has been very helpful in sorting out a lean stumble and misfire early in the tuning. If I had it to do over, I would have bought the wide-band unit, but I guess it is close to $400USD. However $400 is Cheaper than a burned piston, though... I will check out the site and your reccomendation- Thanks for posting that link!!

My biggest issue with the motor is the fule delivery system. The motor is running out of fuel volume at high demands (Wide Open Throttle) WOT for an extended pull of say 15 seconds or more will cause me to run lean. Fuel delivery is marginal, and I must fix that before going to the track. low fuel delivery is Very dangerous to the well-being of your motor.... Consequently, I am going with a larger regulator, and will re-assess the fuel pump since the original pump I installed went "belly up" last night (see the earler post by me.


The banjo bolts you used to convert the PS box to manual - are they a BMW part (doubt it)? Did you have to have them fabricated? Subjectively, at what speed does this stop feeling like arm wrestling and more like driving? On my 320i, it doesn't take more than barely moving. Thought I'd try this before hunting for a manual box.

Thanks for your compliments!

Doug B

Lastly, have you installed a wide band o2 meter to help set up the jetting. I changed over to a WMS ( www.wmswideband.com/ ) and it has been a huge help - very precise. No affiliation but definitely a recommendation.

Great car, thanks for sharing your ideas.

Doug C[/quote]
 

TrackRat

Member
Messages
34
Reaction score
26
Location
Mid-coast Maine and Connecticut
Hello Steve,
The radiator is from Speedway Motors in Nebraska. Cost is approx $150. See their on line catalog at:
www.speedwaymotors.com
It is an aluminum radiator with "Chevrolet" placement of the hose connections. That is to say when seen from the back of the radiator, the outlet is on the bottom right and the inlet is at the upper left. The radiator and cooling system seems to be a "home run" - I have run the car on the street so far without any overheating issues in 90+ degree heat. I was able to find a single upper hose at the local NAPA auto parts store for the top connection from outlet neck to the rad. I did have to cut and section this hose at the joint that is visible in the middle of the top hose- i used a piece of steel tubing wjith hose clamps as the joiner between the two cut sections.

The bottom hose was a combination of a BMW hose at the motor end, sectioned ito another NAPA hose with a steel pipe joiner and clamps- as used on the top hose. The Bottom right hose stub of the radiator was larger than the motor's water connection stub. Since the two bottom hose diameters were different, I used a "stepped" exhaust pipe joiner segment from the local pep boys store that worked with the different hose diameters. Simple and cheap.

Vraned, Thanks for the compliments. Yep, I'm an alum of Georgia Tech, Class of '80.. Go Jackets!

Doug B
 

TrackRat

Member
Messages
34
Reaction score
26
Location
Mid-coast Maine and Connecticut
Hello All,

I thought I would post an update as to the progress of my Hotrod Coupe. Since I last posted here, I sucesfully "dialed in" the three Webers by playing around with the idle jets and their air bleed holes. I ended up buying a set of number drills and sequentially enlarged the air bleeds a step at a time to get the optimum tune at part throttle openings. THe Idle jets are a bit misleading by name, since they really control the mixture from Idle on up to 3000-3500 RPM's or until the main fuel circuit takes over. The air bleed hole in each idle jet is the ONLY means by which you control the mixture setting in that range. Anyway, I learned a lot about Webers.. Before I took it to the track, it actually ran very cleanly and nicely from idle all the way up to WOT. I will still need to play with air correctors on the main jets, but it was pretty darn close. That took quite a bit of tweaking to get it right, but it has been very satisfying to get it running well.

I have run the car at both Lime Rock and Watkins Glen, but have had teething problems that centered around the stock head gasket and head bolts. The stock head bolts and stock gasket are not "up to the task" of the high compression motor, running at full chat for any significant length of time.

I managed to recognize bad things were happening to the motor while running on the back stretch at Watkins Glen. The temp shot up, and I could see water on the windshield from the catch can overflow just as i got through the top of the esses, and started down the back straight. I was able to quickly shut the motor down, even before the 220 degree F "idiot light" came on, which it did within a couple of seconds after shutting the motor down. I coasted the last 2/3 of the back straight, through the "busstop" and around the outer loop, while at the same time watching the temp gauge climb steadily. the temp rised finally slowed down as it approached 240 F, where it rather gently "pegged" the gauge. nuts. I rolled to a stop on the unused NASCAR short straight, near where the active long course re-joins that NASCAR straight and got towed in.

Fortunately, It wasn't a massive overheating . I avoided getting water in the oil and vice versa. however, I did get some water in the no 2 cylinder, but no damage to the bore of any consequence.- I removed the head and got it all cleaned up the next day. The head was not warped or cracked as I had feared, so I really dodged the bullet there- I had lots of time invested in the porting of the head and would have hated to see that work lost to a cracked head or a bad warp.... I took the head to my engine guy Bill Carlqust who checked it for cracks, confirmed that it was not warped and then milled it .003 to give a good clean surface for the new head gasket. I replaced the stock euro L block head gasket with a MLS - Multiple Laminated Steel gasket and ARP studs instead of the stock head bolts. Those parts were pretty expensive, totaling about 400 buckaroos, but it needed to be done. I just re-assembled the head to the block and torqued it to spec (80 Lbs Ft) last night and am beginning the re-assembly of all the other bits this weekend. I plan to have it back on the road this month and on the track for several planned track days at Lime Rock in early November.

I was just getting into figuring out the handling set-up of the car when the head gasket troubles began. However, My initial sense is that the car is set-up a little bit loose, so I will soften the rear ARB before going out again.

Regards, Doug B
 

79aggie

Active Member
Messages
60
Reaction score
3
Location
Dunn Loring (Washington D.C.)
Three webber set up

Doug,

I sent a message but you may not have gotten it.

Nice set up on your mock CSL.

Now that I've sorted out my Twin Cam Special I need to resurrect the coupe.

I'm interested in your webbber set up, where can I source the manifold
for this set up?

TIA

Victor Montes, Architect
 

TrackRat

Member
Messages
34
Reaction score
26
Location
Mid-coast Maine and Connecticut
Hi Victor,

I did get your PM and responded to it. Hopefully it is in your incoming messages. Incidently, Your message is what prompted me to write up last night's post. I will summarize what I sent to you in that PM below.

I used a Korman one-piece intake manifold, and have been very happy with it and the spanish Weber carbs that came with it. The advantage of the one-piece manifold is that all of the carbs remain together on the manifold. Consequently all of the linkage adjustments come away in one unit when you remove the manifold. Since I replaced the head gasket, that one-piece manifold has already paid off for me. the Earlier triple Weber set-ups would typically use three individual manifolds, so taking the carbs or manifolds off the cylinder head causes all of your throttle travel adjustments to "wander" a bit. Try Korman Automotive in North Carolina. I had to wait for them to make a run of the raw intake castings, but it was worth the wait.

I love the Lotus, especially with the "Twink" . A very cool car for sure. I went for a ride in one about 30 years ago, but needed a shoehorn to get in and out of the passenger seat then. I'd probably need ortopaedic work/leg shortening to actually drive one however...<grin>

Regards, Doug B
 

decoupe

(deceased)
Messages
1,333
Reaction score
16
Location
Alberta, Canada
"Manual" Power Steering

Hello Decoupe, Thanks for the question. I thought pretty carefully about how to set-up the brakes so that I could have those sidedraft Webers hang out unfettered by the big power-brake booster. I constructed a mount for and adjustable dual M/Cyl mount from aluminum plate and thick walled aluminum tubing. THis mount bolts to the 4 bolt flange on the end of the stock pedal box/ master cylinder mount. I found a Wilwood/tilton 60 degree master cylinder mount, but I had to cut and re-weld it to make it an opposite hand if you will. This picture below was taken before the motor went in. it shows the vertical flange of my fabricated mount bolted to the stock BMW mount at the left, with two big 1" square alumimum tubes coming off of this flange. the reveresed wilwood 60 degree mount with the twin M/C' are bolted through these two big square tubes, and then through to the fenderwell. I needed to brace the entire mount against the inner fenderwell in order to keep flex down and a firm pedal when I'm "standing" on the brakes. Pedal feel is good and it keeps the entire brake set up "low and away" from the carbs, venturi stacks and filters.


06206dualm-cyl.jpg


THis photo shows the Power-steering box and the brake mount flange. I used the stock power steering box because it had a quicker ratio than anything I could find. (15 to 1 or nearabouts If I recall correctly) I hooked up the banjo fittings that connect to the box to a gravity fed power steering fluid reservoir- jut to keep out moisture and keep the box lubricated with p/s fluid. I don't believe this is a mechanical "no-no" i.e. running a p/s box without a pressurized feed of fluid, but so far so good.

Oct28051.jpg


Regards, Doug B
'Rat


Found the post - Trackrat aka Doug B are you still around and can you give me a comparison to a 2002 as far as feel?

Doug C
 

coupe2800cs

Well-Known Member
Messages
162
Reaction score
15
Location
Oakland California
$150.00 Alu Radiator

I like the $150.00 Chevy circle track alu radiator, and the tandem braking with bias set up, I just love this car, very tastefully done, right down to the little shock tower bracing bracket, I think I am just going to remove the heater cowl area behind the engine, and make a box for the heater this will give the engine some more venting through the hood..
 
Last edited:

Trucopey

Active Member
Messages
50
Reaction score
0
Thanks dacoupe

That is a very neat setup he has there. I think I am going to try to duplicate this. Both brakes and steering. I will see if I can find tilton/wilwood parts. Thanks again.

Alex
 

TrackRat

Member
Messages
34
Reaction score
26
Location
Mid-coast Maine and Connecticut
Catching up

Hello All, Been a long time since I've been here on the forums. I saw there were some PM's and questions posted here. sorry to have dropped out of sight.

decoupe: Sorry I can't help with the steering feel issue- I've never driven a 2002! The feel of my coupe with the original PS box and no PS pump is pretty good. The steering ratio is still pretty slow though. I'd love to speed that up. Anyone know if there is a faster manual ratio steering box that will bolt in?

Doug B
 
Top