Interior & Upholstery project questions & progress updates

boonies

Well-Known Member
Site Donor $$
Messages
1,122
Reaction score
799
Location
US - Philadelphia suburbs
I think there is a thread somewhere where that bosch motor is still available but a couple things have to be changed on it to fit but doable
Thanks found the post.


Part is on the way, Bosch 0130007002 A/C Evaporator Motor, available on Amazon for about $65.
 
Last edited:

boonies

Well-Known Member
Site Donor $$
Messages
1,122
Reaction score
799
Location
US - Philadelphia suburbs
Removed the base of the dash today. The drivers side corner had been wet at some point in the past. When unbolting that dash hold down the nut and bolt were frozen and I ended up pulling the bolt through the mounting point.

About half of the screws holding the decorative dash back pieces were rusted in both corners, so I needed to remove with needle nose pliers (screws are straight wood screws).

The bottom of the dash on the drivers side was delaminated so I spent the afternoon starting some repairs.

76FC3447-B52E-4D05-B239-5820F3125079.jpeg
FB4A86D6-7278-400A-A193-E343A385F272.jpeg


I carefully peeled the vinyl back from the section to be repaired and cut the top and bottom sheets out of the way with a utility knife and then made some filler pieces using maple veneer. The veneer patches are glued and under pressure tonight and the three remainig layers of plywood were glued and clamped. If all goes well tomorrow I will plan on gluing the patches in place to stabilize the corner.

I do need to find a replacement for the nut that is supposed to be captured in the bottom of the dash. It is solidly frozen on the dash bolt and I have it soaking, but dont expect it will survive. If anyone has any suggestions or has one please let me know. The top picture is the middle hold-down and shows the nut captured in the wood dash, the photo below shows how the wood is blown out when the frozen nut pulled through the wood.

6BBEDF0F-0033-4492-A261-7FD7816A28EE.jpeg
ECBEEABD-2F6D-4D8D-A0AC-6B827CF3EE22.jpeg
 

bavbob

Well-Known Member
Site Donor
Messages
3,354
Reaction score
1,568
Location
Boston, Ma
Maybe I can find the dimensions but I used pine and a pine dowel and it all worked out fine. I shoud add that I started with a fresh dash piece from Maderna. I saved all my wood except for this which was like papyrus paper.
 

jmackro

Well-Known Member
Messages
2,452
Reaction score
721
Location
San Juan Capistrano, Ca.
Maybe I can find the dimensions but I used pine and a pine dowel and it all worked out fine. I shoud add that I started with a fresh dash piece from Maderna. I saved all my wood except for this which was like papyrus paper.

Madera Concepts makes and sells these mounts. See this webpage http://www.maderaconcepts.com/NewSite/VehiclePages/bmw_vehicles.html#BMW_2800_3_0 where you'll find the text: AND, we manufacture replacement Deck panel mounts, those pesky “T” shaped blocks of wood with a nut in them, that always seem to break to bits because the mounting bolt has rusted itself into the nut. (They are glued into recesses on the bottom of the deck panel)

I bought mine from Madera and they worked great. Yes, I could have made them, but I'm not much of a woodworker (guess you could call me a "checkbook woodworker").
 

boonies

Well-Known Member
Site Donor $$
Messages
1,122
Reaction score
799
Location
US - Philadelphia suburbs
Thanks to both, I reached out to Madera and will see what they say about availability. I am not in a huge rush, and depending upon their response may try to make one. I too am not much of a woodworker, and know just enough to be dangerous.
 

eriknetherlands

Moderator
Site Donor
Messages
2,697
Reaction score
1,929
Location
Netherlands, Eindhoven area
You can also simply epoxy a nut in place.
Lay the dash upside down. A light coat of epoxy, place the nut, fill up with epoxy. Go to bed. Wake up.

Then glue two short pieces of wood just next to the nut, making sure the thickness is compared to the broken or to the other still intact cilinders. This will provide a height reference, and give pressure when tightening the screw. There is no need to make it a nice cilinder as long as it fits in length and width and has the right thickness.
It's done.

Take breakfast somewhere in the middle of all this.
 
Last edited:

bavbob

Well-Known Member
Site Donor
Messages
3,354
Reaction score
1,568
Location
Boston, Ma
People say they are not much for wood working but guess what, you are, just take the time. If you don't want to take the time, that's different. It is just attention to detail and if you are on this forum, you have that already!
 

Honolulu

Well-Known Member
Messages
1,918
Reaction score
226
Location
Honolulu Hawaii
HBChris stated in post 38: "On Don's advice don't purchase a windshield from BMW they don't fit." Well shoot! If BMW's glass doesn't fit, whose does?

In the distant past, Carl Nelson commented that non-fitting windshields could be caused by body flex once the original was removed, even if the glass was "correct", but IIRC others have shown that aftermarket-sourced glass may actually have physical size differences. Out here in the middle of the pond, a replacement windshield from the dealer would seem to be the best bet, with least potential for trouble if it arrives damaged or is not correctly sized. But then, what are the gross height and width numbers for a windshield?
 

HB Chris

Well-Known Member
Site Donor $$
Messages
19,418
Reaction score
8,757
Location
Huntington Beach, CA
It has been posted several times that the Walloth glass does fit and apparently some aftermarket glass fits but Don has assured us that the current crop from BMW does not.
 

boonies

Well-Known Member
Site Donor $$
Messages
1,122
Reaction score
799
Location
US - Philadelphia suburbs
Windshield and gasket (and a few other bits) are on the way from Walloth, so will be ready when the interior is.

The blower motor showed up (Amazon purchase), but the seller didn’t package well and a port of the plastic armature support were broken, so back it goes and another one ordered.
CACDC86B-4F99-4CA3-BD0A-958974973AF6.jpeg


I have a couple of hairline cracks in the dash. Any good alternatives to sending out for restoration (I think the vendor others here have used is just dashes).
 

boonies

Well-Known Member
Site Donor $$
Messages
1,122
Reaction score
799
Location
US - Philadelphia suburbs
Making some progress, but it is always slower than expected.

Floors are done: Second Skin ceramic heat treatment and then application of Damplifier pro sound deadening pads across the entire space.

Dash area: The Dashboard base had some very small areas of light surface rust, that I cleaned with wire wheel back to clean metal and treated with Eastwood rust encapsulator.

Dashboard base: water damage was repaired with birch veneer and the hold-down nut was replaced with a standard nut captured in epoxy. A little risk with the latter as there is not much room for adjustment, and will require some washers for spacing to tighten.

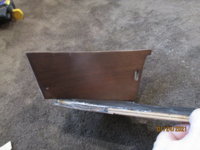
This weekend I attached the replacement dash wood to the base. Quite a lot of work extracting the old screws from the old wood. New dash from @bela22 was attached with brass #4 x 1” screws. This is quite an improvement from the slotted screws that were originally used to attach the dash wood.

Windows:
The W&N windshield arrived, very poorly packed (possibly a custom inspections thing), but the cardboard box was damaged in several spots and really didn't look much like it should have made it intact, but the window is in great shape. The edges were wrapped in duct tape and then covered with a continuous piece of foam and the box filled with minced cardboard packing...it worked! Now have a new windshield and gasket to go along with the other bits ordered.

Drivers side front window tracks cleaned, lubricated and the window transmission cleaned and filed with synthetic grease.

When I removed the drivers-side rear window I was surprised to find two of the snap rings had failed with the guides literally falling apart as I pulled it out of the hole. I did find the part that took a walk during the removal, but of course that happened after I purchased replacements on eBay.

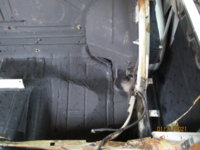
The factory sound deadening in the back-seat window bays was still intact, but not a solid tar based material as original, but was a light fiber material that was installed with what appeared to be contact cement. This may have been done when the car was apart in the 90's for extensive rust repair. I have seen evidence of the repairs which are all in good shape.

On both side panels I removed the old material, cleaned the panels with wax and grease remover and then treated any surface weld spots with rust encapsulator. The great news is that there were only a few areas of very light surface rust.

Very pleased that the rear wheel wells look to be in great shape as well.

At the last minute I realized that I had forgotten about the quarter panel drains that are in the window cavities and made a quick trip the the hardware store to grab some clear tubing that made for a quick replacement of the old rubber tubes that were degrading with surface cracks. I may revisit the replacement of the tubes as several on the forum have drilled through the wheel well to drain outside rather than through the rockers. Seems like a good plan, but I just didn't have the material to do it this weekend.

Getting ready to order the interior leather and carpet now, as it seems like I am on the right path, but still have some big projects to finish such as
Heater core case re-assembly (core was rodded and dipped, no leaks!) and the AC evaporator and expansion valve...and a lot more...


Dash base lamination repair.JPG
Lower dash complete new wood.JPG
Pass side dash with new wood 2.JPG
Floors with sound deadener 3.JPG
Floors with sound deadener 2.JPG
 

Attachments

  • IMG_0105.JPG
    IMG_0105.JPG
    313 KB · Views: 122
  • IMG_0127.JPG
    IMG_0127.JPG
    289.1 KB · Views: 121

BavarianCream

Well-Known Member
Site Donor $
Messages
167
Reaction score
135
Location
Park City UT
Thank you Lance, can't wait to see them and excited to watch the progression as it all comes back together.

Michael
 

Ohmess

I wanna DRIVE!
Site Donor $
Messages
4,833
Reaction score
2,639
Location
Aiken, SC
Just a comment - I made a point to do sound deadening up the panel behind the seat backs and on the wheel wells. Not sure where I got this info, but I think there is a lot of road noise transmitted throug the wheel wells, in particular.
 

boonies

Well-Known Member
Site Donor $$
Messages
1,122
Reaction score
799
Location
US - Philadelphia suburbs
Just a comment - I made a point to do sound deadening up the panel behind the seat backs and on the wheel wells. Not sure where I got this info, but I think there is a lot of road noise transmitted throug the wheel wells, in particular.
I think that makes sense too. I had to order some more sound deadening material (the stick on panels) for the window cavities and the back of seat area. I also have two other products, Luxury Liner Pro that is a second layer on the floor and mega zorbe that I will use between the door and the door panels and also behind the rear seat.

Between all that and some new rear window seals and window channel I might be able to hear that crappy little dash speaker;)
 
Last edited:
Top