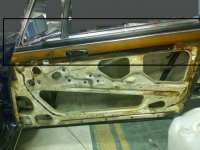
Lan-renewal of door trim, rubbers, clean and regrease of mechanisms,...

deQuincey

Quousque tandem...?
Site Donor
Messages
8,371
Reaction score
2,389
Location
BIO - 43°15'46.5"N 2°56'03.7"W
Thanks DeQuincey - well done and invaluable documentation.

2 questions...

(1) I believe I have the clips inserted correctly. They just slide over the metal at provided gaps in the felt backing strip? Then I suppose they create a friction fit against door top?

(2) The NLA rubber that's shown in my photo just below the chrome trim affixes to front edge of trim - guessing with some spray adhesive. But, what about the second one down? It's heavier/ stiffer rubber and I have replacement new rubber for it. Anyone know where that piece goes?

Thanks!

(1) yes

that rubber(2) goes inside the car, i mean closes the gap around the triangular window between the chromed frame and the inner upper trim, take a close look to it in my thread

sent you a pm
 

RTHLSS1

Well-Known Member
Site Donor $
Messages
467
Reaction score
337
Location
Slovenia
How do you remove this section with wood?
210220135034_zps614bb90b.jpg
 

JamesE30

Well-Known Member
Messages
345
Reaction score
413
Location
Germany
Just read through this post and wanted to say thanks for all the detailed pictures and info! A great resource for when I’m putting my car back together!

Last night i was actually working on cleaning some of these parts as well. Some of the old grease on these mechanisms was rock hard! I had to soak them and brake cleaner and eventually could chip the grease off with a wooden scraper.

I actually planned to replate these parts along with all the other door stuff. But the plater didn’t look too impressed with the state of them haha and asked if I could clean them a bit and take them apart..

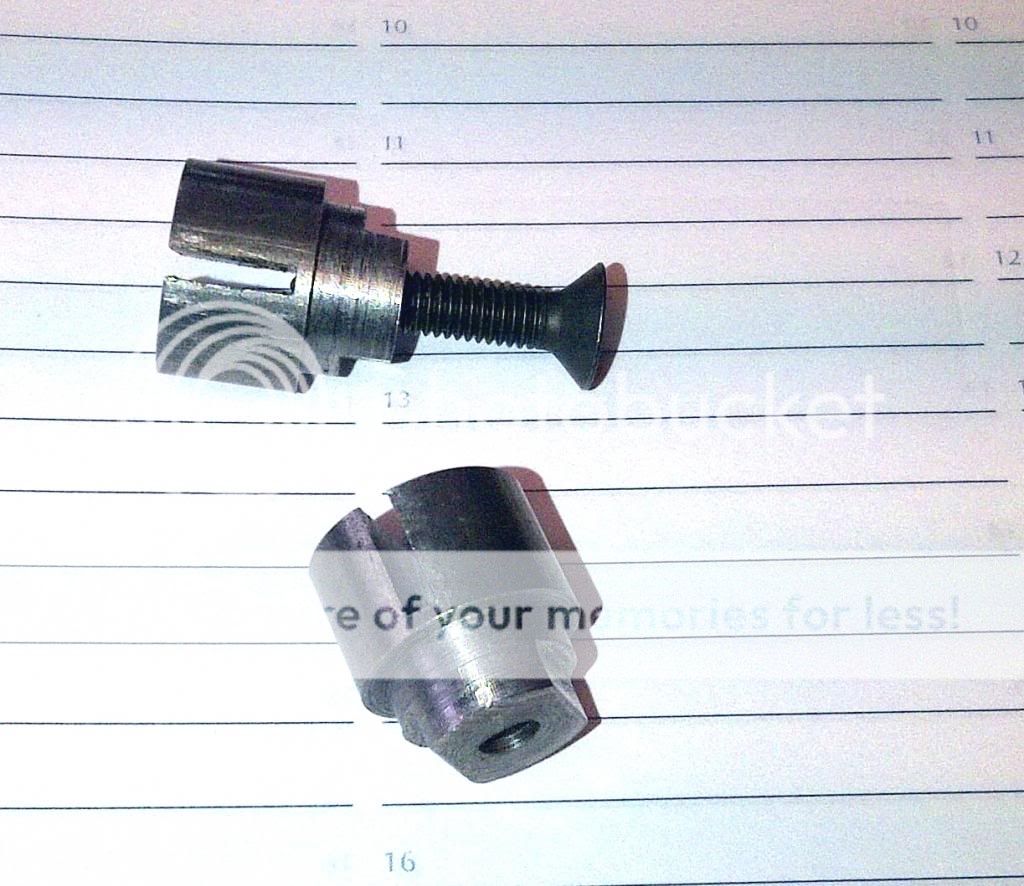
I see there is no way to remove the spring without fabricating a fixing point similar to yours. Anyone know if it’s ok to leave the spring on during replating?

23978D4B-F638-4038-AF21-E2BDD41AC1DC.jpeg
 

Wladek

Well-Known Member
Messages
1,305
Reaction score
792
Location
Gdansk, POLAND
I see there is no way to remove the spring without fabricating a fixing point similar to yours. Anyone know if it’s ok to leave the spring on during replating?

View attachment 55778
Spring can be disassembled easily without any damaging. Spring is slided in.
Now your mechanism is in closed position & spring have full tension on it, so you need to make mechanism in open position (tension will be much reduced) & you will be able to continue the work.
Then, pull the spring from the fastener (bent end) & then you just need to pry it from the bottom with big flat screwdriver.
Spring, during the plating process, when there is tension on it can break.
That type of springs better tolerate oxydation/blackaning process, than zinc plating.
 

deQuincey

Quousque tandem...?
Site Donor
Messages
8,371
Reaction score
2,389
Location
BIO - 43°15'46.5"N 2°56'03.7"W
Just read through this post and wanted to say thanks for all the detailed pictures and info! A great resource for when I’m putting my car back together!

Last night i was actually working on cleaning some of these parts as well. Some of the old grease on these mechanisms was rock hard! I had to soak them and brake cleaner and eventually could chip the grease off with a wooden scraper.

I actually planned to replate these parts along with all the other door stuff. But the plater didn’t look too impressed with the state of them haha and asked if I could clean them a bit and take them apart..

I see there is no way to remove the spring without fabricating a fixing point similar to yours. Anyone know if it’s ok to leave the spring on during replating?

View attachment 55778


@JamesE30
again you should call the person like this @deQuincey so he will notice your question
i do not think your mechanisms are in need of plating, those mechs can not be dissasembled, plating can be done though, but i would not recommend
you can remove the spring easily, just drive the mech to the end in which the spring is almost relased
 

JamesE30

Well-Known Member
Messages
345
Reaction score
413
Location
Germany
Spring can be disassembled easily without any damaging. Spring is slided in.
Now your mechanism is in closed position & spring have full tension on it, so you need to make mechanism in open position (tension will be much reduced) & you will be able to continue the work.
Then, pull the spring from the fastener (bent end) & then you just need to pry it from the bottom with big flat screwdriver.
Spring, during the plating process, when there is tension on it can break.
That type of springs better tolerate oxydation/blackaning process, than zinc plating.

Ooohh of course! Ok thanks for the tip!

@JamesE30
again you should call the person like this @deQuincey so he will notice your question
i do not think your mechanisms are in need of plating, those mechs can not be dissasembled, plating can be done though, but i would not recommend
you can remove the spring easily, just drive the mech to the end in which the spring is almost relased

I must admit I thought the same after cleaning them.. they actually look pretty good. But since I am having a whole bunch of stuff done anyway I thought I would also get these plated. Why would you not reccomend it?
 

Wladek

Well-Known Member
Messages
1,305
Reaction score
792
Location
Gdansk, POLAND
With zinc plating there is one major problem - person who is making it. Of course part should be also good prepared/cleaned/degreased/sometimes blasted etc.
If something will be done wrong in process you might have imperfections & then rust instead of zinc.
 

RTHLSS1

Well-Known Member
Site Donor $
Messages
467
Reaction score
337
Location
Slovenia
@deQuincey noted. I have removed that section.

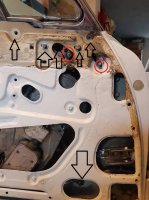
How do I remove vent window. I have removed all that is marked on photo but when I try to pull out window the 2 "spindles" marked red are preventing to put window out they. What is the trick?

Thanks

46743279_352718135527689_427860364240093184_n.jpg
 

deQuincey

Quousque tandem...?
Site Donor
Messages
8,371
Reaction score
2,389
Location
BIO - 43°15'46.5"N 2°56'03.7"W
@deQuincey noted. I have removed that section.

How do I remove vent window. I have removed all that is marked on photo but when I try to pull out window the 2 "spindles" marked red are preventing to put window out they. What is the trick?

Thanks

View attachment 55870

those spindles belong to the vent window mechanism, that mechanism must be removed from below, you must find a bolt that links the vent window with that mechanism. remove it, and let the vent window free from the mechanism, only this way you will be able to take out the whole vent window assembly
 

nico13

Active Member
Messages
74
Reaction score
6
Location
Lochem, The Netherlands
Hi deQuincey,
I am planning to restore my doors too, your post is a great help, but it seams that many photo's are missing or deleted.
Are the photo's still available?
Further the window liner in the triangel window, how is that kept in the slot. In my case it is moving with sliding the window up and down.

Regards,
Nico
 

deQuincey

Quousque tandem...?
Site Donor
Messages
8,371
Reaction score
2,389
Location
BIO - 43°15'46.5"N 2°56'03.7"W

Mark Jarman

Member
Messages
37
Reaction score
39
Location
Seattle, WA
assembly almost done, some facts and tips

the assembly of all the elements is not difficult, but there are two important aspects,

first of all is the need of a sequence, some elements can be assembled, others can be compromised and impossible to introduce once other parts are mounted

second, is the inherent difficulty of the adjustment of all the elements to provide a correct movement and fit of the window

my experience says, that for a completely dissasembled door, the sequence is :

first is the outer handle and its mechanism, then is the door lock mechanism, then the door lock itself, following this sequence it is straight forward, but one last issue, the final adjustment of the outer handle must be done at the end of this block of parts

(do not assembly now the inner handle mechanism, this IMHO is the last mech to be assembled in the whole door)

when this is finished, the next part is the triangular vent window, the complete frame, place it in its position , but do not tighten the nuts and bolts

then the window glass itself, but to introduce it you will have to remove the big support that move along the rear guide,

then introduce the rear guide, and with this part in position, introduce and fix the above mentioned support,

now introduce the vent window mechanism from under

before any window adjustment, introduce the window lift mechanism, the adjustment will be influenced by the whole system

in my experience, the adjustment is too complicate, not only you will have to compensate the paralelism of the guides, but the position of the mentioned big support within the window glass is also an aspect to be considered

it is also critical the position of the lower supports of the guides, these two points, one in the front and the other in the rear are the responsibles for the top of the window to move inwards or outwards

this adjustment is critical for a good closing of the front and rear windows one against the other, but is critical for the closure of the triangular and front window against the door top frame too

i am still preparing an alternative rubber part for the NLA one in the weatherstrip, so my experience finishes here, but i assume that now i will have to assembly the outer weatherstrip, then the inner one that carries the wood trim part too

then the door foil (this will not be done for some weeks while testing that all works correctly)

then the door panel, and then the arm support, the door handle, the window lifter handle, the ashtray

....und das ist alles !

deQuincey -

Your assembly order is very helpful. Do you recall and tips to installing the exterior chrome piece with the window sweep/weather-stripping?

I'm thinking you put the clips on the door first and then push the chrome piece down over the clips.

Thank you.

Mark
 

deQuincey

Quousque tandem...?
Site Donor
Messages
8,371
Reaction score
2,389
Location
BIO - 43°15'46.5"N 2°56'03.7"W
deQuincey -

Your assembly order is very helpful. Do you recall and tips to installing the exterior chrome piece with the window sweep/weather-stripping?

I'm thinking you put the clips on the door first and then push the chrome piece down over the clips.

Thank you.

Mark


mark,

i do not remember, but in principle the clips usually go first in the piece that you want to assembly and then you put everything to the door

please post your pics and we will try to remember from there
 

eriknetherlands

Moderator
Site Donor
Messages
2,699
Reaction score
1,930
Location
Netherlands, Eindhoven area
mark,

i do not remember, but in principle the clips usually go first in the piece that you want to assembly and then you put everything to the door

please post your pics and we will try to remember from there
Mark, i indeed followed the order that DQ posted above. (clips inside trim, then the trim on the door). I also put a generous dab of grease on the clips where the sharp teeth bite into the paint. I hope that this way any future rust is kept 'sleeping'.
 

Midwestbike

Member
Site Donor
Messages
43
Reaction score
52
Location
Nashville, IN
sorry thread is 9 years old,
all covered in dust
apologies
I know the thread is old and was hopeful it would still be around. What I don’t understand is why we can’t buy that spring holder/pin as a separate unit. It has to be in production somewhere because 2002 window regulators are still available and Mercedes Benz has regulators and the holder/pin is similar if not the same. Well time to keep looking…

Thank you for the quick reply
 
Top