Mr. Johnson's 1970 2800 CS - Update 09/05/2024

After pulling the fuel tank, I’ve kept up the progress. The tank is at the radiator shop so hopefully it turns out ok. I haven’t yet ordered a sender as I was debating asking for a used one but I should just order a new one.

I moved back under the hood to the excitement of cleaning. I had previously tried to remove the cover over the heater but found one of the screws for the rear of the cover had the Philips head stripped out enough to prevent using a screwdriver. I used a small vise-grip pliers and was successful. Not sure what I expected but eww. BB6E06B2-5FF6-4AE1-8B7E-B3D6FCF344A0.jpeg
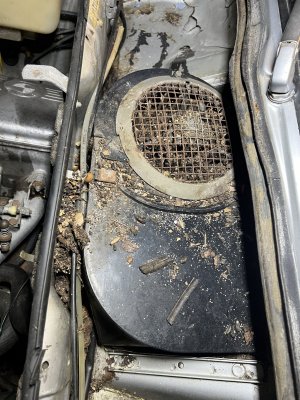
Naturally, this was concerning but I was hopeful that there wouldn’t be any rodents inside the heater box, given the design, but to find out, I had to remove the fan. First, though, I had to vacuum up all this stuff.

So instead, I decided to remove the “trim panel” under the nose. That went without too much issue and I think it could possibly be saved but I don’t know if that’s worth it. I guess I didn’t take a photo of that. Only have so much room for rodent crap on my phone!

After I removed that I decided to take the front bumper off. It went pretty smoothly and it doesn’t look like it’s ever been off the car from the look of the brackets or the fasteners.

13BF84B7-8BF8-4D9B-94B9-30D99F6B5EBE.jpeg


Removing the bumper was mostly to help clean up the nose better and also to give me a chance to do something that will keep me motivated (not that I’m not motivated).

To me, it looks like most all of the brightwork on the car is in really nice condition but the chrome has these freckles on it. Not deep pits or corrosion by any means so I thought I’d start cleaning it up with the front bumper and to get a good idea of how it would go, I started with the bottom.

39B52366-9A96-45B9-836C-81FF41E08D45.jpeg

After a bit of time, this was the result:
E02E2800-DD52-4669-B263-31537AF0976C.jpeg


I did the whole bottom and then moved to the top:

8A4596AB-F7E6-458E-B68A-B1AF6504765E.jpeg
A70DF2ED-D5B7-4087-8A77-8AAE89E228D3.jpeg
2AB54127-7FE0-4BC2-A4D9-88CA4F24D8E9.jpeg

It cleaned up pretty nicely and while it doesn’t look brand new, it fits the car. I put it aside in my “reception area” so it’s safe and out of the way while I work on the rest of the car once it’s here at the shop.

Back at my house, I finally had the shop vac and vacuumed up more stuff at the base of the nose. I carefully removed the headlight covers to assist with this plus they and their hardware need to be cleaned up anyway. I also removed the heater blower motor and vacuumed the small amount of junk that likely fell out of the fan during removal.

D0FD6927-968C-4905-BE49-FAB3D4AFE11A.jpeg


AC1B689A-09D5-4DB1-AE00-CF63A23F3F6C.jpeg


The flap was closed and I felt like I won the lottery on that one. I used an endoscope to look around the partition in the box. I don’t want to open the flap until I clean and sanitize this part of the box.

Also note that a couple of wires were chewed up (green and brown). They go through the small grommet above the valve cover. The other pair of wires (also green and brown) go to the washer pump I believe. Shouldn’t be hard to fix.

I then set my sights on the hood insulation. There are areas that had been chewed upon. Fortunately it wasn’t original, but also had a couple extra pieces added. It was quite a bit of work, but I worked at it methodically and while my fingers are quite sore this evening, I was quite satisfied with the outcome.

9F4B646D-F944-4CE8-8F94-A3D51E923078.jpeg


That’s where it’s at now. Will probably spend more time cleaning under the hood tomorrow and then tow it to the shop so I can get to work on more mechanical stuff.
 
You are making great progress Chris. Looks like the PO replaced the hood torsion bar, excellent! Does the air cleaner touch the firewall?
 
You are making great progress Chris. Looks like the PO replaced the hood torsion bar, excellent! Does the air cleaner touch the firewall?
Thanks! Feels nice to finally get into it even if it has mostly been dealing with feces and bad fuel. The air cleaner wasn’t installed when the car showed up and apparently I didn’t get the complete one as the lid is missing, but it appears new holes were drilled to alleviate the misalignment. I got a complete unit with the engine I picked up and it had the same modification. The ‘73 I worked on had different adapters for its Webers that centered the stud so it didn’t have that issue.
 
Yes, another update but this one is free of feces. We had a “warm,” sunny day today so I used the opportunity to do something that I think needed to be done but at the same time is a bit risky. With so much rodent activity and the results of said activity, I’m unaware of really any other way to rid the vehicle of the after effects than using the pressure washer.

To prepare for this, I put a bunch of effort into isolating the rest of the car from the affected areas. I covered all of the surviving labels with painters tape, I covered the aluminum belt line trim with tape and also as much of the exterior paint as possible with both tape and plastic sheeting. I’m very careful with the nozzle but one mistake and it’s too late, so best to do my best to avoid it.

I think it’s much improved and things dried out much more quickly than I anticipated so I could breathe a sigh of relief. At least I think that’s what it was. Either way, I think if you look back to previous photos of inside the nose, you’ll agree.

96D614D3-6005-462E-9910-F654593C5CA2.jpeg

45529C31-7D7A-4368-BC3C-307C4E0F5618.jpeg
4A11C474-46BA-48FB-BCB0-9AF17B84ABCF.jpeg
12D7EB69-DE51-49C7-B80F-AB5CF483BD4F.jpeg
13BE4592-1D51-4D12-9FD2-0D036306E13B.jpeg


I didn’t have much hope for the heater blower but I had to rid it of all of the detritus it accumulated (and thankfully didn’t transmit throughout the car). Once I emptied it out, I decided to hit it with the pressure washer as well, then cleaned the motor itself out with brake cleaner and electronics cleaner and then hosed it down with Deox-It. I think it cleaned up pretty nicely and it spins smoothly which was a real surprise. Going to let it sit a while longer before testing it but I’m still surprised how it turned out, especially given the “before” photo.

00F70B07-12B2-4718-B422-B7D7D38B1880.jpeg


So at this point, I’m ready to move the car and get started removing the drivetrain. I made arrangements to tow it over in the morning but then I had to postpone because I had to put brakes on my mom’s car and needed the lift.

Stay tuned for more updates (I know, what a shock).
 
Nice job!

For the front noose I might suggest Rust911... It is non toxic and once sprayed it will eat all the rust without rubbing or sanding.

One example of usage:

I would avoid any sanding of that car and acids are too risky to be used. So Rust911 could be a nice option to consider is some places.
Later on to cover (isolate) the bare metal after treatment and you can pait it being sure there is no rust even in between the point welds as long as the solution was reacting for some time.
 
Nice job on the clean up. The acids from rodent excrement look like they didn’t do too much damage! Bumper tuned out really nice dude!. I hope that blower motor works, it was really worth a shot with the power washer.
 
Thank you and thanks for the suggestions. I feared the worst with the effects of the acids and the amount of time it had accumulated so while it’s not attractive, I feel much better about it. I have a large quantity of evaporust I was considering using say soaked in a rag to keep it on the surface but I’ll investigate the Rust911. Great call on the blower motor. I had looked it up and had only seen the whole assembly for considerably more. Thank you.

Is there an update today? You bet there is!


I was able to get the car towed over to the shop from my house and got it on the lift. Pretty exciting.

07B5AE42-D669-4A94-952E-C4B3B2DF5D22.jpeg

4FB74C7E-F6C9-4990-AFA7-09F5573EC71C.jpeg


This was exciting because this will help make more progress on the car but I also haven’t been underneath it. I naturally looked under it just kneeling down, but I didn’t get the opportunity to inspect the body so I didn’t know if there was something lurking. Here’s a handful of photos under the car:

51AF95EA-E2DA-4303-83F7-D339A65033A2.jpeg

CAE5CD76-5D67-4E50-B1D2-7CF3552344D4.jpeg
2F894F2E-7C2A-4549-9381-AED3F17CA4BD.jpeg
B496F913-0637-428C-AD7A-2052C41C4A5E.jpeg
46E92593-8F69-4930-BCBE-2A2C47FAEC7D.jpeg
0D10F242-C8FF-4B8B-BB78-DE5B21F24CB4.jpeg
4F5A9197-832E-4431-9230-140CBC01C139.jpeg
4AEB5ECD-CF7E-4224-A836-B48EDA6D871A.jpeg
0830A147-9628-4FC7-876A-788466F98D81.jpeg
14C9B7BF-18F3-4461-A4B5-B19D56B10C2E.jpeg
86E412B9-1E28-47F1-8BDE-35C3BB481256.jpeg
47FD992A-E1C6-4D9E-A931-DBCB97A79EE5.jpeg
AEC66257-CB52-43B4-9BF4-8906B3067488.jpeg


I have to say I was pretty pleased. Amazed I ended up with this car. Excited to keep moving.

So next, I decided to get cracking on removing the drivetrain and that all starts with the exhaust.

I removed some bolts and then this fell out:

5284BA51-91DE-46D9-BCE3-F87B704C67AF.jpeg


It’s just me so this worked pretty well. Everything came apart easily and that was nice. I removed the downpipes and while I was concerned the fasteners would cooperate after all this time, everything came apart cleanly. Driveshaft came after that. It looks like the original 4-speed shaft modified for the 5-speed. Staked U-joints but they move freely and smoothly so I’ll throw another center support bearing on it and use it again. I didn’t take a photo of it, but it’s a driveshaft. Guibo still looks nice but that likely won’t last!

I decided to call it there as it was getting “late” but had enough time to pull the wheels off and check things out. I was surprised to see all of the ball joint boots were in great shape and there wasn’t any play in the steering linkage. The bushings need replacement so that will happen.

I was surprised at how light the stock wheels are. I pulled the drums off in the back and yep, they’re drum brakes. Wheel cylinders aren’t leaking but they might not have any fluid. The brake hoses are braided stainless but I’m sure they’re well past their service life, so I’ll replace them.

One thing I happened to catch was a metallic sheen off of the rear springs and that made me curious. I sprayed some degreaser on a rag and found that the springs appear to be plated, both front and rear. It doesn’t appear to be paint. The front springs are also loose with the suspension at full droop, so I have no idea what’s going on. Any chance anyone recognizes them?

421FC4AB-B962-488D-98F2-90191653B2BB.jpeg

7C8279BD-6368-4DD7-B6C0-3F50EB077194.jpeg


Next up, I’ll work on getting the front subframe ready to drop out. I guess that means further updates are coming.
 
Last edited:
Thanks for pictures. They are extremely valuable for us - having ugly, rusty or - for many cases - improperly repaired E9 ... There is always "not enough" such a pictures! WE are hungry for more!

There is a topic about the colors on the coils. Maybe you can add your part to it?

One thing is bothering me looking on the pictures - the two hitch ears:
1672995538302.png


1672998144133.png


This also looks to be bent but maybe it is an original shape ... I have no idea.
1672995606977.png


There is still a mystery for me that BMW was adding a squares after the front wheels. There are even in my E30 but for sure they are not for towing the car. Might it be used on assembly line or paint shop during car manufacturing or transportation? Does anybody know?
1672995747916.png


I can only dream about such a perfect underbody of BMW. Your car is really amazing and this is just about to clean and secure it.

Are you going to remove the sill covers? Most of E9ers are interested what's behind. First look on the cover's opening looks very good.

Do you have a plan for the renewal of the underbody? Are you going to treat it with frozen carbon dioxide to remove all dirt, grease and surface rust without using a water or chemistry which could come into the profiles?


Excellent condition! Thanks for sharing the pictures!
 
Last edited:
Thanks for pictures. They are extremely valuable for us - having ugly, rusty or - for many cases - improperly repaired E9 ... There is always "not enough" such a pictures! WE are hungry for more!

There is a topic about the colors on the coils. Maybe you can add your part to it?

One thing is bothering me looking on the pictures - the two hitch ears:
View attachment 154513

View attachment 154522

This also looks to be bent but maybe it is an original shape ... I have no idea.
View attachment 154514

There is still a mystery for me that BMW was adding a squares after the front wheels. There are even in my E30 but for sure they are not for towing the car. Might it be used on assembly line or paint shop during car manufacturing or transportation? Does anybody know?
View attachment 154515

I can only dream about such a perfect underbody of BMW. Your car is really amazing and this is just about to clean and secure it.

Are you going to remove the sill covers? Most of E9ers are interested what's behind. First look on the cover's opening looks very good.

Do you have a plan for the renewal of the underbody? Are you going to treat it with frozen carbon dioxide to remove all dirt, grease and surface rust without using a water or chemistry which could come into the profiles?


Excellent condition! Thanks for sharing the pictures!
Thanks! I’ll be taking a lot more photos. Can’t have too many.

The tow hooks are a mystery. They both look cleanly bent backward even on both sides. Wonder why they’re like that. It does appear that one piece by the driver floor is bent. It’s not severe so it could probably be bent back easily. The squares (at least on the later cars) were used to move the car down the assembly line. Big source of rust problems on E12s, 28s, 24s, etc. They shouldn’t be used for lifting the car.

As for cleaning the underside, I’m still working on an idea for that. I would love to find someone locally that can do what Dr. Detail does in Costa Mesa, CA. One thing I’ve learned is that the dry-ice cleaning is bad for the schutz as the pressure necessary to actually clean it can damage it. Of course, once I figure it out, I’ll share.
 
Thursday, I removed the exhaust and driveshaft, as I shared before. Friday, I spent more time under the car getting things prepared. I drained the oil, It smelled pretty foul, and some clumps of who knows what came out so I am glad I am not wasting any time on this engine.

I also put some effort in to seeing if the front caliper pistons were seized as the car was somewhat difficult to roll and I noticed some resistance on the front rotors. All 8 of them moved without too much issue and the fluid I removed from the calipers during the process really wasn’t that bad, so the brakes might even be functional.

I brought the vacuum over today and vacuumed up all the cobwebs, leaves, etc. I sucked out the ATF from the power steering canister, removed it from the firewall, unhooked the heater hoses, removed the brake booster hose and the huge amount of wiring that is connected to the engine. The only real concern I had was the steering u-joint but I did get the splines moving freely. Lift the car, remove the slave cylinder, speedo cable and the rear shifter mount.

I had a couple ideas for lowering the subframe out of the car but ended up copying what OCCoupe did when he put his car together in 2016. It worked well. Being able to make fine adjustments to get the steering shaft separated from the joint and also allow the distributor to clear the frame rail was helpful. Of course on install of the replacement engine, the distributor won’t be installed.

So here’s some photos of how that went.

0F24C495-2B93-448E-80DD-C64931D8ECFE.jpeg
D80A44E3-6411-4DF6-9634-1748F547AEBD.jpeg
0995880F-B2F8-4DB7-996B-D2CCBC00337A.jpeg
7722E939-30A5-4012-AFFF-DF36F732E745.jpeg
6C502344-B863-40EB-993C-DA9367BA2EDC.jpeg
0467B893-444D-4898-8319-7B68662F9C86.jpeg
0D95E066-AEB8-484A-B206-496DBD99F362.jpeg


So that’s where we are at now. Of course now that I’ve made the car immobile and have taken up my lift, I have to figure out the plan from here. I’m leaning towards cleaning everything up and just getting it running with the replacement engine and it doing anything crazy. At least right now.

Guess we will see how tomorrow goes!
 
Incredible work! I can see you are an OCCoupe acolyte. Going "full Burger" on this car is the right thing to do.
Looks as though the PO used some sort of rust inhibitor spray in the wheel wells. They are usually the color of the body.
Keep up the great work!
 
Thank you Stan. Happy to finally dig into the car. I wasn’t quite expecting to end up where I’m at now, at least at this point in the project. Of course during this time to trying to figure out what direction to go now that I’ve got the car on the lift and it’s immobile, I’ve been doing lots of cleaning and of course that leads to discovering things and then time trying to process what I’m finding.

First, I discovered that I was originally incorrect about the subframe color. I was confident it was black. While I was cleaning off the rear springs to attempt to identify them I decided to try a bit of the trailing arm that looked like it might clean up well.

AB2A1A8C-2177-4B26-A1B6-61DE526D9F5B.jpeg


Wow this is exciting. I wasn’t upset to think the car had black but I was disappointed to not have the grey. I was amazed at how nicely it cleaned up. Then I thought that is weird the front is black but the back is grey. Turns out, again totally wrong.

06426B62-BC2D-435D-AF83-B5341BFFCAF9.jpeg


I cleaned off this part of the subframe and questioned the black paint there but was so happy to see the grey, I didn’t think anything more of it.

I know that the knowledge base says the wheel wells are body color. There was such an accumulation of grease and dirt, I wasn’t surprised by how dark they looked. I was looking forward to the transformation back to the bright, clean-looking wheel wells. Then I saw this run of black on the bottom right frame rail.

F52758AC-00DF-440B-AED8-E648F40EFDFD.jpeg


I tried cleaning it off but soon realized it’s paint. I was a little disappointed to see that but as I continued to clean (I would put money on this car not having ever really been cleaned underneath), I uncovered lots and lots of black paint. It’s not undercoating, it’s paint and the more I scrubbed to remove dirt, in many areas it is wearing thin. This puzzled me. Also, I notice that under the black paint is not a silver but more a light dusting of silver over the beige schutz. It was obvious that no one had removed the front bumper before I did and the paint is black behind the bracket and inside the recesses for the carriage bolts.

792D0EED-91E2-4434-B2A4-5E3FFA2E11CD.jpeg


The left side has more things attached and I think makes an even better case that the black paint was applied before anything was attached to the car on that side.

BB73519F-E05B-4A69-B983-35EC5E484BF1.jpeg
2F6CBEA4-1F18-4846-937F-2DE254EB07D2.jpeg
3AA24814-8B0D-44DA-A34A-EA21314D637D.jpeg


So while I think there’s disagreement that this is original, I’ve seen enough evidence along with the context that this is a car with original paint, not wrecked and no real evidence of regular undercarriage cleaning that I’m going to maintain what’s left of the black paint. I still have some cleaning to do in crevices but it has come up surprisingly well given the accumulation of crud.

Meanwhile, I also worked on the transmission tunnel and was very pleased with how it came up.

8E8687C9-671F-4CD2-B113-F96900041039.jpeg
A6B8C09C-D2AB-4F11-961A-E3743EA40DF7.jpeg


I’ll eventually work my way further back but I was curious how this would clean up and was not disappointed. The floor is going similarly.

Initial plan for the engine was to simply pull the old one off the subframe, give it a good clean and put the replacement on and put it back in the car. That has changed since I really need to attend to the left inner fender and the paint that’s been removed from years of fluids and battery acid. On top of that, I have to address the issues in the nose at the same time. I have formulated a plan for that and am working on getting things together for it.

6EF56E38-B7C2-4999-9071-241C0D704A80.jpeg


The left side of the subframe has a similar fate, including the steering box, power steering pump, etc so that seems to have expanded the scope yet again. I don’t have much choice but to refinish the subframe, and that then means I’ll be replacing all of the still serviceable control arms and steering linkage because it’s all ugly as well.

7E9C62C6-F139-4BFF-9AC0-2215D7191690.jpeg


Since dropping the subframe, it’s been sitting in front of the car with the motor on it while I make a huge mess cleaning the front of the body up. This evening, I finally pulled the motor off of the subframe. I don’t really have anywhere to put it just yet, so it’s resting on the ground but still supported by the hoist. This allowed me to finally clean up the subframe, the struts and the transmission. There was a bit of trial and error on getting a thorough job since it was dark out, but the parts came up pretty well.

6C10E038-E99A-40C7-837C-0D74ADBAD409.jpeg
9D445158-A6B8-4AE0-833F-46298EAE27C7.jpeg
626A6590-881A-409F-B8C1-313826DFD27F.jpeg


I guess I’ll be disassembling the subframe tomorrow and see about getting it and the related parts refinished. I hate to do the strut tubes since they’re in such nice shape and original to boot. I might wait with those. I think the subframe itself is more of a concern, along with the steering arms and tension struts (it looks like they all get the same color).

Two very heavy and expensive packages are on the way from Walloth and Nesch. I, of course, have forgotten to order a few other items (or foolishly assumed I either already had them or I could easily acquire from another source) so I guess another order is going to have to be placed.

That’s all for now.
 

Attachments

  • 49BF9966-6566-422D-9430-75D756EF3FBF.jpeg
    49BF9966-6566-422D-9430-75D756EF3FBF.jpeg
    219.1 KB · Views: 105
  • 0D892A69-80B1-4D92-A2B9-FB49A671CAEB.jpeg
    0D892A69-80B1-4D92-A2B9-FB49A671CAEB.jpeg
    566 KB · Views: 117
I wish anyone's E9 to have such a nice wheels wells! Amazing. For most E9 even additional body protection chemistry haven't had helped.

What kind of chemistry and method you have used for cleaning the underside? Which is the most efficient as typically it has to be time consuming.
 
Despite a lack of updates to the thread, I have been busy.

I took the subframe apart and took it and the related parts to be powder-coated.
687A8CEC-7D2D-4416-B78A-866CFCBEA6BD.jpeg

Because the shop has a minimum charge per color I added a bunch more black parts to the mix.

I was used to receiving packages very quickly from Walloth and Nesch but apparently UPS has a different mission these days so it took over a week before the boxes even began the export process.

While they worked on that, I started cleaning up under the hood. Scope creep. So much for just throwing a motor in and hopefully having a running car.

2B0CB9DD-D673-4DFC-BA37-F74F6DA2F31B.jpeg


638354A8-7816-43EE-8D83-D952D25D9265.jpeg


I also focused on cleaning up the inside of the nose.
F01E2F08-4047-4406-9CCB-BD53D5E3F454.jpeg

I did a considerable amount of sanding and also used some evaporust, which isn’t as easy as you’d think it would be.
EEED7F79-15D1-4644-9CCE-467451248D37.jpeg


I ended up using silver POR-15 in the nose. I bought a kit which contained their degreaser as well as their metal prep product so as to ensure this would actually work, even on the clean metal. Access is so tough in some of the crevices, I decided this was really the best path forward. It turned out pretty well.
DD886ECE-EBDD-4555-AE68-9D6E56459B52.jpeg

9FA24A7A-C2B7-4FE9-8236-8FFD48FCE9A7.jpeg
D1D3CF49-0CDC-4B9C-95F5-0AF20B296D07.jpeg


I continued to sand the engine compartment (120 where the rust is, then 220, then 320) then epoxy primed it. I decided that I had to paint the core support just because of the area around the battery. I could have blended in front of the radiator but decided I may as well paint the whole thing but leave the right inner fender. I had paint mixed up.

2733B634-A233-4FE1-9D3C-9E7F25A443DE.jpeg


I also had to do something about the top of the valance where there was some bubbling paint likely from urine or something. I first soaked some rags in evaporust and wasn’t thrilled with that.

0F58926D-D66E-436D-B8C9-0A1BBC093FE2.jpeg


120, 220, 320 on the DA and then epoxy primed.
DD8BAA73-824F-4E30-9E98-C4DC2F64F239.jpeg
466F58DD-D090-4657-B5B4-6DCEF3543AA5.jpeg


While the primer cured, I decided to pull a few things off the engine I removed from the car.

191A425D-791B-4335-BC5B-603646D49493.jpeg


I took a few more bolts off and then I had this.

6324B3AF-549C-4912-B065-3FB77450ECBE.jpeg


I also found out that despite paying import duties immediately that UPS took that info and then decided they don’t know when I’ll receive my packages and then sent them so Shenzen, China. Neat.

I picked up the powder-coating. There were a couple mistakes in masking the shop had to fix on the steering knuckles so I left those parts behind. Then I realized I had selected the wrong grey, so this was excellent discovery. Made me really feel great about my progress.
4FC17E5D-EE3D-4EB9-BF7B-FF30C9C09B90.jpeg

Here’s a shot of the tension strut washer against the original trailing arm.
4AF93B55-9AD8-4BC8-934D-C2B2596ED465.jpeg


Yay.

Hey but great news, two boxes from Walloth and Nesch showed up. One of the boxes from the original order and the other order placed over a week later. It didn’t go to China. The other box from the first order is a few days away still.

D3B054F3-4E82-4515-B1EA-B9932219F56A.jpeg


Oh.
D62BBFFC-2130-4287-8482-C6D79B3CEDE0.jpeg


I opened the boxes at the shop and everything was accounted for despite the hole but it wasn’t without casualties.

E880DCD1-E113-4AA2-899F-219125512EF1.jpeg
343C4161-8D19-4A00-A311-5CB71CCE3AE7.jpeg

I’m not sure I’d have put this box adjacent to brake drums and then give that package to UPS.

After trying to decide what to do about the incorrect grey, I fell on my sword and said hey I screwed up and requested the wrong color. I’ll pay again to redo them. So I took them back to the shop and they can fix their mistake with the steering knuckles on my dime.

I sanded the epoxy primer 320, 400, 600 and finally shot the color on the valance.

8B60FC24-2FAF-44BC-B65E-FDEFB2BC440D.jpeg
693185C9-37D2-4D41-8FDA-AE269A07FD27.jpeg
CD7EFFCB-0225-4E41-B938-E1F5D5B60E34.jpeg

I let it sit overnight due to the temps and cleared it the next day.

766F6E6D-5877-4E92-80F0-80B4726C857B.jpeg
B5A14468-527C-47F1-BC8E-1034B731B2F6.jpeg
89340421-88CB-47FE-8F06-ED98FDFE8D60.jpeg


It came out pretty well so I am happy with that. More great news, my second box from the first Walloth and Nesch order showed up! Nice.

4795AD15-659C-45CB-A369-5E9BC397ADF3.jpeg
08A62E61-6348-4FF3-ACDE-E583FE7C4958.jpeg

Oh.

1B15E784-C766-4CD5-96FD-8A7BC16199B5.jpeg


In the box were new front calipers, new front rotors and one control arm. Somewhere between Germany, China, Alaska, Kentucky, then here, one fell out of the box.

Fortunately I wasted no time documenting this stuff and sent everything to Walloth and Nesch both times and have two replacement shipments on the way.

Next, I shot the color under the hood. I felt it was a bit dark. But I let that sit for a couple hours then shot the clear anyway as I felt the base was dark then it lightened up on the valance with the clear.

137DB01C-AF78-41BA-83AD-10BE2798960D.jpeg
27C7D0FA-5271-4D22-9036-9A2E7D5CE1AC.jpeg

CB4F3E85-6261-4F3F-A11C-7846FD83C579.jpeg


Sigh. So while the application looks pretty okay, it now looks like I took my original paint car and made it look like it’s been in an accident (salvage titles increase values on BaT). It might not have been so bad if I had painted the right inner fender but I left it alone because I didn’t expect it would be so far off and also I didn’t want to have to work around the AC stickers, plus it was already in pretty decent shape considering. Not a restoration, I keep saying.

I spent some time disappointed with the outcome and with how this relatively simple project has exploded and I’m going to have to get this car off the lift because I have paying customers that need my attention and obviously very little is going my way.

I decided that I can’t live with the paint the way it is as it upsets me. The valance is okay but under the hood just can’t hack it. So I set out to go with a different source. I talked to a PPG dealer and he looked at the headlamp cover and said they don’t offer a metallic that is small enough. He had just gotten in some of their latest extra fine metallic for the concept line and it was much larger than the original. Basically metallic size is key to Polaris looking right. I appreciated his honesty in saying he couldn’t match it. I went to another store near my shop that does offer Glasurit and Spies but they only mix Naison or ChromaBase on site. He couldn’t do it either. On top of that he couldn’t put the paint in an aerosol can.

On my way back to the shop so assess how crazy I actually am, I remembered this one store called Old School Paint Company and I stopped in there. They carry Valspar lines and their high-end line is Debeer. They showed the code 060 as Polaris Neu. They wouldn’t mix it while I was there but said hey come back in the morning and it will be ready. They also carried the SprayMax 2K Glamour Clear since I was going to need that too. Couple hundred bucks for a couple spray cans from a half-pint of paint but what the hell. I left the headlight panel with them.

I rebuilt the clutch master cylinder with an Ate kit from Walloth and Nesch. Fortunately the bore was really nice and it cleaned up well.

This morning I collected my new paint and I could already tell there was going to be an improvement.
76CAA7D8-49A7-4217-8288-60310FE02D32.jpeg

Obviously metallic size is key. There’s a smudge of the new base on the cover over the original nearly 53-year-old paint. I had a discussion with the guy there about my project and he told me that the problem with some of the lower end brands like Limco (I only had two options for aerosol at the previous store, Limco or Matrix which doesn’t match BMW or Porsche metallics at all) is they only have 4 metallic sizes and a limited amount of toners. This Debeer line is much more prolific. I felt more positive leaving the shop.

I sanded down the previous paint job. 400 grit in some areas and then 600 on the whole thing.

After just shooting the base I was pretty excited.
15BC9BA2-E600-4277-8EEA-AFBE62AE4F76.jpeg

851B7A7D-B030-46D2-B038-D5E465DCB32E.jpeg


I also decided to do the right inner fender as well and found a spot to blend where I wouldn’t encroach on the AC decals. I also cut the masking out over the strut towers and sanded and primed that area before base coat. I took a break and gave it a couple hours before clearing.

After some carne asada tacos, here’s the result:

773A06E7-33D0-436C-A83E-F89B54B62499.jpeg


B99C043E-BFDB-43FC-8699-F5D616E82FDA.jpeg


I feel a lot better about how that came out. Now it’s onto something else. Keep going back and forth and how much cosmetic stuff I want to do on the engine.
 
Thanks for detailed description.

It is useful to know about the paint metallic grain.

Sad you've been redoing the paint job but it was worth to make all the engine bay fresh.

I hope the urine from the "life" living in the front hasn't soaked in between the steel sheets. Quite often the paint is to dense to penetrate these areas. At least you closed the air from one side. With dry climate should work forever.
 
My engine compartment is almost an identical situation as yours was - needy driver's side fender, decent passenger side. I will try to track down this paint. I'm also going to not spray the insulation so I can save the decals like you did. Thanks for posting this.
 
Back
Top