My not a restoration Bav

Bearmw

Well-Known Member
Messages
199
Reaction score
86
Location
Western, MA
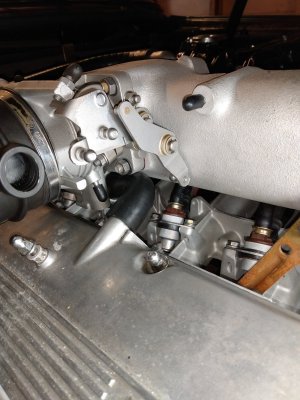
Chris thanks for the reminder on the throttle stop. I tore the car completely apart in a frenzy (I never learn) and am trying not to make more work during re-assembly than it already is. It's a slow project so hopefully slow and steady...

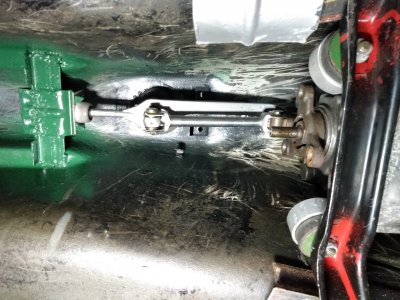
Maybe this weekend I'll get to install the rebuilt axles and then take a closer look at the linkage.

Steve I also appreciate the mention of Pierce as another option.
 

Bearmw

Well-Known Member
Messages
199
Reaction score
86
Location
Western, MA
I'm making slow progress but it's better than no progress. I've decided to have my steering box and PS pump serviced by Jay Stratton and am working on solving the custom driveshaft issue. I may also be going into the heater box but I'm not sure how involved I want to get. Beyond that it's been re-assembly and figuring out how to make non-stock things work including battery in the trunk, Megasquirt with Djet intake and so on.

I decided to use the smaller Euro turn signals and delete the front side reflectors. Went with E code H4/H1 lights. I'm using an E28 radiator. I'm not too happy with the IE rebuilt brake booster in that the paint is failing and surface rust is coming through. It looks like they didn't do a good prep job but it is holding vacuum so I'm not in a hurry to do anything with it. Here are some pics.
 

Attachments

  • IMG_20230507_183937334.jpg
    IMG_20230507_183937334.jpg
    290.7 KB · Views: 123
  • IMG_20230515_185036352.jpg
    IMG_20230515_185036352.jpg
    328.6 KB · Views: 106
  • IMG_20230515_185258194.jpg
    IMG_20230515_185258194.jpg
    279.6 KB · Views: 101
  • IMG_20230515_185304803.jpg
    IMG_20230515_185304803.jpg
    275.8 KB · Views: 97
  • IMG_20230507_184448976.jpg
    IMG_20230507_184448976.jpg
    240 KB · Views: 99
  • IMG_20230516_161028152.jpg
    IMG_20230516_161028152.jpg
    326.6 KB · Views: 100
  • IMG_20230509_200249838.jpg
    IMG_20230509_200249838.jpg
    315.7 KB · Views: 101
  • IMG_20230516_162856929.jpg
    IMG_20230516_162856929.jpg
    304.1 KB · Views: 94
  • IMG_20230509_200700981.jpg
    IMG_20230509_200700981.jpg
    281 KB · Views: 96
  • IMG_20230507_182706515.jpg
    IMG_20230507_182706515.jpg
    319.8 KB · Views: 105
Last edited:

Bearmw

Well-Known Member
Messages
199
Reaction score
86
Location
Western, MA
2 more options down the road. I have some 16 x 7.5" style 8s if I want a more performance oriented tire at a reasonable price. I also have these E30 seats I refurbished and could dye to match the interior if I'm so inclined. Talk about mission creep. I'm a master

And my other 72 for backup.
 

Attachments

  • IMG_20220709_134318195.jpg
    IMG_20220709_134318195.jpg
    307.6 KB · Views: 89
  • IMG_20221224_115922713.jpg
    IMG_20221224_115922713.jpg
    211.6 KB · Views: 84
  • PXL_20220911_183206498.jpg
    PXL_20220911_183206498.jpg
    729.4 KB · Views: 99

Bearmw

Well-Known Member
Messages
199
Reaction score
86
Location
Western, MA
I have a couple questions for our resident experts:

I don't need to do this now but what options are there for the rear window gasket. Do most just cut and glue a windshield gasket to make it work?

A more pressing issue is that I removed the rocker panel trim strips years ago and was somehow able to do it with the plastic retaining clips remaining intact on the car. Now I want to reinstall the trim and see that in addition to the holes for the plastic clips there are similarly sized holes a bit lower and offset from the clip holes. Do all E3s have the lower holes and what was their purpose? Here are some pics to illustrate.
 

Attachments

  • IMG_20230523_173301606.jpg
    IMG_20230523_173301606.jpg
    209.6 KB · Views: 78
  • IMG_20230523_173437823.jpg
    IMG_20230523_173437823.jpg
    206.5 KB · Views: 74
  • IMG_20230523_173402826.jpg
    IMG_20230523_173402826.jpg
    228.8 KB · Views: 70
  • IMG_20230523_173343082.jpg
    IMG_20230523_173343082.jpg
    209.9 KB · Views: 76

E3AV

Active Member
Messages
65
Reaction score
54
Location
Norway
The lower holes are intended for the wider trim style i think. Like the ones on my -69 2800 or on 3.0S/SI
 

Bearmw

Well-Known Member
Messages
199
Reaction score
86
Location
Western, MA
Thanks for the info. Is it considered OK to just leave the unused holes open or should they be plugged somehow? I wonder what BMW recommended. FWIW my rockers received a heavy coating of Ziebart rust prevention tar many years ago.
 

E3AV

Active Member
Messages
65
Reaction score
54
Location
Norway
I would probably just let the holes be. If there is no rust/bare metal around them I se no reason to do anything.
My 2800 has the lower row of holes only. I know replacement rockers have double set of holes.
Have the rocker panels been replaced on yours?
 

Bearmw

Well-Known Member
Messages
199
Reaction score
86
Location
Western, MA
The rockers appear to be original and I think I will follow your suggestion of leaving them alone. It seems that being open all these years has not caused any harm as they are not rusted.
 

Bearmw

Well-Known Member
Messages
199
Reaction score
86
Location
Western, MA
I'm hoping for some suggestions on dealing with a broken hood latch. The part that secures the cable broke off and I'm not sure what repair options I might have. Worse case scenario I look for another one but if there is a feasible repair option I'd prefer that. Here's the issue.
 

Attachments

  • IMG_20230608_193152699.jpg
    IMG_20230608_193152699.jpg
    308.7 KB · Views: 61
  • IMG_20230608_193056058.jpg
    IMG_20230608_193056058.jpg
    323.1 KB · Views: 63
  • IMG_20230608_193220302.jpg
    IMG_20230608_193220302.jpg
    214.8 KB · Views: 70
  • IMG_20230608_193132239.jpg
    IMG_20230608_193132239.jpg
    323.5 KB · Views: 63

StephenZ

Well-Known Member
Site Donor
Messages
318
Reaction score
125
Location
Cumming, GA
Couple thoughts..Looks like it's a rivet type fit with a mushroomed end to hold it in place so it can still swivel...can you use a punch to flare the head again to hold from falling through? Second, maybe a small drill and tap for a tiny machine screw/washer to hold it in place? Mine are boxed up with all my parts, so I can't look at them in person..
 

Bearmw

Well-Known Member
Messages
199
Reaction score
86
Location
Western, MA
Stephen thanks for the suggestions but I don't see how I can get a punch at it because that side is obscured by other parts of the assembly. There is also very little metal in that spot to work with so I'm not yet sure how to attack it.
 

StephenZ

Well-Known Member
Site Donor
Messages
318
Reaction score
125
Location
Cumming, GA
Stephen thanks for the suggestions but I don't see how I can get a punch at it because that side is obscured by other parts of the assembly. There is also very little metal in that spot to work with so I'm not yet sure how to attack it.
Oh, I guess I was thinking it would have to be disassembled to access the backside area? It's hard for me to tell in pics..I hope you can figure something out.
 

StephenZ

Well-Known Member
Site Donor
Messages
318
Reaction score
125
Location
Cumming, GA
I'll try to dig mine out and see what it looks like. Maybe you can send it to me and I'd be happy to find a solution. Sound fun...:)
 

Bearmw

Well-Known Member
Messages
199
Reaction score
86
Location
Western, MA
Stephen thanks for your reply. Mine is now in the hands of a talented friend who said he might machine a new piece that will attach with a clip of some sort. He is busy with real work though so it may take a while to see what he comes up with.
 

StephenZ

Well-Known Member
Site Donor
Messages
318
Reaction score
125
Location
Cumming, GA
Stephen thanks for your reply. Mine is now in the hands of a talented friend who said he might machine a new piece that will attach with a clip of some sort. He is busy with real work though so it may take a while to see what he comes up with.
Sounds good...yeah, I enjoy machining new parts here and there for my projects...I'm trying to get ready for prime/paint...then I can do the mechanical stuff that I actually enjoy..:)
 
Top