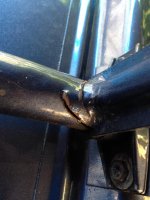
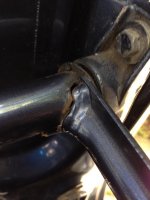
I had a cracked support rod weld that was repaired in situ. Depending on the severity of yours, perhaps you can have a welder look at it before dismantling.
You are using an out of date browser. It may not display this or other websites correctly.
You should upgrade or use an alternative browser.
You should upgrade or use an alternative browser.
New owner 1976 3.0Si Arctic Blue
- Thread starter E3_kiwi
- Start date
I welded in-situ as well. A common problem. Do I recall DeQ having a wonderful tutorial on repair here somewhere?
E3_kiwi
Well-Known Member
Sounds like an in-situ repair may be achievable then.
But on the other hand, if I remove the hood and spring, it will make installing the foam soundproofing a lot easier - makes sense to tackle both jobs at the same time.
BTW, I found the aforementioned DIY thread by deQ, thanks.
Here is the link:
http://www.e9coupe.com/forum/showthread.php?t=12775&highlight=hood
Last edited:
The hood foam can be put in easily with the tortion bar in place. The trick is to slice the paper backing with a razor horizonally in sections, this allows you to line it up at the bottom edge and work up without it grabbing the bar and all other unwanted spots, removing paper to expose the adhesive as you go.
E3_kiwi
Well-Known Member
Thanks for the advice, guys.
Sounds like a plan....I'll go the in-situ route for both foam replacement and weld repair.
Sounds like a plan....I'll go the in-situ route for both foam replacement and weld repair.
How is your hunt for belt trim going? It looks like all the holes have been filled in is that correct? Did you decide to just go with that look or do you for sure want to put the trim on?
E3_kiwi
Well-Known Member
I'm going to pursue the restoration of belt trims on this car if possible....she looks a bit naked without them, and I want originality.How is your hunt for belt trim going? It looks like all the holes have been filled in is that correct? Did you decide to just go with that look or do you for sure want to put the trim on?
To do this I need to obtain the donor parts car ('73 3.0S auto) for a reasonable price. So far the seller is not playing ball, but I'll keep pestering him and hopefully we'll agree on a fair price.
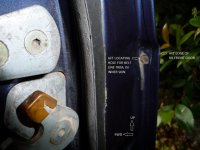
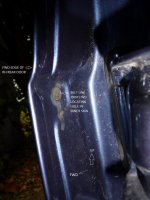
Old belt trim holes have been filled in on remaining original panels and trunk lid, some very faintly visible in certain light/angle of view, others not there at all - for example on the doors. The reason for this being at least two doors are new (or so I've been told).
However, on the doors, it looks like the fwd and aft locating holes are already there from factory, in the inner skins only.
You can see them in the attached pictures (which also show that I need new bumpers for the door latches!).
Attachments
MarksE9
Active Member
Parts car
Hi I sent you a pm about an E3 in Auckland I will be selling for parts soon.
Cheers
Mark.
Hi I sent you a pm about an E3 in Auckland I will be selling for parts soon.
Cheers
Mark.
You can do both in-situ but to remove the old adhesive may be a chore. The hood has a double steel layer at the front edge that holds water and rusts out. That's why I took mine off...to also address this issue. If you do, mark the positions of hinges etc to help align when replacing.
E3_kiwi
Well-Known Member
Thanks Mark.....reply message sent.Hi I sent you a pm about an E3 in Auckland I will be selling for parts soon.
Cheers
Mark.
E3_kiwi
Well-Known Member
My hood was renewed by the PO, so there's no old adhesive or rust to worry about.You can do both in-situ but to remove the old adhesive may be a chore. The hood has a double steel layer at the front edge that holds water and rusts out. That's why I took mine off...to also address this issue. If you do, mark the positions of hinges etc to help align when replacing.
Almost every other E3 hood I've seen has that same rust issue in the double-skinned leading edge. I'll be applying a liberal coating of Dinol to the interior crevices of mine, to hopefully ward off any future corrosion in this area.
E3_kiwi
Well-Known Member
E3_kiwi
Well-Known Member
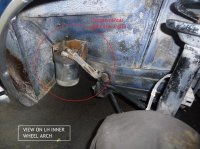
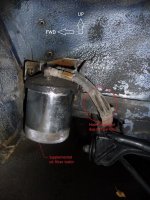
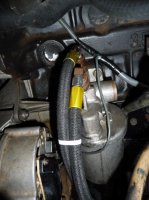
While doing some cleaning and minor rust treatment in the left front wheel well, I was able to get a closer look at what looked like an aftermarket filter canister that caught my eye, whilst working underneath the car last week.
I've now concluded that this is a pressure-return supplemental oil filter installation which, although beneficial to oil cleanliness and prolonged engine life, also means I'll have two oil filters to change - assuming of course that there's still a filter in the original housing!
The two pressure hoses have their cotton outer braid worn through by tyre rubbing, but the inner metal braids are still intact.
The mounting bracket for the canister looks rusty, but in fact this is the copper coating underneath the peeled-off chrome plating.
Despite this being a non-original system, I can see the benefits of an extra filter, which may also be easier to replace, so I'll try and get some replacement hoses and leave it connected for now.
Is there anyone else in the E3/E9 community using a supplemental oil filter?
Attachments
Last edited:
I've never seen one on an e9. One filter is enough to change!
That's a first for me in any car.......e3, e9 whatever...Seen oil coolers, but not (2) oil filters...
E3_kiwi
Well-Known Member
A couple of interesting links I found about Supplemental Oil Filters - they are mostly used in commercial vehicle fleets, but the benefits are the same for any engine.
Interesting data on the relationship between oil filter micron rating and engine life - the data shows that a 7-micron supplemental oil filter will increase engine life by more than seven-fold over a standard, 40-micron filter, with normalised engine wear reduced to 0.14 of the standard, full-flow filter system wear factor.
http://web.applied.com/base.cfm?page_id=5567
http://ecomicrofilters.com/whtyofsufiar.html
E3_kiwi
Well-Known Member
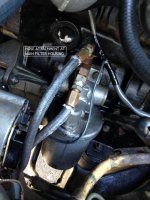
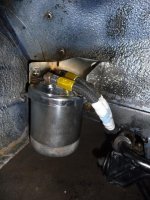
New Aeroquip hoses, new chrome plate on mounting bracket, and the filter is installed again, with some Dinol sprayed around for good measure. Also wrapped hoses with teflon spiral wrap and silicon tape with tyraps to secure it - just in case tyre rub happens again....although I think I've got enough clearance now.
Attachments
Hi e3 kiwi, where about's in NZ are you? If you are in Auckland it would be nice to catch up sometime.
I have an e9 and she will be back on the road in the next few weeks after getting new brains (ECU) for the engine.
By the by, we had a blue e3 3.0s when I was a kid (early 80's) it was a pretty special car back then when most had a Holden or Ford
Steve
I have an e9 and she will be back on the road in the next few weeks after getting new brains (ECU) for the engine.
By the by, we had a blue e3 3.0s when I was a kid (early 80's) it was a pretty special car back then when most had a Holden or Ford
Steve
E3_kiwi
Well-Known Member
Hi Steve
Thanks for chiming in - I'm also in Auckland.
Once I get this old girl complied, registered and on the road, I'll be taking her to a few classic meets this summer, so hopefully we'll meet up at one of these.
My primary aim is to make it to the Ellerslie concours......I think you were there last year with your car in the BMWCC display, if memory serves.
I was also there with my silver 850CSi, which I've since sold...man, I miss that car. It's certainly been a quantum leap going from an E31 to an E3!
Catch up soon.
Cheers
Peter
That's the one peter, yes I now have a face to the name, will see you around the traps over summer