Pretty amazing! Just need the sending unit (and a proper green paint job) to turn it over?
You are using an out of date browser. It may not display this or other websites correctly.
You should upgrade or use an alternative browser.
You should upgrade or use an alternative browser.
Prep for 3.5 Megasquirt
- Thread starter Peter Coomaraswamy
- Start date
Looks like a lot of reasons in that shop to keep your head up Peter.
Hello all! I need some help in the headliner department; my car is a 1974 with a sunroof and it has a door-card like material that the headliner is glued to. The other headliners I've done were earlier cars and did not have that configuration so I'm wondering if there are any tips for gluing the headliner without having the spooge seep through the little dimples in the fabric, and that is of course if I can find the correct or close fabrick.
Please be kind enough to chime in,
Also, are there any recommended door seal substitutions for the piece that goes around the cabin opening for the doors and is held under the stainless sill strip?
All comments even if they're not helpful are welcome!
thanks
Sam, I promise to post more pictures soon-
Honolulu
Well-Known Member
3M Super 77 is good spray contact cement, may be useful for your headliner and being a spray may not seep through perforations. I have a can that I've used only intermittently for years and years, yet it keeps spraying nicely after a good shaking. Just used it the other day on the E34 sunroof trim panel, amazing how the can has held up over the years.
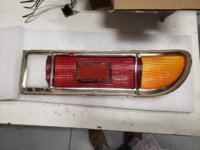
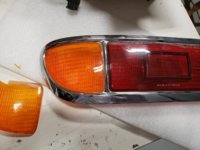
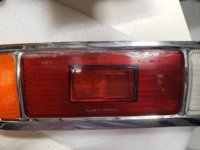
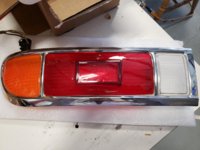
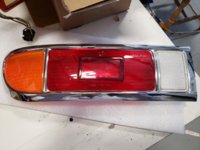
Hi Folks, back to my old thread; Don should be back in TX in April for a visit at which time he promises to tune in the mega-squirt- I can hardly wait. In the meantime I'm trying to do all the little things that I don't need rocket-science to figure out and so with Stan's connections I was able to get these rear tail light lenses and now I have to put them in. I got the old ones out easily enough with a heat knife from Harbor Freight and I thought someone here (I hope they're watching) recommended some special glue/sealant for the new lenses. I have pictures with some comments.
The corner amber lens has a small gap, but it is the exact same size as the original. The extra plastic that was "melted" to keep these in place from the factory filled in the gap- or so it seams. Other than that the fit is really good and I think I'm glad I attacked this little project.
The corner amber lens has a small gap, but it is the exact same size as the original. The extra plastic that was "melted" to keep these in place from the factory filled in the gap- or so it seams. Other than that the fit is really good and I think I'm glad I attacked this little project.
Attachments
Hello Peter;
This is Victor from Houston ,We met at Drew's house in Clear lake some time back, I just want to say that your car looks amazing, Ok back to the glue, it's called LIQUID FUSION, It's a clear urethane adhesive, Hopes this helps and good luck finishing your car.
Victor
This is Victor from Houston ,We met at Drew's house in Clear lake some time back, I just want to say that your car looks amazing, Ok back to the glue, it's called LIQUID FUSION, It's a clear urethane adhesive, Hopes this helps and good luck finishing your car.
Victor
Hi Folks, back to my old thread; Don should be back in TX in April for a visit at which time he promises to tune in the mega-squirt- I can hardly wait. In the meantime I'm trying to do all the little things that I don't need rocket-science to figure out and so with Stan's connections I was able to get these rear tail light lenses and now I have to put them in. I got the old ones out easily enough with a heat knife from Harbor Freight and I thought someone here (I hope they're watching) recommended some special glue/sealant for the new lenses. I have pictures with some comments.
The corner amber lens has a small gap, but it is the exact same size as the original. The extra plastic that was "melted" to keep these in place from the factory filled in the gap- or so it seams. Other than that the fit is really good and I think I'm glad I attacked this little project.
Peter,
I just did this process myself. Liquid Fusion as the previous post recommended. You can find it on amazon. Also when you apply it it looks very wet and gooey and you will think you messed up, but when it dries it dries clear in 24 hours or so. Super strong so set the lenses first. On one of my lenses, because the housing was re-chromed, I had to dremel about 1 mm off one corner to sit correctly.
Hi Victor & Ajay- thanks, liquid fusion it is! Is one tube enough or should I get 2?
Thanks!
Thanks!
Hi Victor & Ajay- thanks, liquid fusion it is! Is one tube enough or should I get 2?
Thanks!
1 tube of the 4 oz was plenty for my set with a lot leftover.