The Raven e9 project

Well, a b34 would have been Motronic 1.0 with the Dizzy on the front of the head. It could have been converted back. And 82 was the first year of the improved b30 head with smaller water passages vs. the peanut shaped passages which would make sense, at least to me. I think the piano tops would be 9:1 compression, US got 8:1, rest of world 9:1.
A US CS delivered to Max with a euro fog light? Side markers gone but could have been removed during the rattle can respray. Any covered holes visible inside?
Steve
 
There is evidence that the side markers were removed. I plan to keep them off, but will patch the holes better. But the fog light is curious - I wasn't certain but did think that those were only on the Euro models. Could someone have replaced that??? Thanks for mentioning that.
 
HB Chris said:
Well, a b34 would have been Motronic 1.0 with the Dizzy on the front of the head. It could have been converted back. And 82 was the first year of the improved b30 head with smaller water passages vs. the peanut shaped passages which would make sense, at least to me.
This is interesting. Is there something I could look for that would identify a B30 replacement head versus a B34 that has been converted? I've always suspected that they (PO) replaced the head itself but kept the original carbs, etc. But this puts another identification point into the puzzle. Thanks you!

So, original US block, but Euro pistons. Replaced head with bigger cam, headers. Obviously someone has spent a lot of time in there. I think I would sleep better at night only after having gone through everything and starting fresh.
 
In the real world the heads are mostly interchangeable and fitted across a range of engine sizes, very late E32 and E24's had larger different shaped inlet ports, your head should have the smaller water holes so far less prone to cracking and corrosion, we used to make a modified nut for the front of a motronic cam to drive a distributor shaft if using a late head on an early engine, the main issue with fitting different heads is to make sure that the piano shape on the pistons matches the head shape, I would think about keeping this engine as is and seeing how it goes, maybe take a look at the chain tensioner to see how far out it is as a guide to chain wear and change the oil pan gasket as they are always hard and leak, may as well take a quick look at the bearings while the pan is off but if it ain't broken.......................... question is what are you going to do with the 3 speed box? Pat
 
Hello Pat - thank you for the thoughtful comments. You've confirmed what I thought I knew at one time, which is that the heads can be interchanged. It is probably an oversimplification (since porting, water jackets, compression results, and mechanical interference are all variables), but the B3x heads do generally fit on the M3o blocks in a similar manner. I may never know "why" this head was changed (out of necessity or for some performance benefit). And that is what bugs me the most...

You've inspired me to potentially work with what I have - or at least pause that decision until I've opened it up and inspected the interior components further.

Question is, what is a "3 speed box"?
It was said before on this forum - early m30 heads like from e3, e9, e12 had some issue with cracking. So a lot of them where changed for later models which where less problematic.
 
Receiving parts...
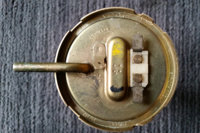
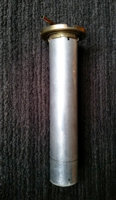
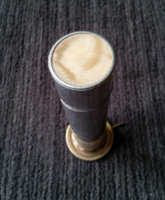
From Eriknetherlands, a new fuel sender just arrived.
20180103-fuel sender-01.jpg 20180103-fuel sender-02.jpg 20180103-fuel sender-03.jpg

Getting anywhere near the car, fuel can be smelled. I suspect something is leaking or perforated. I don't see any drips or obvious leaks. I'll eventually pull the tank completely and thoroughly inspect inside and out, as well as all lines from front to rear. It will be a treat to place this NOS fuel sender into the restored tank. :)
 
More parts...
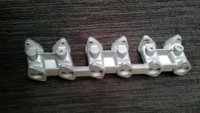
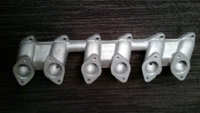
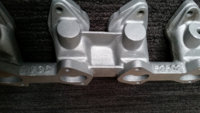
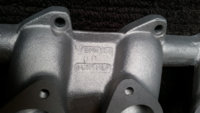
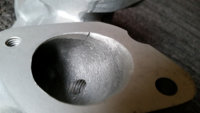
From eBay Germany, a VGS intake manifold for my triples.
20180103-VGS-01.jpg 20180103-VGS-02.jpg 20180103-VGS-03.jpg 20180103-VGS-04.jpg 20180103-VGS-05.jpg
As I'd suspected, rather than being cleaned well this aluminum intake has been sprayed with silver paint. Everyone knows that a couple dollars of silver paint increases the sale price by at least $100 (or euros in this case). ;) I can see the two center bolt holes that are still dirty - no doubt where the seller suspended the piece to spray it. There is one area that could possible be a repaired crack. I will not know until I clean the paint (and whatever lies beneath it) from the aluminum. But both mating surfaces appear dead flat with a straight edge, so I think this will work out well.
 
Receiving parts...
From Eriknetherlands, a new fuel sender just arrived.
View attachment 38226 View attachment 38227 View attachment 38228

Getting anywhere near the car, fuel can be smelled. I suspect something is leaking or perforated. I don't see any drips or obvious leaks. I'll eventually pull the tank completely and thoroughly inspect inside and out, as well as all lines from front to rear. It will be a treat to place this NOS fuel sender into the restored tank. :)

My tank had some rust on the right side where it sits on the opening in the trunk floor. I pulled the tank and found what looked like JB Weld. I wire brushed that off and found several holes. I brazed the tank since that's lower temperature than welding and then used a tank sealer to make sure there were no leaks. I still have some gas smell because the plastic tank above the gas tank is cracked. I've got a replacement and I'm going to upgrade the car to a carbon canister under the battery to control the venting and burn the fumes. That should do it.

Ian
 
Another part from Deutschland has arrived: a new/different kidney grille.
The original one the car appears to have been kicked in. And while my intent was to massage it back into shape, I quickly realized that I don't know exactly what shape it is supposed to be. Such a prominent part of the car's identity. So when I saw this one come up, I grabbed it. Unfortunately, it is not perfectly straight either. It seems to have a skew to it - not sure how that could happen. But I think this is within my limits to tweak. :)
20180129_180830.jpg

Old one on the left. It appears that someone put electrical tape on the slats, but that has hardened and become very brittle. I want the slats to be bright, so the new one on the left is already on its way to the correct finish. Just a bit of massaging, and some polish, and it will be quite nice, I think.
 
great Stephan , but nevertheless i like more the black slats... so they blend in with the grilles. Even don't understand the OEM alu look of the kidney slats between black grilles in the first place :)

Red car has them , on the blue one ...it was the first thing i painted ... :eek:
 
but nevertheless i like more the black slats... so they blend in with the grilles. Even don't understand the OEM alu look of the kidney slats between black grilles in the first place
Hi Barry, I don't disagree that it is curious that the kidney grilles are often silver while the horizontal side grilles are black. I suspect it is a brand recognition detail that BMW presents. For my black car, I feel the shiny bits add to the overall appearance. And if I understand correctly, this model year car would have come with the silver center grilles, at least for dark colors. Somebody feel free to correct me if I am wrong. :D
 
Just climbed (more like slithered) under the car to find the stamped numbers on the rear diff. It appears to be a 3.64 ratio. I find that to be pretty good news, in a vacuum. However, the car has a dogleg 5-speed so I suspect when I actually drive it (more than around the neighborhood like I've done thus far), the engine might be revving pretty darn high. Was REALLY hoping to find the "S" of an LSD on there. I don't think I see it, but if anyone sees anything that I didn't catch, or can point to the location I should be focusing on, please do.
20180322-rear diff ratio.jpg


Just to keep track of items for this car, I am going to double post the following photos, too - new 123ignition items that arrived this week. :)
20180321-123 delivery.jpg
20180322-kingsborne package.jpg
 
i don't know the ratio of my diff ( rebuild LSD ) but i do know that with the dogleg i rev 4000 at 120 km/h.
So my max speed is 180 km/h at 6000 revs

That is indeed no fun on highway , if rally start is more than 100 km away , we use the trailer.
 
Today I shifted my attention to the tool kit "clam shell". I did't have one, and another forum member helped me out greatly by selling me two for a very reasonable price. They each have their share of battle scars, but I think I have enough here to put together a wonderful refurbished shell for my car. If I really set my mind to it, I could end up with two refurbished units, but I think I have too many other little projects that I should be focusing on.

Here are the two shells The one on the left has a pretty good top piece (the exposed piece). The one on the right has a pretty good back piece. My plan is to join these two components after some repair and refinish. Speaking of finish, I am shocked by the discoloration of the left side piece. My guess would be that this is due to UV exposure. But the plastic seems reasonably solid - at least as sound as the other, more correctly colored piece.
20180325-2 used shells.jpg

20180325-backs of shells.jpg


On the inside, both of the tool trays seem decent - not perfect. But I think I can restore one to a nearly perfect result. I'll completely replace the thin foam that covers the tool tray on the lid.
20180325-inside of shell A.jpg

20180325-inside of shell B.jpg

20180325-pieces inside.jpg


The latch chrome is peeling off a bit. If the rest of the case comes out as nice as I hope, I will have this piece re-chromed.
20180325-only handle.jpg


Taking the shells apart went quite well. I drilled out the metal "rivets" accordingly. The hardest part of this whole little project may be finding new rivets that are correct for the three different fastener types. If anyone knows of a source for these things, please let me know. :)
20180325-rivet drilled out 1.jpg

20180325-rivet drilled out 2.jpg

20180325-rivet drilled out 3.jpg

A little tip. You want to drill the rivets slowly and make sure the body of the rivet doesn't spin. If you begin to heat up the rivet too much, it will begin to melt the plastic case. I kept a finger on the rivet body - if it burned me, it would be burning the plastic. And you should be able to smell the plastic heating up if you've crossed a line.

By the way, here is the current extent of the contents of my tool kit. :eek: I have a long way to go. But I'll focus on having a tool case first - then we can populate it.
20180325-set of tools.jpg
 
here is a little advice Stephen, epoxy some large washers on the backside of the box where each of the screws attach to the trunk lid.

toolbox 1.jpg


on the split of the case, epoxy some filament tape to the back side.

toolbox 2.jpg
 
Hi Scott,
I like that idea from a reinforcement perspective. Since I didn't have the tool case in my car, I am not certain, but when installed would these metal washers be in contact with the paint on the trunk lid? If so, I'd be concerned that the metal on metal contact (albeit with some paint in between) could be a potential rust incubator. Or does the tool case attach to the inner panels?
Thanks!
Stephen
 
Back
Top