Zen and the black art of triple Weber tuning (and other lessons learned along the way)

Stevehose

Well-Known Member
Site Donor $$
Messages
13,003
Reaction score
5,679
Location
Sarasota, FL
Part 1:

Often at a Cars & Coffee type event I will get a comment like “Triple sidedrafts - I hear they never stay in tune.” They will stay in tune, but getting them there is the challenge! Here are some tips and suggestions I’ve learned during my often frustrating, multi-year, sidedraft self-flagellation. These are my findings as they relate to the DCOE/DCOM and M30 engine and by no means are the gospel. I will update as new findings and theories dictate and hope others will contribute either by questioning these tips or chiming in if you have your own. All in all, triples are not cheap to install with all the accesories needed to properly set them up, but they deliver in spades on the visceral experience. On to the fun!

Before tuning the carbs:

-If you haven't yet, get a set that has been professionaly rebuilt/restored or a new set from a legitimate Weber supplier - not Chinese knockoffs. Even if you rebuild them yourself there are still pitfalls like leaking throttle shaft bearings, worn tolerances etc. that can derail your tuning efforts and lead to frustration.

-Install an air fuel ratio (AFR) gauge - critical for accurate jetting and idle mixture.

-Ensure ignition system integrity: new NGK or German Bosch plugs gapped correctly (I am using NGK BP5ES set at .030), distributor, cap & rotor, coil, ballast resistor, points & condenser (if using), and plug wires are all in new or proven good condition. You want no doubts on the ignition side.

-Ensure your compression is within spec.

-Regulated fuel pressure at 2.5-3lbs from a high volume, low pressure pump with filter between it and tank. I am happy with the Carter 4070.

-Float levels set at 25mm from the top of main jet stack deck. Make dipsticks out of paper with measurements on them so you know when it gets wet at 25mm.

-Stock timing set correctly (see note below on the 123ignition distibutor for tweaks on this).

-Vacuum advance disconnected and any ports plugged.

-Ensure linkage is working properly with no binding or unusual movements. With engine off have someone press the pedal to the floor and look down the barrel to check throttle plates are open all the way at wide open throttle (WOT) - and closed fully when released.

-For M30 do not use “soft mount” carb manifold gaskets, use plain “base gaskets” from Pierce Manifolds. Soft mounts are not needed and are a potential source of air leaks and supreme frustration.

-For stock engine use 34mm chokes. Larger engines/cams will likely need 36mm from a DCOE45.

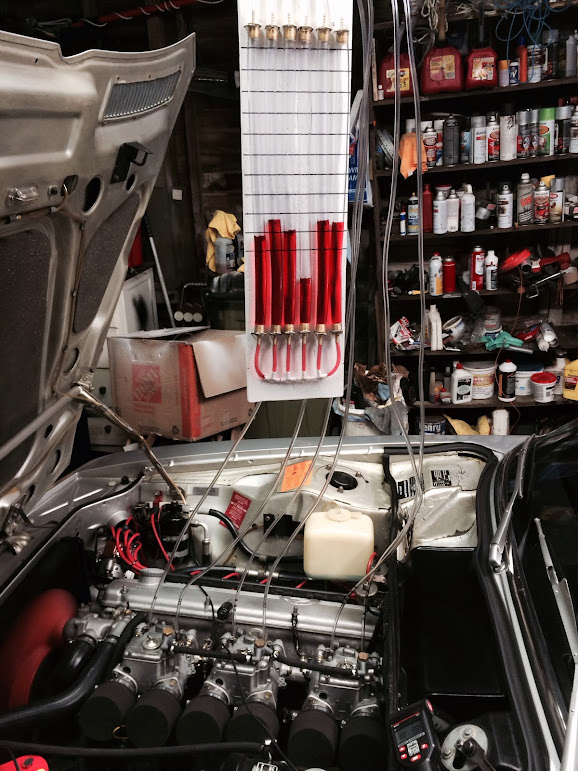
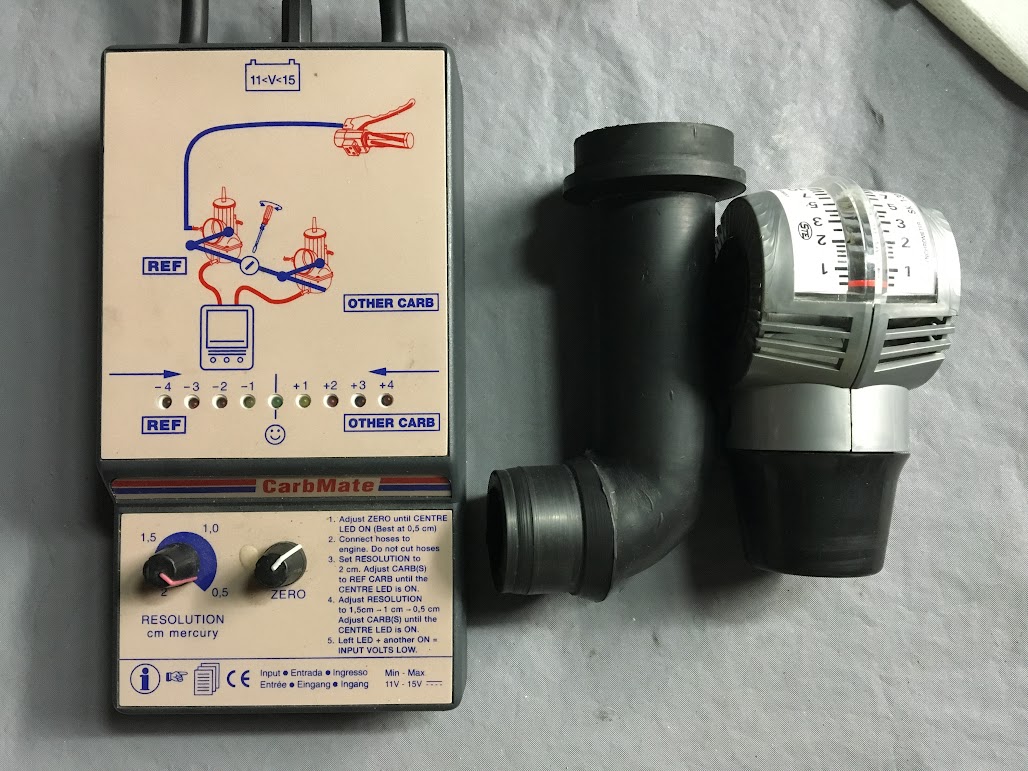
-Use a Carbmate gauge if carbs have vacuum ports (emissions carbs like 151/152, DCOM et al).

-Use an STE SK Synchronmeter gauge (the German one) with the STE-6 90 degree adapter if carbs don’t have vacuum ports.

Tools of the trade:

GR454QrUc6eEhtehDX5JntdVE9_ZHIEdzlEqCxQpgHoIeFPXIBxWIN00IjrBG9RLEkJcqImNvDH-_YOv9IW1iBwkd8dfxEWdLwsJnhWQeSPhEcqAo5DgZ7NUIPypvoMaUS9EkqZlM0ofopchMeKJPlcQJm2uno2ALYWZF6SNnF1UnuCbkKnh6TVJJGrXkhT7ELrFBog5pEUYJNZqMavutVPuceuYFEwn8MZ8IUtbAe7z3RMwPbcgXEZjjawAEjI5LVkuxED5m0czGSlw4mrtz-Y_ecIMw16SoYbpJT8POboG9LrtYvz31okCWftPw_xLQ_JPUFEIuOjAYICToWoXzyvhHGEgsZR8lou6EFzcDmT8bLuNKFqbNju7F7tV3DovhMeTkHWRE9-ZtCEGWGynMcai5D8VUTGetxqWDvyALZ4I6bwfCfC5fBqJEojEN4fIQi_59A5csdVU-tqmI0YN6cfPiVJjoSSiKrAit9ytVk0lK3gLYs9mysxj84Xauhdgag8n3UXc5-rXR1xVfCGss7IYPN93C3fcW-RjmolS88bUn_Q5c54pUEJkUOV-kCsSaZ4ywRvLF9p4bQWQYgC-5DUyxnZcAZVEj79RSwLXsWglLzEb=w1028-h771-no


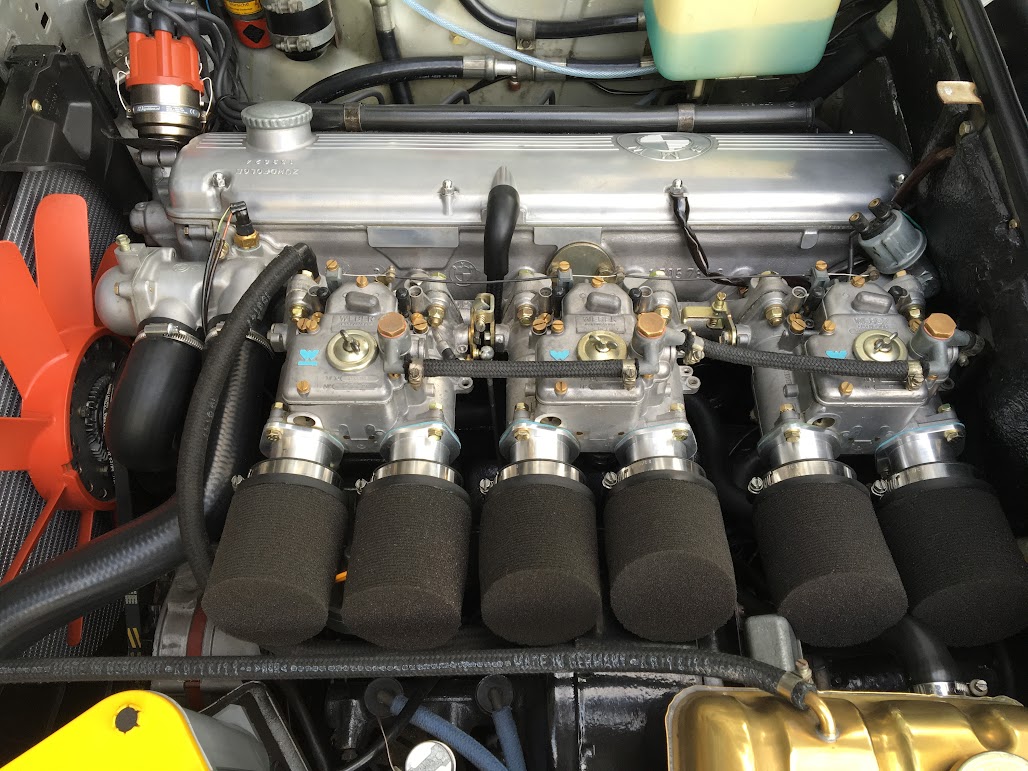
-Use as much air filter as space will allow. The 1” paper style and foam Ramflo’s tend to run richer than others like socks or taller paper ones and will affect jetting more so than others.

-On the carb bodies, replace the paper top cover gaskets with the rubber ones - better for stopping leaks and vapors.

-Ensure the cold start mechanisms are locked in the off (pistons down) position or eliminated altogether - you won’t need them and you don’t want them to leak. They can also be effectively blocked off by tapping for a grub screw to seal off where they flow into the venturis or buying disable kits from Dellorto UK.

-Understand the principles of jetting before buying a bunch of jet sizes, this gets expensive very quickly (more on this below). It's not good when your wife comments on the weekly deliveries from Pierce Manifolds. Download the Weber Tuning Manual in PDF and read it several times:

http://www.lainefamily.com/images/WeberTuningManual.pdf

This writeup is for the interconnect linkage system, adapt this if you have the crossbar/push rod system:

Set throttle plates to cover first progression holes on each carb. A flashlight in the venturi with the inspection covers off will show the position. Or shine the light over the exposed holes from above and locate the throttle plate position. Ideally you want to keep the plate as close as possible to directly under and covering up the first hole (closest to engine) to avoid off-idle flat spots and erratic idle but some deviation is inevitable during the tuning process.

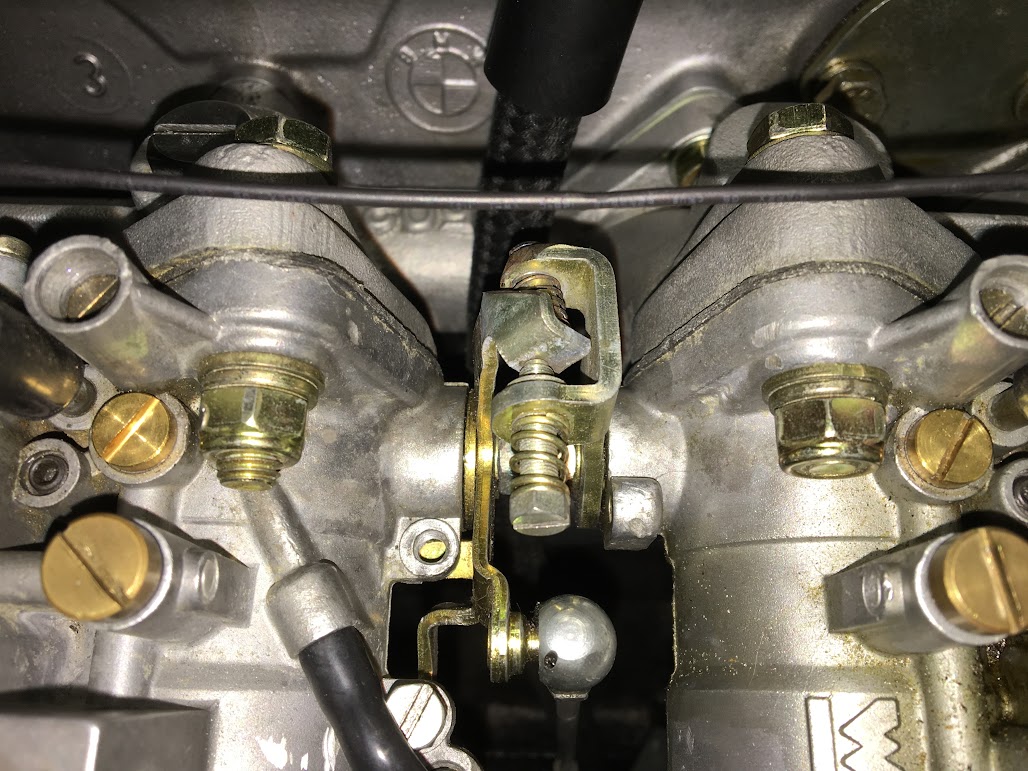
The carb with idle stop screw is the base carb and I use the barrel that is connected to the pedal linkage pull rod as the base barrel for all synching. As a starting point, open the idle mix screws about 2 - 2 1/2 turns. Some model carbs require less open, others more.

My base carb is #1 carb (front of car), shown here is bbl #2 of that carb which also has the idle set screw (under the black silicon tube opposite the pedal linkage ball and socket connection). The left side of pic on #2 bbl top to bottom is the mixture screw, progression hole cover, and accell pump jet cover. Far left shows the idle bypass (covered by hex grub screw) and rubber covered vacuum port above that. Between the carbs is the lever with adjustment screw used to match the airflow of each carb. All my synching is based on #2 barrel on the left:

ryVTEZqfb6D0wLD9EclOdYRLF0nlH71PTEiCTePB1jveRvL0AhNcoQJZ25AnsXyMIWL10ywy4l-9zi93S5LY1o4OWY_LwsS_-GyeWmNj9Hnz2Xv6JGkKSBY0taDaa5W1L-FzEsq2C--97AtJXchuTc_dt174SnOxeGIldWpCTR-tglYN4rOTDFkVkqHqbldq3LOldmFlyRjURoqBzNAbW59K_N18YbLg79OJbPrAJgxuMsdbkhKSIJCrzgmyZoSZy8OQbwp6o8bkS0uaPPeItuOJnRvtGoINW4RSWylSc3OzAFzF_ymehOJMtejeQDjxYYiXo1w_BlddQIbp9M309EaAWBTHpJ6Nk0tpl6pySicgDzs6Esk7GXaN2Gq9-mn5PfBs1slxUFNsp6y9OVqnqHkWFFuiKLDhgFeSQuDNcQbUTjazcylUhlIx5O40FhXanA1cgZJtrf54O2LHQNqwFLOpjDMac6kUShfOe1v3hFOhNFylDfCy-DDsDoA22wkUKRp_MRLXtXwQRDaY5brjd-b-9MEFGUX1sVbTTKal_N4Vka6DASYyludO3DYYQMklpPy0_rRwptr3mVs2P31ZoZ4kMSwAkFlzyxtkbKMqIrNEu4j3=w1028-h771-no
 
Last edited:

Stevehose

Well-Known Member
Site Donor $$
Messages
13,003
Reaction score
5,679
Location
Sarasota, FL
Part 2:

Start engine, run until completely hot including carbs, set the idle to 950 with the stop screw and sync carbs to base carb. If your base carb is #1 then sync #2 carb next then #3 since any change on #2 influences #3 relative to #1.

If you have air bypass screws, close both then match the higher vacuum bbl to lower bbl by turning out that screw (one adjustment per carb). My base bbl also happens to be the one without the open air bypass screw which I prefer since it eliminates a potential source of error, you could use the other bbl of this carb as the base if it is the one not needing air bypass opened on it - optional and probably not a big deal.

If no bypass screws then compare the flow between each carb’s own barrels, if they are way off you have issues (bent throttle shaft or butterfly). Otherwise synch to the average of the 2 barrels to the base barrel (one barrel a little higher and the other a little lower than the base barrel). I look at the corner of the hood in the air as an indicator of excessive engine shake which should be minimal when all are synched at proper idle rpm.
  1. Use the idle set screw to adjust idle to 950 (you will discover where your engine likes to idle smoothly, it might end up a little more or less than this).
  2. Set best idle with mix screws using digital tach, listening, and feeling any misfires while leaning on the fender (the Zen part), I blip the throttle after each bbl ’s adjustment and let it settle back down before moving to next bbl. I start rich and turn the screw in slowly until the rpm drops then back out about 1/16 to 1/8 turn. I like being close to the edge of being too lean as it improves a rich idle AFR but can make it more susceptible to off-idle lean spot and/or misfires - so compromise here. Some say to put it in the middle of lean idle drop and rich idle drop but I stay closer to lean but do whatever works for your engine.
  3. Use set screw to set idle back to 950 if idle changes after step #2.
  4. Re-sync carbs to base carb. If you have air bypass screws redo this process also.
  5. Repeat last 3 steps until stable, ending with mix screws which should need minimal (if any) changes by now. Drive for a while and then recheck it all. If you are having problems settling back to the same idle after throttle movements then check the linkage and for vacuum leaks. Too rich or lean on one or more cylinders can also affect idle stability/hunting.

-When satisfied let the engine idle for a few minutes then turn off and check spark plug electrodes. See if any cylinders are unlike the others by being too rich or lean. Keep this in mind when setting mixture.

-Check AFR’s at idle, off-idle, at no load cruise in various gears and speeds, and WOT in at least 3rd, 4th, and 5th (if applicable).

-Re-jet accordingly if needed. For progression and main jetting always have air cleaners installed.

-Revving in neutral and observing AFR is not the same as in motion under load - always use test runs on the road to analyze all jetting changes.

-If changing any idle jet specs (bore or bleed) then re-synch as above every time.

-The static advance and therefore idle rpm can also be adjusted with the 123ignition distributor to help offset a departure from ideal throttle plate/progression hole relationship. Same with air bypass screws. Side drafts seem to like a high static advance and more advance early on in the revs. I am at 15 BTDC idle and 34 all in at 2200 rpm. If you stay with the old distributor you will leave performance on the table if you don’t get it recurved, so for the price of doing that plus a little more you can get the 123 and be able to infinitely adjust with a laptop (now iPhone too) for the ideal curve after your test runs or on a dyno which I plan to do in the near future. No brainer imho.

Some behavior I’ve noticed:

Idle mixture screws can affect cruise and transition AFR so a smaller idle jet doesn’t necessarily lean out the cruise because it can lead to having to open the idle mixture screws to get it to idle smoothly and thus allowing more fuel in than before. It will depend on carb style and # of progression holes but be aware that you may have to strike a balance between the two. A test I did on how much the idle mix screw impacts progression was to close off the mixture screws and observe AFR when revving up vs. normal. Mine is very lean without the mix screws involved but my carbs have 5 progression holes. Other carbs with 3 may behave differently.

There is a relationship between idle jet size, mixture screw setting, and throttle plate setting. All should be considered when tuning the progression circuit or troubleshooting.

Use the smallest accell pump jet you can to avoid dumping gobs of fuel into the throats when accelerating, ideal is to get the AFR to stay the same or dip slightly when pressing the pedal as the pump compensates for the increased air flow. On DCOE’s there is also a bleed valve for the pump circuit that can be used to change duration of squirt. DCOM's are adjustable for stroke and volume. I use the smallest jet they make which is .030. Quick acceleration with the pedal will tell you what you need and show up on the AFR meter as either going lean or rich as the engine starts to accelerate. With engine not running, look into each venturi and when activating the throttle, ensure that each pump streams to the back and doesn’t dribble straight down into the barrel which indicates a failure of (or missing) the little jet washer.

Popping at around 3k rpm in 2nd or 3rd gear no load cruise means the idle jet bore is too small or your idle air bleed is too big. If you put load on it the mains will come in and the pop should go away. So a bigger jet bore or smaller air bleed hole (if fuel volume is sufficient) helps here. Remember this will affect idle and cruise AFR (fun, yes?). I tune for acceptable AFR cruise just before it begins to pop.

AFR can be leaned or richened by the size of the fuel bore in both the idle and main jets. So a smaller bore may lean the AFR out to your chosen target but at the expense of not giving the engine the volume of fuel it needs. So you could have great looking AFR’s but leaving power on the table. I err on the larger bore/larger air corrector side to get the target AFR until the engine feels boggy or sluggish and makes a boggy bullfrog-like noise when accelerating. Too little fuel (even with “correct AFR” will sound thin and the engine will feel restricted when you accelerate and will note have the same loud tone (more Zen). The goal is to give the engine the quantity of fuel it can efficiently use at the correct AFR, not one or the other. The result is a deep roar with strong revs and acceleration to redline when the throttles are opened wide with no lean or rich spots along the way.

AFR can also be leaned or richened by the air bleeds. Both the idle jet air bleed and the main jet air corrector tend to affect the mixture more at higher rpm’s. So if you lean out towards end of progression before the mains come on, or under WOT towards redline, a smaller air bleed can help (provided the volume of fuel is sufficient). I rarely take the old girl to redline anyway, just don’t ever go lean there. A larger main jet air corrector can delay the onset of the main jets but it is a band-aid approach to tuning the mains and tends to make them too lean at higher rpm’s. Another band-aid is opening the idle mix screws to cover a lean off-idle condition or higher rpm pop.

Regarding which jets to use, each engine has it’s needs and/or modifications so one size doesn't fit all. If you have jetting questions I am happy to offer a suggestion (and others can too based on what works for them) but without being under the hood it’s not easy to accurately troubleshoot. A drill set from Pierce will save you time and money when jetting:

http://www.piercemanifolds.com/product_p/98.0181.00.htm

Buy small jet sizes and drill up until you get in range. Solder them up and re-drill if you go too big. When all set, order a crisp new set of correct jets and enjoy all the extra money you didn’t waste chasing AFR scenarios each time with new jets.
 

Stevehose

Well-Known Member
Site Donor $$
Messages
13,003
Reaction score
5,679
Location
Sarasota, FL
Part 3:

Tuning triple Webers is about compromise, it is difficult to get them to perform in all phases of operation: idle, off-idle, around town cruise, highway cruise, and WOT. They were designed for racing and WOT, not going to Starbucks like I use them for. So you may likely have an AFR scenario that will drive you nuts. For me it is low speed cruise, my AFR is between 12.2 and 12.7 around town in 2nd and 3rd gear. Same for highway at 60mph. At 80mph (the speed of traffic on the interstates in Louisiana) it is a delightful 13.5. WOT is 12.5. Idle is 12.5 (I’ve read M30’s like to run rich and with exhaust gas dilution etc. so don’t sweat the idle AFR as long as it’s not below 12). So decide which conditions you use most and tune accordingly, except always shoot for 12.5 on WOT so your engine doesn’t blow up. WOT means grit your teeth and foot to the floor! I don't recommend doing this test with your spouse or s/o in the car. Once you conciously do WOT tests you may realize how little you actually open the throttles all the way on your drives.

Try not to be a slave to the AFR gauge - also listen and feel how your engine runs (Zen) as it will tell you as much as the gauge once you know how rich and lean sound. I plan on removing the AFR gauge from it’s spot in the footwell so I can do more listening. On long trips I might have the gauge back out. My engine runs pretty well now and the plugs are a nice tan color so I am letting it go at that. Free at last. I think.

Temperature change can affect the AFR’s, the main jets in particular, I had to put smaller air corrector jets when the temps dropped below 60 degrees recently so consider this during the year depending on your climate. It’s normally 85-95 degrees when I drive so that’s what I originally jetted for. The idle mix screw may need a small tweak also. I don't have any experience with altitude changes but I suspect going over 3k feet would require a similar jet change.

Triples take some time to warm up before they behave civilly, generally they will pop and run lean and require pedal until warmed up which is a good sign that they are not jetted too richly. A couple pumps of the accell pedal is all I’ve ever needed to start them, even at 30 degrees. Once warm they will idle nicely.

Again, the 123ignition distributor is a godsend for DCOE’s because you can change the timing curve for adjusting idle speed, also giving the carbs’ their preference for extra advance early on, and the ability to change everything with a laptop in 1 minute which will be gold when you go to the dyno. You can also program a vacuum advance curve for some highway cruise efficiency if you have a vacuum source. It’s an amazing device.

I am still learning this stuff and will revise as new findings warrant. I hope other tuners will add contributions/experiences so we on the Dark Side have a decent M30 specific DCOE/DCOM reference. Enjoy the (intake) music!

a-IvFQrU8yKM9GFq-1cBD7nqkSAWrejv0Io6L2ZnOniqAVz_5gpGj1naX6J2W3whXmATOn3LZrLJA6lBxFJuEaN8mTSTmEfEMughJikUuUZnmOhygdGBLC9iiMWE0vd9ScD3hILXqp9YEzGMrvf6_sKwZX2qt8ixXkbtAjMlrjR2JKmMbytmYM9NUT5sTlWWFD00M_u0vG02QK7Wk6z7G4b_BY3z_C5HOgpXa-VLkC6ixszMo23QbSuLyGiaQjYuvrDv96hxzfJHk4wYUhxRdY_4COL2GkTOjfRZ99wXQmVIHtFgb20VXtbNChETqs102dxBJo3EVE6P9zT7YUFYNl-TH4oKw_e5UdltxY1EUC8AhmPSZyXz2kG6kG-oyS4nj9j70MjIja2R7voA_ToB0G689bEA1jO0gBziv2hqREqLyQ4rM28tVZaZbPo5GliRYxRZoA9ZULjJj7iLdvhV5DogO9ahWZbkoUugp6Xu71-cbV8u2mNQnKas0bcRwv1V2dpkrNsAZgJRAFBSvhYJhd7hGzhFHE9KuF7BVljyQG3Lzomk0tptKOgJ4yZBuaIHklIB0TodXwTqHR5do6Ev_xnSyNMCo8WrTBDaMHx-nqaWEGi0=w1028-h771-no
 
Last edited:

m5bb

Well-Known Member
Site Donor $
Messages
2,082
Reaction score
911
Location
Peachtree Corners, GA
Really great write up Steve. I learned some things for my Weber set-up.

BTW Pierce Manifolds also has a excellent DVD set on tuning the DCOE.
 

Stevehose

Well-Known Member
Site Donor $$
Messages
13,003
Reaction score
5,679
Location
Sarasota, FL
Similar, the tuners (Alpina, GS, Gunther, others) used Solex and Weber sidedrafts of either 40 or 45 body size depending on engine mods. Alpina plenum requires 90 degree trumpets that go up into the air cleaner from below. I'd love to have an Alpina box but my VGS manifold staggers the spacing of the carbs to avoid changing the thermostat housing and brake booster so as a result the box wouldn't fit without changing it all. I suspect the box muffles the intake music somewhat but looks very cool.

it is an amazing art
a question due to my absolute ignorance, is this the setup under the alpina plenum in the alpina cars ?
 

Stan

Well-Known Member
Site Donor $$
Messages
7,006
Reaction score
1,526
Location
Newmarket, New Hampshire
Similar, the tuners (Alpina, GS, Gunther, others) used Solex and Weber sidedrafts of either 40 or 45 body size depending on engine mods. Alpina plenum requires 90 degree trumpets that go up into the air cleaner from below. I'd love to have an Alpina box but my VGS manifold staggers the spacing of the carbs to avoid changing the thermostat housing and brake booster so as a result the box wouldn't fit without changing it all. I suspect the box muffles the intake music somewhat but looks very cool.
I really like the look of the Alpina airbox but there is nothing sexier than the look of naked triple side drafts!
 

Nicad

Well-Known Member
Site Donor
Messages
3,517
Reaction score
542
Location
Toronto
Wow that is a lot of great info. You have really learned a lot about this in your journey. Just wondering….once they are set to your liking, do they stay that way? I have the 123 on my list when the car eventually gets put into use. I guess I am intimidated by all these variables. Hopefully this winter I make some progress.
 

Mal CSL 3.0

Well-Known Member
Site Donor
Messages
543
Reaction score
233
Location
Sydney, Australia
Wow what a brilliant informative thread. Thanks. Loved the technical explanation and read it all (even though my E9 is injected). Am very jealous of your engine bay, it looks spectacular even down to the small details of the blue Weber logos.
 

Stevehose

Well-Known Member
Site Donor $$
Messages
13,003
Reaction score
5,679
Location
Sarasota, FL
Yes, if your linkage is sound they will stay put. If so, a quick check with the Synchronmeter a couple times a year or before the driving season would give you peace of mind.

Just wondering….once they are set to your liking, do they stay that way?
 

zinz

Well-Known Member
Site Donor $$
Messages
1,213
Reaction score
1,216
Location
Austin, Texas
Wow... great write up, Steve. I know lots of folks will reference this for many years to come. Please take a gold star out of petty cash :)

I've never seen that CarbMate tool, interesting, though. I need to find one of those 90 degree adapters for the squirrel cage... that's VERY handy to have. I use a 4-port, CarbTune on my Solex DDHs. There are only two carbs on the M10, but the CarbTune allows me to see all the vacuum signals at once and balance accordingly. I have seen Ferrari manometers with a dizzying array of gauges to balance all the Webers at once... yikes.

SSL11411SC.jpg


Ed Z
 

Stevehose

Well-Known Member
Site Donor $$
Messages
13,003
Reaction score
5,679
Location
Sarasota, FL
That Carbtune is a very good device, I wish they made a 6 cyl model but the 4 version would work well. Being electronic, the Carbmate is very sensitive and adjustable. I made this manometer but haven't used it much as the Carbmate can be used while driving. Do you have a pic of the Ferrari rig?

PGEvxdP2lK__Y9qnnjWMPQEW1NuBHi4eIeViWpZ1GNeHybgZxw8bjFa4UB6RzfQrRkLeWbu3VqKoSBWltWOwBXHOQJcYMyqpqAkGhbklKZSX9iAC0STxsUGaciY4wE6PMJWipei--4v79MzLde8eZ8WVm0G0UXgszpTU7pUbfbhtNdz_IDqcEijIWm3SZATAM9ar1pZXCOG732bUWLBQbyp2u9mxSLKKmMkp5TW4iSOxyVz_MW9dO2mL5950YtxtbzJP1e1ekuMAaL5QlQ59TmDWqWB1n24xWdDYIbAhiImuZzNVzFq1Lus_D8T6mQZQHhg_y7DFxTqK5JLfBN40dR0Nh5mWUPYFmt6QB9Do8xv-1FHI82yRBQLudI7LKs9N0GKyq4D4Hn0T9EENCnjbTbbSvPRhtUHeKGq2coegH32_UuDCZzU8zo6yRJ6lpal0-WAqVSL4Dqs8B5kfP6WU98_SUsIjSyFJHA5IkoQaohg9Frak1yVqJgx-Whg-KZbQP9PKpTFbsuCVs1rpaeRteSzQea30NUXiuQhOBmUtOyDzq4RMlvWk_327QsFyo7GoenYJyYCUwlV7B5Hzm55EtMw6obYnZDUnWD5lqkETm1oNqmjF=w579-h771-no
 

zinz

Well-Known Member
Site Donor $$
Messages
1,213
Reaction score
1,216
Location
Austin, Texas
Oh wow... your home-made manometer is a beauty. I made one and it failed miserably... I didn't put restrictors in-line and the vacuum would pull the fluid right out of the device... woops. It was only ATF, so no harm done.

Couldn't find the pic of the Ferrari gauges... I'll keep searching. It was a large table-mounted device with 6 dial gauges and such. Pure old school.

Ed
 

jamesw

Well-Known Member
Messages
524
Reaction score
43
Location
Houston TX
Ed: the exact same thing happened to me! I pulled all of the ATF into my engine on the first blip of the throttle!

Steve, I think your manometer is very impressive. I think it would be tough to pull that much vacuum that the fluid would travel up and out the top of those big long tubes.

Cheers
James
 

Stevehose

Well-Known Member
Site Donor $$
Messages
13,003
Reaction score
5,679
Location
Sarasota, FL
My first manometer attempt was the DIY one you see online with only 1 long thin tube folded in half for 2 barrels, if I didn't cut the ignition in time I would have had a carb full of ATF as well. I promptly threw it out. With this one the action is slow and you have plenty of time before that happens as it has room in each column for at least 3 barrel's worth of fluid plus the pull from the other 5 cylinders would make it difficult to overflow but it helps to have everything ready to adjust before turning the engine on. Heck now I might hook it back up this weekend and fix what isn't broken which I excell at!


Ed: the exact same thing happened to me! I pulled all of the ATF into my engine on the first blip of the throttle!

Steve, I think your manometer is very impressive. I think it would be tough to pull that much vacuum that the fluid would travel up and out the top of those big long tubes.

Cheers
James
 

zinz

Well-Known Member
Site Donor $$
Messages
1,213
Reaction score
1,216
Location
Austin, Texas
Here's mine on the '71 2002, right after I put the DDHs on, some years ago... I couldn't wait for stuff like braided fuel line and a real manometer, so I slapped this contraption together, called it the KarbToon 5000. Used it twice with no luck... threw it in the trash and got some proper parts. Fun times.

Karb Toon 5000.jpg

Ed Z
 

Ohmess

I wanna DRIVE!
Site Donor $
Messages
4,887
Reaction score
2,707
Location
Aiken, SC
Hey Steve -- I wonder if you might provide some detail on the procedures you use to obtain AFR data and what other data you keep with the AFR info. Some tests are easy -- idle, WOT, and highway cruise AFRs for example -- whereas consistent repeatable procedures for testing off idle and 2nd or 3rd gear cruising AFRs are a little more difficult.

Also, What other data do you record with the AFR info? By way of example, this time of year at lower ambient temperatures I am getting richer AFR readings due to the increased density of the colder air. Do you track this? What about humidity? And I would love to be able to merge the output from the 123 with the AFR data in order to overlay revs, timing, and manifold vacuum with the AFR info.
 

Stevehose

Well-Known Member
Site Donor $$
Messages
13,003
Reaction score
5,679
Location
Sarasota, FL
With the denser air you should have been leaner, yes? That's what I experienced with the 2 weeks of 35-45 degree temps we had here a while back. I put in a smaller air corrector jet to temporarily richen up the timimg of the main circuit. Now that we're back in the 70's - 80's I swapped back. Humidity also makes it richer but to a lesser extent than temp I've found.

I don't keep any data anymore, I've removed my AFR gauge in hopes of just relying on sensory feedback. Due to the crude nature of carburetors, I don't think it's possible to get ideal afr's in all circumstances so I've stopped obsessing about it. The AFR gauge was my enabler. I focused on WOT, cruise, idle, and off idle and just tried to get into an acceptable ball park for each. Back in the day pre-AFR gauge they just did it by seat of the pants for WOT and probably had lots of crazy numbers at other points that they were not aware of like very rich idle and/or cruise etc. I bet a Miura runs very rich in most areas.

A telling spot for me is the 3k rpm range under no load in gears 1-3, any popping here indicates the transition from idle jets to main jets needs work, either the mains need to come in sooner or the idles need to hold on longer. If it goes rich here then there is too much overlap of transition. You'll be able to see on the gauge the rpm range where this happens. This overlap will have some effect on top gear cruise AFR as well.
 
Top