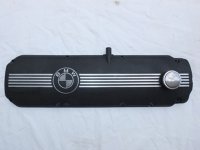
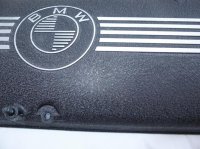
I have a sacrificial valve cover for experimentation so after wire wheel cleaning and buffing on the polisher I smooth filed the casting irregularities out of the strips and roundel, wet and dry papered them to a brushed type finish, masked them off then sprayed a wrinkle finish. Despite my scepticism about the manufacturer's claimed results it came out surprisingly well. The trick is to spray plenty of paint on, contrary to the usual practice of thin layers. Around the roundel it's best to spray the whole thing then, carefully, scrape the paint away before it starts to dry as masking this area is out of the question.
It's not perfect but not bad for an experiment. On the final cover I will clear coat the shiny bits to avoid the inevitable tarnishing in the hostile environment of the engine bay.
It's not perfect but not bad for an experiment. On the final cover I will clear coat the shiny bits to avoid the inevitable tarnishing in the hostile environment of the engine bay.
Attachments
Last edited:


