Haseeb,
Here's my little write up on what I would do. Since it will apply to pretty much any carbureted car of the era, you might be interested in reading. Do this and 9/10 you'll end up with a running motor, barring any serious complications.
Remember that carbs are often blamed for running issues, though usually end up not to be the cause. Everyone likes to point at the carbs and go to town with a screwdriver, but quite often the problem is actually with the ignition system or some other electrical problem. Period service manuals heavily stress ignition and electrical component verification plus ignition timing before touching the carbs--there is a reason for this. I have seen many carb rebuilds performed when the root problem was bad plugs, timing, points, etc.
Ignition System
1. Verify that your spark plug wires are connected to the correct spark plugs. Do not waste any time doing anything else until you know for CERTAIN that your firing order is correct. The order for the inline 6 is 1-5-3-6-2-4.
2. While someone else cranks the engine, pull a plug lead off a plug wire and hold the end close to something metal (cylinder head, etc) while the engine is cranking. You should see and hear a spark. If no spark, then you need to determine why and resolve before you move forward.
3. If no spark, make sure your ignition points are opening and not melted together or seriously mal-adjusted. My guess is that your engine still has points based on the condenser screwed to the side of your distributor. Be aware that you will damage or destroy your ignition points if you leave the ignition on but engine off for too long (10-20 minutes is long enough to melt points together if you are unlucky). Verify/ adjust your points gap so that they open to a maximum of about .024" for the M30--roughly the thickness of the paper cover on one of those old paper match-books. If the contact surface of the points is heavily pitted, or has a nib on one and a crater on the other, you can gently file off the nib to get you down the road, but they will need to be replaced. Make sure that the plastic points follower (or shoe) that rides on the distributor shaft and opens the points is not worn down to nothing. No sparks will happen if your points do not open, or are seriously mal-adjusted. While you have the cap off, make sure that the little spring loaded rotor contact in the center of the cap is present. Also make sure that the contact points inside the cap are not in terrible condition. If they are oxidized, you can gently scrape this off to get you down the road. My favorite tool for this is the end of a stout feeler gauge, works great.
4. Roughly set your ignition timing. With the cap removed, the distributor housing should have little reference line notched into it where the rotor should be pointing when cylinder #1 is at TDC (piston top dead center, exhaust and intake valve closed). Set the engine at Cyl #1 TDC and rotate the distributor so that this mark lines up with the ignition rotor. This will get your ignition timing roughly adjusted so that you can actually run the engine. You can go even further with this "static timing" by using a regular old test light (look up "static timing with ignition points" on youtube or somewhere), but you shouldn't need to.
Now that you have verified spark, and have the timing set well enough to run the engine, the rest will be easy!
Carbs/Induction
1. Make sure that there is good gas in the float bowls of the carbs and that the mechanical or electric pump is providing a steady supply.
2. Verify chokes are free, and not set with too much spring tension. They should have about the tension that a carpenters' tape measure has to pull the tape in (best comparison I could think of).
3. Back both idle speed screws all the out and look down the primary openings of the carbs (in these Webers, the primary is controlled by the throttle linkage, while the secondary is vacuum operated). With the screws turned all the way out, both throttle plates should be totally closed. Now by hand, open the throttles via the linkage and make sure that both primary plates open roughly the same rate and amount--this is your carb synchronization and they must be the same. If one is open more than the other, you will need to make adjustments so that they open in an equal fashion. When this has been verified and both plates are totally closed, now slowly turn the idle screws inwards until they just barely begin to actuate the throttle plate. When the plates are now just barely acted upon by the idle speed screw, give each screw one and a half complete turns. One and a half turns will probably result in a high idle, but no worries as you will adjust this down later.
4. Remove the idle mixture screws from each carburetor, and make sure neither is damaged or showing signs of internal cleanliness problems (ie tarry, varnish susbtance). Gently screw these idle mixture screws all the way in until they bottom out. Now back each screw out 3 whole turns. This will likely result in a richer idle mixture, but you will adjust this out later on.
5. Verify that the accelerator pumps of the carbs are working correctly. These are the little nozzles that emit a stream of gas as the throttle is opened.
Starting Sequence
You have now verified that your firing order is correct and that you have a spark occurring at roughly the proper time in the cycle. You have checked that there is fresh, clean gas of the correct octane in the float bowl of the carburetors, that the chokes are adjusted roughly correctly and have verified a baseline synchronization. You have both throttle plates slightly open (one and a half turns each), and idle mixture screws adjusted to provide a healthy, rich idle (three turns out on each).
After priming with a couple pumps of the gas pedal, crank the engine. Unless you have some serious vacuum leaks, or internal engine issues, it will start. You will need to turn your idle down, adjust your idle mixture and set your final ignition timing, but these are easily accomplished on a running engine.
Good Luck!
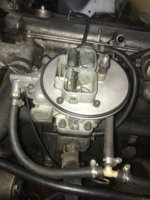
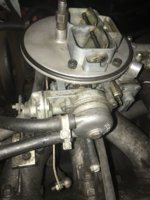
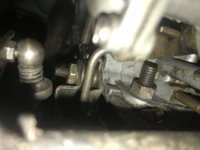
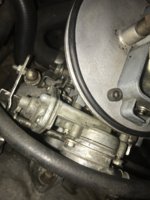
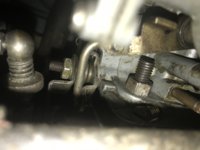
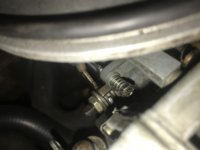
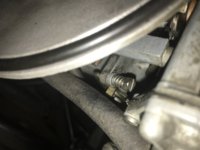
PS--I'm pretty sure the reason that your engine is not running is because the idle circuit solenoids on one or both of your carbs is unplugged. Now having actually looked at the pictures you posted, I can clearly see the blade connector with nothing plugged onto it, and the wire harness hanging out below the carbs! That solenoid needs to get 12V with ignition on at all times--their purpose is to block off the idle circuit when the engine is shut off. The engine cannot idle with those unplugged, period! Unfortunately, since you have likely made a ton of random adjustments to the carbs and ignition system in attempt to solve your issue, you are probably going to have to follow the above procedure anyways to get things back in shape.
")
 the battery is new and advance auto checked it out but it was fine. Any advice guys?