CSL Restoration

Marc-M

Well-Known Member
Messages
377
Reaction score
311
Location
Preston - Lancashire-UK
It been a while, but there is really not too much to show as most of my work has been getting panel gaps right.
I am not there yet but getting close, the only way I can describe how its going is as follows…

The car is a Rubik’s Cube….. you move one thing that you think is right, then nothing else fits .. but it all comes together just at the end.
The engine has gone off for it rebuild, and I have been getting new parts for it.
The engine guy is a racing engine specialist and has done the M30 engines before back in the 80s so I’m in good hands.
The engine is being kept to standard specification, will be fully balanced but he’s is going to increase the compression ratio and go to 90mm bore.
Pistons, the size I want are no longer available for the car, the ones I have found are very expensive. However, the custom forged ones cost less than that OEM… so someone is taking advantage of us E9 owners!
Due to the piston being forged (and this is what I’m being told) they normally have to have a bigger tolerance because they expand more than the standard ones – so could be a little nosy on cold start up…. Until warm
I have been recommended to have a “skirt coating” (they do this for Jaguar E type pistons) and this then reduces the tolerance down to standard… so no noise on start-up… We will see!!
The head was cracked and I was trying to find a replacement, however I got recommended a company whom specialise in restoring damaged heads and they are on with that now – what I thought was bad – they think is actually good and well within their capability to repair.
They are also putting in new valve seats and valve guides.
The head will also be sent off for some sort of pressure impregnation treatment to stop it being porous ( it will have been pressure tested) but this is something he says it well wort it as an extra as its only a few ££ more.
I am putting in new valves – rocker shafts, rocker arms etc etc
The block has had a hard time and when I got the car, no 3 pistons was seized… so on strip down that bore was badly scratched – all the other were very good.
However, it was too badly scratched to bore out and it has been re sleeved, and the block is now all prepped ready for the rebuild.
The crank has been reground to +25 so was in good condition…
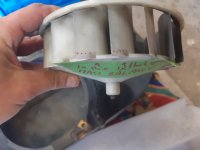
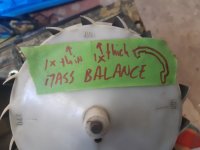
The flywheel has been reground smooth.
The list of parts is quite long… and dammed expensive…
And a few unforeseen things I had to get…
The cam was chipped and worn – so a new one!
The con rods were rusty and slightly different weight – so I got a new matching set.
The front pully was all chipped – so a new one.
Once the engine is built its going to be run on his dyno and set up there.
It will cost me a few extra ££ but I like the idea that any problems with the fuel injection set up will be sorted and that It should start on the button when put into the car…
All the engine aluminium has been blasted and now is ready to go for vapour blasting, but a couple of the castings have suffered and rotted out – so I ground off the rot and re welded up the ends – so that has saved me a few ££.


IMG_4652.JPG

IMG_4656.JPG


CE157850-1C70-40C4-939A-44ED7066D681.JPG
 

Marc-M

Well-Known Member
Messages
377
Reaction score
311
Location
Preston - Lancashire-UK
Keeping it the orig apart from increase in compression .
All the cars I have done are carbs and it’s easy
I have no real clue on how djet works apart from the trigger is from the dissy...and there is a box that sends a signal to the injectors to work - and a throttle sensor - don’t even know what that does yet! But that does have some sort of mechanical adjustment .....
And I not sure if the box can be re programmed maximise performance to use the crap fuel we have now...
I have got a 123 dissy if when it goes on dyno and it all needs Ignition advancing / retarding to get it running well??? I do not know but will find out..
I will probably know all about how it all works by the time I’m on to it... cos nothing will work at the beginning - that is if it like everything with the car - is one big fight ...... but once it’s done - it’s done...
 

Marc-M

Well-Known Member
Messages
377
Reaction score
311
Location
Preston - Lancashire-UK
My new forged pistons have arrived – interesting to see the difference between the cast and the forged – the cast ones have a longer skirt and the profiling on the top pf the forged ones are similar to the originals, but not an exact copy, but I guess this will be due to the machining capabilities.
Also, you will see the black coating to the skirts of the forged pistons that I hope will reduce any cold start clatter????
IMG_4712.JPG


IMG_4714.JPG

IMG_4715.JPG

IMG_4716.JPG


Will the black coating work??? - we will see
 

Marc-M

Well-Known Member
Messages
377
Reaction score
311
Location
Preston - Lancashire-UK
Its been a while since I posted an update on the car.
The big news is that I have just about finished the body shell and managed to get all the gaps even.
This has been a huge task………….
Getting the doors gaps and getting them to fit so they are smooth with no jutting out bits has been fun!
The bonnet gaps are even but the front edge is a couple of mm bigger that the other 3 sides.
The only option I had to close the gap up was to weld a bead on the front edge of the aluminium bonnet, but I think welding on old aluminium would have caused more problems.
I did look at my mates CSL and it’s a very original car – and his gaps were different on both the front edge and the rear edge…
So, I have decided to leave it as it is….
Most of all the car is built up now, trial fitting all parts as I welded it up….
Getting the headlights to all sit evenly through the black plastic gill was time consuming…
So, loads to take off it before it goes to SPL for its dipping and e Coat.
I’m looking forward to cleaning out my workshop – clearing up all the tools and getting it ready for the clean rebuilding.
I have decided that when it comes back from e coat – to seam seal- and paint the underside engine bay trunk and inside at my house
Build up the car so its on all 4 wheels with engine etc etc all in, and send off to the painter.
If I paint the whole car and then start putting it back together, I think I would scratch the paint.
And you never know, once it’s on its wheel’s thing have a tendency to move a little so I can sort out and gapping problems… but I hope not as its been built up on stands at the suspension points.
The engine is at the engine re builder and I hope to get it back soon.
I have managed to get a spare used re con 73 head as I was unsure about my old head – but the orig. 72 stamped was not that bad, has been re furbished with new seats, guides and had some welding done , machined and pressure tested and is all good as new.
On a side note – my engine builder recommended that I send the head off after all the work as an extra precaution to get it impregnated as he does this with all his old racing engines as a belt and braces.
i took it down and picked it up next day and it looked just the same....
I have never heard of this treatment before – but it was only £55.00 and he seems to think its well worth it.
if anyone knows anything about it and if its any good i would like to know more.... or have i pissed £55 away??

See
https://www.impregnation.co.uk/
 

paul

Well-Known Member
Site Donor
Messages
321
Reaction score
305
Location
Australia, Queensland, Gold Coast
Marc.....my bonnet front gap is the same slightly wider than the other 3 sides. I would not worry about it. My door gaps were lined up when car had engine suspension in it and are all perfect. Noted that when it came off the rotisserie there was movement so left it until engine and suspension in. Did you have you the engine block decked? My car is up and running now (m90/b34) and it sounds awesome has heaps of torque and grunt...I am extremely happy with it :D:D
 

Marc-M

Well-Known Member
Messages
377
Reaction score
311
Location
Preston - Lancashire-UK
Marc.....my bonnet front gap is the same slightly wider than the other 3 sides. I would not worry about it. My door gaps were lined up when car had engine suspension in it and are all perfect. Noted that when it came off the rotisserie there was movement so left it until engine and suspension in. Did you have you the engine block decked? My car is up and running now (m90/b34) and it sounds awesome has heaps of torque and grunt...I am extremely happy with it :D:D
Hi Paul

no i had the car on axle stands located at the suspension points... so i may have cocked up there re gaps - but.... the car is off for dipping and while its away i ill be building up the sub frames and they will be bolted up with engine etc after i have its been seam sealed and painted ( engine trunk, inside and underside) i will then put on the doors and see if and how much i need to tweak the final gaps......

I must say that this corona thing is quite bad, but self isolating in the garage is keeping me sane....
Marc
 

Marc-M

Well-Known Member
Messages
377
Reaction score
311
Location
Preston - Lancashire-UK
B64EEADB-E43F-410C-A7C3-FF826EBF1D78.jpeg
the windscreen wiper mechanisms was totally seized and once in bits the the rust had taken hold...the splined drive bolts were beyond use ,, chopped off the splines and welded onto new shafts ( the middle one)
28D2960D-7259-441B-8210-49DBA3A5F09C.jpeg

front axle 80% done
66839D26-304C-488F-BE98-21D647B0845C.jpeg

77F30C99-4496-4490-9D94-466DDF14851E.jpeg

rebuilt the brakes,spot how the last owner kept the pads in!
He nailed it.........
Had to split them all ... a big job getting the pistons out.... had to weld a big bolt in to use as a puller .10 of the buggers...home zinc plated them ... not factory but will stop the rust...may have to,paint them when the shops open...
8F0046D5-5188-438F-9BF7-AC07C5FC708E.jpeg


All new bolts etc .... but having huge problems getting the 7mm ( stupid size) bolts for the rear...no one does them ...
So will have to put the old ones back in...and that’s not recommended, but so still waiting for the body to go off to dippers and got new 7mm nuts.... but if anyone knows where to get them?
1AAB2AEE-6231-4343-94A0-210EE7D9AC82.jpeg

engine nearly rebuilt . Justwaiting for extra shims for oil pump .. chain a bit slack...
 

frogisland

Well-Known Member
Messages
294
Reaction score
99
Location
Cheshire, UK
"but having huge problems getting the 7mm ( stupid size) bolts for the rear...no one does them ... "

I searched everywhere over a long period time for specific m7 bolts to build up some e12 M535i calipers (after i lost the original bolts!!!) and never found any in the UK. I did wonder if they could be drilled out for m8?
 

Bmachine

Well-Known Member
Site Donor $
Site Donor $$
Messages
3,533
Reaction score
1,790
Location
Northern California coast
"but having huge problems getting the 7mm ( stupid size) bolts for the rear...no one does them ... "

I searched everywhere over a long period time for specific m7 bolts to build up some e12 M535i calipers (after i lost the original bolts!!!) and never found any in the UK. I did wonder if they could be drilled out for m8?


frogisland

Well-Known Member
Messages
294
Reaction score
99
Location
Cheshire, UK
Thanks for the link. The original caliper bolts are a higher tensile strength than the 8.8, can't recall exactly the TS. Quite critical in a hydraulic situation. I noted on my e12 race car a couple a days ago how a 8mm thick adapter plate deflects under a hard press of the brake pedal (rear brakes, 4x 38mm pistons)

Oh, and the caliper bolts are stretch bolts also.
 
Last edited:

eriknetherlands

Moderator
Site Donor
Messages
2,749
Reaction score
1,993
Location
Netherlands, Eindhoven area
I think there is a thread on here somewhere by "PMB Performance", (a well know caliper rebuild company ) They stated that they reused the M7 bolts and nuts. Let me see if i can dig it up.

Voila:
Go read it if you want to do *anything* with your brakes. It was very helpfull to me.

 
Last edited:

Marc-M

Well-Known Member
Messages
377
Reaction score
311
Location
Preston - Lancashire-UK
Well I have failed….

Could not find any m7 hex bolts for the rear callipers, so I cleaned up the old ones and reused them with new nuts that are available- not something I wanted to do….
If they do not work my only option is to get the existing holes machined out to 8mm….
I think I should have done that at the start… it would have saved a hell of a lot of messing…

The engine is now built up – and on the dyno – compression is now I believe 10.5:1….
But none of the fuel injection is plumbed in yet….

This is a big worry as the main box has not been used since 83 and we don’t know if it works… plus a hell of a lot of other things that may cause problems…

But all we can do is build it up as per the drawings and see.

If not, my engine man is saying that we keep it looking original and put in a new fuel injection system and he would trigger off the flywheel!!!
Anyhow let’s wait and see if the thing starts……
IMG_5631.JPG

Wood…..
So, I have done a diy job and redone all the wood on the car.
I found it quite interesting trying to work out how to clamp the new veneer in place….
I could have got a vacuum bag – but wanted to see if I could do it a different way.
Oh yes – the glue I used is called Cascamite – what a glue –
I had to make moulds first for the curved sections.
IMG_5548.JPG

To make the moulds I got some u shape channel and filled with expanding foam- picture above is the dash roll - you can see the masking take holding the veneer in place
Placed the wood into the foam and left to set. (I covered the wood sections with masking tape first so that if the foam stuck – it would stick to the masking tape)
Once the foam dried – took the wood out – took the masking tape off – and stripped off the veneer.
Sanded all old glue residue off – used the cascamite glue to fill in any holes and left to dry.
Then gave the whole thing another good sand and then aligned up the new veneer.
Applied the glue with a brush – placed the veneer and held it in place with masking tape.
Put it in the mould – clamped up nice and tight – and after 24 hours took out -sanded with 400s then 1200 and sprayed from a can 5 or 6 coats of stain finish that we used for wood floor repairs.
The speaker cover was a hour or two worth of work..
i used a small craft knife to double cut everything and a small file to get the square edges nice and square.
The fabric speaker cover could not be re used , but keeping a bit i found that one of my old linen shirts was very close to the texture of the fabric - so chopped that up and gave it a gentle spray with black paint - and it looks great....
IMG_5555.JPG

59824B47-9F12-4A8D-A6CF-D82F81763664.JPG

Just had another coat on - so the wet look!
EF567031-9C9E-41CF-A0F0-E1B5462A2CDD.JPG

Building up the dash
D8AA82F9-5109-4967-8E51-57C2EB75116B.JPG

I am very happy with the results, and looks like it was done by someone who knows what they are doing!

I am now on the heater box – that is cracked and a mess – the motor does not look like its going to work! – so taking that to bits this week.
IMG_5701.JPG
 

eriknetherlands

Moderator
Site Donor
Messages
2,749
Reaction score
1,993
Location
Netherlands, Eindhoven area
Nice work Mark. Hope your engine runs.

Be carefull when removing the fan, it is balanced with small metal clips. I actually did not photograph the part itself, just their outline and location. See pics. I had a thin and thicker clip installed at 180 degrees.
Dont loose them...
 

Attachments

  • 20200601_154105.jpg
    20200601_154105.jpg
    146.3 KB · Views: 208
  • 20200601_154053.jpg
    20200601_154053.jpg
    163.6 KB · Views: 208

Marc-M

Well-Known Member
Messages
377
Reaction score
311
Location
Preston - Lancashire-UK
So a lot has been going on...
Engine has been run on the dyno and started within a few mins of being wired up… the engine builder was supplied (and so was I!!) it started as the ecu and the pressure sensor was all old and untested, however I the injectors and the throttle switch was new.
The engine fired up with no cold start as he did not wire that up… and idled at the correct speed after a few minsites – again this we expected to be a problem – with no adjustment! Again, a big surprise.
I did ask him about further tuning and he said that it’s a all pre mapped and fixed and the only thing they can do is the idle and timing – but he’s run it for a few hours and wound up the brake on the dyno and he said its going to produce over 300 ft lb torque – so its good news.
He will now torque the head down and check the tappets… before I get it back.
IMG_5896.JPG

IMG_5898.JPG

The body has been away and submerged in an e coat paint and is now at the painters – I have decided to change the colour to Orange (well that is of today). from the blue it was from factory...
body.jpg

I have also been restoring the trim cards and dash top, as they have a few cuts and nicks along the bottom of the door cards.
I purchased a vinyl repair kit and re glued the nicks, and where there was insufficient vinyl to repair took some from the back of the cards and cut a new small section in.
After cleaning a few times, you could clearly see the repairs, so I got some vinyl dye spray and after a few coats of light spraying the whole panel, they were well disguised.
However, they were a gloss finish and looked crap.
After a few different processes I managed to get it looking satin and looking great.
I have restored the heater box – the heater core was broken, however got everything zinc plated and put in new neoprene seals.
nnn.jpg

There were a few cracks in the plastic so used a small Dremel and ground out a small V along the cracks and mixed up some black epoxy glue and filled in the V –
All I can say its like a rubric’s cube and getting it put back together is a pain in the ass.
I ran out of patience trying to get the two halves back – so I drilled a 0.9mm hole in the ends of all the control flaps and tied in 0.8mm MiG wire to each end and used that to guide it all back together…
Worst job so far…. as it took a whole day just figuring out how to get the flaps in place without them dropping out every time until i came up with using the wire as a guide to put the two halfs back – so I have saved you loads of time there…
 

Wes

Moderator
Site Donor $
Messages
1,641
Reaction score
1,488
Location
Tasmania, Australia
Those heater boxes are the worst. Mine was all cracked and had a hole in one end. Managed to epoxy back together and run a carbon strip over the join. It came up really well and is now back in the car.

Curious to hear what others have to say on a colour change on a CSL. I know loads of members say 'it's your car, do what you want' but that's not in this context. For mine I'd stay factory colour and spec generally wherever possible.
 

day66

Well-Known Member
Messages
249
Reaction score
227
Location
Manchester, UK
I’d have no qualms about changing the colour of you don’t like the original - though orange would be a long way down my personal wish list ...
 

Wes

Moderator
Site Donor $
Messages
1,641
Reaction score
1,488
Location
Tasmania, Australia
Yeah, mulling it over I don't agree in the context of CSL's. I think moving from factory colour will hurt value, which you need to consider as a restoration costs a mint and you need to recoup costs if/when you sell.
 

Marc-M

Well-Known Member
Messages
377
Reaction score
311
Location
Preston - Lancashire-UK
Those heater boxes are the worst. Mine was all cracked and had a hole in one end. Managed to epoxy back together and run a carbon strip over the join. It came up really well and is now back in the car.

Curious to hear what others have to say on a colour change on a CSL. I know loads of members say 'it's your car, do what you want' but that's not in this context. For mine I'd stay factory colour and spec generally wherever possible.
I have spent months, well years thinking about it (the colour)
When I have seen other cars in the blue it (and its only my opinion) looked a bit normal.
I just fancied something that popped out a bit….!
I’m not bothered about value as I restore to keep, and I’m not bothered how much it will fetch cos I probably be dead when its sold.
But ……………………………………
1) As there are so few of the CSLs – should I keep it in its original colour as I hope the car will be around ?
2) Will I look a knob head driving an orange car at 55+?
3) Does the blue look a bit flat?

As you can see, I’m all over the place with this and I’m still not 100% with my decision…………
Thinking of booking a few weeks with a therapist!!!!!!!
 

Wes

Moderator
Site Donor $
Messages
1,641
Reaction score
1,488
Location
Tasmania, Australia
Ha.
In my experience some people look like a knob head no matter what they do :D
Given the rarity of the car and you presumably hope to hand it on some day to a like minded person I'd keep it original. There are heaps of threads on here about CSL's that have been messed with and how hard it is to find one that's correct. Just my 5 cents worth.
 
Top