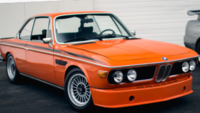
CSL Restoration

Marc, I like blue, but I cannot fault any of your thoughts! If it's a long term keeper, then I think you need a colour that you will be happy with. Personally I wouldn't knock the value of a car if it had had a colour change to a colour I liked!
 
I’d have no qualms about changing the colour of you don’t like the original - though orange would be a long way down my personal wish list ...
 

Attachments

  • B65112B9-28FE-4463-9FEE-A6CFBED17F0F.png
    B65112B9-28FE-4463-9FEE-A6CFBED17F0F.png
    1.6 MB · Views: 255
I have spent months, well years thinking about it (the colour)
When I have seen other cars in the blue it (and its only my opinion) looked a bit normal.
I just fancied something that popped out a bit….!
I’m not bothered about value as I restore to keep, and I’m not bothered how much it will fetch cos I probably be dead when its sold.
But ……………………………………
1) As there are so few of the CSLs – should I keep it in its original colour as I hope the car will be around ?
2) Will I look a knob head driving an orange car at 55+?
3) Does the blue look a bit flat?

As you can see, I’m all over the place with this and I’m still not 100% with my decision…………
Thinking of booking a few weeks with a therapist!!!!!!!

these photos might make your choice, easier or harder lol
 

Attachments

  • F704EB46-EAE2-4FC4-8862-D32578FA50A4.png
    F704EB46-EAE2-4FC4-8862-D32578FA50A4.png
    564.2 KB · Views: 240
  • 211BADBE-0034-4B80-BFF7-9F0A9A6F0EC0.png
    211BADBE-0034-4B80-BFF7-9F0A9A6F0EC0.png
    517.9 KB · Views: 226
It’s been a long time since I posted anything – but it’s been a slow process.

The body went to my painter, and as normal he found quite a few things I did wrong with it.

Because in an idiot. I set all the gaps with no seals and when he asked for all the seals – and put them on the car – well it was all out.

The trunk – I just assumed that placing the original trunk (boot) lid in the hole and align up the rear wings would be fine! – wrong!!!

By the time you put the new seals on and attached the torsion springs that lift the lid – it distorts the lid and its all over the place!

Doors – again did the gaps with no seals – put new seals in and the pressure on the door pushes the door all over the place and you can’t get a flush door – oh days of fun!

Then ,add into the getting all the swage lines to run parallel down the side of the car, even getting the door handle to be in line with the belt line trim… only a few mm but as they say --- if you are going to do it – do it well.

Then the bonnet lid – same – put the seals on and the catches pull it down – and the thing just moves and the edges rise up…

Windscreen – trial fitted the old screen but it was delaminating – but it fitted well –

Got a new screen – fitted it – the rubbers did not sit flush at the top edge on one side – so the windscreen man had to take it away and sand down the top corner to allow the rubber to fit – re fit – all good - do not assume a new windscreen will fit!

Everything has been trail fitted to ensure it all fits – bumpers – all windows - lights – grill .... the lot....

Well, we are at the paint stage – the car has been e dipped – and dipped in a bath of paint to seal everything – all seams (and there are days’ worth of them) have been seam sealed.

The underside has been sprayed with a 3m product that costs a fortune and, in some areas, he’s sprayed the 3m on top of the seam sealer to try and give a factory finish.

And its staring to get colour…. Orange…. Not the original colour of blue, as I wanted something a bit brighter, and boy its bright.

So, I’m hoping I will get it back in a few weeks’ time, but I know everything fits now ,so I’m now going into the clean stage of the resto…. and i hope it goes back together and fits!
1ff.jpg

1v.jpg


1dd.jpg

1ee.jpg


1b.jpg

1d.jpg

1b.jpg
 
Awesome work and great colour choice !!!!!

Let the fun start with the re-assembly of the whole car aka the big jig-saw
 
Popped down to see how it was going - its now painted apart from the out side body parts.

The primer is flatted down with 360s and will be flatted down again with 500s........and i noticed how crisp the swage lines and how parallel they are.
I think it was the shading the light cast over the side of the car that shows it best.
Next week i should have a orange car......
body 1a.jpg
 
A few more pictures to look at -
so into the next stage of paint ( not these pics) - doors ,trunk lid etc etc are now being put back on car after spraying and will be flatted down.
Then a few coats more applied on all of the car..
Cant decide if i need a clear coat on top of the whole lot -
qww.jpg


qqwqq.jpg

I hope that is is about the right quant/ finish of stone chip under the paint....
wwq.jpg
 
Looking great!, when you talk about putting clear over the whole car I presume that being a solid colour there is zero clear at present ? , sometimes painters will a little clear in with the last top coat. To add clear to the paint job at this point , which will give it far greater 'depth', is a bit of work , sand the whole car , remask, and you have the issue of the bolt on panels are on the car , sanding the leading edge of bonnet, doors boot lid in place , is TRICKY, removing bonnet and boot lid would simplify the issue. Good Luck.
 
Looking great!, when you talk about putting clear over the whole car I presume that being a solid colour there is zero clear at present ? , sometimes painters will a little clear in with the last top coat. To add clear to the paint job at this point , which will give it far greater 'depth', is a bit of work , sand the whole car , remask, and you have the issue of the bolt on panels are on the car ,
At the mow its just pure orange - hes going to flat off the whole car with all panels on - then paint it again ( i think 2 coats).... but i asked if we should put a top clear coat on and hes not 100% sure if it will need it - he did say a flow coat maybe?? - i was just wanting the paint to look deep - but i think once its had its final coats of orange i ( well probably him) will make the call if it needs the clear......
sanding the leading edge of bonnet, doors boot lid in place , is TRICKY, removing bonnet and boot lid would simplify the issue. Good Luck
 
YOU MUST HAVE A CLEAR COAT TO ENRICH THE LOOK AND PROTECT THE PAINT
MUST HAVE!!!!!
AND TO REPAIR BLEMISH NICKS LATER
 
Best pic ever! Leffe is my personal favorite, so is Inka... But they only match, lets say, in a static condition.
Amazing how the reflection of the crate runs continuously from the door to the front fender without distortion. Class work!
 
And so, the rebuild starts - as usual bits I did not think about need ordering up - when putting the front loom in - all the old clips has rusted away.

The new loom from Autosparks is good but quite a few of the block connectors are missing – so I am taking them off the old loom.

dvasvA.jpg
sdfss.jpg
 
Back
Top