i would imagine Don would be using megasquirt. i doubt the s38 intake / airbox would fit with the brake booster - i could be wrong. perhaps Don can share what is successful.
You are using an out of date browser. It may not display this or other websites correctly.
You should upgrade or use an alternative browser.
You should upgrade or use an alternative browser.
72 3.0 CS 2240344 Restoration
- Thread starter ScottAndrews
- Start date
-
- Tags
- restoration list
Paging @nosmonkey ; you're running an S38 isn't it? Didn't you have a s*xy carbon fibre airbox?
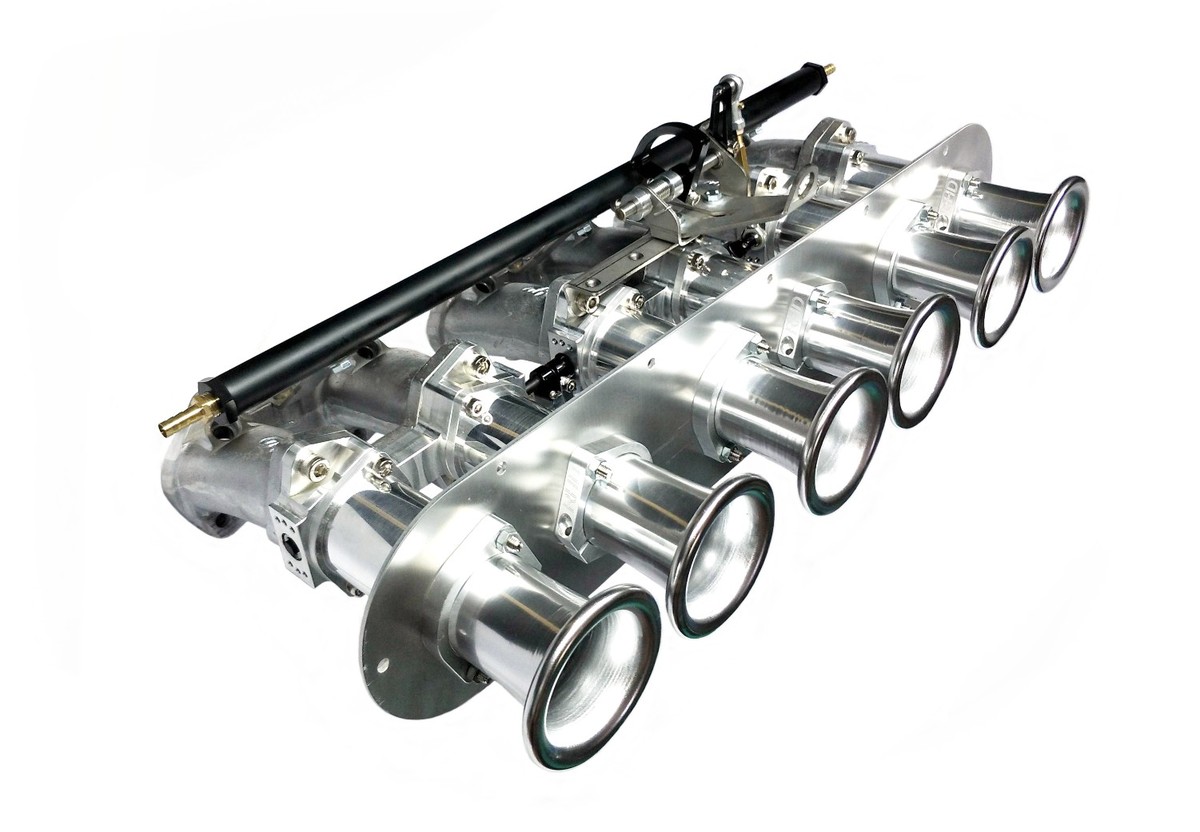
there are a couple companies that make a DCOE ITB:
 www.racetep.com
Top End Performance - Universal DUAL ITB Package for use with existing Dual Weber DCOE Carb Intake - Distributorless Ignition Systems and ITB EFi kits - BMW - Auto Brands
<p>(2) 45mm or 48mm Throttle Bodies <br />Dual Fuel Rail Set <br />Fuel Injectors 320cc to 650cc High Impedance <br />Adjustable Fuel Pressure Regulator<br />TPS with Plug and Pins<br />Cable Bracket Kit for use with existing throttle cable.<br /><br />Ca
www.racetep.com
M88 with a carbon plenum, although being rhd i have more space on the intake side.Paging @nosmonkey ; you're running an S38 isn't it? Didn't you have a s*xy carbon fibre airbox?
Personally on an m30/m90 would either go jenvey heritage dcoe itbs with an appropriate manifold or the kit from rhd engineering
BMW M30 Complete ITB Kit - Racehead Engineering
Complete bolt on ITB kit BMW M30, All linkage components, vacuum / ICV accumulator and all associated fittings and hose tails. Proven Performance.
racehead.com.au
Clubsport_CSi
Well-Known Member
There are adapter plates available for adopting the S38 ITBs to the M30. But I would not go this route as i) the S38/M88 ITBs are ported for the intakes with two valves and ii) such solution will be more expensive than using kits specifically designed for the M30. Additional suppliers for M30 ITBs are Dbilas and VGS.
For MS'ing M30s with Motronic, there are P'n'P solutions available like the KdFI, it is a bit harder to transition L- or D-Jet engines.
For MS'ing M30s with Motronic, there are P'n'P solutions available like the KdFI, it is a bit harder to transition L- or D-Jet engines.
My goal here is to use the DCOE carbs with the M90 motor, not to transplant an M90 CSi engine into the car. Looking at the Karsundpartz (Pierce. Ireland, etc) manifold I see that it is formed to the shape of the B30 intake ports, so I’ll either need to port the manifold to the head, or make a new manifold. I think I can port the ones I have unless the flanges are too small
So, I'm curious about this setup (not because I plan to use it, but just engineering curiosity). With these ITB systems, how does the ECU determine mass air flow? Are there multiple MAFs?M88 with a carbon plenum, although being rhd i have more space on the intake side.
Personally on an m30/m90 would either go jenvey heritage dcoe itbs with an appropriate manifold or the kit from rhd engineering
BMW M30 Complete ITB Kit - Racehead Engineering
Complete bolt on ITB kit BMW M30, All linkage components, vacuum / ICV accumulator and all associated fittings and hose tails. Proven Performance.racehead.com.au
Clubsport_CSi
Well-Known Member
Usually, the corresponding ECUs on modified engines work with MAP sensors and/or alpha-N models. The standard M88 and S38 has a Bosch MAF, however, as more proper for daily street use.
The nice thing when using a programmable ECU like Megasquirt on a Motronic/L-Jet M30/M90 , e.g., is that you can get rid of the old flap based AFM which is restrictive on modified engines.
The nice thing when using a programmable ECU like Megasquirt on a Motronic/L-Jet M30/M90 , e.g., is that you can get rid of the old flap based AFM which is restrictive on modified engines.
Last edited:
Is Halltech also an option for you?
I have two S14 friends (both engineers) that converted to the Halltech system with the "throttle by wire". They are extremely pleased. I can provide their contact if you want to speak to someone.

I have two S14 friends (both engineers) that converted to the Halltech system with the "throttle by wire". They are extremely pleased. I can provide their contact if you want to speak to someone.
So a change in subject. I noticed that the bitumen pads on the inner front fenders are painted body color. This begs the question, what is under these? Is the car painted and then the pads installed and painted, or is the car primered, then the pads installed and then the car painted??
Good question - I’ve seen some threads which suggest that it may be best to prime, paint and then install bitumen, which appears to be how it was done originally, since there is paint color not primer only on mine. One thing I haven’t figured out is whether the bitumen should be painted before installation (easier) or once it’s on. If I do it before I worry the paint may crack since the bitumen is a bit flexible. I’m open to suggestion, but thinking of the following workflow:
1. Prime bay and inner fenders
2. Paint engine bay
3. Install bitumen
4. Paint bitumen in place
5. Clear coat bay including bitumen
Not sure whether to add clear coat between steps 2 and 3 so that the bay itself is fully complete regardless of the presence/absence of the bitumen.
1. Prime bay and inner fenders
2. Paint engine bay
3. Install bitumen
4. Paint bitumen in place
5. Clear coat bay including bitumen
Not sure whether to add clear coat between steps 2 and 3 so that the bay itself is fully complete regardless of the presence/absence of the bitumen.
Intreresting. Doing the paint-apply-paint process with body color seems like a lot of extra work. In my painting experience, the color was basically a one-part lacquer type paint that gets over-coated with a two-part urethane clear. So I would be wary of applying the bitumen over the color coat without the clear. But then putting color and clear down and then applying the bitumen and then putting more color and clear means that some of the color will be over the first clear coat, which seems odd.Good question - I’ve seen some threads which suggest that it may be best to prime, paint and then install bitumen, which appears to be how it was done originally, since there is paint color not primer only on mine. One thing I haven’t figured out is whether the bitumen should be painted before installation (easier) or once it’s on. If I do it before I worry the paint may crack since the bitumen is a bit flexible. I’m open to suggestion, but thinking of the following workflow:
1. Prime bay and inner fenders
2. Paint engine bay
3. Install bitumen
4. Paint bitumen in place
5. Clear coat bay including bitumen
Not sure whether to add clear coat between steps 2 and 3 so that the bay itself is fully complete regardless of the presence/absence of the bitumen.
Putting Bitumen over primer also seems odd, since the primer may not provide as much protection as regular paint.
I am wondering if the best approach would be to apply POR or some other serious rust preventative paint in the areas where the bitumen goes...Basically mask off everything except the shape where the bitumen goes. Paint that with some good quality one-part paint (not a color-clear setup), apply the Bitumen to that, and then paint the entire thing with color-clear.
It is also possible that the original colors were not a two-stage (color-clear) urethane, which would mean that the engine bay was painted twice. Once without the bitumen and then painted again over the bitumen. The single stage paint would presumably provide good protection.
I agree that painting the bitumen by itself before installing it is probably not a great approach either.
On my car the old bitumen has a lot of cracks, which look terrible. I am wondering what the stuff adds, and if the downsides of it (cracking, trapping water, etc) outweigh the loss of originality and the possible higher noise from leaving it out entirely. Seems like a good undercoat in the wheel wells might do the noise reduction job just as well. An alternative might be to spray lizard skin or some equivalent noise absorber on the fenders and then paint over that (super un-original)...
I did a search through old threads since I seemed to recall this discussion but couldn't find anything that really detailed the process. I will say that the majority of the rust that is present in my engine bay was under one of the bitumen pads, lending some credence to the idea that moisture capture can be an issue. My hope is that a very thorough two-part rust prevention process (remove rust and then rustproof with a rust-counteracting paint prior to priming) would help prevent the problem in the future. I think it would be an issue with any type of sound deadening.
You're right that it would be a bit odd to apply the base coat paint over the clear coat and then clear coat again. Perhaps this (slight) variation: complete engine bay fully with paint and clear coat, then lay the bitumen down without adhering it and mask off the rest of the engine bay, masking just 1 mm or so under where the bitumen will lie. Press the bitumen down just overlapping the edge of that mask, paint/clearcoat and then peel out the masking.
Before I put the bitumen down I'll test spray a piece to see whether it holds the paint and clear without cracking as long as I don't bend it in half. Most of the pieces there are along flat sections, so we may be overthinking it.
To add another slightly off-topic consideration, I've seen various thoughts on seam sealing before painting. All of us seem to have factory seam sealant that is brushed on at the back edge of the engine bay which just looks very rough but is clearly original. It seems that some people have added some seam sealant along the seams where the fender attach to the engine bay, basically just underneath this bitumen area. The thought would be much the same - prevent a place for water ingress which then could be a source for rust.
I painted my engine compartment (and the front fender well area, and had the pads on a stand outside and then shot them before cleaning the gun. I made a mistake though and forgot to peel off the clear protective film on the pads (yes, there were instructions) and had to paint them again...
I painted and primed my fender tops along with the entire engine bay. I pre-painted the insulation pads prior to installation - this was a mistake as when I installed, the forming and pressing of the pads to the fender curves etc. caused the paint to crack, so I stripped them and painted in situ and they came out great.
good call Steve, mine show "paint wear" from the installation process.I painted and primed my fender tops along with the entire engine bay. I pre-painted the insulation pads prior to installation - this was a mistake as when I installed, the forming and pressing of the pads to the fender curves etc. caused the paint to crack, so I stripped them and painted in situ and they came out great.
So the @Stevehose method sounds like paint the entire engine bay, then apply the bitumen, and mask off everything except the bitumen pads, and then paint those. Is that how you did it? Seems better than painting color over clear and then clear over everything.
Were you able to get the edges of the pads painted as well?
Were you able to get the edges of the pads painted as well?
Based on my disassembly pics, it looks like the pads were originally applied onto primed metal before paint. So this could be another option. I had no issues with the edges getting covered (especially since I had paint already underneath). When I painted the pads after installation I didn't mask the engine side - I sprayed the pads then blended down onto the already painted inner fenders. Then clear coated everything.So the @Stevehose method sounds like paint the entire engine bay, then apply the bitumen, and mask off everything except the bitumen pads, and then paint those. Is that how you did it? Seems better than painting color over clear and then clear over everything.
Were you able to get the edges of the pads painted as well?
Interesting...Based on my disassembly pics, it looks like the pads were originally applied onto primed metal before paint. So this could be another option. I had no issues with the edges getting covered (especially since I had paint already underneath). When I painted the pads after installation I didn't mask the engine side - I sprayed the pads then blended down onto the already painted inner fenders. Then clear coated everything.
View attachment 214781
Based on this photo, per @e9Leveque comment on seal sealing, I'd be inclined to seam seal all those seams, then per your approach, paint, then apply the bitumen, and then paint and clear.
This thread has some info on the seam sealing, since I think anything that we do is additional over what was done at the factory
In the @Stevehose picture above, it looks like there are some spot welds along the inner fender where it joins to the engine bay. It would be easy enough to run a thin line of sealer along that entire portion. My car comes back Sunday from the dry ice blasting (I'll post some pictures since there had been questions about how well that works) and then I'm going to start the sanding and prepping for the painting. As it goes along I'm sure I'll be asking for some input - it's a collective.
Bo,
I can't help you with factory specs on where seam seal was applied. My car was repaired in the front, so not original anymore in that area.
I would keep the area of the last picture open. Think about seam sealing as being SEAM sealing; where two plates are in contact water will be sucked into it (capilair action) and will have a hard time evaporating, giving it time to eat your metal. That is where seamseal is a solution; covering the seam from both sides. Also don't forget that every seam also has a front and back end to it; close these seam ends as well. Big lumps also tend to...
