72 3.0 CS 2240344 Restoration

I love my blow spray booths Scott… it’s a must for clean crud free painting.

I have only done small stuff powder coating as I only have a toaster oven… it’s a cool process and so easy.
 
I love my blow spray booths Scott… it’s a must for clean crud free painting.

I have only done small stuff powder coating as I only have a toaster oven… it’s a cool process and so easy.
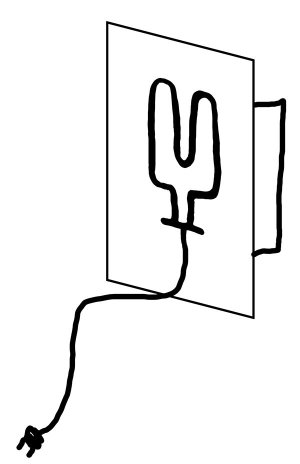
I've picked up a used heating element from some sort of kitchen device, much like what's in your oven, that plugs into 120v that I've thought I could use with a backing reflector to do the curing of large powder coated things, though I haven't cobbled up the arrangement yet as I haven't got the powder coating materials yet. I'll probably put a bracket on the back so I can use a stand. So many projects in the waiting.

RADIATIVE HEATER using heating element .jpg
 
Cleaning up old parts like this very satisfying.

My spouse is patient up to a point, but If I brought parts into the house to use the oven for powder coating it would be curtains for either me or my marriage.

I have a blast cabinet that is really too large for the garage, but it will fit almost anything that I can think of. I converted it to also use it for vapor honing and that is amazing for aluminum parts. I have been rebuilding some Weber carbs and switched back to dry blasting and have been using soda to blast the carburetors and parts where I don't want to vapor hone because of the difficulty in getting all the blast media out of the small passages.
 
How hard is the conversion to vapor honing? Nice thought to be able to use the same cabinet for both.
Regarding the heating element, I ended up purchasing an infrared heating lamp that comes on a stand. The primary issue is that the area of the part needs to get up to about 350-400 degrees and hold it there for 30 minutes. Smaller elements have a lot of fall-off so the process would be very slow. This guy for about $100 seemed to do a better job than I’d be able to rig up, between cost of stand, reflector, heating element, etc. But if you get it to work post the result!
1782585224135.png
 
The conversion to vapor is not bad at all.

A holding tank, high volume pump and blast gun that accepts water and media under pump pressure and air.

I sealed the cabinet, added a waterproof led light and a separate air pressure regulator for the cabinet.

the pump is a Tsurumi Pump HS2.4S Submersible Trash Pump, the gun was made for Vapor Honing here’s a link
 
Kinda hijacking Scott’s thread here but with powder coating you want the atmosphere at 400 to cure the powder… the part does not need to get to that temp. Hence the reason for the short cure time.
 
Kinda hijacking Scott’s thread here but with powder coating you want the atmosphere at 400 to cure the powder… the part does not need to get to that temp. Hence the reason for the short cure time.
hmmm, that wasn’t my understanding. What I’ve read is the part itself needs to get to temp, which is why thicker pieces will take longer since the time to heat the thicker part to temp is longer

https://blog.powderx.com/post/powder-coating-cure-time-temperature

Relevant line is “cure time starts when the part reaches temperature (not when it enters the oven)”

When I did parts using the infrared lamp I would check the surface temp with an IR temp gauge and only “count” areas that had gotten to full temp when moving the lamp on to the next part of the piece
And yes, sorry for the hijack and from what I have learned about Scott by reading his writing, he is like a terrier always ready to go chase animals down rabbit holes. He strikes me as a “knowledge is power” guy :)
 
Yep. Knowledge is key in this game.

Funny.., that was how it was explained to me. I honestly have no idea. Maybe the guy that told me that is off his rocker. Hmmm. Let’s consult the internet which is always correct… right?
 
The conversion to vapor is not bad at all.

A holding tank, high volume pump and blast gun that accepts water and media under pump pressure and air.

I sealed the cabinet, added a waterproof led light and a separate air pressure regulator for the cabinet.

the pump is a Tsurumi Pump HS2.4S Submersible Trash Pump, the gun was made for Vapor Honing here’s a link
So I did a bit of research on this, and it seems pretty simple just a slurry mix in the bucket with the pump, and a gun to handle it. Otherwise just a standard blast setup. Do you recycle the media back into the slurry bucket?

I like the smoother finish you get with VH
 
Last edited:
So I did a bit of research on this, and it seems pretty simple just a slurry mix in the bucket with the pump, and a gun to handle it. Otherwise just a standard blast setup. Do you recycle the media back into the slurry bucket?

I like the smoother finish you get with VH
Yep I may try this out as well. the media blasting I do is mainly removing old paint and surface rust, so the vapor honing seems as if it would work for that, even if it just takes a little longer.
 
Yep I may try this out as well. the media blasting I do is mainly removing old paint and surface rust, so the vapor honing seems as if it would work for that, even if it just takes a little longer.
I think it depends on the material. Vapor honing steel will mean it may start rusting right away, unless you dry it really well. But it is strong enough to clean up well with dry blasting, and still have a nice paintable finish. Aluminum is a different story. Any smooth cast Aluminum parts will come out with a satin finish. The vapor honed ones stay pretty smooth.

Probably eliminates the dust issue though!
 
Yes, the slurry is recycled and lasts quite a while. It works well on aluminum, on steel I prefer a dry blast. There is also a chemical that I use post blast to slow down the oxidation process.
 
So since for some reason this weekend has been full of 3D modeling, I decided to go back and take another run at the Weber manifold. It's remarkable how the learning curve has changed. Back when I first did this, I was just finding my way with Fusion 360. The first manifold took days. Now I can whip out a simple model in 15-30 minutes. The manifold below took a bit longer, but mostly because I wanted to be sure I had the dimensions right. The first one had the right bolt holes, but those holes did not actually position the manifold opening at the right place on the head, and I modeled it after the M3B30 intake shape of the Pierce Manifolds unit, which is not correct for the M90.

Anyway, here is the second go at the Weber manifold...
Screenshot 2026-06-28 at 8.33.16 PM.png
Screenshot 2026-06-28 at 8.33.35 PM.png
Screenshot 2026-06-28 at 8.34.01 PM.png
Screenshot 2026-06-28 at 8.34.50 PM.png
 
Last edited:
Spent a long afternoon over at the shop disassembling the struts and rear subframe, and degreasing the struts and front and rear subframes. Forgot to take photos because I was so busy cleaning up! OMG that rear subframe had caked on dirt and grease about 3/8 inch thick! The struts and front subframe cleaned up easily, but the rear subframe is only about 1/2 done.

Struts had large hex “nuts” at the struts tubes. I just put them in a vise and used a big crescent wrench on the lower end of the assembly. Nuts came loose fairly easily. The struts are KYB, and totally shot ( can move the rods by hand!). Some smelly oil in the tubes too.

Interesting question for the hive mind… the components appear to be slightly grey vs black. I will be powder coating them, but I am wondering about the color…
 
Last edited:
Those look great! My print completed but I’m out of town for a few days, will let you know how speaker option #2 turns out
Post pics here so we can see it !

I am especially pleased with the shift console core. Mine was a deteriorating mess..this one should take a vinyl covering well, and last a lot longer..
 
  • Like
Reactions: Dlc
Back
Top