Glad this adds more info on the auxiliary fan, since US cars had a/c we would not have known that it was used on all automatic coupes as well.
You are using an out of date browser. It may not display this or other websites correctly.
You should upgrade or use an alternative browser.
You should upgrade or use an alternative browser.
Fixing that little rust spot...
- Thread starter eriknetherlands
- Start date
-
- Tags
- restoration list
My 1970 2800CS appears to be a US model that never had a/c and no aux fan, but was, according to BMW, "delivered to a company named J.B.S. in Frankfurt/Main, probably for delivery to a US citizen temporarily living in Germany."Glad this adds more info on the auxiliary fan, since US cars had a/c we would not have known that it was used on all automatic coupes as well.
Did all US delivery cars have a/c?
I believe Hoffman ordered all with a/c but yours ordered in Germany would be different. Canada got the same VIN series as us and those cars could come without a/c and usually had vinyl seats.
Yes, my Chamonix car has blue vinyl seats as well. They are still in terrific condition.I believe Hoffman ordered all with a/c but yours ordered in Germany would be different. Canada got the same VIN series as us and those cars could come without a/c and usually had vinyl seats.
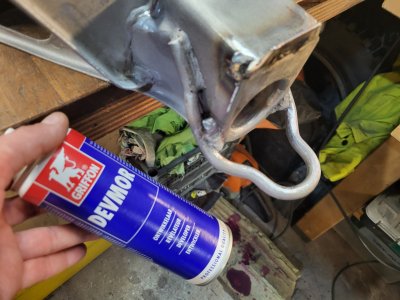
Was busy with the subframe; it was covered in 40 years of wax oil and dirt, so started by scrapping it off as best I could.
While cleaning the remains with solvent, I noticed how annoying all the weldspatter bits are; there were about 100 little blobs scattered all over the part, from factory it seems.
But they are bloody annoying if I ever want to wipe-clean the subframe ever again. So I belt sanded them all off.
Not sure if it will ever earn those 3 hours back, ever....
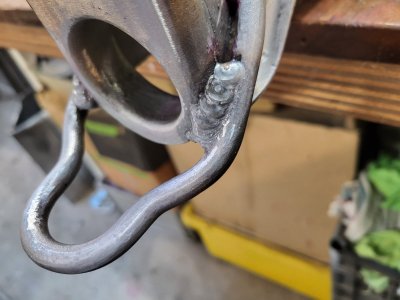
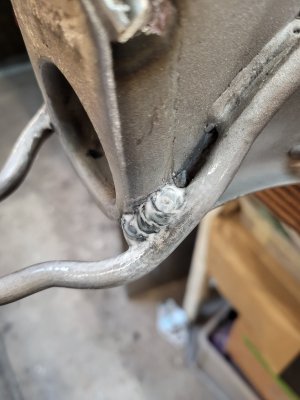
Then I also noticed cracks, the famous ones near the towhook, so I had it sandblasted to see if there were more. (None luckily!)
Drilled the end of the crack, grooved it, and welded them up.

then checked with dye penetrant. My welds were good, but it's not easy to check as the dye just hides in the 1000 corners, dimples and ridges that are on and around the welds. Rest of the frame checked out fine.
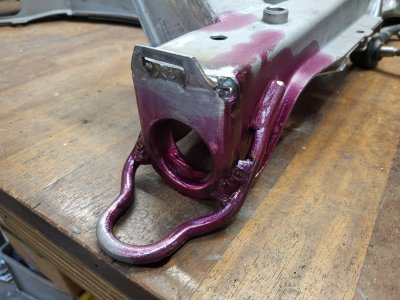
But what a sh*t job did my new sandblast shop do! I was hoping it would be clean enough to send it out for rustpreventative coating, but still a cup full of grease and sand and stones were stuck in corners.

I'm sending it back for a rerun, let's see if the sandblasting shop gets the PINK clue...

While cleaning the remains with solvent, I noticed how annoying all the weldspatter bits are; there were about 100 little blobs scattered all over the part, from factory it seems.
But they are bloody annoying if I ever want to wipe-clean the subframe ever again. So I belt sanded them all off.
Not sure if it will ever earn those 3 hours back, ever....
Then I also noticed cracks, the famous ones near the towhook, so I had it sandblasted to see if there were more. (None luckily!)
Drilled the end of the crack, grooved it, and welded them up.
then checked with dye penetrant. My welds were good, but it's not easy to check as the dye just hides in the 1000 corners, dimples and ridges that are on and around the welds. Rest of the frame checked out fine.
But what a sh*t job did my new sandblast shop do! I was hoping it would be clean enough to send it out for rustpreventative coating, but still a cup full of grease and sand and stones were stuck in corners.
I'm sending it back for a rerun, let's see if the sandblasting shop gets the PINK clue...
Attachments
Last edited:
Buggered.
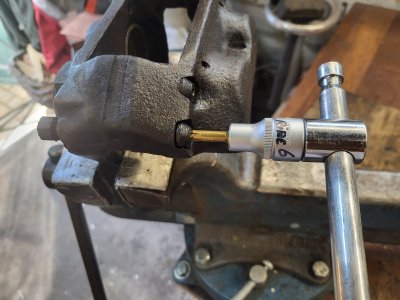
Ordered the correct Ribe bits for the front calipers, it's size 6 by the way.
Choosen an A brand (Hazet, like snap-on), and gave it a go. It lasted one bolt, and snapped at the other.
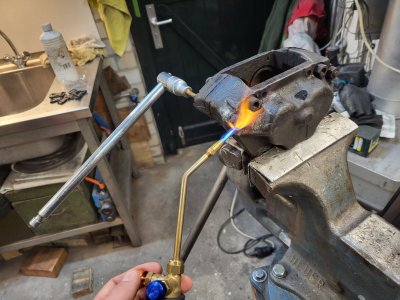
I greased them up a day before, hit them with a low temp butane gas burner, got the bolt+nut spinning (still fused together) in the caliper, but still it wasn't enough to get the nut to spin off the bolt.
Buy a new one, perhaps 2 at the same time and try again?
Ordered the correct Ribe bits for the front calipers, it's size 6 by the way.
Choosen an A brand (Hazet, like snap-on), and gave it a go. It lasted one bolt, and snapped at the other.
I greased them up a day before, hit them with a low temp butane gas burner, got the bolt+nut spinning (still fused together) in the caliper, but still it wasn't enough to get the nut to spin off the bolt.
Buy a new one, perhaps 2 at the same time and try again?
Attachments
Last edited:
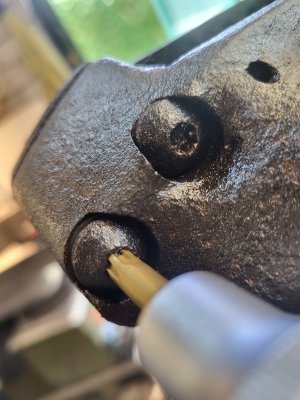
At least the fastener did not get damaged. Maybe a touch more heat next time such that the expansion can break it free. Watching with interest!
I'm doubting if I can re-use the nuts (and bolts perhaps as well) after heating them up. In uni they tought me that heating them change their special molecular cristal-like structure that made them a high grade bolt (class in US terms). Heating them just degrades them to mild steel.
It will get them off all right, but i can't re-use em. Meaning I'd be forced to switch to allen head bolts from Walloth. Which is non-original.... but then again , it's a safety item; i should not be so stubborn
It will get them off all right, but i can't re-use em. Meaning I'd be forced to switch to allen head bolts from Walloth. Which is non-original.... but then again , it's a safety item; i should not be so stubborn
Last edited:
If you dont think you can re-use the fasteners, break out the welder and weld a nut to them. The heat sink will likely break them free and give you a strong surface to put a wrench on.
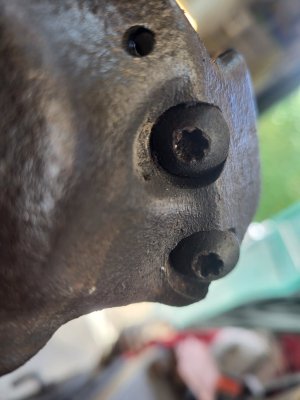
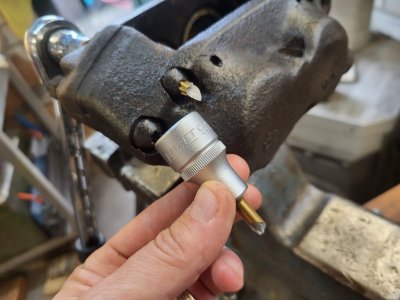
Well, they did let go this time. I invested in an Oxy Acetelyne burner that reaches 3300 Celsius - enough to get them nicely cherry red. Plus a new Hazet RIBE -6 bit drive.
250 euro's worth of equipment for 8 bolts... And they just popped off.
Now I just have to think about the re-use question.
250 euro's worth of equipment for 8 bolts... And they just popped off.
Now I just have to think about the re-use question.
You can't go wrong with the oxy-acetelyne torch. You'll need to heat something else up eventually. I have used my tig torch for the same purpose. It will very precisely heat up a bolt in a hurry (if I'm not careful, it will melt it).
The oxy-acetelyne torch is also good for carbon coating sheet metal, cutting, and you might even try welding with it - old school style.
The oxy-acetelyne torch is also good for carbon coating sheet metal, cutting, and you might even try welding with it - old school style.
well, it can't be stuck if it's liquid...
tdgray
Well-Known Member
I am one that has a firm belief that one can never have too many tools ")
Hello Erik, it’s not advisable to reuse those high strength bolts and nuts after you heated them up. It will have reduced strength. Buy new high quality (same grade).Well, they did let go this time. I invested in an Oxy Acetelyne burner that reaches 3300 Celsius - enough to get them nicely cherry red. Plus a new Hazet RIBE -6 bit drive.
250 euro's worth of equipment for 8 bolts... And they just popped off.
Now I just have to think about the re-use question.
PS for low strength bolts it isn’t so harmful to use a burner for unscrew them.
Last edited:
That is exactly what he already said in post #308Hello Erik, it’s not advisable to reuse those high strength bolts and nuts after you heated them up. It will have reduced strength. Buy new high quality (same grade).
While waiting for some front axle parts to be refinished, I took it up to see what I could do with the 4 toolboxes I have collected over the years.

Goal is to make a good one, hopefully perfect for my own car. Keep one as a spare.
Then to make room, and pay for my upcoming motor revision, fix up another good 2 to sel with a near complete tool set.
So I started out with the toolbox that I recently bought. It had a few ears snaped off where the screws mount, quite common, but interestingly enough the rivets and hinges are still shiny; not (partially) rusted as they are on the other 3.
But it did have a massive gouge from where an angle grinder (or comparable) had a momentarily touching condition. 10 cm long - (4 inches)


I gave it a good clean with a metal polish, as it gently abrades some of the gunk that lies on top of the grain. The plastic is a polystyrene, and that's quite hard by itself. Besides being brittle by now, it also polishes quite well.
Then it was time to fix the battle scar. Now as it's a polystyrene, it means it dissolves in strong paint thinner.


Having some pieces left from a broken box, I made some shavings, and added some thinner.
I left it for a few minutes, and the magic happened: it turns into a moldable clay like texture.


Then smeared the lump in the trench, and spread it out to let the paint thinner also work it's way into the base material.


Then, after letting it sit for a few minutes to solidify a bit, I pushed a rubber piece which had a matching (enough) grain into the soft surface: it worked like magic.
Some high spots were flattened with a knife, and with some fresh thinner I repeated a second time to press in the grain.


after the second attempt, it shows that I the grain isn't perfectly pressed in yet. It has some flat spots, so I may redo the last step again tomorrow, letting it soften a bit more (deeper).

Edit: next day I did a 3rd cycle of softening with paint thinner and a retry to get a better grain imprint. Comparing it to the start situation, I see a learning curve")
Apart from the gloss differences, which will disappear with a paint layer, the scar is well healed!
before vs after:
.jpg")

Goal is to make a good one, hopefully perfect for my own car. Keep one as a spare.
Then to make room, and pay for my upcoming motor revision, fix up another good 2 to sel with a near complete tool set.
So I started out with the toolbox that I recently bought. It had a few ears snaped off where the screws mount, quite common, but interestingly enough the rivets and hinges are still shiny; not (partially) rusted as they are on the other 3.
But it did have a massive gouge from where an angle grinder (or comparable) had a momentarily touching condition. 10 cm long - (4 inches)
I gave it a good clean with a metal polish, as it gently abrades some of the gunk that lies on top of the grain. The plastic is a polystyrene, and that's quite hard by itself. Besides being brittle by now, it also polishes quite well.
Then it was time to fix the battle scar. Now as it's a polystyrene, it means it dissolves in strong paint thinner.
Having some pieces left from a broken box, I made some shavings, and added some thinner.
I left it for a few minutes, and the magic happened: it turns into a moldable clay like texture.
Then smeared the lump in the trench, and spread it out to let the paint thinner also work it's way into the base material.
Then, after letting it sit for a few minutes to solidify a bit, I pushed a rubber piece which had a matching (enough) grain into the soft surface: it worked like magic.
Some high spots were flattened with a knife, and with some fresh thinner I repeated a second time to press in the grain.
after the second attempt, it shows that I the grain isn't perfectly pressed in yet. It has some flat spots, so I may redo the last step again tomorrow, letting it soften a bit more (deeper).
Edit: next day I did a 3rd cycle of softening with paint thinner and a retry to get a better grain imprint. Comparing it to the start situation, I see a learning curve
Apart from the gloss differences, which will disappear with a paint layer, the scar is well healed!
before vs after:
Last edited:
Next challenge is seeing if i can get the broken corners fixed to a visibly satisfactory level. I'll likely back them up with alu or stainless steel for strength.


Question: if anyone has broken pieces of tool tray remnants they are willing to part with, I'm in need of them!
Question: if anyone has broken pieces of tool tray remnants they are willing to part with, I'm in need of them!
Last edited:
Next challenge is seeing if i can get the broken corners fixed to a visibly satisfactory level. I'll likely back them up with alu or stainless steel for strength.
View attachment 208910 View attachment 208911 View attachment 208912
Question: if anyone has broken pieces of tool tray remnants they are willing to part with, I'm in need of them!
Love it Erik! Very nice job! I did a bunch of body work on my old tool box then shot it with SEM's Storm Grey, it turned out great. A year later, BMW did their run of new e9/3 toolboxes, I immediately started begging my wife to get one for my birthday or Christmas. Not sure if you can even get those anymore.