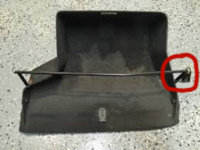
2231367 Underway

Hmmm if your horn ring and brush are not shorting somehow then it may be down by the relays. The 2 relays by the voltage regulator are for the horn and high beam, could it be these wires are mixed up somehow? What say the forum electrical experts?

Yeah, Hmmm :( If you push the left stork forward (remember its a RHD) you get the horn and that's it for that stork.
 
Wes,

I only can refer to a 73 build LHD, because this is the configuration of my own CS. Since your car is an older one, I'm pretty convinced, that there's not that much of a difference for the steering column storks for left and right. To resume how these two should work: Left one is only responsible for the high beams (center head lamps). If the stork is leveled, nothing is turned on. If you have the low beams switched on, turning the left stork clockwise will switch on the high beams. Pulling the stork while it's still leveled will activate the (what we call in Germany) "light horn". NO sound, but lightning of the high beams as long as you pull the stork. So as you can see only two actions possible and only in regards to the high beams.

Right stork has multiple duties. Turning signal of course is self explaining. Pushing the stork sideways activates the wiper (in interval mode, if the switch for permanent in the center console isn't pulled). Pulling the stork will turn on the washer pump and wiper (wiper a certain amount of time longer, after you already stopped pumping water to your windscreen).

If the horn is shouting by doing anything with the left stork, for sure there's an electrical gismo somewhere. As Steve already mentioned, the two relays close to the battery tray are responsible for horn and high beam. Maybe some of the POs were messing with the different main cable connectors for the two storks. Or maybe it's a result of having the wrong part used (you mentioned, that there was something repaired for the turn signal switch ?!?). Maybe this is also the reason for the non working signal for the right side.

I'd disconnect the two storks and check the different wires manually. For instance the relay for the high beam. The responsible relay will be recognized by the wire colors rather easily. Relay for the high beam has a red one (should have permanent power, because it's coming directly from battery plus), a brown wire for ground, a white cable (coming from the left stork at your steering column) and a white/purple one, which is going to your high beam lamp. So giving the white line power, should close the coil inside the relay and active the working circle for your lamp (connecting the red line with the white/purple). You can just simply bridge the white and red socket to check this out. To avoid any short circuits or wrong actions caused by wrong former cable repairs, I'd disconnect the high beam switch first as mentioned before. If the beams are working, then check the white wire for continuity between the relay socket and the connection socket for the left stork.

Having an appropriate (different for the building years) wiring plan helps a lot. A plan after 74 is completely different for these functions (high beams doesn't have a relay anymore i.e.).

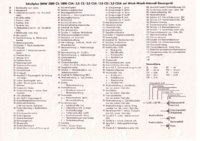
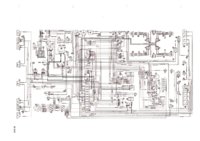
I attached a German version for the wiring plan until 73 (left hand drive). Maybe that helps you out to identify the problems a bit easier.

Cheers

Ingo
 

Attachments

  • bis73_Text_verkleinert.jpg
    bis73_Text_verkleinert.jpg
    306.4 KB · Views: 349
  • Stromlaufplan_bis73_verkleinert.jpg
    Stromlaufplan_bis73_verkleinert.jpg
    296.7 KB · Views: 320
  • Like
Reactions: Wes
Just an update that my perspex wedges for the sunroof arrived from BMW Atlanta today, been a bit of a mission to get them as they appear to be presently out of production.
I'm talking about part number 54129734122
Seeing as though they were missing to start with i don't really have an idea as to how/where to install them.
Does anybody have some good pictures of them in situ?
 
Been a while since I posted on here so thought I'd document what I've been doing during winter, other than feeding the woodheater 24/7.

My care package from a US Forum member arrived a little while back with some much needed parts that are basically impossible to find in Australia :)

Here is an overview of what I've done so far:

Re-installed the chrome trim atop the right hand side door;
Install Blaupunkt period radio, this was some fun to get working;
Installed a reconditioned washer pump as the other one was broken;
Fixed my hi-beam - literally had a crossed wire;
Fixed my indicators, only one side worked;
Installed new washer stork and got the wipers working - still need a ne relay;
Passed a registration pit test. Car is now on full Tasmanian registration - previously on ACT dealer registration;

Still having fun with the sunroof. It had some parts missing that I wasn't aware of until viewing an exploded diagram. Suspect the problem is the transmission or the motor - possibly both - it lacks the grunt to go home the last half inch.

I plan to keep sourcing parts and fixing/replacing things as I go ahead of a re-spray in 2019.

W.
 
Been a pretty eventful week on the car and it's only Friday.
I had my first and only mechanical trouble on Monday when I went to leave a local cafe with my daughter. No matter what I tried (inc a new battery) she just wouldn't start. Did I also mention it started to pur with rain :(
My two year old daughter was less than impressed, until the tow truck arrived - that was pretty impressive. A rebuild of my starter motor later and we are all good again.

I'm booked into a local restoration specialist to quote up the job tomorrow morning. I'm going to go with a local sole operator that seems to have a passion for their work and is happy for me to do some grunt work to help keep costs down.

With that in mind I took the advice of the Forum members who gave me their thoughts on where to begin and I pulled the sill covers off both sides earlier today.
Ordinarily they would be easy to remove but some helpful soul (previous owner) stripped all the heads of the screws , used different size screws and siliconed the heads for good measure :(

On taking them off this is what I found:


IMG_1430.JPG


Doesn't look too bad, but is that body filler?

It soon became this:

IMG_1430.JPG


IMG_1436.JPG


The good news is the chassis behind looks pretty solid and it's old rust and it's also bone dry.
The corresponding left hand side is rock solid.

Forward of the back wheels has a couple of issues as well:

IMG_1430.JPG


IMG_1436.JPG
IMG_1426.JPG


You can see where it's just starting to break through, this is the situation on both sides.

So, what do we think and ideas to remedy?
My tkinking is some new inserts from W&N for my restorer to weld in?
 
Get a bit more paint off it, all around the rusted area so you/we can see better.

Good luck and go hard.

John
 
Get a bit more paint off it, all around the rusted area so you/we can see better.

Good luck and go hard.

John

You can't quite see in the pics but I attacked the suspect spots on the sills with a chisel to see if there was filler under the paint.
All seems pretty solid other than that area. I've had the covers off below the glove box and steering column too and can't see any rust from the inside.
Confims my view the guards have to come off to do it properly.
 
I attacked mine in those same areas with a wire brush attachment on an angle grinder so I didn’t miss any spots.
If you have a good metal man you should be able to fab most of the bits you need to treat, you need to weigh up the costs of buying the panels versus making patches.
I think from memory I bought both panels on the front wing/fender and one side at the rear, they do fit well and need very little fettling, of course your car could be quite different than mine.

John

Keep the pics coming
 
We might attack those spots with a wire wheel at the body works tomorrow.
Will ask my body guy, assuming he takes the job, about cost of fab vs buy.
Might go look at W&N right now.
 
I attacked mine in those same areas with a wire brush attachment on an angle grinder so I didn’t miss any spots.
If you have a good metal man you should be able to fab most of the bits you need to treat, you need to weigh up the costs of buying the panels versus making patches.
I think from memory I bought both panels on the front wing/fender and one side at the rear, they do fit well and need very little fettling, of course your car could be quite different than mine.

John

Keep the pics coming

I'm thinking this is the piece I'll need?

https://www.wallothnesch.com/en/sidewall-panel-for-front-side-wall-e9-right-side.html
 
Wow they have gone up in price since I needed mine, but yes there the ones. So depending on how high up the rot is you may be able to fab the piece if it’s under the outer sill cover and the wheel arch part is still solid.

John
 
Only two weeks now until my baby goes into the body works.
To get things rolling I commenced the tear down today. No problems/gremlins so far will post some pics tomorrow.

One thing has me stumped though. How do you remove the glove box? I can't seem to get access to the hinge at the back.
 
Only two weeks now until my baby goes into the body works.
To get things rolling I commenced the tear down today. No problems/gremlins so far will post some pics tomorrow.

One thing has me stumped though. How do you remove the glove box? I can't seem to get access to the hinge at the back.
Open the glove box and you should see a hinge way at the back with 2 bolts. It has been a long time since I removed mine but that is where I think it connects
 
One thing has me stumped though. How do you remove the glove box? I can't seem to get access to the hinge at the back.

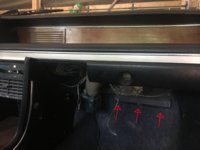
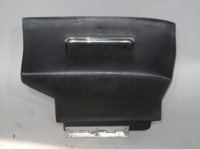
Look under the glovebox, there should be three bolts that keeps the glovebox hinge to the body, see pics:

Untitled2.jpg Untitled1.jpg
 
Thanks for this guys.
Does that mean there are three bolts for the hinge below the box and two more up the back?
 
Thanks for this guys.
Does that mean there are three bolts for the hinge below the box and two more up the back?

No, there should only be three screws/bolts under the glovebox, if you have the linkage that prevents the glovebox from dropping all the way to the floor, it's held in place by two screws that you access from inside the glovebox.
index.jpg

EDIT, I now realize you have a RHD coupe, this is how it is on a LHD, hopefully it's the same on both.
 
Been a while since I updated this. Been a mountain of work going on with the car. Still haven't got the bloody clock out yet though :)

The car has been entirely stripped and was delivered to the body works about a month back. He's a one man show and specialises in classics but this is his first E9. Have to say I'm pretty impressed so far as he's really done his homework on the car before I dropped it off. Probably had a look on here.

He's replaced the rusted out spare wheel well with the W&N replacement.

IMG_3863.jpg


No nasty surprises in the boot as far as rust goes, which is a bonus.

Have also started looking at a couple of rust spots down on the sills around the jack points.

IMG_3857 2.jpg


IMG_3858 2.jpg


We will do some more cutting here to make sure all of the rot is removed.

The screens will come out next week . They are pretty scratched up and I understand NLA. Any ideas on how to recondition them? My thinking is rub off the chrome and anodise?

IMG_3872.jpg


The car had 10 coats of paint in some places. With all of it off you really get a sense of the line of the car. Been pleasantly surprised by the lack of rust or old body repairs so far. Confirms that the car has spent much of its life inside, as I was told it had, in addition to the majority of its life in South Africa where it's nice and dry.
I'm spending most of tomorrow helping to remove a heap of old foam underlay that some PO has helpfully glued all around the inside of the boot.
 
No, there should only be three screws/bolts under the glovebox, if you have the linkage that prevents the glovebox from dropping all the way to the floor, it's held in place by two screws that you access from inside the glovebox.
View attachment 51362

EDIT, I now realize you have a RHD coupe, this is how it is on a LHD, hopefully it's the same on both.
Same
 
Been a busy few days at the body shop with lots more bodywork and rust repairs undertaken.
We've also done the first fit of the Zap race air dam.
IMG_3897.jpg


These are a two man job and take a bit of jiggling to get right as you need to trim the leading outer part of the dam in order to give clearance for the chrome bumper to fit snug against the car.

We also cut out the rust behind the RH front wheel. The metal behind was in good condition, always a bonus, which was a bit of a surprise given the nearly 50 years of dirt and dust behind the panel.

IMG_3892.jpg


The LH rear sill had some pin hole rust and had broken through near the jack point. Once the skin was cut away it became obvious that much of the inner frame was also roached.
The rot also extended into the the wheel well so that also had a replacement panel fabricated and welded in. You can see all the crap on the floor that fell out :(

IMG_3903.jpg


replacement pieces tacked in place.

IMG_3901.jpg


This section has now been fully repaired and re-skinned. The forward section of the LH sill will need similar treatment as it also pin holes coming through. The good news is it doesn't extend into the the fender.
 
Back
Top