Great pic of you and the misses!
You are using an out of date browser. It may not display this or other websites correctly.
You should upgrade or use an alternative browser.
You should upgrade or use an alternative browser.
Andrew Wilson's '73 CSi
- Thread starter adawil2002
- Start date
-
- Tags
- restoration list
Just read the thread and realized I'd snapped a couple pics of your car at Mission Ranch in Carmel! Gorgeous!
I see pics like this and feel that it is hard to argue that Fjord isn't the most flattering E9 color.

i know what you mean Markos ... years ago i thought it was too common. well, there's a reason for that ... its a great color. even my wife who doesn't like blue cars - except midnight blue, made a bunch of positive comments when seeing pics of Andrew's coupe ... then after watching the art of racing in the rain. thought for an hour or so about buying the '74 fjord for sale in town
Thank you all for your kind comments.
i know what you mean Markos ... years ago i thought it was too common. well, there's a reason for that ... its a great color. even my wife who doesn't like blue cars - except midnight blue, made a bunch of positive comments when seeing pics of Andrew's coupe ... then after watching the art of racing in the rain. thought for an hour or so about buying the '74 fjord for sale in town
Good that you came out of that movie wanting to buy a coupe, and not a dog.
Replaced the driver side door seal, the old one had gaps along the widow channel that really bothered me. So I bought a new one from Paul Wegweiser who is working for Max.
Removing the old seal was really easy.
Removed the interior trim that holds the welting. Then pried the door jam side to to free it up, then pulled it off. Someone had used silicone or some yellowish glue on the foam piece at the transition from the welted piece and the window channel.


The new door seal was glued at the foam rubber transition. The welted side held well but the upper window channel piece began to fracture so I separated it the rest of the way.
Reinstalling took a little finesse to get the upper jamb side to fit properly. Had to trim the welting so the rubber tab would fit between the vinyl and the interior rear window trim strip. Took 2 tries to get it right. Then worked down the B pillar, pressing the welting to the channel to the curve at the botton, then tapped it home with a rubber mallet. Then worked the curve to get the welting tight, then moved onto the bottom which went quickly. Then worked the hinge curve and up the hinge side. On the foam rubber transition between the upper & lower partsI used some 3M Black Weatherstrip Adhesive, then shut the door to clamp it. I let that for what wound up being overnight.
In the morning I worked on the upper channel. The profile has a narrow outside and a C channel in the inside. After some trial & error, I tried to fit the C channel first by bending the seal to open the C channel to a U which worked great. Was unable to get the narrow side in the channel. So I tried fitting them into the channel & rail in one motion, the results we good but some of the narrow channel didn't seat properly. What I wound up doing is fitting the narrow profile into the channel evey few inches. Then seating the the C channel in to rail from the hinge side up and over to the rear with the rubber mallet.


Removing the old seal was really easy.
Removed the interior trim that holds the welting. Then pried the door jam side to to free it up, then pulled it off. Someone had used silicone or some yellowish glue on the foam piece at the transition from the welted piece and the window channel.
The new door seal was glued at the foam rubber transition. The welted side held well but the upper window channel piece began to fracture so I separated it the rest of the way.
Reinstalling took a little finesse to get the upper jamb side to fit properly. Had to trim the welting so the rubber tab would fit between the vinyl and the interior rear window trim strip. Took 2 tries to get it right. Then worked down the B pillar, pressing the welting to the channel to the curve at the botton, then tapped it home with a rubber mallet. Then worked the curve to get the welting tight, then moved onto the bottom which went quickly. Then worked the hinge curve and up the hinge side. On the foam rubber transition between the upper & lower partsI used some 3M Black Weatherstrip Adhesive, then shut the door to clamp it. I let that for what wound up being overnight.
In the morning I worked on the upper channel. The profile has a narrow outside and a C channel in the inside. After some trial & error, I tried to fit the C channel first by bending the seal to open the C channel to a U which worked great. Was unable to get the narrow side in the channel. So I tried fitting them into the channel & rail in one motion, the results we good but some of the narrow channel didn't seat properly. What I wound up doing is fitting the narrow profile into the channel evey few inches. Then seating the the C channel in to rail from the hinge side up and over to the rear with the rubber mallet.
Any door slamming now?
Any door slamming now?
No, closes the same.
SIILLY THING CHROME PLATE THE DOOR LATCH

Last edited:
Next project is to re-adhere the foam to the metal of the lower dash panel. Plan to use West System Epoxy and a glue syringe. Will mask the vinyl with painters tape inject the epoxy and clamp, protecting the vinyl with paint sticks.


I used that exact same method and epoxy to repair the same part on my e36. I used cauls (blocks of wood) to evenly distribute the pressure. Has held up perfectly for many years.Next project is to re-adhere the foam to the metal of the lower dash panel. Plan to use West System Epoxy and a glue syringe. Will mask the vinyl with painters tape inject the epoxy and clamp, protecting the vinyl with paint sticks.
View attachment 86493View attachment 86494View attachment 86495
Next project is to re-adhere the foam to the metal of the lower dash panel. Plan to use West System Epoxy and a glue syringe. Will mask the vinyl with painters tape inject the epoxy and clamp, protecting the vinyl with paint sticks.
Would love to see “in process” photos as you do the repair. Have the same condition on my coupe.
Sent from my iPad using Tapatalk
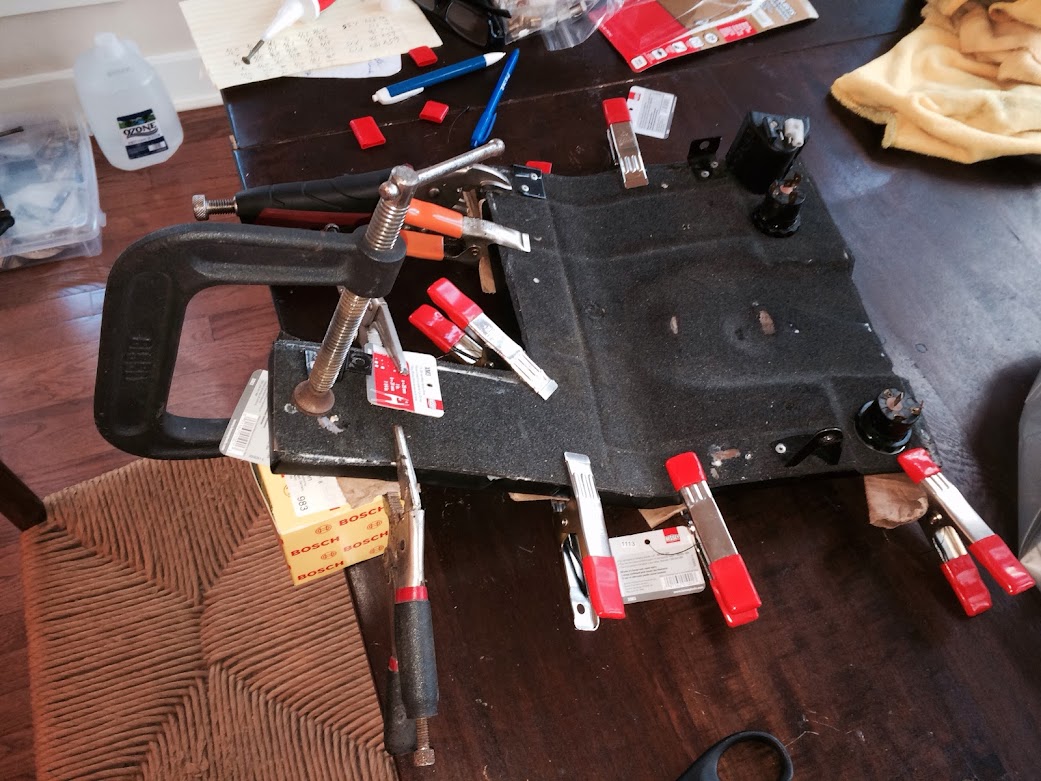
Taped up the areas around the panel where I was going to apply the epoxy. Then cleaned the pulled away parts with Precision Tip Q-Tips until they came out clean.
Mixed up one pump of each West 105 Resin & 205 Hardener. Which I have from building & repairing strip built kayaks.
Then use the Precision Q-Tips to neatly apply the epoxy. Then used cedar shingles and black spring clamps to clamp the vinyl back in place.


Mixed up one pump of each West 105 Resin & 205 Hardener. Which I have from building & repairing strip built kayaks.
Then use the Precision Q-Tips to neatly apply the epoxy. Then used cedar shingles and black spring clamps to clamp the vinyl back in place.
Hey Andrew,
Your latest project reminds me of a recent project fixing the speaker pods on my 635.


Your latest project reminds me of a recent project fixing the speaker pods on my 635.
Been there done that!
Unclamped it this morning. Very happy with the results.


looks like great results Andrew ... keep making your wonderful coupe even greater!
Reassembled the switches and put everything back, the panel fits much better than before.

Reassembled the switches and put everything back, the panel fits much better than before.
View attachment 86646
Great job! Thanks for documenting!
As Athena had no Odometer Trip knob, I have been using an AC knob I found in her spare parts. Shouldn't the actual knob be a set screw knob like on the 1968 1600 Radio?

