CSL Restoration

Marc-M

Well-Known Member
Messages
377
Reaction score
311
Location
Preston - Lancashire-UK
Things are moving i am enjoying the process of rebuilding - heater box in - not easy on your own - most of the engine bay is now done -much more electrical work to be done and I need Mr Magoo glasses to see the wiring schematic....
111111111.jpg
111dwdqd.jpg
 

tferrer

Well-Known Member
Site Donor
Messages
2,153
Reaction score
2,336
Location
San Francisco, CA
Things are moving i am enjoying the process of rebuilding - heater box in - not easy on your own - most of the engine bay is now done -much more electrical work to be done and I need Mr Magoo glasses to see the wiring schematic....
I've taken schematics I can't read to Kinko copies and had them make a large format copy to read.. Made it MUCH easier...
 

Marc-M

Well-Known Member
Messages
377
Reaction score
311
Location
Preston - Lancashire-UK
Fitting the fuel filler flat was not an easy task – mind bending would be a better way of describing fitting it.

Not sure if all are the same, as the CSL has a cast aluminium cover.

But after trying all sorts of different ways and many hours I found an easy way.

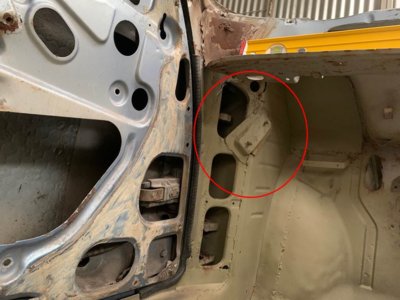
Un clip the 2 small springs – they are located at one end with a rivet and the other end with just a 90-degree bend in the spring that clips into the filler flap arm, just pull that bit of the spring out and fitting the cover is nearly easy (getting the nuts on requires small hands – used nylock nuts as putting spring washers on would have been too much hassle)

You will notice you have 2 holes in the rubber shroud – to gain access to the springs – get a small set of mole grips (pointed) and spend a few minutes re locating the springs – it’s a bit fiddley but not beyond the will of man.

The next problem is getting the flap with perfect gaps.

Again, this is a struggle because the rubber seal is moulded to the shape of the inside of the flap and has a little bit extra where the finger hole is located on the flap itself.

The rubber seal once fitted has no real movement so you need to align the flap with the rubber, and the extra rubber determines where the flap will sit.


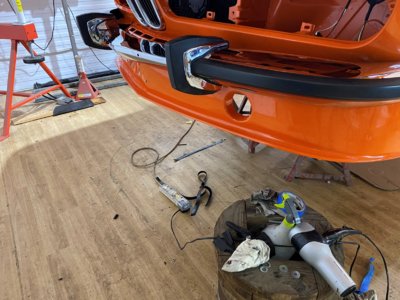
As you can see from the pictures – my gaps are not uniform and that bugs me a lot.

The cover however is the correct contour and matches into the wing well.
verve (2).jpg

veerv (2).jpg
 

AndyNZ

Active Member
Messages
45
Reaction score
4
Location
New Zealand
Hi Marc, firstly thank you for sharing the photos and lessons learned with your restoration. I'm not far into a restoration of a RHD City Pack and it's immeasurably valuable reading through your posts and seeing your images. One question you may be able to help with - does your car have these two bolts on this plate located on the inner A-pillar next to the glove box? I purchased my car disassembled and am both trying to figure out what these are for and if they are even original.
 

Attachments

  • Bolts on plate.jpg
    Bolts on plate.jpg
    80.1 KB · Views: 135

Wes

Moderator
Site Donor $
Messages
1,628
Reaction score
1,472
Location
Tasmania, Australia
Hi Marc, firstly thank you for sharing the photos and lessons learned with your restoration. I'm not far into a restoration of a RHD City Pack and it's immeasurably valuable reading through your posts and seeing your images. One question you may be able to help with - does your car have these two bolts on this plate located on the inner A-pillar next to the glove box? I purchased my car disassembled and am both trying to figure out what these are for and if they are even original.
Bonnet Latch mounting points.
 

Marc-M

Well-Known Member
Messages
377
Reaction score
311
Location
Preston - Lancashire-UK
Hi Marc, firstly thank you for sharing the photos and lessons learned with your restoration. I'm not far into a restoration of a RHD City Pack and it's immeasurably valuable reading through your posts and seeing your images. One question you may be able to help with - does your car have these two bolts on this plate located on the inner A-pillar next to the glove box? I purchased my car disassembled and am both trying to figure out what these are for and if they are even original.
Hi - yes as wes had said - bonnet latch mounting point
 

Marc-M

Well-Known Member
Messages
377
Reaction score
311
Location
Preston - Lancashire-UK
Last night was bonnet fitting.

Fortunately, everything was made to fit before paint, but getting to this stage was a lot of fiddling.

The aluminium bonnet does flex when fastened down with all the seals in place does resist fitting correctly.

The bonnet catches, as you pull the leaver to lock them pulls the bonnet over to the right slightly.

So, it’s a game of cat and mouse to set everything up.

We have managed to get the gaps pretty good and even, plus the levels against the aperture is almost perfect.

I guess when it settles on the new rubbers it will again need a tweak.

Looing at the pictures - i think i may have to give the car its first clean - lots of grubby hand marks.

4fgswb.jpg

5gqq.jpg

6fwf.jpg

8dds.jpg
 

eriknetherlands

Moderator
Site Donor
Messages
2,696
Reaction score
1,927
Location
Netherlands, Eindhoven area
Looks very consistent on the gaps!
And what a good color, even though I know your thread is going to scream orange once I open it, I get that Wow- feeling everytime the pics appear on my screen.

Would you mind sharing the gap dimensions in a couple of places?
Ideally 2 points on each side, to give an idea of parallelity (or is it parallelism?)

I'd like to use them to judge if my fenders are in a proper position, before taking them off to restore the upper A pillar /strut mount area. I'm doubting, as my full front + fenders have been replaced in the past.
 

Marc-M

Well-Known Member
Messages
377
Reaction score
311
Location
Preston - Lancashire-UK
Looks very consistent on the gaps!
And what a good color, even though I know your thread is going to scream orange once I open it, I get that Wow- feeling everytime the pics appear on my screen.

Would you mind sharing the gap dimensions in a couple of places?
Ideally 2 points on each side, to give an idea of parallelity (or is it parallelism?)

I'd like to use them to judge if my fenders are in a proper position, before taking them off to restore the upper A pillar /strut mount area. I'm doubting, as my full front + fenders have been replaced in the past.
Hi

Sides are 6 mm


Front gap is 10mm

Rear (along window) 10mm

Rear Corners - well these are just even - because of the shape it and the way the wings were made its impossible to get the fit to match the sides of 7mm unless you start chopping the bonnet so these are a little less but even.

Hours and hours of fun


I had the luxury to set the wings and front panel to my bonnet - but i measured a CSL that has not been restored -


Having said that – as long as you get even gaps and it looks somewhat symmetrical, I don’t think it matters – if it looks right – it probably is right and all these cars are a bit different.


The big thing is to get the bonnet to sit flat with the wings and the front panel.

This can be done with the adjustment of the front hinges – adjustment of the rear catches and the two wind out rubber buffers in the inner front wing.


I had a problem with the new rubber that goes along the bulkhead – it was pushing up the bonnet and causing a slight distortion – so it has to be cut down a little to get a good fit.


The catches pull the bonnet down but the rubbers push it up – so using these you can get a good fit


Hope it helps
 

sandhu

Well-Known Member
Site Donor $
Messages
1,129
Reaction score
408
Location
England, UK
Hi Marc

Great job so far

Take your time on finishing the car , the reassembly is as important as the work you have done so far on the car

I have seen so many E9 cars rushed by owners / garages , so the car can be driven ,
then take months to re-strip The car and put things right again

Doing a job right , do it slowly and do it right 1st time

The gaps on the bonnet , doors , bootlid don't worry about ,

All the gaps on our cars are all different

These cars where hand built back in the day
 

Marc-M

Well-Known Member
Messages
377
Reaction score
311
Location
Preston - Lancashire-UK
Hi Marc

Great job so far

Take your time on finishing the car , the reassembly is as important as the work you have done so far on the car

I have seen so many E9 cars rushed by owners / garages , so the car can be driven ,
then take months to re-strip The car and put things right again

Doing a job right , do it slowly and do it right 1st time

The gaps on the bonnet , doors , bootlid don't worry about ,

All the gaps on our cars are all different

These cars where hand built back in the day
Hi - yes i am taking much time on doing the rebuild - i have restored quite a few cars over the years - and i find that once i have finished restoring a car i get a bit depressed that its done - so im going to take as much time as it takes.

Regards
 

sandhu

Well-Known Member
Site Donor $
Messages
1,129
Reaction score
408
Location
England, UK
Hi - yes i am taking much time on doing the rebuild - i have restored quite a few cars over the years - and i find that once i have finished restoring a car i get a bit depressed that its done - so im going to take as much time as it takes.

Regards

To Stop you from getting depressed when your car is finished and on the road

You can start on my car lol
 

Marc-M

Well-Known Member
Messages
377
Reaction score
311
Location
Preston - Lancashire-UK
This week I put on the front air dam and bumper - quite happy with how it all went together.

Garage need a good clean out - I seam to amass crap!
The 2 retaining pan heads I have used to hold the front air dam (under the number plate line) not sure what they should be – they look a bit bling…. does anyone know what was the original type of fixing?


wdwqqq.jpg
wdwd.jpg
 

Attachments

  • wdwqqq.jpg
    wdwqqq.jpg
    375.8 KB · Views: 99

Marc-M

Well-Known Member
Messages
377
Reaction score
311
Location
Preston - Lancashire-UK
Last night the boot ( trunk) lid was put on the car - still a bit of messing to do to get prefect , but will leave the thing shut so it will settle the seals and then in a few weeks see how it changes - got gaps very good and even and like the bonnet - it level sits well against the rear wings.

Had to put the badges on - more bling - got into bed at 11.30 pm !


l9l9l.jpg
ikmm.jpg
ilil.jpg
 
Top