You are using an out of date browser. It may not display this or other websites correctly.
You should upgrade or use an alternative browser.
You should upgrade or use an alternative browser.
Engine rebuild and engine bay resto thread - 2240284 '72 CS
- Thread starter Stevehose
- Start date
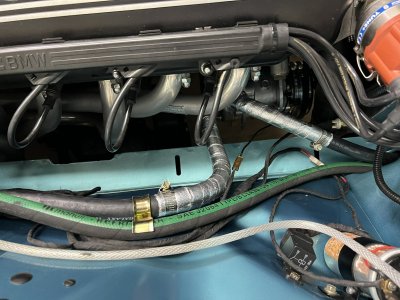
Headers are back from the ceramic coater and they look great. 2 hours later they’re in. The bottom six nuts are tightened 1/4 turn at a time with a wrench from underneath. Great care was taken to install without banging them up. The coater suggested to wipe them down with iso alcohol or similar to get any oil off them so they don’t get hotspots when firing them up. So I also used nitrile gloves to put those snakes in:


I went with regular exhaust gaskets vs the pair of heat shield ones (I have those too) because I don’t want to hide those pipes! I can always swap in the others if things get too hot but it seems like there is a lot of room around them for air circulation.
After 5 trips to O’Reilly auto and some trial and error, I finally determined the proper size for my a/c, alternator, and power steering belts since I am no longer using a factory setup. So they are now on.
Interior is completely back together, I rerouted my AFR oxygen sensor wire through the cabin floor instead of up through the engine compartment into the glove box so I had to resolder that birds nest back together.
Next the rest of the exhaust goes back on then it will finally be time to start the engine.
Drooling, and longing for the startup video.
Looks really good!!
Is that a new brake booster, or just refinished with a new sticker?
Also how did you do the zinc chromate on those various parts?
Is that a new brake booster, or just refinished with a new sticker?
Also how did you do the zinc chromate on those various parts?
Thanks, I had the booster rebuilt, then I painted it and added the decal. I also had the steering box rebuilt. My carb fittings are mostly brass including the top screws, the other yellow zinc clamps and hardware came from Belmetric, and I reused what original stuff I could.Looks really good!!
Is that a new brake booster, or just refinished with a new sticker?
Also how did you do the zinc chromate on those various parts?
Steve--I wouldn't worry about the heat coming off the headers. I have the same ceramic coated Stahl headers with the OEM heat shields mounted upside down by the award winning restoration shop that must believe heat sinks. Four years and 15K miles later, no apparent problems. BTW, the shields were in the correct position when they removed the engine,but now we can see those headers. @sfdon suggested wrapping the A/C lines with heat shield tape since they are so close to the header. @Dohn would say we did that asbestos we could....Headers are back from the ceramic coater and they look great. 2 hours later they’re in. The bottom six nuts are tightened 1/4 turn at a time with a wrench from underneath. Great care was taken to install without banging them up. The coater suggested to wipe them down with iso alcohol or similar to get any oil off them so they don’t get hotspots when firing them up. So I also used nitrile gloves to put those snakes in:
View attachment 174989
View attachment 174990
I went with regular exhaust gaskets vs the pair of heat shield ones (I have those too) because I don’t want to hide those pipes! I can always swap in the others if things get too hot but it seems like there is a lot of room around them for air circulation.
After 5 trips to O’Reilly auto and some trial and error, I finally determined the proper size for my a/c, alternator, and power steering belts since I am no longer using a factory setup. So they are now on.
Interior is completely back together, I rerouted my AFR oxygen sensor wire through the cabin floor instead of up through the engine compartment into the glove box so I had to resolder that birds nest back together.
Next the rest of the exhaust goes back on then it will finally be time to start the engine.
Attachments
looking most excellent Steve !!! but then again that factoring in the expectation that it would be ... so its really good.
Thanks for that confirmation about the gaskets. I routed my a/c lines to the compressor through the front clip, as far away from the headers as possible.Steve--I wouldn't worry about the heat coming off the headers. I have the same ceramic coated Stahl headers with the OEM heat shields mounted upside down by the award winning restoration shop that must believe heat sinks. Four years and 15K miles later, no apparent problems. BTW, the shields were in the correct position when they removed the engine,but now we can see those headers. @sfdon suggested wrapping the A/C lines with heat shield tape since they are so close to the header. @Dohn would say we did that asbestos we could....
Wouldn’t this mean that the internal edges of the gaskets are blocking part of the exhaust port to the header pipe?OEM heat shields mounted upside down
That is a good question. I was not present when the engine was removed and was told by David Masi that the heat shield gaskets were mounted below the header. Perhaps someone reading this can place the shields below an exhaust manifold or a Stahl header and post a pic of the result. With big car shows and the 4 days of driving in the Gator Crawl, I'll not be taking the exhaust apart in the next 2 months.
The Stahl header on my car is 1 3/8" diameter.
The Stahl header on my car is 1 3/8" diameter.
I think it was Power Brake Exchange in CA. The Stahls are 1 3/8”. It’s a brisk 65 degreesWhat Diameter Stahl headers are those? Nice on all the details. May I ask who rebuilt your booster and steering box? Looks pleasant outdoors there.

Ok folks, here are some videos The carbs have not been synchronized or mixture screws set yet. I did set the 123 timing curve with actual timing with a light.
The startup:
Some revs:
The engine sounds amazing! Like a pissed off bunch of hornets ready to get out of the nest!
I could NOT have done this without the support of our forum maestro @sfdon who has tirelessly helped me along the way. Thank you Don you rock big time!!!
I let the engine warm up then changed the O'Reilly Auto 30w oil for some Kendall GT-1 20w50.
After re-checking vitals I put it on the ground and it drove under it's own power for the first time in 8 months (1st gear through the neighborhood sans hood) and I am blown away. Thank you @Bert Poliakoff for the 3:45 diff that replaced my 3:64, now I don't have to shift out of first gear so soon and I love it.
In the coming days I will check for leaks etc. then on goes the intake filter and it will go out on the real road to set the rings.
Thanks to all who cheered me on - it has been a fun but exhausting road back. More to follow.
The carbs have not been synchronized or mixture screws set yet. I did set the 123 timing curve with actual timing with a light.The startup:
Some revs:
The engine sounds amazing! Like a pissed off bunch of hornets ready to get out of the nest!
I could NOT have done this without the support of our forum maestro @sfdon who has tirelessly helped me along the way. Thank you Don you rock big time!!!
I let the engine warm up then changed the O'Reilly Auto 30w oil for some Kendall GT-1 20w50.
After re-checking vitals I put it on the ground and it drove under it's own power for the first time in 8 months (1st gear through the neighborhood sans hood) and I am blown away. Thank you @Bert Poliakoff for the 3:45 diff that replaced my 3:64, now I don't have to shift out of first gear so soon and I love it.
In the coming days I will check for leaks etc. then on goes the intake filter and it will go out on the real road to set the rings.
Thanks to all who cheered me on - it has been a fun but exhausting road back. More to follow.
Last edited:
most excellent Steve !!! it sounds like it wants to scream, revs up quickly ... gotta love high compression
I made it as an emergency ignition switch bypass/engine compartment switch for tuning right before I blew up my engine.Steve, who makes that stater switch? I like that it has a safety toggle.
Is there a way to bypass the ignition key?
Last week I went and did a local rally. Much to my surprise, after a midway stop, my car would not start again. I would turn the key do usual way but absolutely nothing would happen when the starter was supposed to engage. I checked power to the starter and it was showing perfect 12 V. It’s as...
Agreed-I’m surprised how quickly it wants to rev vs before. Don also port matched my intake manifold which won't hurt either.revs up quickly ... gotta love high compression
Last edited:
That will become another nice screamer.
Can't wait to have my own tripple....
Congrats.
Breiti
Can't wait to have my own tripple....
Congrats.
Breiti
Looks well thought out.Like something you would use to launch Rockets!I made it as an emergency ignition switch bypass/engine compartment switch for tuning right before I blew up my engine.
Is there a way to bypass the ignition key?
Last week I went and did a local rally. Much to my surprise, after a midway stop, my car would not start again. I would turn the key do usual way but absolutely nothing would happen when the starter was supposed to engage. I checked power to the starter and it was showing perfect 12 V. It’s as...e9coupe.com