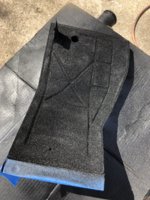
Had my Lokari fender liners painted black with rubberized undercoating.
You are using an out of date browser. It may not display this or other websites correctly.
You should upgrade or use an alternative browser.
You should upgrade or use an alternative browser.
Gary's Avus Blau 3.0CS rebuild
- Thread starter m5bb
- Start date
-
- Tags
- restoration list
Gary- I HATE your garage!!
Still working......
Spent a few days getting high pressure hoses made for my Hydratech booster system. Found a hose shop that was patient enough to make up the hoses, let me take home and mark them for alignment and then take back to be crimped. Working on all the water and heater hoses with a much better installation than I had before.
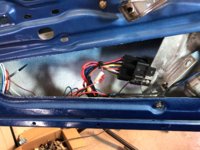
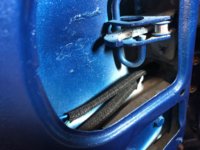
Got the keyless entry installed and tested. Mounted control unit in drivers door. Plenty of room there but not under the dash and didn't have to run but 2 wires to the passenger door.
Had good weather today so I could open the door and do the FLOCKING of the glove box and kick panels. I sprayed the adhesive on with my spray gun. Much, much easier than a brush. Went pretty well as I had never done this before. Love learning new stuff.
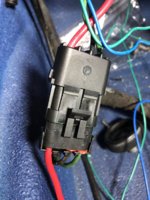
One photo shows little antenna for keyless entry in drivers door. Another photo is waterproof connector for wire to window motors. You can see the wire in the door in these great covers the race teams use. It opens up and you put the wire in and it has a memory and closes back up. It actually makes about a 420 degree circle as it has great overlap so the wires don't come out. It's actually kind of tedious to get the wires in. Comes in many sizes. Actually going to use on my main harness wire in the engine compartment. I have already wrapped it with the correct tape but like the looks of this so much better.
Tomorrows another day at the Beck garage and one day closer to completion. YEA!!!!!
Spent a few days getting high pressure hoses made for my Hydratech booster system. Found a hose shop that was patient enough to make up the hoses, let me take home and mark them for alignment and then take back to be crimped. Working on all the water and heater hoses with a much better installation than I had before.
Got the keyless entry installed and tested. Mounted control unit in drivers door. Plenty of room there but not under the dash and didn't have to run but 2 wires to the passenger door.
Had good weather today so I could open the door and do the FLOCKING of the glove box and kick panels. I sprayed the adhesive on with my spray gun. Much, much easier than a brush. Went pretty well as I had never done this before. Love learning new stuff.
One photo shows little antenna for keyless entry in drivers door. Another photo is waterproof connector for wire to window motors. You can see the wire in the door in these great covers the race teams use. It opens up and you put the wire in and it has a memory and closes back up. It actually makes about a 420 degree circle as it has great overlap so the wires don't come out. It's actually kind of tedious to get the wires in. Comes in many sizes. Actually going to use on my main harness wire in the engine compartment. I have already wrapped it with the correct tape but like the looks of this so much better.
Tomorrows another day at the Beck garage and one day closer to completion. YEA!!!!!
Attachments
More pretty.
All the wiring and connection of power steering hoses. Brake master tomorrow.
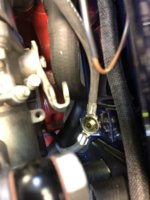
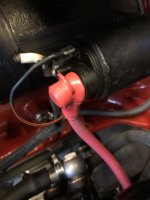
The wiring stuff is really nice. Notice the cover over the post on the starter motor which is hot (12volts) all the time. Don't want to get a wrench up against this and the body. Lots of sparks. Extra heavy duty ground from engine to body.
All the wiring and connection of power steering hoses. Brake master tomorrow.
The wiring stuff is really nice. Notice the cover over the post on the starter motor which is hot (12volts) all the time. Don't want to get a wrench up against this and the body. Lots of sparks. Extra heavy duty ground from engine to body.
Attachments
More pretty.
All the wiring and connection of power steering hoses. Brake master tomorrow.
The wiring stuff is really nice. Notice the cover over the post on the starter motor which is hot (12volts) all the time. Don't want to get a wrench up against this and the body. Lots of sparks. Extra heavy duty ground from engine to body.
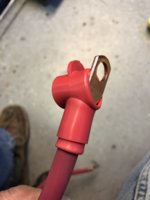
Nice! I wish I thought of these covers when I made my battery cables.
Hey Chris, yes a lot of work but I put up with it early on when I rebuilt the engine but knew I was going to rebuild the car and get rid of the brake booster all together. Still a lot of work but on the way back together now and hopefully have some pretty powerful brakes to stop the 300 HP. Ha!
I need a curvy girl friend. HA!!!!
Here's some of my trunk. Ditched the boring gray for the nice tan to match my interior.
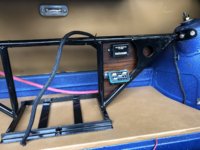
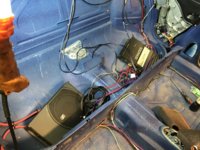
Battery in trunk now and an additional fuse box for the E28 upgraded window motors, my amp and the electric fuel pump controller with extra fuse room for the future if I need a search light or something? #2 battery cable all the way to the starter motor with battery jumper cable ability in engine compartment. Just in case. Reaching in the trunk with jumper cables is not fun.
You can see the texture of the Lizard skin noise and heat abatement material on the wheels wells. Probably won't cover those. Treated the complete trunk area with the Lizard Skin.
Attachments
Here's some more eye candy.
I actually lifted this 265 trans from the ground to this trans jack. Over 4 ft off the ground. Right at that transitional area, were it any higher I would of had to press it and that I could not do.
I didn't drop it and was quick to get it balanced and the chain around it so didn't hit the floor. Losing 15 lbs and working out every day has made this 70 year old feel pretty good.
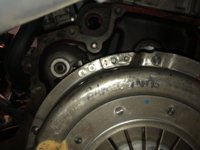
Even my flywheel and pressure plate were balanced when I built my engine. You can see the marks I stamped in the metal to make sure it went back in the right spot. Makes those 6000 RPM's pretty smooth.
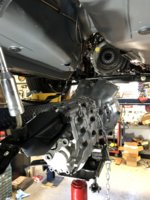
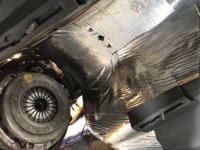
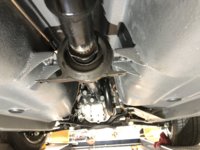
The whole inside of the car is treated with the Lizard Skin noise and heat abatement material but still added some extra sound and heat blocking material to the trans tunnel especially where the headers come down and back. It gets pretty hot there. Also putting the metal baffle there that was used in an E12. Also helps with heat. Purchased an new Guibo and buttoning up the drive train in another hour or so. Shouldn't have to get under the car for anything else. Yea, another area completed.
I actually lifted this 265 trans from the ground to this trans jack. Over 4 ft off the ground. Right at that transitional area, were it any higher I would of had to press it and that I could not do.
I didn't drop it and was quick to get it balanced and the chain around it so didn't hit the floor. Losing 15 lbs and working out every day has made this 70 year old feel pretty good.
Even my flywheel and pressure plate were balanced when I built my engine. You can see the marks I stamped in the metal to make sure it went back in the right spot. Makes those 6000 RPM's pretty smooth.
The whole inside of the car is treated with the Lizard Skin noise and heat abatement material but still added some extra sound and heat blocking material to the trans tunnel especially where the headers come down and back. It gets pretty hot there. Also putting the metal baffle there that was used in an E12. Also helps with heat. Purchased an new Guibo and buttoning up the drive train in another hour or so. Shouldn't have to get under the car for anything else. Yea, another area completed.
Attachments
Last edited:
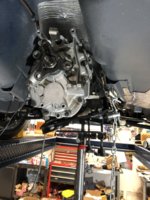
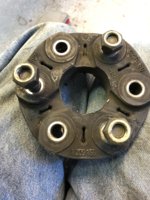
All the drive train is done. Looked at Guibo and saw small cracks so ordered a new one. Photo is OLD one.
Interestingly my car had a cover over the drive shaft tunnel area. It was a BMW part as I found a number on it. Aluminum bumpy kind or semi rigid material. Found out it was from a Z4.
Something the PO had done. It really didn't look bad and protected the drive shaft and tunnel from dirt but I elected to not put it back.
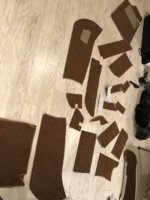
New carpet from the German company Herman Mayer is laying on my family room floor to examine and hopefully flatten out after 2 years in the box.
Couple other little items I worked on and completed today will have to wait for your personal inspection. Surprise!!!
One thing that really frustrated me is my headlight switch. I have two and neither one works. We'll the dash light circuit doesn't work. It did for a few weeks and now nothing.
Since I had two switches I decided to get brave and open one up. Seems like I like to live on the edge and it gets everyone so excited.
You have to Dremel the corners to get it open. Then carefully lift the top off but you better do it over a box or table with something soft so parts don't roll away. There are 6 springs in there. Two are as big around as a 4 mm bolt. The other 4 are as big as a pencil lead. I lost one of the big ones on the floor where I have an office type chair to work on things that I can hold in my lap or hands.
That was yesterday. Much searching including the magnet and no luck. So first thing this morning I carefully moved my chair checking the seat cushion for the spring. No. Then I looked in a few boxes on the floor, under my desk and you know EVERYWHERE! I got the broom and carefully swept the area and then with a big light I got down on my hands and knees and wallah I found the spring. I looked it over carefully and did not see any broken parts. It was a little gummy from the lube but not frozen. Remember it did work, a few times. I cleaned everything up and did some measuring with my meter as I was very suspicious of the rheostat that changes the voltage to the dash lights. There was continuity but kind of intermittent. Could not see a break in the winding but it is very, very tiny wire. It almost looks like the threads of a small bolt. Still not sure why it wasn't working I put it back together and held it closed with a zip tie. Tried it in the car and no luck. Still no dash lights. So to be able to complete some of the dash area and fuse box I decided to jump around the rheostat circuit and just make them come on at 12 Volts. Probably get used there most of the time anyhow. I found another used one on eBay and for $45 I'll give it a try. Originals are NLA and shown at $245. Yikes!!!
So this will work until the other used one comes. If it works. NO return but ebay Guarantee.
Tomorrow's another day.
BTW the cars debut will be a Southeast Sharkfest in Greenville SC April 25-27. Get your plain tickets soon. The hotel is sold out so you'll have to find another hotel. Sorry!
Interestingly my car had a cover over the drive shaft tunnel area. It was a BMW part as I found a number on it. Aluminum bumpy kind or semi rigid material. Found out it was from a Z4.
Something the PO had done. It really didn't look bad and protected the drive shaft and tunnel from dirt but I elected to not put it back.
New carpet from the German company Herman Mayer is laying on my family room floor to examine and hopefully flatten out after 2 years in the box.
Couple other little items I worked on and completed today will have to wait for your personal inspection. Surprise!!!
One thing that really frustrated me is my headlight switch. I have two and neither one works. We'll the dash light circuit doesn't work. It did for a few weeks and now nothing.
Since I had two switches I decided to get brave and open one up. Seems like I like to live on the edge and it gets everyone so excited.
You have to Dremel the corners to get it open. Then carefully lift the top off but you better do it over a box or table with something soft so parts don't roll away. There are 6 springs in there. Two are as big around as a 4 mm bolt. The other 4 are as big as a pencil lead. I lost one of the big ones on the floor where I have an office type chair to work on things that I can hold in my lap or hands.
That was yesterday. Much searching including the magnet and no luck. So first thing this morning I carefully moved my chair checking the seat cushion for the spring. No. Then I looked in a few boxes on the floor, under my desk and you know EVERYWHERE! I got the broom and carefully swept the area and then with a big light I got down on my hands and knees and wallah I found the spring. I looked it over carefully and did not see any broken parts. It was a little gummy from the lube but not frozen. Remember it did work, a few times. I cleaned everything up and did some measuring with my meter as I was very suspicious of the rheostat that changes the voltage to the dash lights. There was continuity but kind of intermittent. Could not see a break in the winding but it is very, very tiny wire. It almost looks like the threads of a small bolt. Still not sure why it wasn't working I put it back together and held it closed with a zip tie. Tried it in the car and no luck. Still no dash lights. So to be able to complete some of the dash area and fuse box I decided to jump around the rheostat circuit and just make them come on at 12 Volts. Probably get used there most of the time anyhow. I found another used one on eBay and for $45 I'll give it a try. Originals are NLA and shown at $245. Yikes!!!
So this will work until the other used one comes. If it works. NO return but ebay Guarantee.
Tomorrow's another day.
BTW the cars debut will be a Southeast Sharkfest in Greenville SC April 25-27. Get your plain tickets soon. The hotel is sold out so you'll have to find another hotel. Sorry!
Attachments
Gary, maybe this will help:
https://e9coupe.com/forum/threads/rebuilding-the-headlight-switch.25022/page-2#post-186951
https://e9coupe.com/forum/threads/rebuilding-the-headlight-switch.25022/page-2#post-186951
Thanks Steve I made it through the apart and back together without your excellent procedure. I guess there must be a broken wire in the coil of the rheostat.Gary, maybe this will help:
https://e9coupe.com/forum/threads/rebuilding-the-headlight-switch.25022/page-2#post-186951
Gary, Take the two wires that feed the rheostat part of the switch and hook them together, you have just bypassed the dimmer. No one ever dims their dash lights!
I did. A little differently but it works. I did find a used switch on eBay and bought it so I could have a fully functional system.Gary, Take the two wires that feed the rheostat part of the switch and hook them together, you have just bypassed the dimmer. No one ever dims their dash lights!
But yes, who ever dims their dash lights.
Good minds think alike.
")
Thanks Chris.
I have my dash lights at 75-80% instead of full bright. Turn the rheostat to 0% during the day when the lights are on.
Some more eye candy.
Engine, AC, stereo, sub and almost all the wiring is done.
Great help from Don L and Chris on the AC circuit and the little diode.
Boy trying to get the probe for the thermostat back in the AC evaporator was no easy task. You can't even see it from the front.
Had to get my endoscope out and look in there to be sure where it was. It's been 3 years and probably should have installed the switch with probe before I put it back in car. Just leave switch taped to front. I had to get some 2x4's and lift the dash to get the space between the AC blower housing to see the hole for the probe. Finally got it in there. If you are reading this and haven't done this yet please install the probe before you install in the car. Life will be so much easier.
Glass guy comes tomorrow for front and rear. He just did Phil Parkey's front two weeks ago and it went well so hoping there are no glitches.
Waiting on headers from ceramic coating. They were done about a year before I started this rebuild but when I got them out and cleaned them they just didn't look as nice as all the rest.
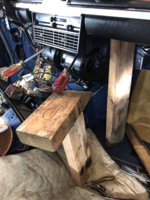
Working on carpets today. Kind of a puzzle. Just looked up other installs and downloaded a couple photos.
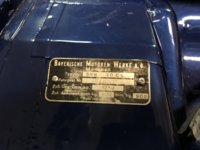
I didn't refinish the ID plate. I kind of like the patina it has compared to all the new. See how I like it long term.
Could be running by Saturday.
Engine, AC, stereo, sub and almost all the wiring is done.
Great help from Don L and Chris on the AC circuit and the little diode.
Boy trying to get the probe for the thermostat back in the AC evaporator was no easy task. You can't even see it from the front.
Had to get my endoscope out and look in there to be sure where it was. It's been 3 years and probably should have installed the switch with probe before I put it back in car. Just leave switch taped to front. I had to get some 2x4's and lift the dash to get the space between the AC blower housing to see the hole for the probe. Finally got it in there. If you are reading this and haven't done this yet please install the probe before you install in the car. Life will be so much easier.
Glass guy comes tomorrow for front and rear. He just did Phil Parkey's front two weeks ago and it went well so hoping there are no glitches.
Waiting on headers from ceramic coating. They were done about a year before I started this rebuild but when I got them out and cleaned them they just didn't look as nice as all the rest.
Working on carpets today. Kind of a puzzle. Just looked up other installs and downloaded a couple photos.
I didn't refinish the ID plate. I kind of like the patina it has compared to all the new. See how I like it long term.
Could be running by Saturday.
Attachments
Gary,
Yes, the probe is a pain, I just barely saw the hole from the side and stuck it in. I had previously inserted it but it fell back out wrestling everything into place. There was originally a copper tube in the fins for the probe to sit but I didn’t have one.
Yes, the probe is a pain, I just barely saw the hole from the side and stuck it in. I had previously inserted it but it fell back out wrestling everything into place. There was originally a copper tube in the fins for the probe to sit but I didn’t have one.
Better rivet the VIN so no one can steal it.