While waiting to see if you'll sell, I spent some time at the W+N web site to see about a new one. However, I couldn't find it, even the parts diagram didn't show the right tank. Their photo shows a tank with a two part filler neck, mine is solid, they show no boot in that parts diagram. I tried the search however I must have the wrong terms! I get e-mail from them almost daily because I bought the complete carpet set-up from them~
You are using an out of date browser. It may not display this or other websites correctly.
You should upgrade or use an alternative browser.
You should upgrade or use an alternative browser.
How to: Remove rubber around the gas flap
- Thread starter Stan
- Start date

Rubber cover for fuel filler behind fuel inlet cover for all models and years of production you need 1 for 1 car
Rubber cover for fuel filler behind fuel inlet cover for all models and years of production you need 1 for 1 car
I'm guessing that will be about $100.00 before it gets to Lovell, Maine - US. So, for now, I'll wait to see about a good used one. I want to drive it for a while before reinstalling everything in the trunk so that I can inspect my welding on the shock tower. It's rained every day now that it's back together & I don't drive it in the rain, so I've got time~. Thanks for the link!!!!!!!Rubber cover for fuel filler behind fuel inlet cover for all models and years of production you need 1 for 1 car
Rubber cover for fuel filler behind fuel inlet cover for all models and years of production you need 1 for 1 carwww.wallothnesch.com
Rod, if you want the one that looks pretty good but is a little stiff at the lip, you can have it for the cost of shipping.
The holes are there I believe… back side photos.
It was a little tough getting it together but after figuring out what works and what doesn't I got it looking good. I haven't yet tried to get the door on, you know, mow the lawn, get some veggies in the ground, put a fence around the garden to keep the deer out, etc. Today we have rain, so I'll be trying to get that door on to finish it up.Rod, if you want the one that looks pretty good but is a little stiff at the lip, you can have it for the cost of shipping.
Must say, this forum is amazing, plenty of good info, with even better people ready to help out in any way they can!!
jmackro
Well-Known Member
I'm guessing that will be about $100.00 before it gets to Lovell, Maine - US.
Oh, it will cost more than that. Walloth has a flat shipping charge (~$50) to the US, regardless of the cost/size/weight of the parts. That's $50 per order, not $50 per part. For "oversized" parts, you pay more. Don't get me wrong; I love W&N and am glad that they exist. But, they aren't oriented toward small orders going overseas.
Last edited:
jmackro
Well-Known Member
I just finished re-installing my fuel filler door and can attest that it is a miserable job. Now that I have done it, I could probably do it again a lot quicker; much of the time that I spent involved going down blind alleys.
There are two challenges to this job:
1) Getting the door into position. The spring on the hinge is bi-stable: it either wants to be closed or open. And, it won't fit into where it needs to go in either of those two positions. Almost fully open is where you want it to be and I achieved that by wedging a screw-washer-nut into the hinge to hold it open, but not fully open. See the first two pictures below. Note that the washer needed to be filed flat on one side so that it did not protrude below the hinge's mounting surface. I used a #8 screw, and had to grind it flat to fit into the gap below the hinge.
.jpeg")
.jpeg")
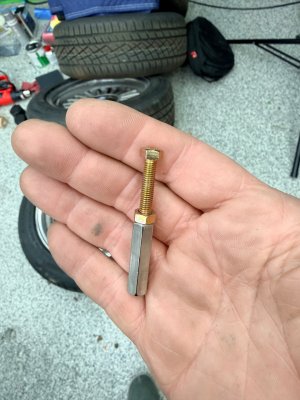
2) The second challenge is getting the securing nuts started once the door is in place. The studs on the body have to be short to allow the door to be squeezed into place, which doesn't leave much stud protruding to start the nuts. Because the hinge won't be parallel to the mounting surface, the most forward stud will be the first one to start. Someone above suggested sticking the little 5mm nut to your finger with grease to maneuver it into place. Instead, I used 30mm long, 5mm threaded connectors - sort of "extra long nuts". These are available on Amazon ( https://www.amazon.com/dp/B0FFMGL354?ref=ppx_yo2ov_dt_b_fed_asin_title&th=1 ) for ~$1 apiece, next day delivery. You can easily grip these with your fingers to twirl them started. Once started, a socket (5/16" worked for me) on an extension will drive them into place. See the first photo below.
One blind alley that I went down: I had removed and then re-glued the elephant skin fabric that covers the inside of the fenders, around the gas door opening. I had mis-positioned that fabric so that some of it overlapped the reinforcing plate that holds the three studs that mount the door's hinge. Big mistake! The thickness of that fabric was enough to prevent the studs from protruding far enough to accept the nuts.
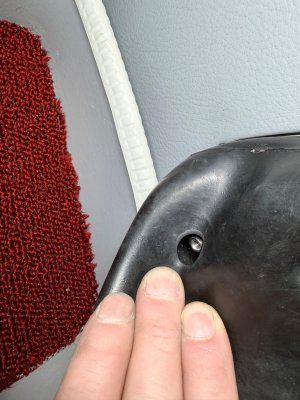
Note that the boot that goes around the filler and hinge has two holes punched in it that provide access for tightening the three nuts. Why two holes for three, separate nuts? Beats me! The two factory holes are positioned above the two rear nuts, but you're on your own to tighten the front nut. I fixed that by punching a third hole in my boot to allow my socket on an extension to go in. See the last photo.
.jpeg")
.jpeg")
I hope that my experiences help to save you some time. Be sure to read through this thread for more ideas. Believe me, no matter how long you spend reading this, it will save you time in the end.
There are two challenges to this job:
1) Getting the door into position. The spring on the hinge is bi-stable: it either wants to be closed or open. And, it won't fit into where it needs to go in either of those two positions. Almost fully open is where you want it to be and I achieved that by wedging a screw-washer-nut into the hinge to hold it open, but not fully open. See the first two pictures below. Note that the washer needed to be filed flat on one side so that it did not protrude below the hinge's mounting surface. I used a #8 screw, and had to grind it flat to fit into the gap below the hinge.
2) The second challenge is getting the securing nuts started once the door is in place. The studs on the body have to be short to allow the door to be squeezed into place, which doesn't leave much stud protruding to start the nuts. Because the hinge won't be parallel to the mounting surface, the most forward stud will be the first one to start. Someone above suggested sticking the little 5mm nut to your finger with grease to maneuver it into place. Instead, I used 30mm long, 5mm threaded connectors - sort of "extra long nuts". These are available on Amazon ( https://www.amazon.com/dp/B0FFMGL354?ref=ppx_yo2ov_dt_b_fed_asin_title&th=1 ) for ~$1 apiece, next day delivery. You can easily grip these with your fingers to twirl them started. Once started, a socket (5/16" worked for me) on an extension will drive them into place. See the first photo below.
One blind alley that I went down: I had removed and then re-glued the elephant skin fabric that covers the inside of the fenders, around the gas door opening. I had mis-positioned that fabric so that some of it overlapped the reinforcing plate that holds the three studs that mount the door's hinge. Big mistake! The thickness of that fabric was enough to prevent the studs from protruding far enough to accept the nuts.
Note that the boot that goes around the filler and hinge has two holes punched in it that provide access for tightening the three nuts. Why two holes for three, separate nuts? Beats me! The two factory holes are positioned above the two rear nuts, but you're on your own to tighten the front nut. I fixed that by punching a third hole in my boot to allow my socket on an extension to go in. See the last photo.
I hope that my experiences help to save you some time. Be sure to read through this thread for more ideas. Believe me, no matter how long you spend reading this, it will save you time in the end.
Last edited:
I cut a notch in the hinge to slide over the stud. Those threaded connectors are a great idea.
No cut done,
no screw placed in the spring,
no long nuts installed.
At the end, i just open the flap to the death point of the spring and place her carefully offer the bolts.
Secured the nuts with a bit tape in the socket.
Breiti
no screw placed in the spring,
no long nuts installed.
At the end, i just open the flap to the death point of the spring and place her carefully offer the bolts.
Secured the nuts with a bit tape in the socket.
Breiti
jmackro
Well-Known Member
At one point (while I was pretty far down one of those blind alleys) I thought about notching the forward hole. But once I realized the problem with the elephant skin fabric getting in the way, which made the studs appear too short, I backed off on that. An advantage of the notch would be that it would allow you to start the front nut a turn or so before putting on the boot and door.I cut a notch in the hinge to slide over the stud.
jmackro
Well-Known Member
Breiti:No cut done,
no screw placed in the spring,
no long nuts installed.
At the end, i just open the flap to the death point of the spring and place her carefully offer the bolts.
Secured the nuts with a bit tape in the socket.
Breiti
It's great that you were able to install your fuel filler door so easily, while everyone else in this thread struggled to get it done. But tell me: did you do it with the black rubber boot in place?
great question Jay ... i was wondering the same thing
Just reinstalled this today. My tips compiled from above
1. Put only the front of the boot onto the outer rim but don’t pull the boot over the gas filler tube. This method allows you to (from inside the trunk) pull the boot forwards to help push the hinge forward as welll
2. I did use a small screw to hold the hinge in an “almost fully open” position. Once I had it close to that front most screw I stuck a small pry bar into the black plug hole to pry it slightly further open and lift it over that front screw
3. ABSOLUTELY use the longer nuts linked above. I can’t imaging trying to do this with the tiny nuts originally on there. Nice side benefit is not only did you make this job easier, but you then make it easier for anyone else after you. Win win.
4. Although I tightened that long nut down with a socket wrench, I got it mounted and did the first few turns with the screw/nut holder shown in the picture below. I found this easier to manipulate than a socket holding the long nut. Twist a few times then unscrew this screw/nut holder and use the socket to complete the tightening
Attachments
It’s easier to remove the gas filler tube first.
You are probably correct but I am afflicted with E9 disease. Primary symptom is making your life harder and cursing despite knowing that there’s an easier way but you’re slightly too lazy to take those extra steps. Then you tell yourself you’ll learn from this lesson…It’s easier to remove the gas filler tube first.
jmackro
Well-Known Member
Glad to hear that the long nut idea worked for someone else. I was able to start mine using my fingers, since they're so easy to grip, before using the socket & extension for final tightening. But threading a long, 5 mm bolt + nut into its top is a great idea.3. ABSOLUTELY use the longer nuts linked above. I can’t imaging trying to do this with the tiny nuts originally on there. Nice side benefit is not only did you make this job easier, but you then make it easier for anyone else after you. Win win.
4. Although I tightened that long nut down with a socket wrench, I got it mounted and did the first few turns with the screw/nut holder shown in the picture below. I found this easier to manipulate than a socket holding the long nut. Twist a few times then unscrew this screw/nut holder and use the socket to complete the tightening
Yes, first the rubber than the flap.Breiti:
It's great that you were able to install your fuel filler door so easily, while everyone else in this thread struggled to get it done. But tell me: did you do it with the black rubber boot in place?
As I remember now, it's a while ago, but I'm pretty sure, i had the rubber already installed.
Breiti
i presume that it might be best to leave it through the rubber piece + just disconnect it from the rubber hose below. thoughts? i will be doing this in the not-too-distant future so i've taken a few notes.It’s easier to remove the gas filler tube first.