Chris, possibly you missed the big clue with this specific plate?
You are using an out of date browser. It may not display this or other websites correctly.
You should upgrade or use an alternative browser.
You should upgrade or use an alternative browser.
Patricia A. Mayer's 3.0 CS / Paul Cain's Fjord project / The 300 mile Test Drive / VIII / Final Punch List
- Thread starter paul cain
- Start date
-
- Tags
- restoration list
I don’t think so
Thank you for your gracious offer, particularly with a piece of unobtainium. If only I'd posted before I fabricated?! I spent a good chunk of time really getting my 55 to60mm piece to fit. So I think, I am going to stick with it. You should hold that tailpipe for another appropriate forum member / candidate whos project you deem worthy. (I am honored that you considered it worthy of this Patricia / project)Paul ... i have the unobtanium, that i'm NOT going to use, i put the fritzbits stainless exhaust on my coupe. its NOS that came from Europe. make me an offer if you want it.
Second comment: I want to thank you for a long ago post you made on Zenith carbs. I am in the middle of trying to get mine to perform and your comments were extremely beneficial in this long Zenith journey. Boy these are finicky to rebuild!
Thank you again for the gracious offer, I look forward to continuing the conversation.
Best regards,
Paul
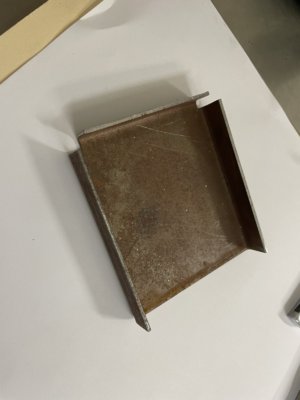
I've fabricated an extra box section for the outside of the footwell.
This fits either right or left side.
If one of you out there is currently in the middle of metal work and rust repairs in this area, and you need this part, its free for the asking. Just cover the shipping. I will ship globally. I would like to see it go on a coupe someday soon -much preferred to sitting in a box in my garage.
Attachments
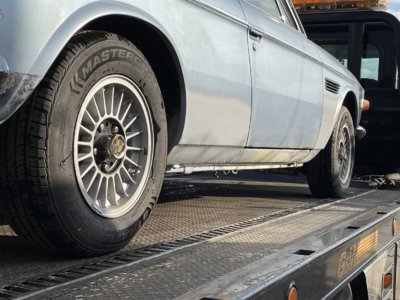
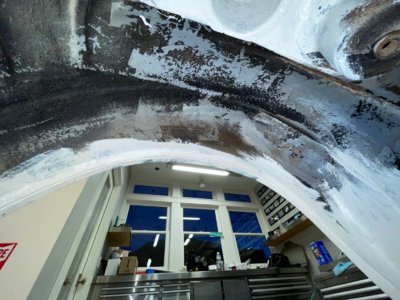
Phase I is finished. Phase I was all the metal work on the car. Rust remediation, Euro bumper conversion, side reflector delete and a full exhaust system are all now done. It's back to my home garage / shop for the next phase. With one more day still on the jackstands, I took the opportunity to pound out a few final metal projects:
Image 1 and 2
-fabricating three plugs to fill in the old bumper bolt holes as they would otherwise provide a leak path into the trunk area.
Image 3
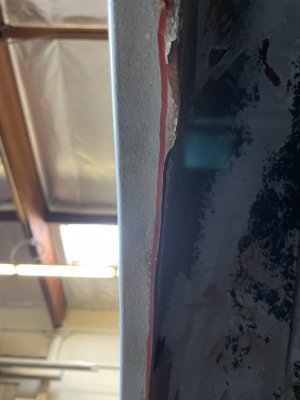
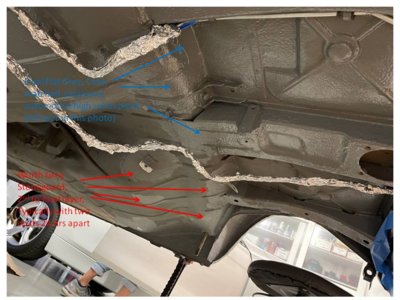
-cleaning up the excessively long 'lips' on the inner fenders (front and rear). Grinding back to the red line. This is 90% of the benefit of rolling the fender lips without damaging all the surrounding rocker schutz. This will all get DTM primer next week. I will likely be putting 16'' wheels back on the car and this (wider) section width might interfere with sidewall at full bounce. This is all excess material outside of the spot welded 'sandwich' that holds the inner and outer fenders together. It is cheep insurance and it is so easy now with the right tools and being high in the air.
Image 4 and 5
back on the transporter and heading home. Its been a great run. Time to move on to Phase II.
Image 1 and 2
-fabricating three plugs to fill in the old bumper bolt holes as they would otherwise provide a leak path into the trunk area.
Image 3
-cleaning up the excessively long 'lips' on the inner fenders (front and rear). Grinding back to the red line. This is 90% of the benefit of rolling the fender lips without damaging all the surrounding rocker schutz. This will all get DTM primer next week. I will likely be putting 16'' wheels back on the car and this (wider) section width might interfere with sidewall at full bounce. This is all excess material outside of the spot welded 'sandwich' that holds the inner and outer fenders together. It is cheep insurance and it is so easy now with the right tools and being high in the air.
Image 4 and 5
back on the transporter and heading home. Its been a great run. Time to move on to Phase II.
Attachments
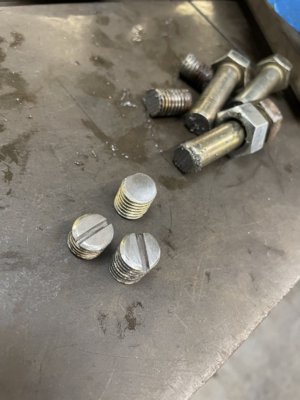

Like the bumper shock plugs. Stainless?
Do these cars in different color and model year all have the same blue carpet? Paul's car still has its original carpet that I can tell and very nice original wood trims. I bought 3 cars back in 1987: silver metallic 73' CS, midnight blue 74' CSi, and silver metallic sunroof 73' CS auto. Only keep the CSi.
I had the CSi stripped down to metal shell on wheels and new paint done in 2005 but have not put it back together yet. Still not sure which engine/tranny to use -- stock or M3 power train. I'm excited to see this lovely car is being rescued from rust. How are the front shock towers condition (sorry if I missed it in the thread)?
I had the CSi stripped down to metal shell on wheels and new paint done in 2005 but have not put it back together yet. Still not sure which engine/tranny to use -- stock or M3 power train. I'm excited to see this lovely car is being rescued from rust. How are the front shock towers condition (sorry if I missed it in the thread)?
Last edited:
@Brian_csi Short answer is 'no'.
Longer answer: 1974 was a transition year to 'one piece carpet' or molded carpet. This VIN No. is very early, xx55th of the line and still had the earlier multi-piece carpeting. IFRC, this change over (cost reduction) also occurred at the same time on 2002's.
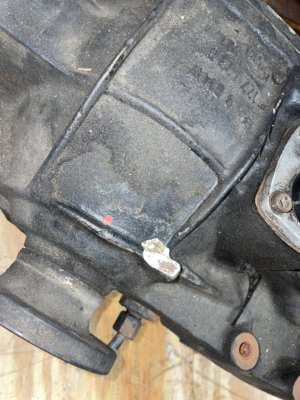
The shock tower and inner fenders on Patricia Mayer's car are in great shape. (image 0230). I will be reapplying a very small amount of pealed edges on the rocker schutz in the inner fenders in the upcoming phase.
Good luck with your CSi, we hope to see you reengage soon.
Longer answer: 1974 was a transition year to 'one piece carpet' or molded carpet. This VIN No. is very early, xx55th of the line and still had the earlier multi-piece carpeting. IFRC, this change over (cost reduction) also occurred at the same time on 2002's.
The shock tower and inner fenders on Patricia Mayer's car are in great shape. (image 0230). I will be reapplying a very small amount of pealed edges on the rocker schutz in the inner fenders in the upcoming phase.
Good luck with your CSi, we hope to see you reengage soon.
Attachments
Paul,
Interesting about "one piece carpet" for the '74, but when I removed everything from my '74CSi I still remember there were many pieces of carpet that glued to the chassis. Are you going to keep the turbine wheels or put back the stock 5-spoke wheels?
Interesting about "one piece carpet" for the '74, but when I removed everything from my '74CSi I still remember there were many pieces of carpet that glued to the chassis. Are you going to keep the turbine wheels or put back the stock 5-spoke wheels?
The switch to one pice carpet happened around May 1974.
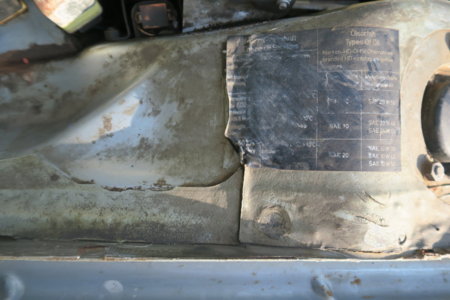
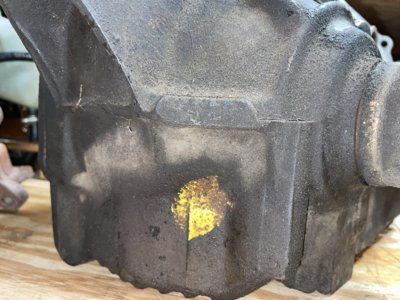
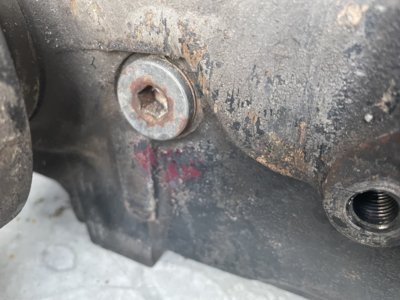
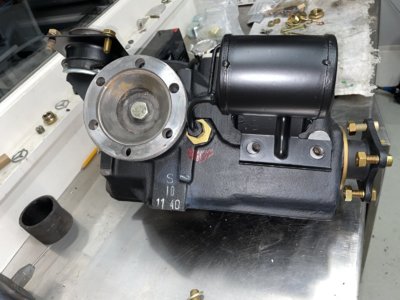
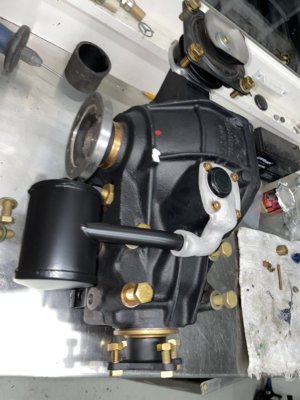
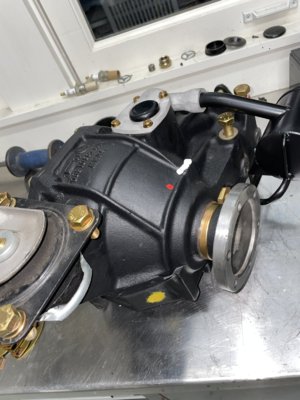
Phase II begins: While we work working on Phase I metalwork I sourced an entire front and rear suspension from a CSi. I've been working on preparing these parts for installation. Rear suspension will be first. The first full sub-assembly to finish on this project is the differential. (Yes, I know the oil reservoir was not originally fitted, I have yet to decide if I am going to install it). Here is the finished diff. sourced locally by a kind member of the E9 community. It got all new seals and the large "O" ring and is ready to be installed. (yes, I know it does not have the '74 threaded hubs). First three pics are for comparison purposes -from my recent archiving of the original color codes used on these diffs.
Attachments
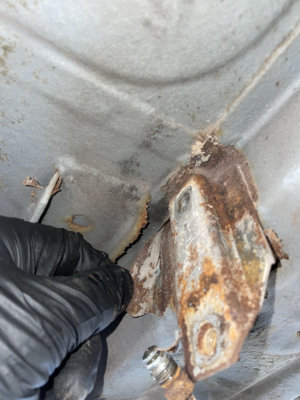
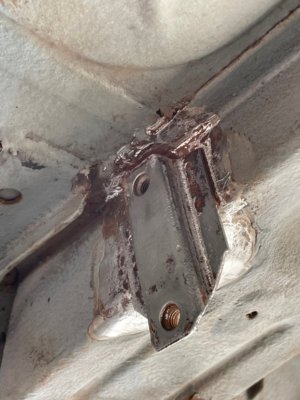
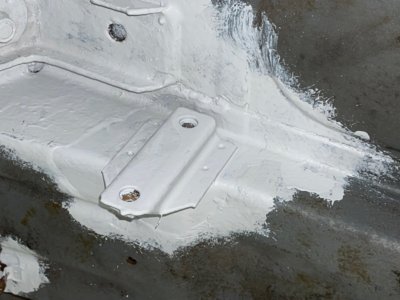
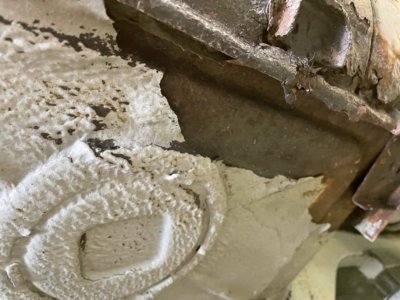
Progress report on Phase II -well underway. The original rear suspension has been removed. Step one is to address all the areas that have pealing rocker schutz in the area of the floor pans and above the rear suspension. This is mostly on vertical surfaces for some reason. Moisture has been creeping under the rubberized factory sealer.
I use and Exacto to cut back all of the areas that are pealing and stop when the factory sealer is still adhering well to the base metal primer (putty beige).
Next step was to grind away the surface rust and create some 'bite' for the primer.
Third step is to two coat the entire area with more modern DTM (Direct To Metal) primer that is very thick and catalyzed (4:1) If only Coupe had this chemistry and layer from the factory. (It is shocking to see just how thin the original paint and primer was applied, these poor cars never had a chance).
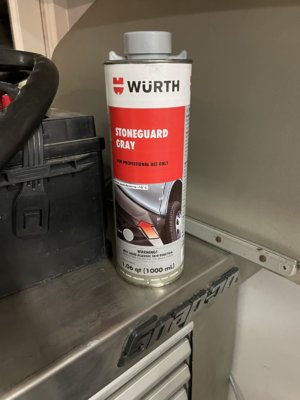
Next step will be reapplying the Wurth Stoneguard. (later)
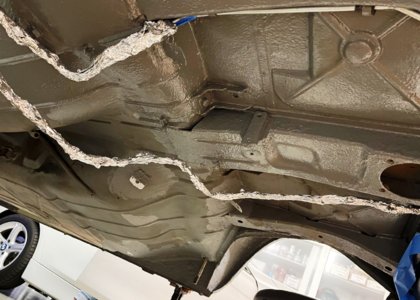
Here is one example area in the rear of the car. This is the rear brake pressure regulator bracket that sits right next to the differential. There are about 6-7 other areas similar in scope that were treated with the same process.
Last image is the fender lips that we were grinding back last month to clean up the edges. I am using lacquer thinner as a final cleaner prep before the DTM Primer. These wheel wells were aggressively cleaned in the Fall with a pressure washer.
I use and Exacto to cut back all of the areas that are pealing and stop when the factory sealer is still adhering well to the base metal primer (putty beige).
Next step was to grind away the surface rust and create some 'bite' for the primer.
Third step is to two coat the entire area with more modern DTM (Direct To Metal) primer that is very thick and catalyzed (4:1) If only Coupe had this chemistry and layer from the factory. (It is shocking to see just how thin the original paint and primer was applied, these poor cars never had a chance).
Next step will be reapplying the Wurth Stoneguard. (later)
Here is one example area in the rear of the car. This is the rear brake pressure regulator bracket that sits right next to the differential. There are about 6-7 other areas similar in scope that were treated with the same process.
Last image is the fender lips that we were grinding back last month to clean up the edges. I am using lacquer thinner as a final cleaner prep before the DTM Primer. These wheel wells were aggressively cleaned in the Fall with a pressure washer.
Attachments
-
 Pealing Rocker Schutz.jpg333.1 KB · Views: 209
 -
 Grind Away.jpg316.8 KB · Views: 191
 -
 Direct To Metal Primer.jpg279.1 KB · Views: 202
 -
 Pealing sealer taken at delivery before metal work.jpg322.5 KB · Views: 211
 -
 Looks good but upon closer inspection there are issues.jpg321.6 KB · Views: 212
 -
 Priming the areas we were grinding last month.jpg386.8 KB · Views: 249
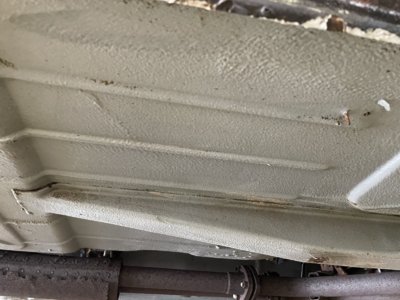
I forgot to photograph the application of the Wurth Grey Stoneguard. If you are going to do underbody repairs on an E9, I can highly recommend staying with Wurth. And this particular product as the best in terms of surface finish, adhesion and lack of shrinkage.
Image: 'final coat' shows that I am about half done with the back half of the underbody. Its slow going to get every nook and cranny.
Image: Slide1 shows the difference between the Wurth texture and the final flat grey sealer paint. This still looks shiny as it is still wet. It'll be tack dry in a few hours. It dries slow and gets less shiny over time.
This is the final surface and will seal off the new and the original stoneguard that I've tried to keep intact. I'll get about half of floor pans done in Phase II and the remainder will be done in Phase III.
Attachments
Finally, the last coat of grey sealer is down and drying. It's now ready to reinstall the fuel and brake lines.


Finally, we put down some color.
Right side of the trunk was completed when the fuel tank was out in December. Now the left side is done. (this is the original trunk floor BTW)
Wheelwells have one coat of base Fjord blue and two coats of clear coat.
Undercarriage is now ready with both new fuel and brake lines install. Ready for the subframe to go back in with the differential.
.jpg")
.jpg")

.jpg")
.jpg")
Right side of the trunk was completed when the fuel tank was out in December. Now the left side is done. (this is the original trunk floor BTW)
Wheelwells have one coat of base Fjord blue and two coats of clear coat.
Undercarriage is now ready with both new fuel and brake lines install. Ready for the subframe to go back in with the differential.
I have been waiting for the rear brake valve rebuild kit to arrive from the UK. It just landed and the rebuild process went very smoothly. Rebuilding is identical to a master cylinder + having to fixture the assembly under spring pressure to re install the four bolts. His instructions are very clear. The kit is complete. Highly recommended.
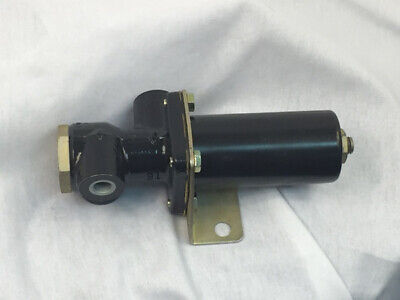
I am getting ready to reinstall the complete rear suspension now that this valve is done and installed with the new hard brake and fuel lines.
Lastly, it is just amazing 48 years after manufacture just how supple the original rubber parts are on this Coupe.


ATE Brake Regulator Seal Kit: Alfa Romeo, BMW, Porsche, VW | eBay
ATE BRAKE REGULATOR SEAL KIT. 1 x EPDM regulator body gasket. NOTE: The complete regulator pictured is for display and is not included in the kit. 1 x EPDM regulator body cap o-ring. Seals and o-rings are compatible with DOT 3, 4, 5, and 5.1 brake fluids.
www.ebay.com
I am getting ready to reinstall the complete rear suspension now that this valve is done and installed with the new hard brake and fuel lines.
Lastly, it is just amazing 48 years after manufacture just how supple the original rubber parts are on this Coupe.
Stunning photographs. Excellent work. Thanks for sharing these details. Mike
Ready for installation. I decided to remove the auxiliary oil canister off the differential as it was not originally fitted in 1974. Still missing some small hardware items, but the big pieces can go back in tonight.


Proof that when Paul starts a project he works seven days a week and 12 hours a day!
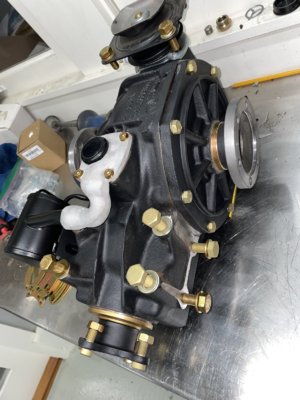
All the final assembly hardware has arrived. The rear suspension / exhaust / floor pans are all Phase II.
Phase II is finished.
Here are some finished photos before the first drive.


Phase II is finished.
Here are some finished photos before the first drive.