First morning out in the garage/nest with the car. Love it!!!

You are using an out of date browser. It may not display this or other websites correctly.
You should upgrade or use an alternative browser.
You should upgrade or use an alternative browser.
The Raven e9 project
- Thread starter autokunst
- Start date
-
- Tags
- restoration list
The joyful ownership experience increases immensely when you can walk out and see/fiddle with your car whenever you want
Most excellent the Raven is in the new home.
What a great new chapter in the story! You almost get as much joy out of seeing someone else’s progress as you do with your own.
I'll apologize in advance for the incremental minutia that I am posting. I had thought about saving up photos/progress and summarizing at various points. But I'd also planned on keeping a journal of the restoration, as a separate effort. It then occurred to me that this thread on the forum is a really great tool to track the project and progress.
Disassembly continues - but I quickly confirmed that I don't have enough room in the new garage to park our daily drivers, store yard tools, etc, plus the Raven, the tools and space I need to work on it, and all of the parts I am storing. At least not the way I was stacking things up. So today we embarked on some storage solutions. It still needs some tweaking, but WOW what a difference this has already made.


Disassembly continues - but I quickly confirmed that I don't have enough room in the new garage to park our daily drivers, store yard tools, etc, plus the Raven, the tools and space I need to work on it, and all of the parts I am storing. At least not the way I was stacking things up. So today we embarked on some storage solutions. It still needs some tweaking, but WOW what a difference this has already made.
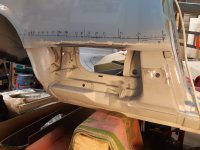
What an interesting history. As I disassemble The Raven, I am finding an interesting collection if discoveries. I’ll admit I am finding some areas that are more corroded than I’d anticipated. But balancing that favorably, I am finding areas that I’d expected to be much worst that are surprisingly original and reasonably solid. Overall, it is a positive outlook. I am also finding some interesting non-original equipment. Does anyone know what this thing is? I found this Blaupunkt box of some sort buried behind the glove compartment (right next to an earlier Becker Grand Prix amplifier box. I may not know the full history of this car, but it appears every owner prior to me liked their music.


Perfect, un-cracked AC vents. Nice!

Shockingly, surprisingly original, reasonably solid rockers (I will replace everything for peace of mind). But it is nice to see. I had a gumption that someone had performed rocker repair in the past, but this appears quite original. I am just happy the geometry of the car


Things I’ve heard and read about, but hadn’t “experience” myself – until know. I found the original foam foot well filler, in reasonably good condition. It was broken in half- not sure if I did it or if it was already broken. But I glued it back together for now. I may make a mold of it to cast a fresh on in closed cell foam.?.

I’ve talked about this before, but I love the manufactured date stamp on driver’s door. I believe this is on all BMWs at east since the 70’s (perhaps only US deliveries? – I don’t know). Shortly after the e9, the pressure stamp went to small pixelated letters and numbers that were stamped out of the sticker. You can see here that The Raven was manufacturer in 4/73. This is consistent with the letter from BMW that states it was manufactured on April 10, 1973. This sticker will be disintegrated when stripping the body to bare metal. I don't know if they are still available, but if so, I'll want to stamp the date back in.

Continuing to disassemble at a relaxed pace. But the anticipation of stripping to bare metal is mounting.
Perfect, un-cracked AC vents. Nice!
Shockingly, surprisingly original, reasonably solid rockers (I will replace everything for peace of mind). But it is nice to see. I had a gumption that someone had performed rocker repair in the past, but this appears quite original. I am just happy the geometry of the car
Things I’ve heard and read about, but hadn’t “experience” myself – until know. I found the original foam foot well filler, in reasonably good condition. It was broken in half- not sure if I did it or if it was already broken. But I glued it back together for now. I may make a mold of it to cast a fresh on in closed cell foam.?.
I’ve talked about this before, but I love the manufactured date stamp on driver’s door. I believe this is on all BMWs at east since the 70’s (perhaps only US deliveries? – I don’t know). Shortly after the e9, the pressure stamp went to small pixelated letters and numbers that were stamped out of the sticker. You can see here that The Raven was manufacturer in 4/73. This is consistent with the letter from BMW that states it was manufactured on April 10, 1973. This sticker will be disintegrated when stripping the body to bare metal. I don't know if they are still available, but if so, I'll want to stamp the date back in.
Continuing to disassemble at a relaxed pace. But the anticipation of stripping to bare metal is mounting.
I can see part of your VIN underneath the "manufacturer" text on the door decal.
Yes, in fact the VIN is stamped there as well. Mine is pretty faint save for the last three digits. I trust all of our cars have these stamps, and are likely all pretty slight. I shine the light from a very acute angle to see them better.I can see part of your VIN underneath the "manufacturer" text on the door decal.
MIne's there too, very hard to read
And not available new but they can be reproduced. US/NA FMVSS sticker.
If your rockers/sills are original I'd consider leaving them.
What I did on the CS and CSL was cut out a small section and put a camera in to do an inspection of the cavities.
Everything was solid so just treated the cavities to make sure no rust could take hold. You will also want to check the drain holes.
Saves you a load of un-need work and maintains the original fabric.
Hi Wes, I love the words you are saying! And if I can prove to myself beyond all doubt that all layers on the inside are indeed solid and harmless, I would love to simply treat them and move on to other parts of the car. I pulled the inspection hole covers, but can't for the life of me find my boroscope camera. I will post pics within the rocker once I find that. What you may not be able to see in the pics is that the floors are toast. But if that corrosion stops before it rolls up into the inner sill, that may be okay. I am particularly worried about the areas by the pillars. But thank you for the encouragement!!!If your rockers/sills are original I'd consider leaving them.
What I did on the CS and CSL was cut out a small section and put a camera in to do an inspection of the cavities.
Everything was solid so just treated the cavities to make sure no rust could take hold. You will also want to check the drain holes.
Saves you a load of un-need work and maintains the original fabric.
Quite often indeed the bottom of A pillar and the rear wheel arch end are most toast. The sheets are very close together in these areas, and up to 3 layers thick.Hi Wes, I love the words you are saying! And if I can prove to myself beyond all doubt that all layers on the inside are indeed solid and harmless, I would love to simply treat them and move on to other parts of the car. I pulled the inspection hole covers, but can't for the life of me find my boroscope camera. I will post pics within the rocker once I find that. What you may not be able to see in the pics is that the floors are toast. But if that corrosion stops before it rolls up into the inner sill, that may be okay. I am particularly worried about the areas by the pillars. But thank you for the encouragement!!!
You can actually access the rear part with a boroscope without cutting open a hole. If you have the rear seats out, you can slide a camera down into the corner of the wheel arch and the quarter panel. This allows a view on the (normally non visible) outer sill (rocker), which in this corner is covered by the quarter panel. See the pic of my car, with the quarter panel chopped off.
The area between the intermediate sill and the inner sill can be viewed through the inspection holes. Some are inside the cabin, one is under the car, just before the sub frame mount. This last one allows entry into the most critical area. I have quite some pics in my build thread, they might help you.
If your floors are toast, then there is a good chance that the floor to sill seam is also corroded.
On my car, the outer sill was replaced by a P.O. , but they left the other layers untreated, allowing them to rot from the inside out. It probably kept the car on the road, so i should be thankful, but point is that appearance from the outside is only half the story.
Attachments
Last edited:
It was a slow week on the car due to a busy work week. But I made a little progress.
75% of the window assemblies are out. The rears work reasonably well, especially the one with the torn open cover. The front left window was very slow going. Question - As these are not the "sardine can" motors, are these the later motors? Anyone know where to get a new black plastic cover?


Original condition jamb on the left side - there's that Polaris Silver sneaking out every chance it has. The right side has had some work done to it. We'll have to dig in deeper to see how well the work was done.

Jamb covers in reasonable shape. I few dings that I should be able to straighten out.

Is this the original texture (I.E., is does this look like an original part rather than an aftermarket replacement?

C pillar emblems. They look slightly better in this photo than they do in person. Does anyone know how the emblems are supposed to be attached to the metal frame surround? Mine appear to have some newer adhesive that I know is not original...

75% of the window assemblies are out. The rears work reasonably well, especially the one with the torn open cover. The front left window was very slow going. Question - As these are not the "sardine can" motors, are these the later motors? Anyone know where to get a new black plastic cover?
Original condition jamb on the left side - there's that Polaris Silver sneaking out every chance it has. The right side has had some work done to it. We'll have to dig in deeper to see how well the work was done.
Jamb covers in reasonable shape. I few dings that I should be able to straighten out.
Is this the original texture (I.E., is does this look like an original part rather than an aftermarket replacement?
C pillar emblems. They look slightly better in this photo than they do in person. Does anyone know how the emblems are supposed to be attached to the metal frame surround? Mine appear to have some newer adhesive that I know is not original...
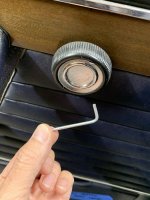
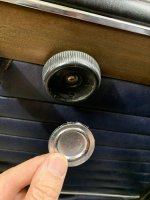
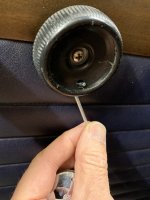
Okay, I am throwing in the flag. I searched but can't find the answer. What is the trick for removing the vent window interior knob? I believe it needs to come off the transmission mechanism to get the whole thing out of the door. Thank you in advance!
You have a late 73 with circuit breakers, switches and improved motors. There is no aftermarket B pillar covers, yours are original. The chrome targets attach to to the C pillar with two screws, the Roundels insert into the targets and are held by pressure of the mounting pins.
Here is what your are looking for for the quarter window knob issue. Rotate the knob and use a little Allen wrench or similar to feel where that hole is. Then simply push hard and maybe use a small screwdriver to help pull the “button” out.
Attachments
I have two of those late style motor black plastic cover. You are welcome to have them. Although, tbh, I would highly suggest switching to the e28 motors since you have everything out. They made a big difference in my car. Independent of cleaning the rails and all that.
See post 238 here:
 e9coupe.com
See post 238 here:
Bringing a '74 back up to her intended glory.
Good grief how time flies. A few updates. The day after that last update, I took the long drive from Rey Rivera's shop, through L.A. and, the following day on up to our new house an hour and a half north of San Francisco. Not too surprisingly, there were a few "special moments", like a hood...
Attachments

Stephen,
Regarding the window motors, I agree with Bo. I had the motors you show in your rear window pix in my May '74 build car. The up or down time was about 20 seconds per window. I replaced all four motors with e28 rear door motors (two sets of motors, rear doors only). After I'd cleaned the old grease, re-greased the mechanism, the up or down time was about 6 seconds per window. IF you really want to keep the 'arthritic' motors, I also have a pair you can have.
Great start, keep showing us your progress.
Gary