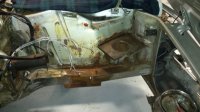
Will have to start somewhere

Hood foam is original and available.

IMHO forget the sealed beams, if I got the car that would be first thing to swap out. Include them with the car.
 
Just had Athena converted from sealed beams to H1s with city lights, the way she was born at the factory and delivered to Italy.

My friend John Dickey's CSi had H1s with city lights, his had never been converted to sealed beams.
 
Hi Peter -- great thread. I believe there was no original heat shield, but I have a note to look into part numbers 51 48 1 832 850 or 18 22 1 177 982 as possible alternatives. I haven't done this yet, so look these over carefully to ensure they will work.
 
Thanks for the numbers Chris, I'm pretty sure I could devise a shield that would be easy to remove if necessary but I'll look into those part numbers tonight.

I started working on the front part of the car today, mostly the engine bay and it was a bit messy but after reading some other members' posts about the temperature in their dwelling-states I paused to think of how lucky I was to have a comfortable place to make a mess of, and since I originally came from the Northeast I do know how difficult it can be to try to get a little "man-time" in a cold garage where the tools stick to your hands because they're so cold. I pay homage to those of you who deal with that obstacle even for short periods of time.

So I decided that the entire engine bay and inner front grill area will need to be painted Polaris, again, none of this should be visible with the hood closed and it can't look worse than it does, well maybe it can, but a question that may be visible from the pictures, should I mask off the "matting" on the inner fender tops and leave them faded, or just paint all the way up to the hood gutter including the "matting"? So happy to find no more rust that needs welding (so far). I have also been in touch with the previous owner's wife, whose deceased husband owned the car and she is really excited to get pictures of the progress as I guess this car was a big part of their family and very precious to them so the pressure is on to get her right. So far it's been really fun and the forum is a big part of that fun-

Thanks,
 

Attachments

  • engine bay1.jpg
    engine bay1.jpg
    59.2 KB · Views: 273
  • engine bay 2.jpg
    engine bay 2.jpg
    69.1 KB · Views: 268
  • engine bay3.jpg
    engine bay3.jpg
    74.8 KB · Views: 263
  • engine bay4.jpg
    engine bay4.jpg
    66.3 KB · Views: 258
Hi Bob, yes, the dog is "not well" :)- Anyhow, a big thanks to HB Chris for the receptacle. It came in today and I got a break so attacked it. I still have to check the functioning of the relay since something caused the original meltdown (pictured below)
 

Attachments

  • fried relay.jpg
    fried relay.jpg
    99.2 KB · Views: 249
Today's play time

After spending much of the weekend with boy and his friends in the country for his 15th bday and kicking their butts at K1 Speed I was able to sneak in a small 11 hour nap and head to the shop for some relaxation. I keep telling myself that this is a maintenance and repair exercise and NOT a restoration but it seems to be blending into some kind of hybrid between all 3. I keep intending to finish the trunk but the idea of crawling in there to get the elephant skin correct is not appealing so I concentrated on the engine compartment for a few hours today. I included a couple of shots. I really hope the polaris paint comes out close to the original color and that I don't screw everything up and have to start over which seems to occur quite often with me.... and not only on cars :-(
 

Attachments

  • still dirty.jpg
    still dirty.jpg
    78.7 KB · Views: 238
  • primed.jpg
    primed.jpg
    47.5 KB · Views: 229
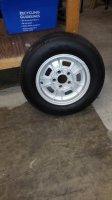
Fun night in Dallas watching the Ducks loose- only kidding, I would have rather they win but Ohio just ran over them. Got back this morning to clean up the last trunk piece and I'm determined to post some pics of the finished trunk in a couple of days. On a technical note since the mold permeated every conceivable portion of the car I had to clean out the sunroof drain tubes. I did this with some bleach and a long length of wire (fairly thick wire) with a small piece of cloth taped to the end, and it seemed to work pretty well, then I used some high pressure air to check that everything was clear. Anyhow, nothing exciting but again I hope to be finished with the trunk including the speaker hole weld-up then it's time to paint the engine bay, patch the under coating and finish assembling the interior. I sent the front seats out to be repaired and my guy is going to try to save all the usable original leather and only replace those pieces that need replacing. The idea being that it will be a maintenance repair rather than a re-uphulstry job. The back seats will remain as they came to me but clean, treated and free of mold :)
 

Attachments

  • spare.jpg
    spare.jpg
    38.1 KB · Views: 196
Hate to contribute to the "balloon project" but have you thought about pulling those brake lines...they are basically just sitting there as an obstacle to your paint work and unattached at either end.

Sorry buddy, I know you are trying to keep the lid on the work, just a suggestion. Looking great!
 
Well, one of the reasons I post... all suggestions welcome :) I think I will remove them, "in for a penny in for a pound" as my momma would say. I'll call it my repair-o-ration project. In truth it will probably take less time than scraping around them and taping them up, plus the painting will be easier.

Thanks Drew!
 
Amazing progress on this project. Can't wait to see the new engine bay paint.
 
Thanks Bob, I think I have some work to do in the office today, can't remember but I hope to sneak into the shop and get that darn trunk together. The toolbox was not complete... BUT it did come with the elusive red handled screwdriver! And since I am a tool hoarder, I have multiple sets of BMW tools from various 70's era Bavarias and 320i's that are unfortunately no longer with us so I think I can put together a complete tool set for this coupe.

I hope to get some more pictures up this evening.
 
Well, one of the reasons I post... all suggestions welcome :) I think I will remove them, "in for a penny in for a pound" as my momma would say. I'll call it my repair-o-ration project. In truth it will probably take less time than scraping around them and taping them up, plus the painting will be easier.

Thanks Drew!

Just trying to help...really I am...
 
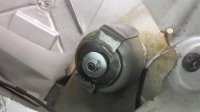
I mentioned on Steve's post that I'm afraid to put the elephant shin back on the shock area until I reinforce that area so this morning on my way to work I'll pick up some pieces as my neighbors who fabricate must be on a rig somewhere and not sure when they'll get back. I'm thinking something simple but it never turns out that way. I found some flaws in my original thoughts but I am hoping to come up with a simple solution that can be a bolt in and the skin has to go over it without being noticeable. If I come up with anything usable I'll post. I have the equipment to do it but it's much more labor intensive than using the machines my neighbors have.
 
Shock brace

OK, fooling around in the shop this morning and came up with this. The more I think of it (which has no bearing on whether I'm correct or not), the more I come to the conclusion that the combination of shorter springs and stiffer shocks contributes significantly to the "Big Bang" theory in the trunk. I came up with this solution? and thought it might be easy to just run a weld on top of the existing weld (after properly prepping it) but I wanted to get the forum thoughts. This solution? is really simple to make and if all you had to do is weld 2 spots then it could be an easy answer. The underside would be very complicated since it's boxed in there and we would have to have de Q put on his thinking cap for that one. Please let me know if you think this would help-

Thanks,
 

Attachments

  • shock brace 1.jpg
    shock brace 1.jpg
    64.5 KB · Views: 196
  • shock brace.jpg
    shock brace.jpg
    54.2 KB · Views: 194
Last edited:
perhaps i'm missing something ... i thought the big washer idea was quite elegant ... in the fact that if you didn't know it was supposed to be there, you wouldn't give it a second thought. might be better off as a large circular "dished" plate with the hole for the shock bolt.

i haven't seen a picture of the sides of this thing ripping off - just the push through / puncture. my thought is that, if you make it where the shock can't push through ... then you probably aren't going to have an issue.

so what am i missing?
 
Will the elephant skin fit back on?

Depending on the size of the washer it may not completely solve the problem if the metal outside of that area is fatigued (like mine). So the traditional repair may have been enough for the 80's and 90's but now this particular area of metal is getting very old and brittle-and not just under the sh!tty spot welded ring where the traditional repair was made.

So imo any pre-emptive action should take the washer-type reinforcement all the way to the edge of the tower top before it ends up like mine-blown out almost to the edge.
 
Will the elephant skin fit back on?

Depending on the size of the washer it may not completely solve the problem if the metal outside of that area is fatigued (like mine). So the traditional repair may have been enough for the 80's and 90's but now this particular area of metal is getting very old and brittle-and not just under the sh!tty spot welded ring.

So imo any pre-emptive action should take the washer-type reinforcement all the way to the edge of the tower top before it ends up like mine-blown out almost to the edge.
i was thinking about going all the way out to the edge. i think that yours expanded because the metal started to tear (from the center) - once it pushed thru, it just kept tearing. to me it is unlikely that the entire cap would shear off.
 
Steve, elephant skin fits perfectly- more than enough room. RS, I am not any kind of engineer but from Steve's issue and others I have seen it "looks" like the tear is following the path of least resistance, so if I put a "dish" in there it will tear at the edges (maybe not as soon/maybe not at all), but with a standard washer the stress is more acute and will punch out the center so I'm thinking that this will definitely solve the problem and you can change the shock and bushing easily with the brace in place. Please keep the thoughts coming as I don't expect to weld anything until this weekend and if I'm going down the wrong path I wouldn't mind knowing in advance :)

Thanks!
 
Also...

I have seen quite a few weld jobs that go all the way out to the outer edge of the "can". This may have been just to be really safe but they also could have torn there. Maybe we should post a thread and get some kind of consensus? With pictures? :)
 
Back
Top