Sounds like allot of work but I think you are correct in that you know what's there! This is a really good thread for me now as I'm helping a friend with a 1970 P-1800 ES- Volvo (don't cringe) actually it's a neat car but in need of allot of work. I wish BMW was as good about keeping parts around- you can still get any part for this car- it's amazing, and good because it needs allot of parts. The construction is a little similar to the e9 in that everything is welded on and they rust quite a bit!
You are using an out of date browser. It may not display this or other websites correctly.
You should upgrade or use an alternative browser.
You should upgrade or use an alternative browser.
And so the saga begins
- Thread starter bimmerboy73
- Start date
-
- Tags
- restoration list
riverflyer
Active Member
Great job...your dedication is very impressive. I know the frozen gray is a semi matte finish, but is the space gray also a matte finish? What color interior?
lawdog-
Thanks for the advice, although i heard mixed feedback on wetting the floor down because it might cause fisheyes if the humidity got too high?? - didnt want to take a chance so i did what i thought to be the next best thing which was lay down a thin coat of spray adhesive and let it set for about 30 minutes before rolling teh car in. Dont have a booth but i did clad all the walls to cut down on dust.
Gave long thought to doing frozen grey, especially after the base was done. Problem is that that finish is still cleared i believe, just in a semi-satin finish. In the end i wasnt comfortable with laying a final coat like that down so i kept to the space grey plan.
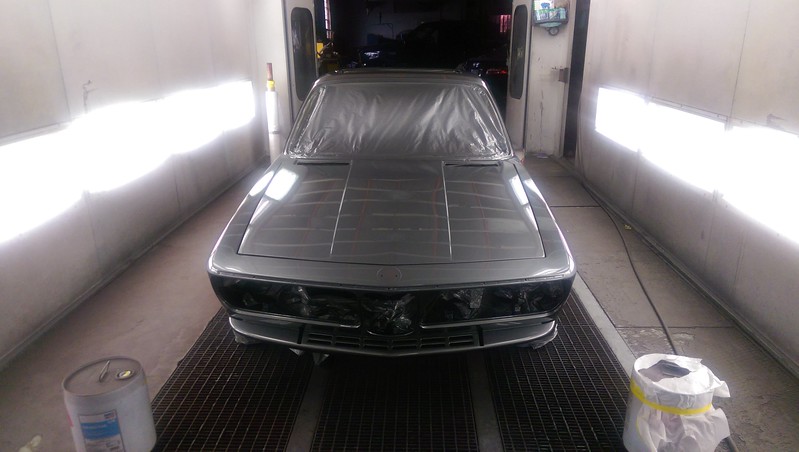
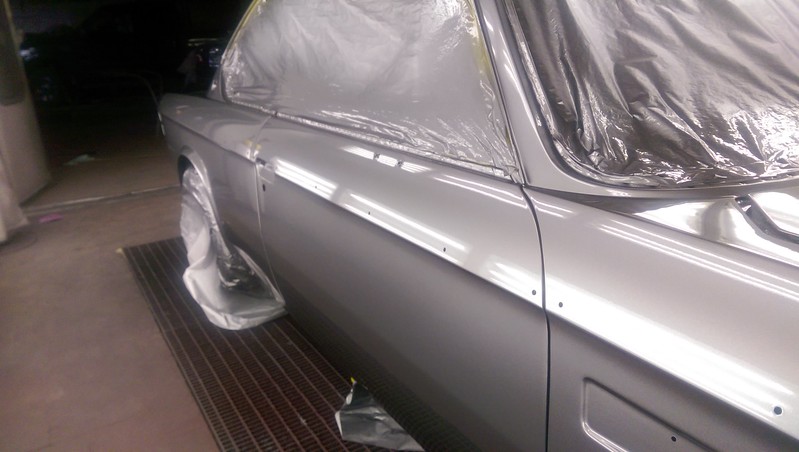
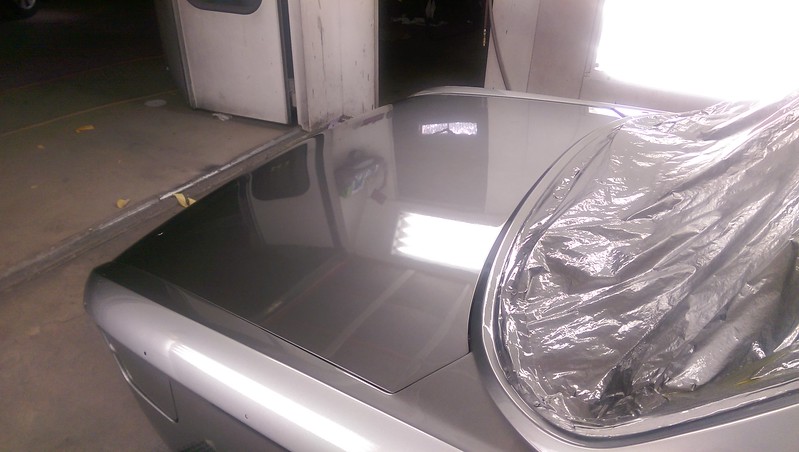
Update - car is cleared, sans hood and trunk. Went ok. had a few really bad runs early on due to a mishap with one of the low florescent lights i have around the car. Made sure to lay down the clear nice and heavy around them so that its easy to sand and level when i wet sand. All in all, i think its going to come out really well. Will start sanding later tonight to address the runs and smooth everything out. Might wait until tomorrow to clear the hood and trunk.
Sounds like you are done, but just a follow up for future reference: We have a booth and still wet down the booth and even outside of the booth every time we paint (3-4 times a week). It's pretty humid where we are. The key is prep and clean the vehicle really well and then wipe it very well with good wax and grease remover, have a good filter on the air line, with a good compressor setup that doesn't get the air too hot. We virtually never get fish eye. There are fish eye remover additives that helps if needed.
Make sure you are using the right speed reducer for your temperature to avoid runs.
Laying the clear down thick can be a bad idea. The clear needs to dry in between coats and if you lay it down too thick the solvents can get trapped and slowly rise, causing issues. Since you don't have an oven, if you are planning to buff the car you may want to wait many months to give the clear time to cure. Otherwise, you may spend an entire day buffing it so find a month later the clear dulls out.
One more comment since you are at this stage: My personal preference, I despise full gloss finish on the inside panels of a vehicle. It just doesn't look right to me. When I'm done with mine, it will definitely be sprayed with a reduced gloss clear on the insides and engine compartment.
For Frozen Grey you have to spray it with a Matte clear to protect the paint. It can be tricky for the inexperienced because technique can significantly affect the gloss level and you also may end up with a splotchy job. We have painted a few different cars that turned out pretty good. DIY in the trunk is fine though if you decide to do it :-o
Let's see some pictures!
Great job...your dedication is very impressive. I know the frozen gray is a semi matte finish, but is the space gray also a matte finish? What color interior?
Space Grey and Frozen Grey are either the same color or almost identical colors. I can look at the formulas if anyone is interested. The main difference is the type of clear coat used AFTER the color is laid down. To achieve Space Grey, you use a gloss clear. To keep it as Frozen Grey, you use a matte clear. When newly painted with Space Grey base coat, the car looks about as good as any Frozen Grey vehicle can look since the base coat has the perfect amount of satin finish to it. But it is unprotected since it has no clear. If you put a matte clear down on Space Grey, you would then essentially have a completed Frozen Grey look.
Last edited:
bimmerboy73
Well-Known Member
One step forward, two steps back
Well, progress was slow this week with more back-stepping and lateral moves than anything else. Contemplated adding another coat of clear to the whole car after i discovered a thin spot in the clearcoat in the drivers front quarter. How i missed it, i dont know. After talking to a few local coupe guys, i settled on re-clearing just the front end of the car and only below the beltline trim as to eliminate the issue of blending or melting the clear within a panel - a big no-no. Clear went on fine, have adequate coverage everywhere now so all that is left is wetsanding - 800 1000 - 1200 and 2000 grits. Dont think i'll be done until friday...
Also had to patch a few flaws and cover, but all is well now.
Got the itch to start unmasking and test fitting a few custom pieces. The spoiler went on without issue. Really happy with the custom turnbuckle attachment i fabricated to stabilize it and take the stress off of any one mounting point. - picture below.
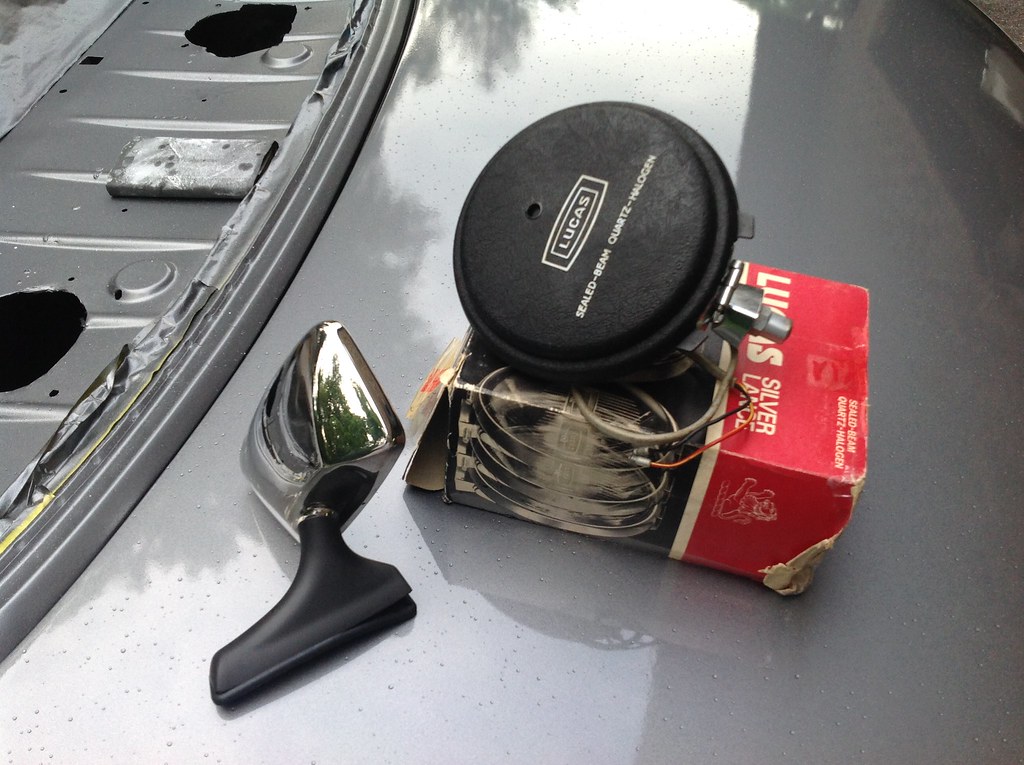
Also popped on one of the new driving lights. went with Lucas over the Hella's for the sake of being different... and because i like the look of them - chrom and black go well with the colro scheme and the 'Lucas' logo and subscript on the covers looks pretty cool IMO.
The custom side views saw the first light of day today as well. Didnt mount them up but i think they are going to look pretty sharp - Nice compliment to the black frame, chrome fill greenhouse openings (also custom) and the blacked out kidney grills and beltline trim / bumper - REALLY cant wait to see how all of its going to look all buttoned up.
Got a little carried away snapping pictures. 100% had to do with the fact that i havent seen the car this close to complete since 2011. I can almost taste it now...
 20140727_224850585_iOS by J_Otte, on Flickr
A hint of what's to come...
 20140727_225756478_iOS by J_Otte, on Flickr
 20140727_225904539_iOS by J_Otte, on Flickr
 20140727_231954526_iOS 1 by J_Otte, on Flickr
 20140727_232017930_iOS by J_Otte, on Flickr
 20140727_232043313_iOS by J_Otte, on Flickr
 20140727_231524566_iOS 1 by J_Otte, on Flickr
 20140727_225209548_iOS by J_Otte, on Flickr
 20140727_224941311_iOS by J_Otte, on Flickr
 20140727_225020052_iOS by J_Otte, on Flickr
 20140727_225033099_iOS 1 by J_Otte, on Flickr
Well, progress was slow this week with more back-stepping and lateral moves than anything else. Contemplated adding another coat of clear to the whole car after i discovered a thin spot in the clearcoat in the drivers front quarter. How i missed it, i dont know. After talking to a few local coupe guys, i settled on re-clearing just the front end of the car and only below the beltline trim as to eliminate the issue of blending or melting the clear within a panel - a big no-no. Clear went on fine, have adequate coverage everywhere now so all that is left is wetsanding - 800 1000 - 1200 and 2000 grits. Dont think i'll be done until friday...
Also had to patch a few flaws and cover, but all is well now.
Got the itch to start unmasking and test fitting a few custom pieces. The spoiler went on without issue. Really happy with the custom turnbuckle attachment i fabricated to stabilize it and take the stress off of any one mounting point. - picture below.
Also popped on one of the new driving lights. went with Lucas over the Hella's for the sake of being different... and because i like the look of them - chrom and black go well with the colro scheme and the 'Lucas' logo and subscript on the covers looks pretty cool IMO.
The custom side views saw the first light of day today as well. Didnt mount them up but i think they are going to look pretty sharp - Nice compliment to the black frame, chrome fill greenhouse openings (also custom) and the blacked out kidney grills and beltline trim / bumper - REALLY cant wait to see how all of its going to look all buttoned up.
Got a little carried away snapping pictures. 100% had to do with the fact that i havent seen the car this close to complete since 2011. I can almost taste it now...
20140727_224850585_iOS by J_Otte, on FlickrA hint of what's to come...
20140727_225756478_iOS by J_Otte, on Flickr20140727_225904539_iOS by J_Otte, on Flickr20140727_231954526_iOS 1 by J_Otte, on Flickr20140727_232017930_iOS by J_Otte, on Flickr20140727_232043313_iOS by J_Otte, on Flickr20140727_231524566_iOS 1 by J_Otte, on Flickr20140727_225209548_iOS by J_Otte, on Flickr20140727_224941311_iOS by J_Otte, on Flickr20140727_225020052_iOS by J_Otte, on Flickr20140727_225033099_iOS 1 by J_Otte, on Flickrbimmerboy73
Well-Known Member
Great job...your dedication is very impressive. I know the frozen gray is a semi matte finish, but is the space gray also a matte finish? What color interior?
Interior for the time being is Pearle beige (an e24 color). Died everything back in 2010. The car has recaro's up front and the rear seats and rest from an e24. The plan now is to either stay with the color scheme (recaro's have black fabric inserts) but wrap it all in double stitched leather or... switch to a complete leather saddle interior with Scheel seats. Will decide when i have it all put back together again.
Saw this project up close and personal yesterday and presuming the paint clears up like the test spot on the roof, it is going to look great. I really like the color and with the black accents it will be sharp.
I'll be really interested to see how that last spray of clear comes out.
I'll be really interested to see how that last spray of clear comes out.
Wow, I really like how that paint looks in the matte stage. Makes me think about my own project. Space grey is a fantastic color. I had a loaner 335d in that color and I loved it.
Impressive work, can't wait to see the final product
bimmerboy73
Well-Known Member
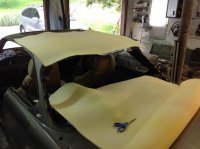
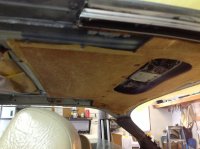
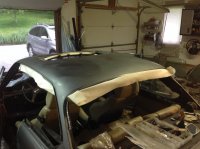
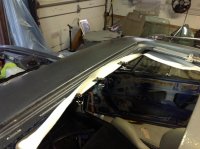
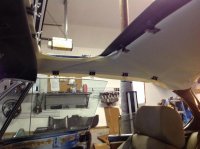
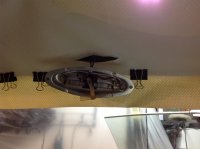
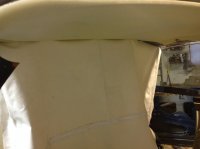
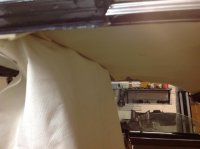
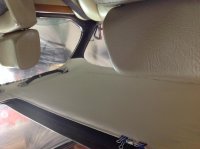
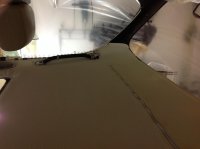
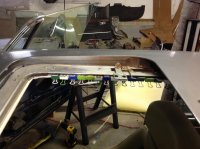
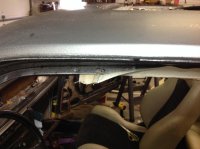
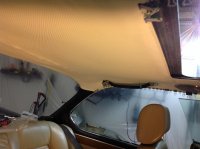
Headliner Install
got around to installing the headliner - need a break from wetsanding...
Took a few pics that i plan to put into a diy thread of sorts. Should have taken a bunch more but forgot along the way. Will try to fill in the blanks through narrative a bit later i guess. Came out ok.
Happy with:
the fact that i got everything in without tears, shifts and major folds or creases
No happy with:
The material overall. Not a good match for the original... particularly the zipper that spans almost the entire width of the ceiling. Otherwise, its not bad.
Lessons learned:
Get extra padding for the areas adjacent to the sunroof where there is no backing material.
Attachments
bimmerboy73
Well-Known Member
bimmerboy73
Well-Known Member

bimmerboy73
Well-Known Member
spent the last week working on odds and ends as time permits. Finally figured out the front and rear windscreen issue. gaskets are on as is the chrome trim, just waiting for my dad to come over and help pop them in.
finished the headliner this week as well but dont like the way a few sections turned out. contemplating pulling the sides down to see if i cant get the material better adhered to the foam backing. then again, doing so might open up a can of worms that leads to redoing the whole thing... we shall see.
Installed the rear quarter glass but before i got to that, had to install new gear boxes on the motors. My rear windows never worked although the motors spun just fine. Taking the whole thing down revealed that the pre PO had actually taken the gears out to prevent operation. Not sure why... anyway. looking forward to having functional rear glass for the first time!
refurbished the gas tank and reinstalled along with the refurbed headlights.
Cutting the elephant skin i got from DeQ tonight so that i can install it. Might just do the sides and back panel to start. Also going to get some wire wrap to clean up the electrical a bit. Looks really crappy now next to all the new paint - so does the fuel pump, but it works, so i'll buy a spare and wait until this one dies before i touch it.
 20140810_222357507_iOS by J_Otte, on Flickr
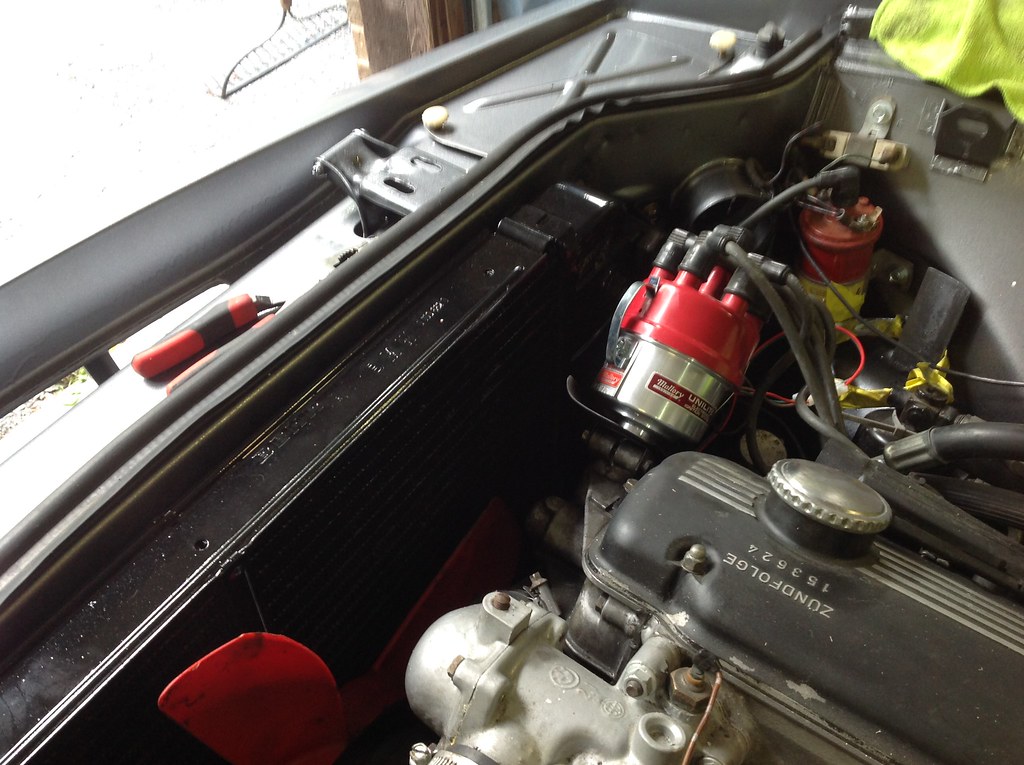
Also refinished the radiator and dropped it back in.
And finally... managed to transfer the gear from my donor dizzy to the new mallory and install it. Not as easy as i'd thought it would be since what was described as the 'roll pin' that holds the gear to the shaft was in fact a section of solid steel rod. Had to drill it and then punch it. Cant wait to fire it up and see how it runs!
 20140810_222034479_iOS by J_Otte, on Flickr
 20140810_222948461_iOS by J_Otte, on Flickr
All good though because it gave me an excuse to buy this...
 20140810_222122210_iOS by J_Otte, on Flickr
which is fun but leaves a ton to be desired in terms of build quality... pride in american craftsmanship anyone?
finished the headliner this week as well but dont like the way a few sections turned out. contemplating pulling the sides down to see if i cant get the material better adhered to the foam backing. then again, doing so might open up a can of worms that leads to redoing the whole thing... we shall see.
Installed the rear quarter glass but before i got to that, had to install new gear boxes on the motors. My rear windows never worked although the motors spun just fine. Taking the whole thing down revealed that the pre PO had actually taken the gears out to prevent operation. Not sure why... anyway. looking forward to having functional rear glass for the first time!
refurbished the gas tank and reinstalled along with the refurbed headlights.
Cutting the elephant skin i got from DeQ tonight so that i can install it. Might just do the sides and back panel to start. Also going to get some wire wrap to clean up the electrical a bit. Looks really crappy now next to all the new paint - so does the fuel pump, but it works, so i'll buy a spare and wait until this one dies before i touch it.
20140810_222357507_iOS by J_Otte, on FlickrAlso refinished the radiator and dropped it back in.
And finally... managed to transfer the gear from my donor dizzy to the new mallory and install it. Not as easy as i'd thought it would be since what was described as the 'roll pin' that holds the gear to the shaft was in fact a section of solid steel rod. Had to drill it and then punch it. Cant wait to fire it up and see how it runs!
20140810_222034479_iOS by J_Otte, on Flickr20140810_222948461_iOS by J_Otte, on FlickrAll good though because it gave me an excuse to buy this...
20140810_222122210_iOS by J_Otte, on Flickrwhich is fun but leaves a ton to be desired in terms of build quality... pride in american craftsmanship anyone?
Boy73, would love to get a write up on the headliner install, can't find a really good source and would like to get your take on the degree of difficulty, also your take on getting ALL the pieces necessary since the PO of my coupe basically destroyed the headliner in a fairly lame attempt to restore the car. In my favor was that he started with the headliner, and the passenger door wood trim then got completely frustrated, threw all the parts in the trunk and sold the car- "One man gathers what another man spills" -Robert Hunter
bimmerboy73
Well-Known Member
New butt holders
Added to the work left to do this week when i picked these up from ebay.de (germany).
 $_57 (6) by J_Otte, on Flickr
 $_57 (5) by J_Otte, on Flickr
 $_57 (4) by J_Otte, on Flickr
 $_57 (3) by J_Otte, on Flickr
 $_57 (2) by J_Otte, on Flickr
 $_57 (1) by J_Otte, on Flickr
 $_57 by J_Otte, on Flickr
 $_57 (11) by J_Otte, on Flickr
 $_57 (10) by J_Otte, on Flickr
 $_57 (9) by J_Otte, on Flickr
 $_57 (8) by J_Otte, on Flickr
 $_57 (7) by J_Otte, on Flickr
Practically brand new. Seller had them made years ago but never installed them
Never keen on shipping from europe but i nabbed them up for less that $800 for the set (couldn't pass them up) Shipping was estimated at around $400, but even with that steep cost, the total is still less than half of what i expected i'd one day have to pay for a set. As for the color combo... going to give it a try. the duo tone might actually go well with the overall scheme of the car. if not, i'll have them reskinned...
Question for anyone with scheels - how different are the scheel rail adapters from the recaro versions? i fabricated my own set for the e21 recaros currently in the car. Would it be a matter of simply drilling new mounting holes?
Added to the work left to do this week when i picked these up from ebay.de (germany).
$_57 (6) by J_Otte, on Flickr$_57 (5) by J_Otte, on Flickr$_57 (4) by J_Otte, on Flickr$_57 (3) by J_Otte, on Flickr$_57 (2) by J_Otte, on Flickr$_57 (1) by J_Otte, on Flickr$_57 by J_Otte, on Flickr$_57 (11) by J_Otte, on Flickr$_57 (10) by J_Otte, on Flickr$_57 (9) by J_Otte, on Flickr$_57 (8) by J_Otte, on Flickr$_57 (7) by J_Otte, on FlickrPractically brand new. Seller had them made years ago but never installed them
Never keen on shipping from europe but i nabbed them up for less that $800 for the set (couldn't pass them up) Shipping was estimated at around $400, but even with that steep cost, the total is still less than half of what i expected i'd one day have to pay for a set. As for the color combo... going to give it a try. the duo tone might actually go well with the overall scheme of the car. if not, i'll have them reskinned...
Question for anyone with scheels - how different are the scheel rail adapters from the recaro versions? i fabricated my own set for the e21 recaros currently in the car. Would it be a matter of simply drilling new mounting holes?
xing6666
Well-Known Member
Lol - it's funny this thread title exactly matches mine...
bimmerboy73
Well-Known Member
9 months...
Time flies when you are overwhelmed at work. It is with equal parts excitement and disappointment that i begin to bring the first chapter of this thread to a close. Excitement because after owning the car for 8 years, the finish line (relatively speaking) is in sight. Disappointment because the pressures of work and life forced me to give up the dream of doing all of the work myself.
Last summer i was working feverishly to get the car done for the Pittsburgh Vintage Grand Prix. I ultimately ran out of time, missing the show. Paint was finished, but again, 'finished' is a relative term. The bodywork came out phenomenally well; I got the body straight, sealed it all up in epoxy primer and sprayed a darn near perfect 3 coats of base color. The clear coat was much more challenging and resulted in my having to spend countless hours wetsanding the finish smooth. I was about halfway through when i came to the realization that the time and effort required to get it right, meant more than likely not finishing the car until the summer, and as a result, tying up the garage for 3 more months; a real concern given the damage the e28 recently took from a fallen tree branch while overwintering in the driveway. So, i reluctantly had it towed up to a shop here in Baltimore and asked the owner to re-base and re-clear it for me. That was 13 days ago. Today, i stopped in to snap some pics prior to paint and found this:
 IMAG00406 by J_Otte, on Flickr
 IMAG00405 by J_Otte, on Flickr
 IMAG00407 by J_Otte, on Flickr
 IMAG00408 by J_Otte, on Flickr
 IMAG00409 by J_Otte, on Flickr
 IMAG00410 by J_Otte, on Flickr
 IMAG00412 by J_Otte, on Flickr
 IMAG00413 by J_Otte, on Flickr
 IMAG00414 by J_Otte, on Flickr
 IMAG00417 by J_Otte, on Flickr
 IMAG00418 by J_Otte, on Flickr
 IMAG00419 by J_Otte, on Flickr
ok. so maybe its not quite 50/50 disappointment / excitement") . Its still a bit of a bummer though. There is some solace in knowing that i have a good bit of work yet still ahead of me to get ready for the vintage and several years still before the car is exactly what i want it to be.
. Its still a bit of a bummer though. There is some solace in knowing that i have a good bit of work yet still ahead of me to get ready for the vintage and several years still before the car is exactly what i want it to be.
In addition to just piecing the thing back together, the to-do list for the Spring / Summer will include:
1. Fitting the front seats and figuring out exactly what i want to do about the interior. I've about made up my mind that the interior will be brown. Question is whether i completely re-wrap the scheels in all brown skin or keep the center back and bottom insert as fabric and modify the rear seats to match.
2. Install of a refurbished Becker Bavaria Stereo w/ bluetooth streaming and phone integration - Very happy about this. I've been driving around with a relatively new Alpine head unit and although the sound was great, the look and idea of it just never sat well with me.
3. Custom trim treatments
4. Driving light install
5. Install and wiring (hopefully) of euro headlights with wipers / washers. I've been snatching up pieces over the years , hoping that one day i'd manage to cobble together a complete set. Ended up finding a complete set on ebay a few weeks ago, minus the harness, relays and various other bits. Will at the very least get them installed for the vintage and likely work on the rest over the coming months.
On another positive note - the shop owner and the guys he has working on it remarked again at how rust free the car is - they'd seen it several years ago when i brought it in to have the side-markers deleted. They pulled the rockers off during the respray to find an almost as new finish to the paint beneath. No rust anywhere - floors, towers, wells, rockers... At the end of the day, that's what means the most to me. the knowledge that i've done my job to preserve its quality for the next 40 years...
Will post more photos as it comes back together
Time flies when you are overwhelmed at work. It is with equal parts excitement and disappointment that i begin to bring the first chapter of this thread to a close. Excitement because after owning the car for 8 years, the finish line (relatively speaking) is in sight. Disappointment because the pressures of work and life forced me to give up the dream of doing all of the work myself.
Last summer i was working feverishly to get the car done for the Pittsburgh Vintage Grand Prix. I ultimately ran out of time, missing the show. Paint was finished, but again, 'finished' is a relative term. The bodywork came out phenomenally well; I got the body straight, sealed it all up in epoxy primer and sprayed a darn near perfect 3 coats of base color. The clear coat was much more challenging and resulted in my having to spend countless hours wetsanding the finish smooth. I was about halfway through when i came to the realization that the time and effort required to get it right, meant more than likely not finishing the car until the summer, and as a result, tying up the garage for 3 more months; a real concern given the damage the e28 recently took from a fallen tree branch while overwintering in the driveway. So, i reluctantly had it towed up to a shop here in Baltimore and asked the owner to re-base and re-clear it for me. That was 13 days ago. Today, i stopped in to snap some pics prior to paint and found this:
IMAG00406 by J_Otte, on FlickrIMAG00405 by J_Otte, on FlickrIMAG00407 by J_Otte, on FlickrIMAG00408 by J_Otte, on FlickrIMAG00409 by J_Otte, on FlickrIMAG00410 by J_Otte, on FlickrIMAG00412 by J_Otte, on FlickrIMAG00413 by J_Otte, on FlickrIMAG00414 by J_Otte, on FlickrIMAG00417 by J_Otte, on FlickrIMAG00418 by J_Otte, on FlickrIMAG00419 by J_Otte, on Flickrok. so maybe its not quite 50/50 disappointment / excitement
. Its still a bit of a bummer though. There is some solace in knowing that i have a good bit of work yet still ahead of me to get ready for the vintage and several years still before the car is exactly what i want it to be.In addition to just piecing the thing back together, the to-do list for the Spring / Summer will include:
1. Fitting the front seats and figuring out exactly what i want to do about the interior. I've about made up my mind that the interior will be brown. Question is whether i completely re-wrap the scheels in all brown skin or keep the center back and bottom insert as fabric and modify the rear seats to match.
2. Install of a refurbished Becker Bavaria Stereo w/ bluetooth streaming and phone integration - Very happy about this. I've been driving around with a relatively new Alpine head unit and although the sound was great, the look and idea of it just never sat well with me.
3. Custom trim treatments
4. Driving light install
5. Install and wiring (hopefully) of euro headlights with wipers / washers. I've been snatching up pieces over the years , hoping that one day i'd manage to cobble together a complete set. Ended up finding a complete set on ebay a few weeks ago, minus the harness, relays and various other bits. Will at the very least get them installed for the vintage and likely work on the rest over the coming months.
On another positive note - the shop owner and the guys he has working on it remarked again at how rust free the car is - they'd seen it several years ago when i brought it in to have the side-markers deleted. They pulled the rockers off during the respray to find an almost as new finish to the paint beneath. No rust anywhere - floors, towers, wells, rockers... At the end of the day, that's what means the most to me. the knowledge that i've done my job to preserve its quality for the next 40 years...
Will post more photos as it comes back together
Worth every minute of work! she's beautiful!!!!
bimmerboy73
Well-Known Member
Very very nice Bimmerboy73! I think I would go red leather with that color but that's just me. Can't wait to see more pictures. What is your wheel choice inside and out?
Thanks!. And I hear you on the red. I'm just not a red guy. Can appreciate that its a perfect combo, just cant get my but to sit on it
Wheels - i have three options at the moment.
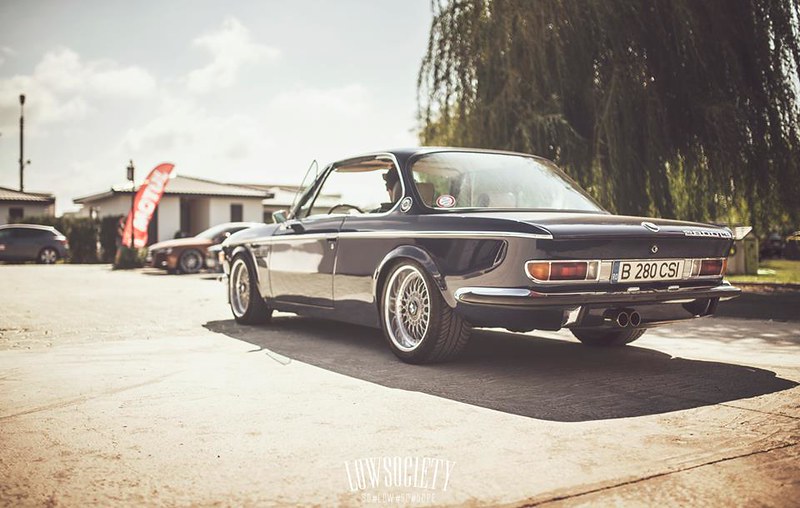
1. naked e34 m systems (5 spoke black center , deep dish) - there's a black, turbo charged coupe with one-off chin spoiler that i've seen pics of here that wears them. currently have a set on the e28.
 Turbocharged e9 BMW 3.0cs by Justin Behrends, on Flickr
2. 17" deep dish style 5 wheels. polished lips.
 tumblr_nbylxyEbGk1qkbpm3o1_1280 by J_Otte, on Flickr
these are a larger diameter, but you get the idea
3. knock-off Alpinas... until i replace them with the real mccoy.
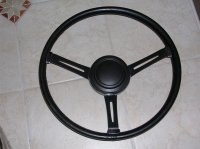
steering - currently have a smaller diameter nardi installed but also have this one:
 1969 BMW E9 by Ciprian Mihai, on Flickr
which needs to be re-wrapped. its a bit on the thin side but its grown on me over the months. Another option might be the 4 spoke alpina currently installed in the e28