skin exchanges started

arnie

Well-Known Member
Messages
222
Reaction score
69
Location
Germany
Hello guys,

in my introduction some weeks ago I mentioned to start a restofred when it's becoming "serious".

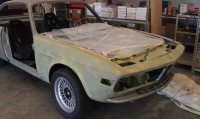
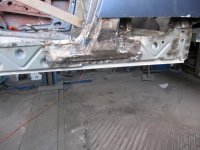
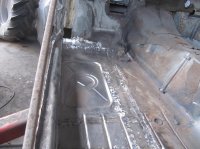
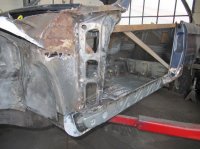
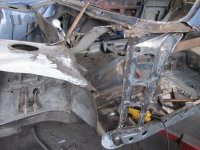
So in the meantime I already prepared more or less everything to exchange the whole outer skin. Have front and rear fenders, complete front mask, door skins, endpiece for the trunk, front and rear floor pieces, A-pillars and a roof skin from a car without sunroof.

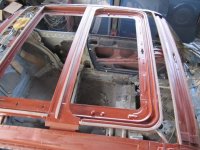
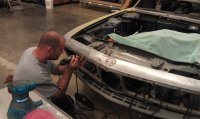
The decision where to start wasn't that easy but I prefered to do the little tricky stuff first and so I cut out the old roof skin yesterday.

Not necessary to say, that I disassambled the complete car in advance.

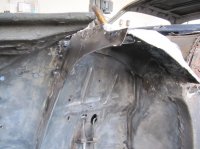
At my former repairs I welded the roof in the complete front area around the sunroof hole. This ended up in a bad roof shape an the need of a lot bondo to compensate this. Despite the sunroof and the roof didn't fit in a satisfying way.
The risk, that later on the rust will come back through again was also to high for me.
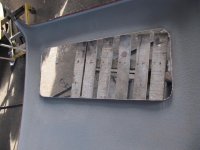
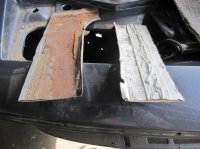
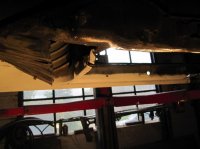
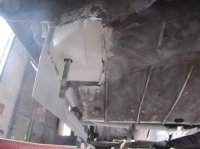
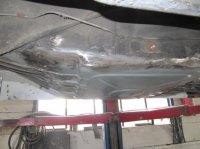
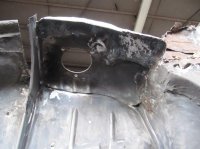
When you see, that apparently Karmann didn't do anything for rustprotection, this wasn't the worse decision. Between the roofskin and the frame you discover naked sheetmetal. (see cut out pieces in my pictures) The mounted foam in the middle stores the humidity perfectly and so the rust has perfect conditions.

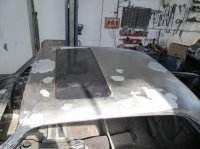
I took the new skin from a complete used roof, seperated it from the supporting structure, welded 2 holes (former mounted antennas I guess) and removed some dents. After that it got 2 layers of basiccoating.

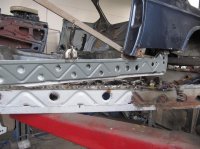
The supporting structure and the sunroof frame were cleaned and also basiccoated. The hole for the sunroof was quite a challenge but went out perfectly.

After I did this opening I put a 3rd layer (underfloorprotection) to the skininside, placed new foam for the intermediate spaces and welded the piece in.

I'm very satisfied with the result, even though I'll need to apply a little more bondo around the roofhole. But this will just require thin layers of it and there's no more timebomb tickin' from the inside :)

Upcoming next will be front left area, front rocker etc.

cheers

Ingo
 

Attachments

  • IMG_3194.jpg
    IMG_3194.jpg
    92.2 KB · Views: 1,551
  • IMG_3196.jpg
    IMG_3196.jpg
    96.5 KB · Views: 580
  • IMG_3201.jpg
    IMG_3201.jpg
    85.8 KB · Views: 604
  • IMG_3197.jpg
    IMG_3197.jpg
    94.5 KB · Views: 559

Peter Coomaraswamy

Well-Known Member
Site Donor $$
Messages
3,787
Reaction score
896
Location
Austin, TX
Big Job!

I just got my radiator in after tearing this down piece by piece over the last year. I still hope to have it painted in September. Can you give me a step by step on removing the sunroof (with the rest of the roof on the car!) :)

Thanks,
 

Attachments

  • fixing small holes.jpg
    fixing small holes.jpg
    94.9 KB · Views: 546
  • etching by section.jpg
    etching by section.jpg
    93.2 KB · Views: 535
  • radiator in.jpg
    radiator in.jpg
    92.3 KB · Views: 507
  • previous holes repaired.jpg
    previous holes repaired.jpg
    91.1 KB · Views: 478

sfdon

Well-Known Member
Site Donor
Site Donor $$
Messages
8,148
Reaction score
4,470
Location
sfbay area
Get rid of that rust!

It looks like you know your way around a body shop.keep posting pics please!
 

arnie

Well-Known Member
Messages
222
Reaction score
69
Location
Germany
project's moving ahead :roll:

The progress of the last week in short words.

Cut out the lower areas of the left front and rear fender
Removed the outer rocker carefully, because this was already replaced not long ago with an original part)
Removed the middle rocker beam, therefor the lower parts of the A and B pillars in advance.
Repaired the inner rocker beam by welding in the lower 5 cm completly (no spot welding here / looks pretty reasonable, because I also added the reinforcing seam like it is original).
Cut out the outer sheetmetal around the rear axle mount.
Cleaned the axle mount from the outside and sealed it.
Closed this afterwards
Replaced the rear and front floor panel, welded in the new middle rocker and completed the B - pillar again (the pictures following are still missing something of this / just showing until the rear floor panel)
The A - pillar will be replaced in the next steps when I'm moving to the left front area, where also a bunch of pieces has to be replaced.
 

Attachments

  • c0575a34.jpg
    c0575a34.jpg
    81.6 KB · Views: 610
  • d508b633.jpg
    d508b633.jpg
    64.2 KB · Views: 515
  • a9ca6dd4.jpg
    a9ca6dd4.jpg
    92.4 KB · Views: 606
  • 245ee05a.jpg
    245ee05a.jpg
    69.8 KB · Views: 503
  • 012b3c7b.jpg
    012b3c7b.jpg
    53.5 KB · Views: 515

arnie

Well-Known Member
Messages
222
Reaction score
69
Location
Germany
some more pics
 

Attachments

  • 15b7e76f.jpg
    15b7e76f.jpg
    89.1 KB · Views: 516
  • 8e8f4ee4.jpg
    8e8f4ee4.jpg
    92.4 KB · Views: 586
  • a5318b31.jpg
    a5318b31.jpg
    75.5 KB · Views: 539

Sven

Well-Known Member
Site Donor $
Messages
1,145
Reaction score
110
Location
Seattle
Wow! Great work. I have not seen one taken down to this level in quite some time. Keep the photos coming.
 

arnie

Well-Known Member
Messages
222
Reaction score
69
Location
Germany
Thx for your comments.

For me it's the only way now to do it quite reasonable. No patches to the body anymore is my goal (hopefully I'll reach that to at least 99% :lol:)

Some progress again.

Still something from the passed weekend.

left front floor and a small piece owned from the bulkhead and the middle rocker panel went in. B-pillar completed.

Afterwards I moved to the front left area under the fender. Hard to describe what you find, when you go for it.

A lot of old patches and destructed original metal had to be cut out and repaired and replaced.

Once you see the problems it's easy as it is on Windows. Just "cut and paste", but don't take the window for the things to be cut to small :razz:

See the actual progress also attached.

cu

Ingo
 

Attachments

  • ad592bcc.jpg
    ad592bcc.jpg
    73 KB · Views: 556
  • c30b9d91.jpg
    c30b9d91.jpg
    89.7 KB · Views: 531
  • 7e0a6803.jpg
    7e0a6803.jpg
    93.7 KB · Views: 504
  • d62b81de.jpg
    d62b81de.jpg
    90.6 KB · Views: 531
  • eed04fe5.jpg
    eed04fe5.jpg
    93.3 KB · Views: 517

arnie

Well-Known Member
Messages
222
Reaction score
69
Location
Germany
some more pics
 

Attachments

  • 3486eeff.jpg
    3486eeff.jpg
    79.9 KB · Views: 445
  • 501c2e16.jpg
    501c2e16.jpg
    83.3 KB · Views: 435
  • 242a5a81.jpg
    242a5a81.jpg
    92.2 KB · Views: 491
  • 3cb3e4c3.jpg
    3cb3e4c3.jpg
    92.5 KB · Views: 404
  • e859c666.jpg
    e859c666.jpg
    92.8 KB · Views: 414

arnie

Well-Known Member
Messages
222
Reaction score
69
Location
Germany
Are you going to use a pinch spot welder

I don't have any, so it has to work with the regular MSG (MIG) device, even though it doesn't look that nice.

I also have an WIG welder (of course this wouldn't be the choice here) , but am not used to it. So I prefer the MSG to do every welding related repair on my cars.
 

m_thompson

Well-Known Member
Messages
780
Reaction score
141
Location
Rhode Island
I bought a pinch spot welder through Grainger to install the fenders. You can get a Chinese one at Harbor Freight for $169.

I also borrowed a LENCO blind spot welder to weld the back of the fender to the A-pillar.
 

Nicad

Well-Known Member
Site Donor
Messages
3,503
Reaction score
536
Location
Toronto
Great that you are documenting this dissection. What was your technique for stripping the under side areas of undercoating?
 

arnie

Well-Known Member
Messages
222
Reaction score
69
Location
Germany
mostly you need a lot of patience :D

Beside this I used a steel brush in an angle grinder.
 

arnie

Well-Known Member
Messages
222
Reaction score
69
Location
Germany
.... left front end, left rocker and floor more or less complete :)

I also did some modifications to the original construction. The front drainage for the sunroof got a different direction (saw this in another restofred and did that also but again a little different) I really don't like it to have all the water just dropping into the A-pillar and rocker.

I also decided not to keep the hole as an open door for the the mudd cave around the strut tower and the bulkhead pieces. I'll seal also the complete edge of the fender seat on the wheelwell extension. With this, doing it really completly, it should be rather impossible to collect any dirt and water in all these caves any more.

What a ridiculous construction :mad:

I'm also considering Lokary inner fenders. Any experiences on those ?

I'll now move to the right side to do all the repairs to this point so far, before I'll replace the complete front piece and all the necessary repairs for the back end, which will hopefully a little bit less (I really hope so).

I'll be back with pictures, when the right side will be at the same status. The process to reach that, will be quite the same - so to boring to post such pictures again.

I'll be back, when there's new stuff.

cu

Ingo
 

Attachments

  • 2d8fa534[1].jpg
    2d8fa534[1].jpg
    91.9 KB · Views: 489
  • 7e73c9fc[1].jpg
    7e73c9fc[1].jpg
    92.5 KB · Views: 460
  • 9ca1303b[1].jpg
    9ca1303b[1].jpg
    83.8 KB · Views: 372
  • 91a6204d[1].jpg
    91a6204d[1].jpg
    95 KB · Views: 481
  • 739d6fea[1].jpg
    739d6fea[1].jpg
    78.3 KB · Views: 468

arnie

Well-Known Member
Messages
222
Reaction score
69
Location
Germany
some more pics again ...

btw :

Any idea why the hell there are these holes in the wheelwell extension ? I can't recognise any function and will close these also I guess
 

Attachments

  • 53546152[1].jpg
    53546152[1].jpg
    85.2 KB · Views: 474
  • 3312740a[1].jpg
    3312740a[1].jpg
    90.5 KB · Views: 474
  • c0c682f0[1].jpg
    c0c682f0[1].jpg
    76.2 KB · Views: 462
  • 284f5b93[1].jpg
    284f5b93[1].jpg
    66.3 KB · Views: 501
  • 98dea189[1].jpg
    98dea189[1].jpg
    83.3 KB · Views: 489

arnie

Well-Known Member
Messages
222
Reaction score
69
Location
Germany
finish so far
 

Attachments

  • d7fa56d1[1].jpg
    d7fa56d1[1].jpg
    83.3 KB · Views: 500
  • 17f621df[1].jpg
    17f621df[1].jpg
    77.6 KB · Views: 394
  • 74c5e739[1].jpg
    74c5e739[1].jpg
    82.5 KB · Views: 416

Nicad

Well-Known Member
Site Donor
Messages
3,503
Reaction score
536
Location
Toronto
Very interesting to see the insides like this. What paint are you using on the areas that are being sealed up?
 

arnie

Well-Known Member
Messages
222
Reaction score
69
Location
Germany
Hi Bob,

nice, that for some people this documentation is kind of interesting. So it's worth to spend this extra time on this :wink:

Regarding the paint I read a lot in advance and decided to go with a very common industrial product, which is called "brantho korrux nitrofest".

It's drying extremly fast to "dust dry" (not more than 15 minutes if you didn't do a very thick layer at a time), but needs a lot more to dry completly through to be able to make further layers of seal or bondo etc.
And if you weld behind an already painted area it's not disappearing or completely burning down at that point. It works kind of welding primer I'd say. For sure not the same way, but better than naked metal anyway. :grin:

Once it dried a couple of days it's very resistant. I did at least almost at every spot 2 layers of it as a basic coat.
 

Nicad

Well-Known Member
Site Donor
Messages
3,503
Reaction score
536
Location
Toronto
brantho korrux nitrofest. Sure sounds like a serious product. Has this been widely used by restorers over the years and did you consider other paint systems? Will look into seeing if it is available locally.
 
Top