I need to start plating my own stuff!
You are using an out of date browser. It may not display this or other websites correctly.
You should upgrade or use an alternative browser.
You should upgrade or use an alternative browser.
The Raven e9 project
- Thread starter autokunst
- Start date
-
- Tags
- restoration list
autokunst
Several years ago I restored an Austin Healey 3000 which we zinc plated most of the hardware. I had purchased the Caswell Plating chemicals etc., and used an old Dell computer power supply as the power source. For current regulation we used a series of 12V auto bulbs which could selectively be added or subtracted in the circuit to regulate the current (amps).
We only did the zinc plating, purchased the chromate solution but never used. If I remember it was just and additional bath. Is this what you used, the Caswell system? So you zinc plated and used the chromate bathe for the cadmium look?
Here is a picture of the crude current regulator with a couple of the baths.

jjs2800cs
Several years ago I restored an Austin Healey 3000 which we zinc plated most of the hardware. I had purchased the Caswell Plating chemicals etc., and used an old Dell computer power supply as the power source. For current regulation we used a series of 12V auto bulbs which could selectively be added or subtracted in the circuit to regulate the current (amps).
We only did the zinc plating, purchased the chromate solution but never used. If I remember it was just and additional bath. Is this what you used, the Caswell system? So you zinc plated and used the chromate bathe for the cadmium look?
Here is a picture of the crude current regulator with a couple of the baths.
jjs2800cs
@jjs2800cs
Hey, thanks for the question. Yes, I am primarily using Caswell chemicals. I'd originally prepared my own solutions based on "internet" chemistry. While it did plate, it wasn't as nice or as consistent as I want/need. So I invested in the Caswell chemicals and I am quite happy.
However, the chromate conversions step is far more important than the appearance it leaves. Both Cadmium plating (which is banned) and zinc plating are sacrificial coatings. They both coat the steel and protect it from oxidizing. However, if left untreated the cadmium or zinc coatings (which both have a silver/grey appearance) will oxidize (white) very quickly. I've seen items that were zinc plated well, and simply left on a shelf in a garage. A year later, they were covered in white oxidation and unusable.
The chromate conversion process provides protection for the protective layer. It actually oxidizes the outer "skin" of the zinc (or cadmium), protecting it from oxidizing. So the zinc protects the steel, and the chromate conversion protects the zinc. If you don't do the chromate conversion, your plating will not last long.
I believe the clear chromate coating, which is what results in a shiny silver finish (some refer to it as blue) has the best corrosion resistance. The numbers I reference (although I am sure I am glossing over some important aspects) is that the blue/clear trivalent chromate conversion coating over zinc plating can withstand a salt spray for well over 100 hours (120 to 130). The yellow chromate can withstand the salt spray test for almost 100 hours (in the 90s). I think the zinc alone - no chromate conversion coating - reaches about 12 hours in the same test. Again, I am not a professional plater nor a chemist or metallurgist - I welcome the experts to convey more scientific data (although it seems that most plating companies protect their processes as proprietary). But I think I understand the basic principles as well as the importance of that extra chromate bath step.
I had a great visit from @Luis A. this weekend. He was able to see the bare metal first hand. And his visit inspired me to get going on this metal work phase of the project. So I spent some time digging out sheet metal and beginning to organize my approach. While going through some of my storage, I found the rear badge emblems and had some fun testing them on the decklid as it hung on the wall. It's the little things that make it fun.

Cool to see the bare Raven and the cozy Nest!
The clean metal is amazing, I wanted to lick it...
Some mysteries --especially the one with the holes on the door and panels; have you asked here? It's a real curious thing...
The clean metal is amazing, I wanted to lick it...
Some mysteries --especially the one with the holes on the door and panels; have you asked here? It's a real curious thing...
Why, no. I hadn't brought it up here as I didn't want to publicize it.Some mysteries --especially the one with the holes on the door and panels; have you asked here?
But, since you brought it up...To all the experts - likely in the autobody and restoration lines of work - any thoughts on why these series of holes were placed on the doors and adjacent fender panels? One would first likely think a non-stock trim - but these holes are large and aftermarket trim would likely be adhesive applied. I have some wild theories, but I look forward to what some experts and/or expert theorists might suggest. They are fairly regular in in alignment. On both sides.
I'd bet those holes were for trim strips. Only later trim was put on with adhesive. It's right above the body crease, so it kinda makes sense.
It's obvious what they were up to..

I am sure you are correct. It is clear to me now.It's obvious what they were up to..
I like your idea, Ian. Honestly, it does make sense and it is the most sympathetic option in my list of wild theories.I'd bet those holes were for trim strips. Only later trim was put on with adhesive. It's right above the body crease, so it kinda makes sense.
Trim strips like this.

Day 131
193 hours
I haven't included a time stamp for a while, and I thought today was a good time to do so. Today I spent some time fettling some metal (finally). I've been taking stock of all the sheet metal I've been stockpiling. It is a combination of pieces from WN, BMW, and Wolf. There was one original BMW outer sill that I'd received from @Dan Mooney . It is really cool to have an original BMW replacement panel, but this particular part appeared to have had a very rough flight from Austin to Wisconsin. Despite being packed well, it arrived a bit pretzeled (I never told Dan this - until now I guess). But what a joy it was to tap it back into shape. This is going to be a fun project.
Trim strips like this.
I’ve seen countless ‘74’s with this trim. @clinton stokes has it on his ‘74. It is so similar across ‘74’s that one might conclude it was all applied by the same dealer.
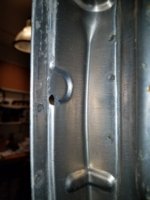
Hey, this bolt-on trim idea seems like it has to be what these holes are from. If anyone has this trim on their car, could you verify the bolt-through connection? The first hole in the front fenders should be visible when the door is open (nothing needs to be removed to see, I don't think). Here is photo of the first hole.
Attachments
Last edited:
I would weld those holes closed when you remove the side markers.
I would weld those holes closed when you remove the side markers.
+1
Absolutely, 100%I would weld those holes closed when you remove the side markers.
I'm getting closer to cutting off fenders and quarter panels. And one thing that I'm concerned about is getting them back on in perfect alignment. My chassis dolly serves as a great jig for the floor and frame rail portions below, but the body panels are another animal. I don't plan on taking off the roof (yet) so that should be a static reference point. As such, I built a plywood side profile template that I can pin to the roof assembly. The bottom edge lies directly on the crease of the main body line. I think this will serve as an effective reference procedure.


Another exciting discovery is that both sides match perfectly (one template lies precisely on both sides). My car was hit in the left rear at some point, so I'd wondered how accurate the car was. It is accurate!
And this template will make a really cool piece of wall art when I'm finished.
Another exciting discovery is that both sides match perfectly (one template lies precisely on both sides). My car was hit in the left rear at some point, so I'd wondered how accurate the car was. It is accurate!
And this template will make a really cool piece of wall art when I'm finished.
Are you sure you need to remove rear fenders?
Are you sure you need to remove rear fenders?
Having removed them before, I’m going to try to avoid this. Removal turns them to swiss cheese. The medal is almost entirely accessible save for the windshield frame and wheel arch. As noted by @autokunst, w&n seals the arch. Removing said arch exposes
the lip of the inner fender. Walkout also sells the lower portion of the fender forward of the wells. This area needs to be removed to access the rocker.
However, One caveat to dipping the car is that the entire wheel arch and windshield frame is bare metal at this point. Removing the fenders would allow for one to prime the are. Most of this could be accomplished however with some paint wands.