What did you do to your E9 today?

shanon

Well-Known Member
Messages
2,031
Reaction score
564
Location
NorCal
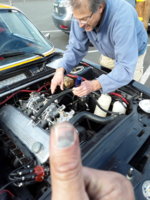
With my engine apart I am detailing and rebuilding various engine compartment components. After 7 years of fuel swilling performance the Webers got some love with cleaned bodies, jets and internals, o-rings, accel pump membranes, other gaskets, a clean/polish, and new fuel hoses and clamps. Ready to go back on:

I-FH52jRMkpTbdRWW2GkKjzHICIuLA0N--Y0ErwBCYB2Or7cUDMMprqKJBL-Orik3q9MpEuwGNOJv-5ehG_JK7gCE_pYV3kHY_IhKPoh4KKCMzML0U8WfO6GPxfdVzf4--XEjQXVXl4C06Iq0fxrXNKo4PDT_kKhs7EIPaxzhTxgryZh_5zm1D5-g-C265a11J7uyw37L-TPYOs3Mp9HAHiX8dqhMxo5aH7ROY5tzyGwlgkgsrSNm9No_L1gyYnp5Bjox-D0v8yhw6gv7u5xE_sCFBUKxmnRz1vTO8tr70i_otpNMwk7FNA5pas9BYiYRJW-csw9jS4kiYnJRxWkzk57rfQDazKs-ySCkYZT74CbnEfYi3Hp91E9GRzlHqJjtWzYCuGArZe9rN84ISp3foZlex67yd78-PiewuyKqpLI8B3GwwxkYuP7yz6EnWfmmb34IMo7T2uG7PcdGz_d28DNI6_RsoT4kMHqW_EvDU1J06Gcz3y1f69B0BmXN0oVthEJ-7IHrYJ79V3Xo0fbq8wBgn9L6Uu0Oo0ZTnlVwgQfrfb4PzrCsAB7f70h5VlB5hNA1aSKA75hbnMH1_5fl7_d0YL7aN1vTKrsohigZPjaAfsEMVLSinQ7G4Xqe-Cp716rdAqnGtXSVecN7pa8k8lltl962NtbAkVyzZU9jJ5fZaJDraXuDj7yU2n3=w1428-h775-no


6Zudrq5WEEDK-z3AK4-LN1MyrmdE3jGJqBAOSBI6CXqYq_24cA1irbMrtLUsHZYTSeB-lxxlTVP1azWzElAEoJZxbH_3rQrFFac78E-tX3R7_SQcZXJpd-AsZBYlln_KwHmyf3PNtUHTmCbySx21voB-j5-ZshDF6PAxGcrneF39VdcsRA62LMtyUfLjZNTP676kEEr6mwQTkDZ6ayeOF8vz-V7gflyBqPg_p44A8k3PN5Ju6uZeCuTdi51TNwc9j1TEC86C1hFyfEsW87GTzoupwISaWx17WCFD_jsjPhQaXYH87z6i6SZA1NNe3kJYhlfDICQIIhUmLiYGFwA8xsDvsjy9YuMB4CvNiKR4JTyHdEsBtrNi-iSyllarpvNPZ_hO25IwgrSsPcrbBgBxLjI_d-Nd-HYEoXhe2icr7tcwgA-i6Q5ws1rQyQb6-s9oqJDfpavUiUWtjO3lDJNv7I_bGMW3_3C1jSdxdS7AuG1HfpZYRSPh7MPuAOBKiV6R_c_kxgn4sSfA3mjghwLzuAPWk42Gv1o9R0Ysy-1re3wuQclkfkqQoq3fbpHzPBTG9rHn7bEH4vB3pEIHX9IKZkccOPzaKUxJ8jFsHD5Z60RquJluQJMADhRIxqG-6hh9TPC-chRBF1LcvVz-o1HDEGfzDpOfeII0dslsYNl4oUyRoreaoNmD_A1uFVjL=w1440-h710-no


errr...that doesn't go there.... ;)
 

Stevehose

Well-Known Member
Site Donor $$
Messages
12,981
Reaction score
5,652
Location
Sarasota, FL
More detailing. Polished the valve cover and heat shields. I like the clean patina look, it only takes a wipe down every month or so to keep it looking elegant, and maybe an every other year off-engine deep detail. And can be done with favorite beverage close at hand.

55C2990A-0421-4AD1-8226-376C7570352E.jpeg
 

Drew Gregg

Well-Known Member
Site Donor
Messages
1,571
Reaction score
1,203
Location
Ft. Lauderdale
I applied 2 decals I bought from Mo Faraz. Many years ago I bought his knob decals for my 2002. They stayed in the envelope until I got the 3.0CS and saw the USA 1973 knobs said wiper speed,lights,lighter,etc. I bought a lighter knob and a headlight knob and needed to change the wiper speed knob. Mo's group of decals has the wiper symbol. After people asking me if the car has a 5 speed,I saw Mo also has the shift pattern for a 5 speed. His instructions are clear and precise for both types of black and white decals. I followed them and the results are in the pics below. I found the flat clear acrylic, Model Master ACRYL at Hobby Lobby. It brushed on easily and almost disappears when it's dry on both the silver knob and the black vinyl shift surround. Replacing the lettered knobs with blank knobs is the first part of the project. Those are best sourced from 2002 dashes made from 1972 to 1976. PS--I also wanted to show the curly Hawaiian Koa brake handle that matches the dash & door wood. It was professionally made after I sourced the wood on EBay.
 

Attachments

  • IMG_2321(1).jpg
    IMG_2321(1).jpg
    365.3 KB · Views: 193
  • IMG_2322(1).jpg
    IMG_2322(1).jpg
    377.8 KB · Views: 199
  • IMG_2298(1).jpg
    IMG_2298(1).jpg
    246.6 KB · Views: 229

tferrer

Well-Known Member
Site Donor
Messages
2,153
Reaction score
2,336
Location
San Francisco, CA
After pulling the horn out to bench test, I figured out (with forum help) that it's a switched power source. Turned the key and viola! After 30 years the horns still work.

Thought I'd tackle something more immediate and less stressful so I polished the center console aluminum trim pieces while the console sides get done. One piece was pretty banged up so I wet sanded it (1000-1500-2000-3000)and buffed it up. Came out pretty good, I think.

20201214_173200.jpg
20201214_173259.jpg
20201214_173313.jpg
 

Gary Knox

E9 Member Emeritus
Site Donor $$
Messages
1,821
Reaction score
743
Location
West Chester, Pennsylvania
Use a little Surf City Garage Killer Chrome Polish on it and it will look spectacular.

No relationship, but an impressed user.

Gary

PS to post below - yes, I've used Simichrome, and it is good, just liked the incredible ease and best results I've ever gotten with the Surf City Garage product.
 
Last edited:

bavbob

Well-Known Member
Site Donor
Messages
3,369
Reaction score
1,580
Location
Boston, Ma
I did Por15 on my tank. Had one decent day here so jumped on it. I had silver-soldered all the pinholes a while back or I thought I did. At first I believed the tank did not need this since there was just surface rust....wrong.

I will use my trusty ice and water shield around the edges of the opening for the tank. I leave a little lip hanging over. Put the tank in, the lip creates a little extra water tight gasket. This area was just one of the design flaws of this car and the E3.
 

m73

Well-Known Member
Messages
1,397
Reaction score
467
Location
NW
I applied 2 decals I bought from Mo Faraz. Many years ago I bought his knob decals for my 2002. They stayed in the envelope until I got the 3.0CS and saw the USA 1973 knobs said wiper speed,lights,lighter,etc. I bought a lighter knob and a headlight knob and needed to change the wiper speed knob. Mo's group of decals has the wiper symbol. After people asking me if the car has a 5 speed,I saw Mo also has the shift pattern for a 5 speed. His instructions are clear and precise for both types of black and white decals. I followed them and the results are in the pics below. I found the flat clear acrylic, Model Master ACRYL at Hobby Lobby. It brushed on easily and almost disappears when it's dry on both the silver knob and the black vinyl shift surround. Replacing the lettered knobs with blank knobs is the first part of the project. Those are best sourced from 2002 dashes made from 1972 to 1976. PS--I also wanted to show the curly Hawaiian Koa brake handle that matches the dash & door wood. It was professionally made after I sourced the wood on EBay.

This looks great Greg :) Your decal installation looks professional and thanks for sharing -- Hope you are enjoying the holidays & will have a Happy New Year :cool:
 

mulberryworks

Mr. Fixity
Site Donor
Messages
1,244
Reaction score
614
Location
Jacksonville FL
I did Por15 on my tank. Had one decent day here so jumped on it. I had silver-soldered all the pinholes a while back or I thought I did. At first I believed the tank did not need this since there was just surface rust....wrong.

I will use my trusty ice and water shield around the edges of the opening for the tank. I leave a little lip hanging over. Put the tank in, the lip creates a little extra water tight gasket. This area was just one of the design flaws of this car and the E3.

I brazed the pinholes that my tank had when I bought the car because that was the best process I had at the time. After several attempts, I still had pinholes that leaked when the tank was filled with water so used a tank sealer and that resolved the issue. It just makes sense to do it and avoid the potential for future leaks.

Is this 'ice and water shield' the sticky stuff that's used on roofs to prevent damage from ice dams? (Grace Ice & Water Shield is one brand)
That would work well, but could be difficult to remove in the future.
 

bavbob

Well-Known Member
Site Donor
Messages
3,369
Reaction score
1,580
Location
Boston, Ma
Yessir it is. I put a strip sticky side up along the underside of the tank lip, then drop it in, screw it down, sealed.
 

Sooner

Well-Known Member
Site Donor $
Messages
889
Reaction score
169
Location
Farmington, NM
After pulling the horn out to bench test, I figured out (with forum help) that it's a switched power source. Turned the key and viola! After 30 years the horns still work.

Thought I'd tackle something more immediate and less stressful so I polished the center console aluminum trim pieces while the console sides get done. One piece was pretty banged up so I wet sanded it (1000-1500-2000-3000)and buffed it up. Came out pretty good, I think.

View attachment 107582View attachment 107583View attachment 107584
nice!
 

shanon

Well-Known Member
Messages
2,031
Reaction score
564
Location
NorCal
Went to the dyno to tune, but car was too low for their system . Insert many curse words. So y Weber guru and I did best we could road tuning it. Smashed thumb in door during process, but we got it to about 90-95 percent....

Holy mother of God......she is flyin.... so stoked. ;)
 

Attachments

  • 20201215_145007.jpg
    20201215_145007.jpg
    315.9 KB · Views: 201

Drew Gregg

Well-Known Member
Site Donor
Messages
1,571
Reaction score
1,203
Location
Ft. Lauderdale
Went on a road trip in the Everglades with my friend's Alfa club today. There were about 10 Alfa's, a Jaguar,a RHD Mini, a '72 Buick GSX,and my coupe. The President of the Alfa Club made a video.
After the trip,I had to clean all of the bugs off the windshield and the grills. Remember, this is South Florida with temps in the low 80's today.
 

Attachments

  • IMG_2469.jpg
    IMG_2469.jpg
    516.9 KB · Views: 164
  • IMG_2470.jpg
    IMG_2470.jpg
    521.9 KB · Views: 144

Wes

Moderator
Site Donor $
Messages
1,641
Reaction score
1,487
Location
Tasmania, Australia
Last day of holidays and I finally fixed the boot lid striker that has been an issue for as long as I've had the CS.
Issue has gotten worse over time and wasn't sure why.
The self tapping bolts were completely stripped and after pulling the mounting bracket it was obvious this was an old problem as the metal underneath was all twisted up and deformed. Bent it all back straight and re-attached the mount with pop rivets and now it feels solid again. Re-adjusted the striker so it picks up the latch better and then tweaked the hinge adjustment and finished it all off with getting the much maligned W&N boot rubber to seat correctly. Still needs some jiggling to get he panel gaps 100% but it's pretty close.
 

Stevehose

Well-Known Member
Site Donor $$
Messages
12,981
Reaction score
5,652
Location
Sarasota, FL
Finished my firewall rehab, cleaned up and painted with POR-15 high temp as prep for my new insulation from cs-werke:

C4BA2CAD-2181-45E3-B8C5-2E39E7B2C728.jpeg

9945DB7A-D9B6-486A-82C7-1B65B2640313.jpeg


then installed the new pieces, some cutting was necessary to clear the a/c hoses on the left and the heater hose, no biggie. My old pieces were held together with several layersof spray paint over the years:

88104DFD-20EC-4CBC-99D8-15AB5CBE7B07.jpeg


4EEFBAC0-8458-4276-8B21-FFDC251750A9.jpeg


much appreciation for people like Christoph who make repro parts for our cars.
 
Top