Will have to start somewhere

HB Chris

Well-Known Member
Site Donor $$
Messages
19,418
Reaction score
8,759
Location
Huntington Beach, CA
If it is a stereo it will have two double pin speakers outputs on the back and one of the knobs is L/R balance. So four wires, two left and two right.

On my NK I used the Blaunkt radio with an adapter to convert speaker wire output to RCA plug which goes to the amp under the rear seat. At the amp I have two RCA Y splitters, the other two are for iPod input to the amp (with radio off). A single 2 channel amp delivers great sound to rear deck 6x9 speakers.
 

Peter Coomaraswamy

Well-Known Member
Site Donor $$
Messages
3,787
Reaction score
896
Location
Austin, TX
Thanks, that's great info- If I run into difficulty I will post pictures and ask more questions. I'm going to pull the radio and have it gone through. Now that the mechanical work is just about finished I'm concentrating on the little things.

In addition to the 2 6X9 holes cut in the rear deck there was a hole for a smaller speaker in the center, I am going to try to fashion that into a 3rd brake light.
 

Stevehose

Well-Known Member
Site Donor $$
Messages
12,997
Reaction score
5,672
Location
Sarasota, FL
Some Beckers are stereo with no balance knob...go figure

But your Mexico likely has one if it is cassette model.

If it is a stereo it will have two double pin speakers outputs on the back and one of the knobs is L/R balance. So four wires, two left and two right.
 

Peter Coomaraswamy

Well-Known Member
Site Donor $$
Messages
3,787
Reaction score
896
Location
Austin, TX
OK, question..

If my 1970 2800 CS came from the dealer with a Becker Mexico AM/FM Cassette and it has a knob for balance would the dealer have installed rear deck speakers or is it possible that they used the single dash speaker. Unfortunately I have the holes in the rear so I'm wondering if those are from the dealer or if the PO had this system installed?

Anyone with "over-the-top" knowledge of these things please enlighten this novice here :)

Thanks!
 

HB Chris

Well-Known Member
Site Donor $$
Messages
19,418
Reaction score
8,759
Location
Huntington Beach, CA
If it is stereo they would never wire it into only one speaker. The dealer may have cut the rear shelf or the owner may have had a shop do it, there is no definitive answer here.
 

Peter Coomaraswamy

Well-Known Member
Site Donor $$
Messages
3,787
Reaction score
896
Location
Austin, TX
Thanks Chris, I just wanted to be sure I am taking the best route here-I get it- finally, I'm not going to overdo anything, just get the best sound with what I have. If I have the need for anything special there is always Pandora and Blue-tooth.

I'll post some pics when I get that part of the interior done.
 

Peter Coomaraswamy

Well-Known Member
Site Donor $$
Messages
3,787
Reaction score
896
Location
Austin, TX
Interior finishing

Man, almost there-I think the dirtiest place on the car was behind the radio but it's all better now :) I posted some pictures of the prep work in case someone can use it as a future reference, and in case someone notices I put the seats in backwards :) I used the Eastwood stuff to spray inside the rockers and under the seat risers and showed some pictures of that, also, using the before pictures I tried to reconstruct the underlayment as it originally functioned (notice I did not say "appeared").

I hope the next shots are a little more interesting as the carpet should be in and the rear seats as well, but there is testing the windows and then getting all that stuff put back- Joy!
 

Attachments

  • finishing interior3.jpg
    finishing interior3.jpg
    72.2 KB · Views: 241
  • finishing interior1.jpg
    finishing interior1.jpg
    75.7 KB · Views: 267
  • finishing interior6.jpg
    finishing interior6.jpg
    76.9 KB · Views: 252
  • finishing interior7.jpg
    finishing interior7.jpg
    68.7 KB · Views: 250
  • finishing interior8.jpg
    finishing interior8.jpg
    84.5 KB · Views: 252
  • finishing interior9.jpg
    finishing interior9.jpg
    89.9 KB · Views: 253
  • finishing interior10.jpg
    finishing interior10.jpg
    76.1 KB · Views: 244
  • finishing interior11.jpg
    finishing interior11.jpg
    58.2 KB · Views: 242
  • finishing interior12.jpg
    finishing interior12.jpg
    58.7 KB · Views: 231
  • finishing interior5.jpg
    finishing interior5.jpg
    74.5 KB · Views: 243

Peter Coomaraswamy

Well-Known Member
Site Donor $$
Messages
3,787
Reaction score
896
Location
Austin, TX
Coming together-slowly

I thought I would document a little work from yesterday, to begin;

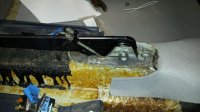
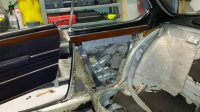
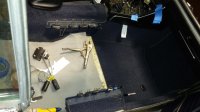
I used a sturdy but thin foam with a fabric backing to replace the deteriorated foam that was on the original black matting, I know from experience that you don't want to use anything too thick because little pieces in the strangest places will not fit correctly if you try to "improve" anything.

That foam is glued with spray glue to the matting.

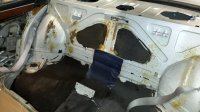
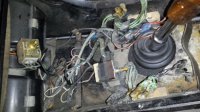
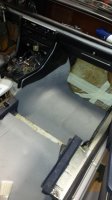
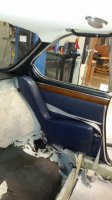
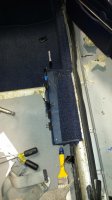
Pic. 3 is the prep work for putting the rear side interior pieces in. I used a pretty thin plastic sheet as a moisture barrier held on with Wurth glue and put the felt back over the screw heads just below the wood. Again, it does not have to be OEM felt but it can't be too thick or you won't get the panel in under the wood.

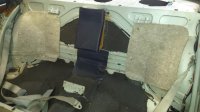
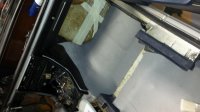
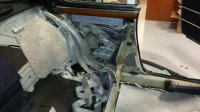
Pic. 4 is the same thing on the other side. You can see I did add back the jute to replace the horse hair insulation and it did not interfere with the seat placement so while it may not be necessary it probably will help the sound a bit.

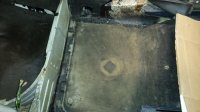
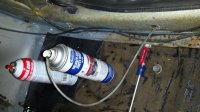
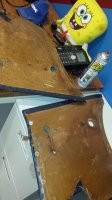
Pic. 5 As seen on TV! I sprayed the flex seal on the press board to seal and preserve- interesting fact, the sealer did a great job on the porous backing but after 6 months it was still tacky on the vinyl, so I guess the lesson here is that it needs something to soak in to to dry properly.

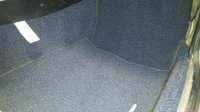
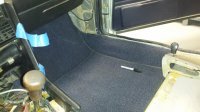
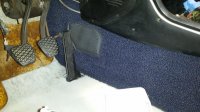
So next I put the panel in and it seems to fit pretty well. On a side note, I will be posting some carpet info and if you are going to replace the carpet properly all the panels should be out of the interior.

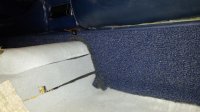
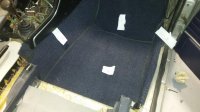
Next is the first piece of the carpet correctly installed, another note if doing the carpet is to line everything up without glue first, then spray the back of the carpet, let dry for 1 minute, spray the contact area in the interior, let dry 1 minute then put them together.

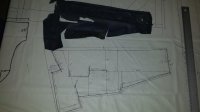
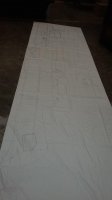
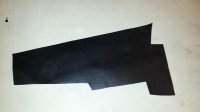
I am very lucky to have perfect carpet so it was professionally-whatever that means-cleaned and I am measuring, tracing, photographing and documenting every piece so that I can have a template and I'm also posting in a separate thread in case anyone wants to make a set, but as I mentioned earlier I may reproduce a couple of sets and see if they are received well here on the forum. As we all know, it's the carpet that is tough to find but we could find something close and the other option, if there are enough people interested is to find a small carpet mill and actually have it perfectly reproduced. Years ago I worked as production manager for a high-end Jacquard Loom company called Boris Kroll, we did stuff like that with fabric (think the incredibly ugly seats on all 70's and 80's Boeing planes), anyhow, the minimum run would probably be 100 yards, which would probably yield about 20 complete sets.

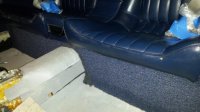
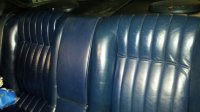
Finally, the rear seats are in, I used the recommended 2 step cleaning process from folks here on the forum, forgot the name of the product but they came out well enough, much better than the pictures show but the front seats had to be re-covered so still waiting for those. I don't plan on putting anyone in the back seat of this coupe so I hope the leather lasts-it is a bit distressed even though I treated the leather liberally.

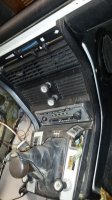
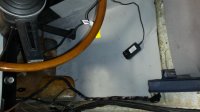
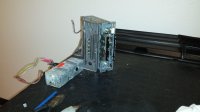
The last picture is of the radio that I will have reconditioned by a shop down here- I'll let you know how that comes out :)
 

Attachments

  • interior prep2.jpg
    interior prep2.jpg
    65.5 KB · Views: 216
  • interior prep4.jpg
    interior prep4.jpg
    94.4 KB · Views: 249
  • interior prep 3.jpg
    interior prep 3.jpg
    95 KB · Views: 239
  • interior prep1.jpg
    interior prep1.jpg
    66.3 KB · Views: 260
  • interior prep5.jpg
    interior prep5.jpg
    77.8 KB · Views: 249
  • interior prep6.jpg
    interior prep6.jpg
    75.9 KB · Views: 250
  • interior prep7.jpg
    interior prep7.jpg
    90.9 KB · Views: 228
  • interior prep8.jpg
    interior prep8.jpg
    96.7 KB · Views: 232
  • interior prep9.jpg
    interior prep9.jpg
    93.4 KB · Views: 270
  • radio1.jpg
    radio1.jpg
    91.5 KB · Views: 228

Peter Coomaraswamy

Well-Known Member
Site Donor $$
Messages
3,787
Reaction score
896
Location
Austin, TX
Carpet install & template

I thought I would move this back to the original thread because I think I'll lose it if I continue on the other thread- sorry.

I have allot of pics below and I did, and will continue to, template each piece. The measuring is quite a pain and I have been testing the templates by using the measurements and cutting some fabric. My conclusion is that you really need both; a full size template and the measurements with notes etc. Once I finish I am going to make a master which will include every piece, all the measurements for the holes, and the vinyl pieces, also a guide on which pieces to do before the others. I like the foam I put in to replace the original foam and there are little jute pieces around the console that really should be placed in their original position for correct fit.

Anyhow, below is some of the work done over the last couple of days. I plan on making 2 complete carpet sets to take to Monterey this summer and see how they are received before considering production. The carpet will not be original but as close as I can get before seeking out a small mill to produce "original" carpet.

As a note, all the carpet is "lay flat" and over the years it has conformed to the curves and bumps so before measuring I had to put steel plates on each piece to re-flatten them out, then trace and measure. I think it's so hard to match the carpet because the weave has to have enough give to conform but also be sturdy enough to stay "whole" for 40+ years.
 

Attachments

  • carpet2.jpg
    carpet2.jpg
    86.8 KB · Views: 224
  • carpet4.jpg
    carpet4.jpg
    99.9 KB · Views: 223
  • carpet1.jpg
    carpet1.jpg
    97.3 KB · Views: 231
  • carpet5.jpg
    carpet5.jpg
    98.1 KB · Views: 203
  • carpet7.jpg
    carpet7.jpg
    32.4 KB · Views: 216
  • carpet8.jpg
    carpet8.jpg
    93.5 KB · Views: 208
  • carpet9.jpg
    carpet9.jpg
    95.3 KB · Views: 210
  • carpet10.jpg
    carpet10.jpg
    99.4 KB · Views: 230
  • carpet12.jpg
    carpet12.jpg
    100.4 KB · Views: 222
  • carpet11.jpg
    carpet11.jpg
    82.1 KB · Views: 214

adawil2002

Well-Known Member
Site Donor $$
Messages
5,187
Reaction score
3,050
Location
Brunswick, Maine
I have the same blue carpet in Athena. My driver side floor mat is in wretched condition. So when the time comes to reproduce, am interested in a carpet set. There is a woman on the 2002 FAQ, Esty, who makes carpet sets for 2002s. She made an E9 replacement trunk carpet from my original. She may be a good resource for making E9 carpet sets if there is enough demand.
 

deQuincey

Quousque tandem...?
Site Donor
Messages
8,417
Reaction score
2,430
Location
BIO - 43°15'46.5"N 2°56'03.7"W
that is an amazing job, not only to install it,, but making the templates,...excellent

unfortunely there is no news from our intent to reproduce the original material in germany, other ways would be welcome
 

rsporsche

Moderator
Site Donor $$
Messages
10,682
Reaction score
3,711
Location
Atlanta, GA
Peter - i can trace out KHM's carpet if you would like. none of mine is stretched or glued down in any place yet.
 

Peter Coomaraswamy

Well-Known Member
Site Donor $$
Messages
3,787
Reaction score
896
Location
Austin, TX
Will have to end somewhere

Just finishing up the 2800 CS, no more major projects until I get both of these e9's 100% but I have 2 more cars in line for pretty major work (Baur Targa and 1970 P1800ES). I probably won't start on them for a while and these cars have owners so I do allot less of the work, they do the work and I just explain why it has to be done again :)

I have all the e9 carpet measured and I'll be cutting some permanent templates but I will make the measurements available to anyone who wants them, maybe I can put it into a document of some sort with pictures and post it in the tech info section.

Below are some pics of getting her ready to finish-
 

Attachments

  • finishing up8.jpg
    finishing up8.jpg
    82.1 KB · Views: 261
  • finishing up7.jpg
    finishing up7.jpg
    99.5 KB · Views: 253
  • finishing up6.jpg
    finishing up6.jpg
    90.5 KB · Views: 242
  • finishing up5.jpg
    finishing up5.jpg
    98.9 KB · Views: 250
  • finishing up4.jpg
    finishing up4.jpg
    93.2 KB · Views: 253
  • finishing up3.jpg
    finishing up3.jpg
    90.5 KB · Views: 241
  • finishing up2.jpg
    finishing up2.jpg
    87 KB · Views: 248
  • finishing up1.jpg
    finishing up1.jpg
    94.2 KB · Views: 240

Markos

Well-Known Member
Site Donor
Messages
13,369
Reaction score
7,503
Location
Seattle, WA
Peter,

I spotte your video on YouTube last night. I didn't realize you linked it I this thread. Great job!

BTW, I have rust in every place you mentioned. :(
 
Top