72 CSi rotisserie restoration

paul

Well-Known Member
Site Donor
Messages
321
Reaction score
305
Location
Australia, Queensland, Gold Coast
Wladek how's your car going? Next week shall post more detailed shots of repairs. We did not go ahead with those fenders you informed me of....decided to stick with my originals as we knew exactly what condition they were in.....only needed work on the tops near the bonnet.
 

Wladek

Well-Known Member
Messages
1,305
Reaction score
792
Location
Gdansk, POLAND
Wladek how's your car going? Next week shall post more detailed shots of repairs. We did not go ahead with those fenders you informed me of....decided to stick with my originals as we knew exactly what condition they were in.....only needed work on the tops near the bonnet.
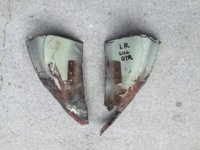
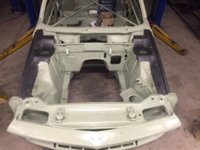
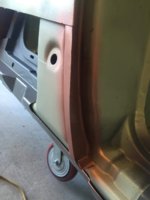
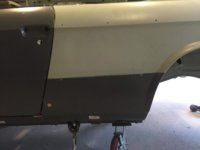
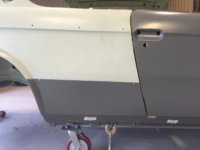
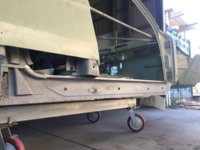
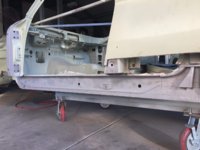
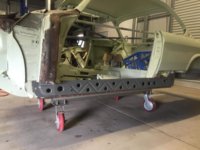
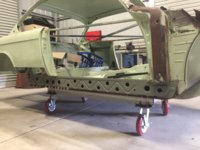
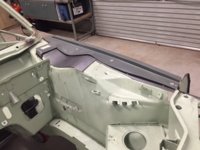
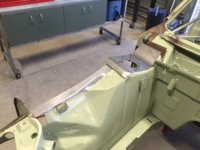
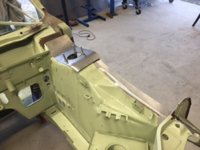
I wish my tempo was as your's, but it's not, i'm ashamed;). Currently still working on doors, one inner frame is almost ready (is welded, need final blasting), i hope with second one will be little bit faster.
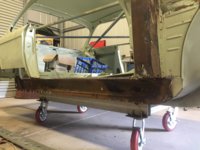
 

paul

Well-Known Member
Site Donor
Messages
321
Reaction score
305
Location
Australia, Queensland, Gold Coast
week 9 and approx 165hrs. inner sills cleaned up pretty well.... some rust at the ends so rather than take out whole sill we decided to cut the ends off and replace with new component.
Photos show Intermediate sill only screwed into place as we sand blasted inner sill before treating. Intermediate sills now fitted and welded into place.
Lower B Pillar has arrived so that can now be fitted along with lower A pillar..............finish off all the sills and then ALL the heavy structural items are finished.
Next week hope to have some Engine news.
 

Attachments

  • IMG_7136.JPG
    IMG_7136.JPG
    280 KB · Views: 604
  • IMG_7164.JPG
    IMG_7164.JPG
    245.4 KB · Views: 612
  • IMG_7167.JPG
    IMG_7167.JPG
    235.4 KB · Views: 611
  • IMG_7172.JPG
    IMG_7172.JPG
    253.2 KB · Views: 617
  • IMG_7141.JPG
    IMG_7141.JPG
    256.1 KB · Views: 582
  • IMG_7139.JPG
    IMG_7139.JPG
    262.1 KB · Views: 587
  • IMG_7161.JPG
    IMG_7161.JPG
    327.3 KB · Views: 566
  • IMG_1626.JPG
    IMG_1626.JPG
    44.5 KB · Views: 650
  • IMG_1627.JPG
    IMG_1627.JPG
    37.2 KB · Views: 634
  • IMG_1646.JPG
    IMG_1646.JPG
    36.4 KB · Views: 652
  • IMG_1645.JPG
    IMG_1645.JPG
    37 KB · Views: 624

paul

Well-Known Member
Site Donor
Messages
321
Reaction score
305
Location
Australia, Queensland, Gold Coast
Week 10 inner sills cut and ends renewed. engine bay LH and RH inner fenders and shock tower region renewed and in place. not much this week....... hope to have engine news soon as new pistons almost finished and ready for engine assy.
 

Attachments

  • IMG_7322.JPG
    IMG_7322.JPG
    211.4 KB · Views: 547
  • IMG_7324.JPG
    IMG_7324.JPG
    236.9 KB · Views: 561
  • IMG_7328.JPG
    IMG_7328.JPG
    224.8 KB · Views: 571
  • IMG_7335.JPG
    IMG_7335.JPG
    252.2 KB · Views: 558
  • IMG_7337.JPG
    IMG_7337.JPG
    230.9 KB · Views: 613
  • IMG_1806.JPG
    IMG_1806.JPG
    37.1 KB · Views: 572

paul

Well-Known Member
Site Donor
Messages
321
Reaction score
305
Location
Australia, Queensland, Gold Coast
Needing some information regarding dimensions for making sure everything is in alignment before we weld the sills and major items................from my fabricator quote

"We are chasing a data sheet or some measurements, heights of rear panel or lower beaver panel. Some length measurements from some front body mounts back to the rear panel, and do they have some lower beaver or rear panel height measurements. As I jack the rear panel up, it changes my door gaps so I'm chasing some sort of rear panels heights."


anyone help out here.....would be much appreciated.
 

paul

Well-Known Member
Site Donor
Messages
321
Reaction score
305
Location
Australia, Queensland, Gold Coast
Week 11 (bit late this week) Approx 220 hrs. sills/ Lower A and B pillars all in place (should be welded by fabricator by time I write this) We noted that when checking the door gaps that lowering the jack at rear end (see photo) the door gap widened at the top. At this stage not all sills and pillars were welded in place so that could cause the flex. However if this is still the case when all is in place we shall weld some gussets into trunk floor. These cars I think were a bit weak in the arse end. Will keep you informed as to what we do.
Autokunst ....you will notice Lower A Pillar had to cut and weld a seam in as the W & N part did not fit properly. (becoming quiet typical now)
 

Attachments

  • Door Gap.jpg
    Door Gap.jpg
    138.8 KB · Views: 561
  • LH Front Shock Tower Area 1.jpg
    LH Front Shock Tower Area 1.jpg
    111.3 KB · Views: 564
  • LH Front Shock Tower area.jpg
    LH Front Shock Tower area.jpg
    114.3 KB · Views: 522
  • LH inside front end sill replaced.jpg
    LH inside front end sill replaced.jpg
    131.6 KB · Views: 561
  • LH Outer Sill.jpg
    LH Outer Sill.jpg
    142.6 KB · Views: 568
  • LH rear end view of sills.jpg
    LH rear end view of sills.jpg
    146 KB · Views: 561
  • RH B Pillar replaced.jpg
    RH B Pillar replaced.jpg
    153.9 KB · Views: 586
  • RH Front Shock Tower Area 1.jpg
    RH Front Shock Tower Area 1.jpg
    100.6 KB · Views: 541
  • RH front shock tower area.jpg
    RH front shock tower area.jpg
    89.4 KB · Views: 539
  • RH inside front end sill replaced.jpg
    RH inside front end sill replaced.jpg
    169.4 KB · Views: 557
  • RH lower A pillar welded in.jpg
    RH lower A pillar welded in.jpg
    116.1 KB · Views: 564
  • RH new inner and inter sill  in place.jpg
    RH new inner and inter sill in place.jpg
    162.3 KB · Views: 523
  • RH Outer Sill.jpg
    RH Outer Sill.jpg
    186.6 KB · Views: 758

autokunst

Well-Known Member
Site Donor $$
Messages
3,606
Reaction score
2,618
Location
Milwaukee, WI
As always, love the assembly photos. I'm looking forward to testing the fitment of the W&N parts - and expecting a little modification.
 

paul

Well-Known Member
Site Donor
Messages
321
Reaction score
305
Location
Australia, Queensland, Gold Coast
missed a couple of weeks. 15 Weeks now 280 Hrs. All sills in welded and finished. Door to rear wheel arch structural member cut and tucked. rear 1/4 panel now welded into place (pics show screwed only). Door gaps good. This week shall move on to holes where wiper motor sits and top of front fenders (hopefully). Engine being assembled this week pics and details to follow. Hope not too many pics but need to show to get full story.
 

Attachments

  • LH Sills.JPG
    LH Sills.JPG
    266.1 KB · Views: 496
  • RH Sills.JPG
    RH Sills.JPG
    245.3 KB · Views: 504
  • LH Door to Wheel Arch Structural.JPG
    LH Door to Wheel Arch Structural.JPG
    162.5 KB · Views: 507
  • L & R Sill Qtr Old.JPG
    L & R Sill Qtr Old.JPG
    609.8 KB · Views: 495
  • Nwe & Old Plate from door to Wheel arch.JPG
    Nwe & Old Plate from door to Wheel arch.JPG
    578.6 KB · Views: 468
  • IMG_8111.JPG
    IMG_8111.JPG
    207.7 KB · Views: 498
  • IMG_8115.JPG
    IMG_8115.JPG
    201.4 KB · Views: 501
  • IMG_8117.JPG
    IMG_8117.JPG
    223.4 KB · Views: 485
  • IMG_8118.JPG
    IMG_8118.JPG
    243 KB · Views: 490
  • IMG_8119.JPG
    IMG_8119.JPG
    226.6 KB · Views: 454

paul

Well-Known Member
Site Donor
Messages
321
Reaction score
305
Location
Australia, Queensland, Gold Coast
OK.......wheels..........they will arrive end of week from NC states. BBS 16x9 rear 16x7 front. need to find rubber next. Nardi steering ready to go. This is all the glitter stuff.
Still working on my dash...almost finished just have to cut fit cut fit but need fabricator to move his bracing so I get clear access.
upload_2018-7-16_15-52-38.png
 

Attachments

  • Nardi Wheel.JPG
    Nardi Wheel.JPG
    96.8 KB · Views: 469
  • Instr Cluster.JPG
    Instr Cluster.JPG
    97.2 KB · Views: 475
  • 20180716_140003.jpg
    20180716_140003.jpg
    191.5 KB · Views: 466
  • New and Old 2.jpg
    New and Old 2.jpg
    167.7 KB · Views: 474
  • New Teak.jpg
    New Teak.jpg
    153.2 KB · Views: 446
Last edited:
Top