more fun watching muted!I think you've been couped up too long Mike.")
You are using an out of date browser. It may not display this or other websites correctly.
You should upgrade or use an alternative browser.
You should upgrade or use an alternative browser.
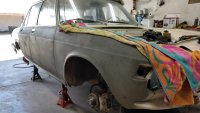
1969 2800 E3 - Bringing "The White Car" back to life!
- Thread starter dang
- Start date
-
- Tags
- 3rd brake light gas tank
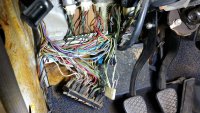
According to the wiring diagrams the shorted wires are for the door switch and the luggage compartment switch/light. I'll pull them for now and deal with it when I have the interior apart running wires for the suspension system. On the plus side, it's a base model '69 so the wiring is as simple as it gets.
Mike Goble
Well-Known Member
Is that a Freudian slip? I've been sedanned up for quite a while...I think you've been couped up too long Mike.
day66
Well-Known Member
I think when the wires are clumped together in the loom, the surrounding wires tend to act as a heatsink for the overheated ones, the exposed ends overheat faster and melt their insulation just a little bit sooner - either way someone caught that just in time!
Yes, that was a fire in the making. I got all the wires repaired and pulled the two fuses on the burnt wires and so far they're staying cool. Trying to get the motor running now so I'll tackle the wiring later.I think when the wires are clumped together in the loom, the surrounding wires tend to act as a heatsink for the overheated ones, the exposed ends overheat faster and melt their insulation just a little bit sooner - either way someone caught that just in time!
Did you check continuity for any stray grounds?
I haven't done any troubleshooting yet. Hoping to get the motor running first since that's what I was doing when I found the wires.Did you check continuity for any stray grounds?
Success!!!
Ran really poorly, popping and misfiring. Seemed like carbs or air/fuel so spent most of my time there. A friend and I finally figured out the problem after spending hours on it. Carbs apart many times, double checking dwell and timing, vacuum leaks, a million adjustments and it ended up being two out of the six brand new Bosch spark plugs were bad. As frustrating as it is, I'm more relieved than anything.
Time to move on to the next task... Center bearing and guibo.
Last edited:
Driveshaft in with M5 guibo and new center bearing! I'm working on the filler plate for the gap made by using the later fuel tank next, then get the tank mounted. I hate to jinks it but it feels like I'm getting close to this thing moving under its own power!
Got the filler plate done and the later fuel tank mounted. Turned out pretty decent. Now on to revisiting the hydraulics.


Last edited:
Nicely done!Got the filler plate done and the later fuel tank mounted. Turned out pretty decent. Now on to revisiting the hydraulics.View attachment 92440
View attachment 92445
View attachment 92447
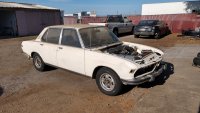
A huge milestone today, the car moved on it's own power for the first time in 26 years! It's not road safe yet but very soon it will be. I noticed I started this thread almost a year ago so that part isn't so great, but I'll keep plugging away...
Attachments
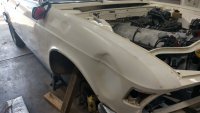
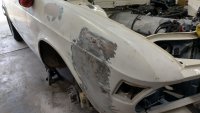
The engine is still running poorly and I'm looking at the ignition side of things now and ordered a few parts. In the meantime, I wanted to verify that I'm not very good at body work so I started working on the damage. Yep, it's official, I suck at body work. I would be elated to only have to do it three times but I'm not so lucky. I started with the worst area and made progress but the dented wheel arch and big dent on the body line are not far enough out and need to be pulled more. Here's what I have so far...
Attachments


Don’t be too hard on your self. Takes a lot of trial and rerror. You’re getting it done!
I've done some body work over the years but not enough to be efficient. I'm patient with it because I know I'm not good at it. My biggest problem is, I buy cars all day every day and my eye is trained to find flaws, so I can't walk up to any car without seeing every ding, paint mismatch, incorrect gap, you name it. I can spot bad body work from 50 feet away. It sucks. LOLDon’t be too hard on your self. Takes a lot of trial and rerror. You’re getting it done!
Then I’m glad we are so far away from each other!!! LolololI've done some body work over the years but not enough to be efficient. I'm patient with it because I know I'm not good at it. My biggest problem is, I buy cars all day every day and my eye is trained to find flaws, so I can't walk up to any car without seeing every ding, paint mismatch, incorrect gap, you name it. I can spot bad body work from 50 feet away. It sucks. LOL
Because you would lose it on mine!Then I’m glad we are so far away from each other!!! Lololol
Driver of imperfect classic car!
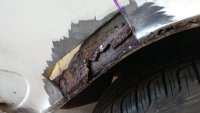
I found out why E3's always rust in the same spot on the rear wheel arch. The sealer used in the trunk between the inner structure and outer skin retains moisture and leads to rust. Maybe this is common knowledge but I always thought it was a strange place for rust.
Attachments


Last edited:
Yes! Even though the points that we're already in the distributor adjusted fine with a dwell meter I replaced them and it fixed the misfire. Engine purrs now. Awesome, now I can move on.
I roughed out the body work on the damaged side but ran out of welding wire when working on the rust repair. More wire on the way.
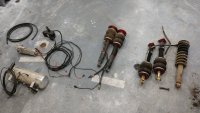
Starting to think about the suspension now. The struts will need adapter plates since I'm using a system from a Lexus. @Mike Goble has some front spindles that I can modify and I should be able to install the whole system with very little or no mods to the car.
I roughed out the body work on the damaged side but ran out of welding wire when working on the rust repair. More wire on the way.
Starting to think about the suspension now. The struts will need adapter plates since I'm using a system from a Lexus. @Mike Goble has some front spindles that I can modify and I should be able to install the whole system with very little or no mods to the car.