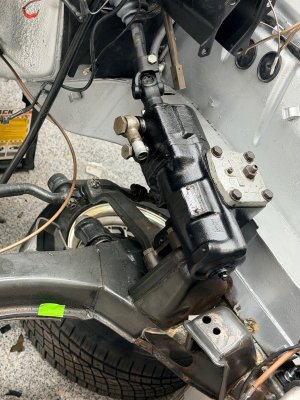
Another while you are in there: check the two plastic bushings on your pedal in the booster mount, impossible to reach otherwise and maybe shoot some satin black on the steering box.
You are using an out of date browser. It may not display this or other websites correctly.
You should upgrade or use an alternative browser.
You should upgrade or use an alternative browser.
What did you do to your E9 today?
- Thread starter adawil2002
- Start date
That was actually one of the first mods I did. I was redoing the window motors and changing my 1990s Alpine head to a retrosound head to look a bit more "period-correct". I think one of my first questions here was "what does this yellow wire do?" I soon found out...Nice! Whilst you're in there - have you considered upgrading your fuse box to the blade fuses with the mod some folks on the forum have provided to us?
Exactly what I was thinking...Another while you are in there: ... maybe shoot some satin black on the steering box.
Yikes! looks a lot like my car when I started pulling yards and yards of extraneous aftermarket wires outThat was actually one of the first mods I did. I was redoing the window motors and changing my 1990s Alpine head to a retrosound head to look a bit more "period-correct". I think one of my first questions here was "what does this yellow wire do?" I soon found out...View attachment 217727
Are those Blue Sea marine terminals? Look like it...Spent a fair amount of the weekend doing some rewiring. I undid all of the tape in the main loom heading from the under dash area into the firewall and retaped, adding 4 new wiring circuits hooked up to my supplemental fusebox. As per a previous thread, some of these are for future proofing. One is for powering the oil pressure/voltmeter/water temp gauges I plan to add to the console, the others are for anything else I might need in the future. I’ll probably terminate one under the rear seat area (seat heater?) and the other under the center console.
I had previously moved the battery to the trunk and used the battery tray to mount my distribution block. I know that this will probably be heresy to some, but I just didn’t like the look of all of these additional wires on the bsttery and the trunk is large enough to hold a medium Optimum battery easily with a 100-Amp breaker in one of its terminals. The distribution block is covered with a metal box that I fabricated just so it looks clean. I used the new labeler that @ScottAndrews had mentioned in a previous thread, very slick and labeling the shrink wrap was a nice touch in my mind.
I also installed the last of the firewall insulation. Slowly heading towards engine re-insertion.
How did the labeler work out (have not yet used mine)? I see you are using heat shrink labels. do those fit over the spade connectors, or do you have to do them prior to attaching the wire termination? Did you try any of the other label types?
Good idea on the satin black, I had sprayed the mount for the brake booster but not the steering box. I'll mask off the plate there and protect the silver mount area. Regarding the plastic bushings, I have the pedal rebuild kit from W&N and I was going to work on that this weekend, but it seems that most of that is on the other side of the firewall.Another while you are in there: check the two plastic bushings on your pedal in the booster mount, impossible to reach otherwise and maybe shoot some satin black on the steering box.
Reading through this thread (https://e9coupe.com/forum/threads/s...ng-source-and-install-technique-advice.45279/) this seems like maybe quite a bit of a job. I wasn't planning on removing the pedal box, but maybe my hand will be forced. Any suggestions? I do have a few extra of those bushings so can try to replace them
Yes, I followed your lead and ordered the 100A Blue Sea breaker for the battery. Those distribution blocks are from Summit Racing, I think. I tried both the wire wrap labels and the Permasleeve heat shrink labels. The Permasleeve works a little better for the smaller wires since it's lower profile and still legible. That Permasleeve comes in 4 different sizes, this is the 0.187 size designed for 22-10 gauge wires. They will fit over the very end of the spade connector but wouldn't go all the way up to the silver tip - for that you'd probably need a larger size, so you have to slide the permasleeve on before you install the wire into the spade connector. I'll use the wire wrap label for any of the larger wires if I decide to label them. Both types are really nice and the setup is professional. I got the version that hooks up to the app, the options available to you on the app allows a lot of control. I don't have a picture of it here, but I was also able to label the side along the fuses with a list of what each one controls by using the standard label and the "fuse panel" option, where in you define the spacing between each fuse and then put a label into each cell down the list, as shown on this picture from Brady's websiteAre those Blue Sea marine terminals? Look like it...
How did the labeler work out (have not yet used mine)? I see you are using heat shrink labels. do those fit over the spade connectors, or do you have to do them prior to attaching the wire termination? Did you try any of the other label types?
I replaced those on my e12 and it was challenging since everything was in place in the engine bay. Yours is much more accessible.Good idea on the satin black, I had sprayed the mount for the brake booster but not the steering box. I'll mask off the plate there and protect the silver mount area. Regarding the plastic bushings, I have the pedal rebuild kit from W&N and I was going to work on that this weekend, but it seems that most of that is on the other side of the firewall.
Reading through this thread (https://e9coupe.com/forum/threads/s...ng-source-and-install-technique-advice.45279/) this seems like maybe quite a bit of a job. I wasn't planning on removing the pedal box, but maybe my hand will be forced. Any suggestions? I do have a few extra of those bushings so can try to replace them
Tonight I thought of @HB Chris as the Kung fu master, urging the young apprentice onwards as he is continuously beaten down and defeated. In the end I triumphed. Damn those plastic bushings. I can’t imagine trying to do this with the engine in there. It’s a combination of working under the dash in the pedal box and working in the engine bay. Eventually I knocked it one way to remove the post from one bushing and then could maneuver it out of the car from inside in the footwell. I chamfered both inside edges and then pushed the bushings in, then put one post of the accelerator shaft T-end through the passenger side bushing and used a ratchet extension and mallet to drive that accelerator arm towards the passenger side until it cleared the driver side bushing at which point I could pull it back through that second bushing. What a pain. Painting the steering box was easy in comparjsonAnother while you are in there: check the two plastic bushings on your pedal in the booster mount, impossible to reach otherwise and maybe shoot some satin black on the steering box.
Attachments
Those pedal box bushings were a fight as I recall!
Kung Fu Master...LOL!Tonight I thought of @HB Chris as the Kung fu master, urging the young apprentice onwards as he is continuously beaten down and defeated. In the end I triumphed. Damn those plastic bushings.... What a pain. Painting the steering box was easy in comparjson
I have been pondering the pedal box. It is still installed so the car can be maneuvered using the steering, but Don's guys will remove it and the subframes when the car is at paint. I'll either go collect all that from them and restore it myself, or i'll have Don do it. It's a bit complicated because I have a full CN suspension kit at the shop (springs, shocks, camber plates, steering links, bushings, etc.), so I'll either need to deliver that to them, or get the powder coated parts from them and do the assembly myself. Ahhh, Logistics...
Have folks power coated the pedal box, or is it better just to paint it?
Nice job on the steering box!.. Much Mo Bettah....
What brake lines did you use? They look easy to bend...
Regarding the pedal box, it will be much easier to rebuild out of the car. Although I have been powder coating a fair amount of smaller stuff, not sure that this would benefit from it over just painting. I didn’t remove mine last night because it would have necessitated taking apart the steering column, which I didn’t want to do. One downside of that decision however is that the rubber piece that goes on the inside side of the firewall/pedal box will have to be cut at its base to account for the steering column that is currently in place. Should still be ok and I assume better than the disintegrating foam that I pulled out last night.Kung Fu Master...LOL!
I have been pondering the pedal box. It is still installed so the car can be maneuvered using the steering, but Don's guys will remove it and the subframes when the car is at paint. I'll either go collect all that from them and restore it myself, or i'll have Don do it. It's a bit complicated because I have a full CN suspension kit at the shop (springs, shocks, camber plates, steering links, bushings, etc.), so I'll either need to deliver that to them, or get the powder coated parts from them and do the assembly myself. Ahhh, Logistics...
Have folks power coated the pedal box, or is it better just to paint it?
Nice job on the steering box!.. Much Mo Bettah....
What brake lines did you use? They look easy to bend...
Brake lines are cunifer set pre-bent from Ireland Engineering. I was going to bend and flare these myself and Don convinced me that this wasn’t the job to do as a first-timer. The set from them isnt cheap (about double the cost of me just ordering equivalent supplies) but it was nice that it came bent. Two of the lines needing rebending to match the ones I pulled out and the long line that heads to the rear comes as a coil so of course needs to be bend but is already the right length and has the flared ends installed. The cunifer is a nice material, I think a copper/nickel/iron blend (thus the name) and bends nicely without creasing and shouldn’t rust. It seems to be the general recommendation for brake lines these days if you’re willing to pay the additional cost.
I fitted missing trunk emblems. I did not want to redrill the welded up holes, so I filled the emblems with UV hardening resin and fixed them with double sided tape.

Sent her off to the "Spa"...


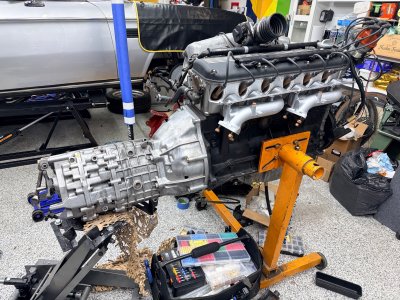
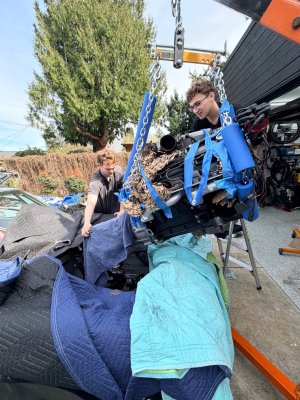
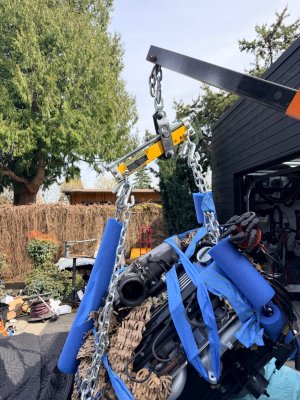
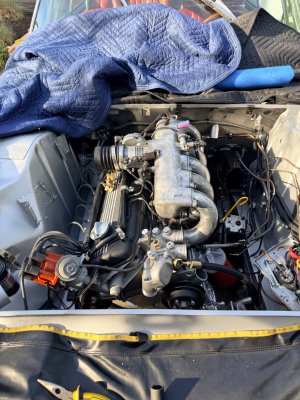
Mounted 5-speed gearbox to engine. Despite some recommendations my son and I are going to try to install this as a unit. Hood is off, we will lower the front, we have a hoist and leveler and a lot of patience. Sunday is the day. Tomorrow is a drive to Canada to pick up Paul Baker springs and Lokari wheel liners sent there because delivery to US wasn’t an option
Attachments
Installed a new battery in prep for its first outing of the year.
Pictures to follow.
FYI - Had to do a bit of MacGyver work here... Battery options limited at 9pm. (will follow up on what that is all about with the pics)
Pictures to follow.
FYI - Had to do a bit of MacGyver work here... Battery options limited at 9pm. (will follow up on what that is all about with the pics)
Good luck to you on this! I'll be watching closely! ANYTHING to avoid dealing with those bell housing bolts in-situ!!Mounted 5-speed gearbox to engine. Despite some recommendations my son and I are going to try to install this as a unit. Hood is off, we will lower the front, we have a hoist and leveler and a lot of patience. Sunday is the day. Tomorrow is a drive to Canada to pick up Paul Baker springs and Lokari wheel liners sent there because delivery to US wasn’t an option
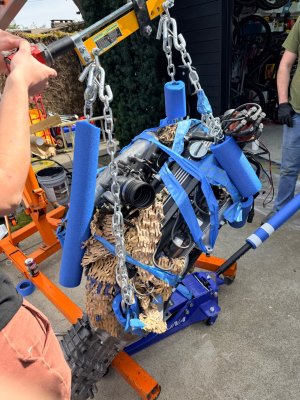
A few hours, a lot of caffeine, but one 53 year old guy and three twenty-year old boys were able to get the whole engine plus trans in in one piece. Critical future suggestions
1. Front pulleys off
2. Alternator was on but needed to be removed to get the motor mounts situated.
3. Leveler set up so that one the engine is horizontal, the crank is way at one end so that you get the full throw of the crank moving along the leveller to raise the front and lower the back. This is not how one would think to set up the leveller up first use, but in this circumstance there is no point where you need to lower the front and raise the back so no purpose in giving yourself that freedom and limiting the opposite motion.
4. Lots of padding - pool noodles on the chain and loads of blankets
5. Two jacks, one for car and one for transmission once it’s partway in.
Attachments
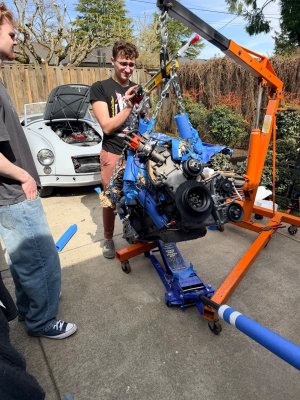
Congrats! Time to exhale! Job well done, nice to have a crew like that, and acceptable weather. ")