Markos

Well-Known Member
Site Donor
Messages
13,369
Reaction score
7,503
Location
Seattle, WA
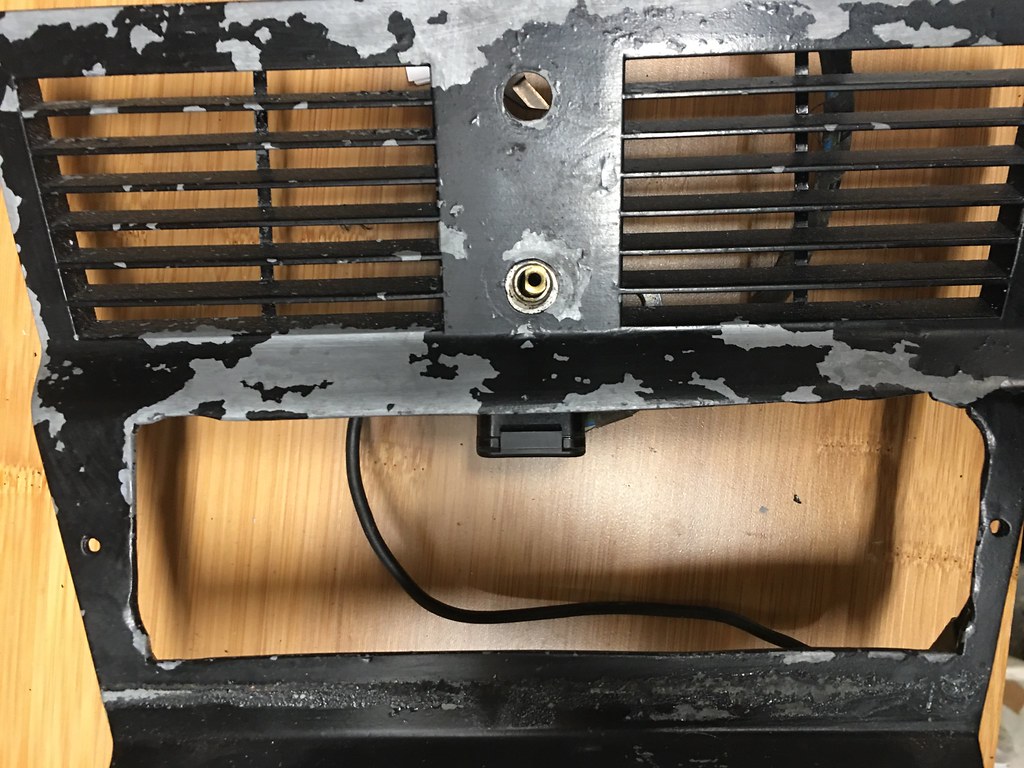
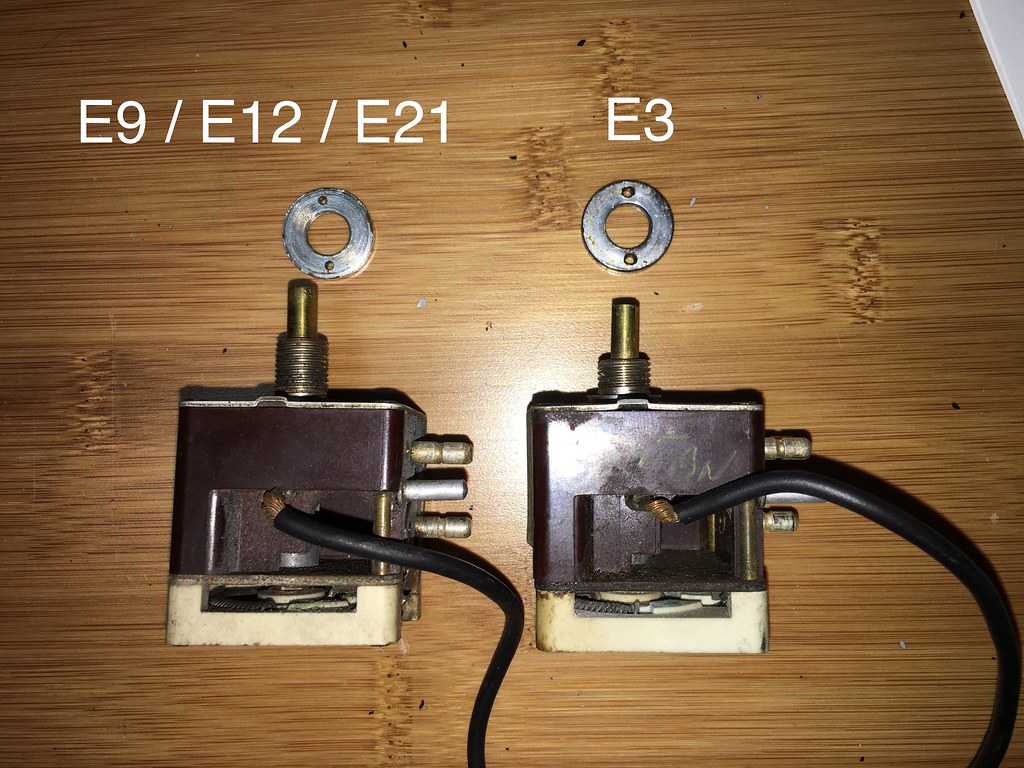
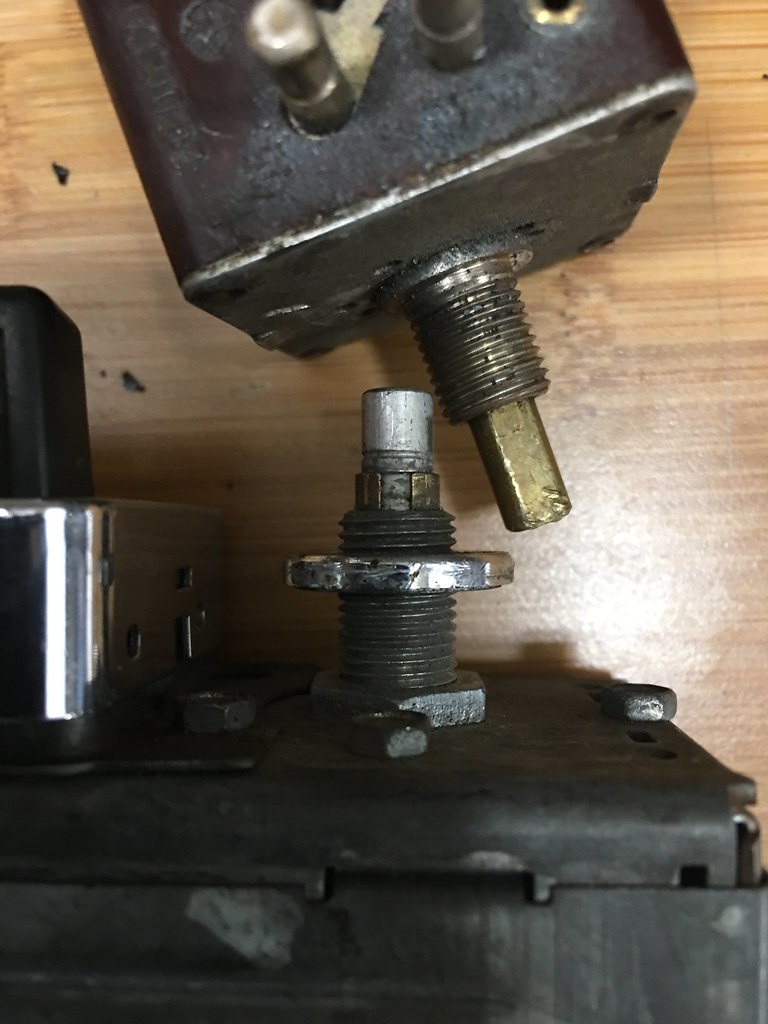
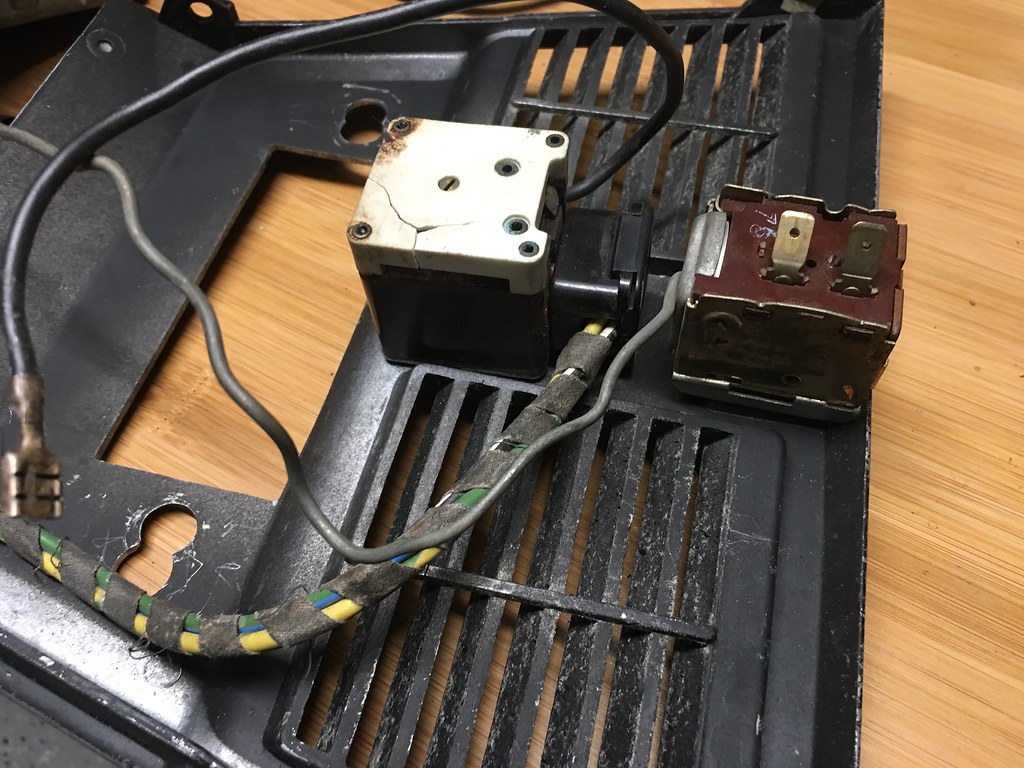
I confirmed that with the e3 plate, the fan switch must be mounted with the plug facing the roof. There is no way to have it face the floor without interfering with the radio. It makes sense that it fits this way because the e3 has seven grilles on the vent, and the knobs are spaced farther apart than that on the E9. There actually isn't that much interference with my face plate and the radio, I'd say about 4-5mm. I suspect that it is just a design flaw with my latest revisions (not the modeler's fault).

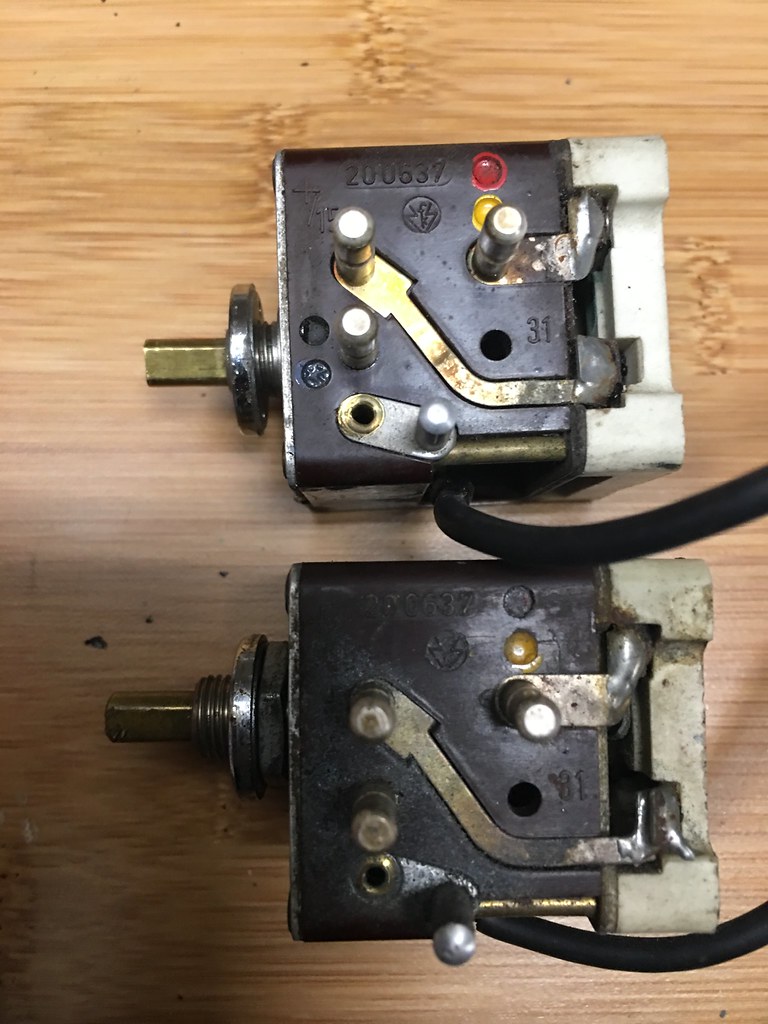
Here is the e3 plate with the switches oriented without interference. @mulberryworks - observe your future pigtail....
35808900614_ebf1369560_b.jpg


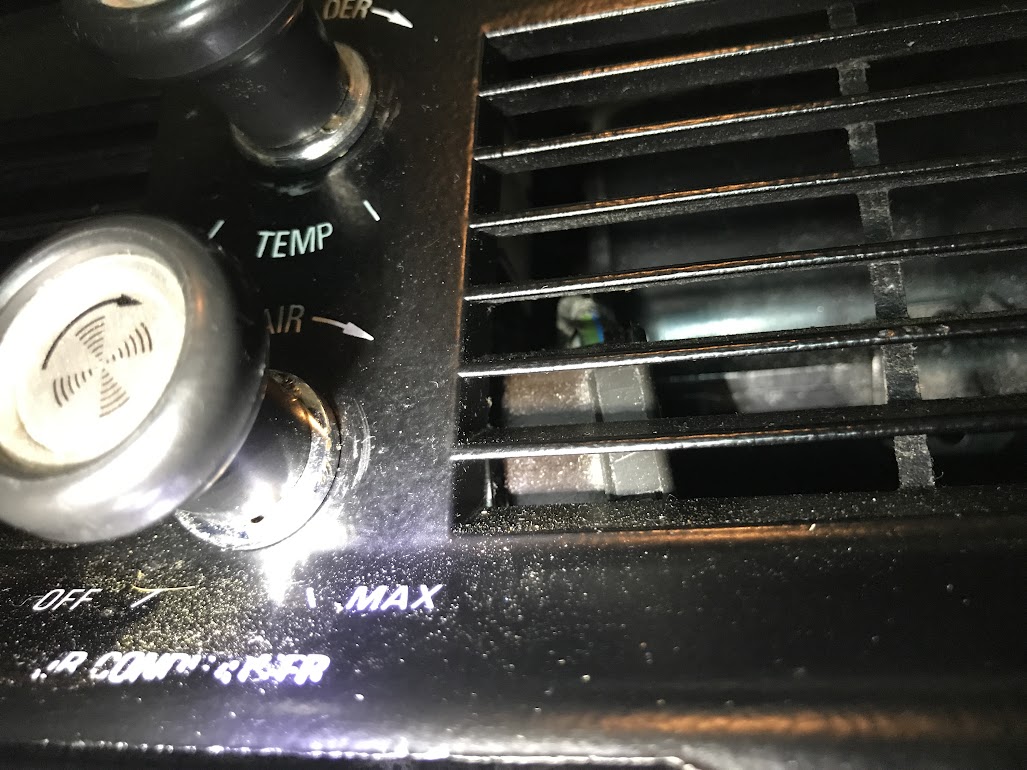
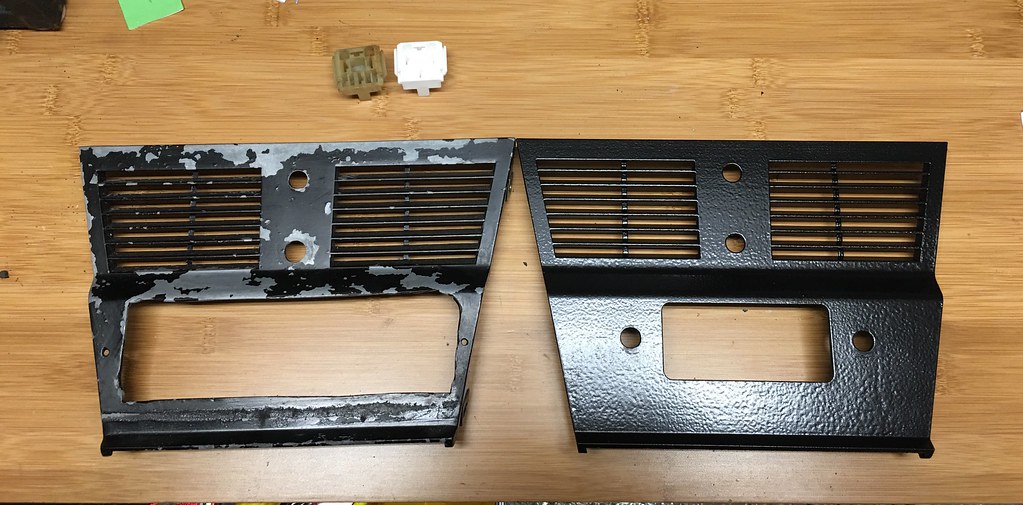
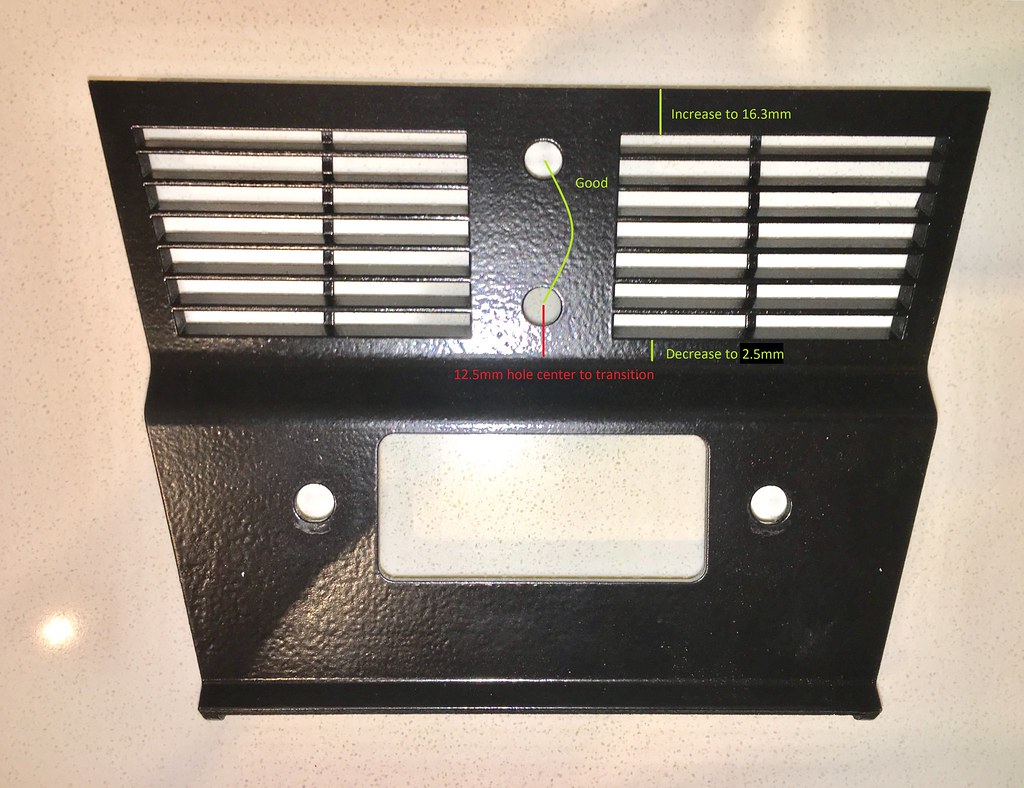
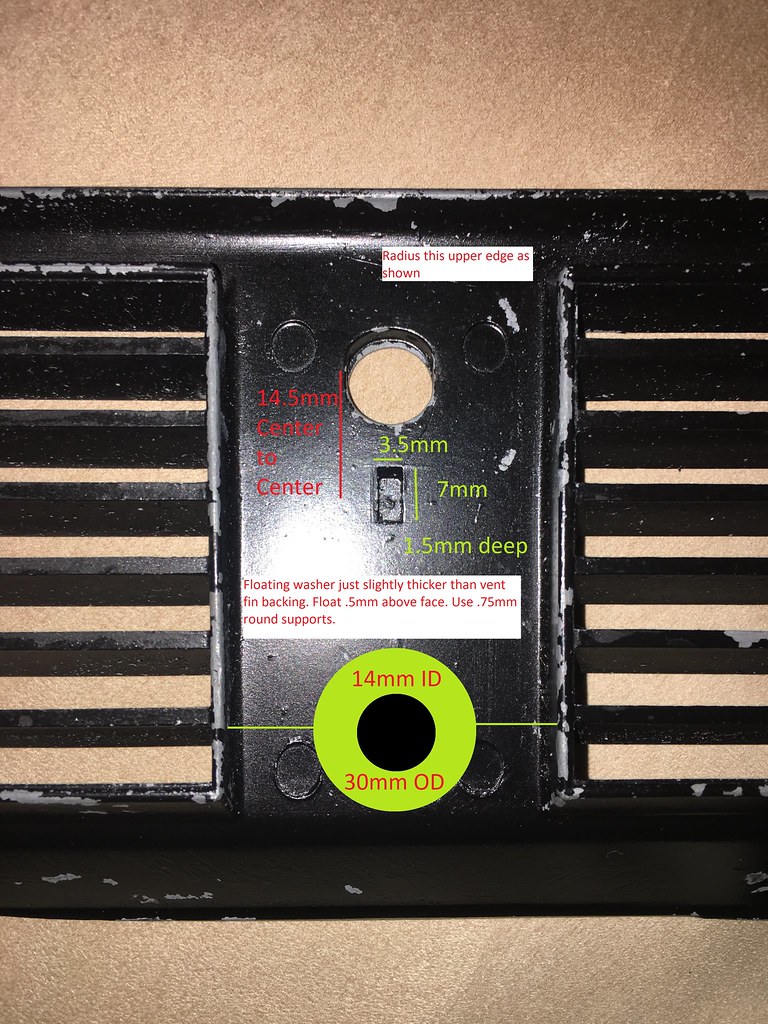
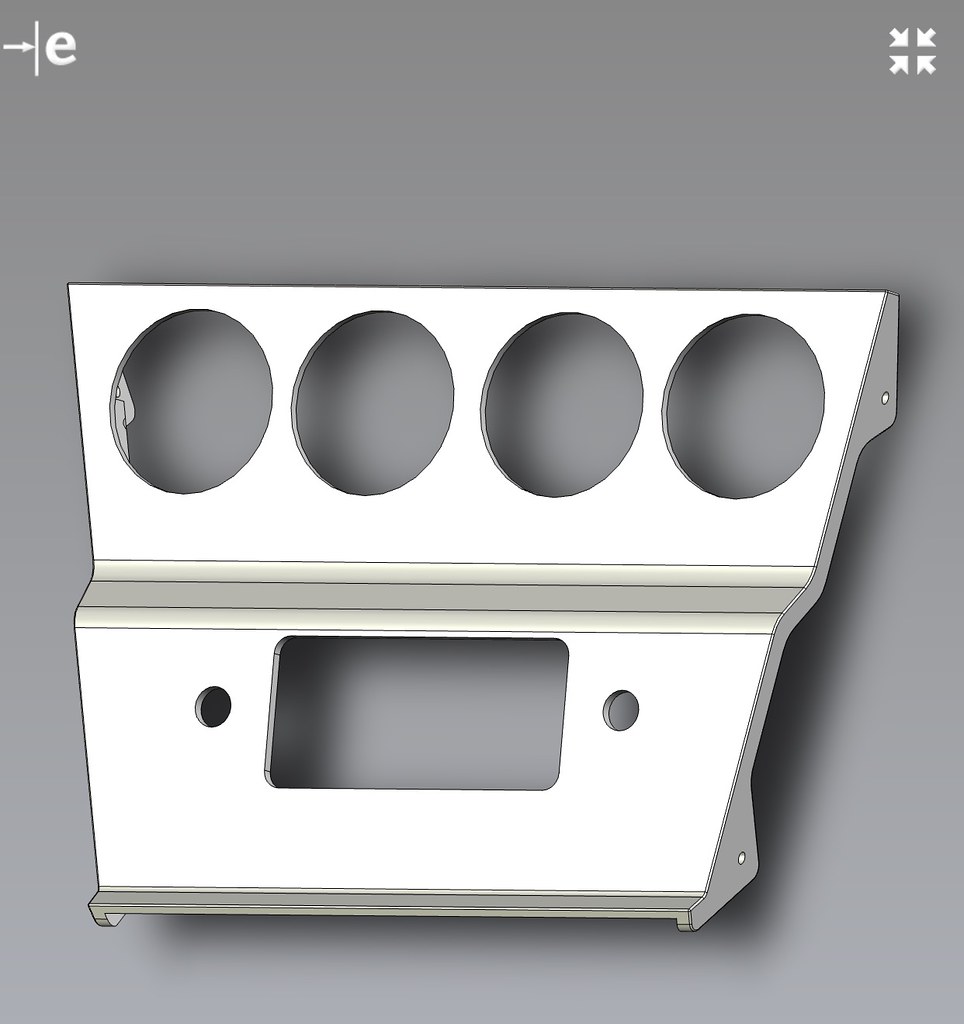
Here is my latest AC face plate print - the problem child:
35834558093_bd7e6d760d_b.jpg


More R&D this weekend between landscaping projects...
 

Stevehose

Well-Known Member
Site Donor $$
Messages
13,004
Reaction score
5,679
Location
Sarasota, FL
Definitively sideways, also, I think there is a spacer between the back of grille and switch, maybe this has something to do with it:

tRo17zVTNsrs9SNsrM6Y2Sza64tRYFFgOWqqICCGcrfOnUeL2D5pBKqZTVwSmR7KziMSH_DCIbQH6RrLNT9P_CzN1rTm71EYAVywyNbCV02HLW6yVJapRzbjCGLUMa2zxlu66a5cNFw9x9vS843WOKl3x8Xv_i0sVqJSm-9FD1-QckTRrT1dMwQGv34FZ2m3gXQhchpVK2cvktnBd_vA9fyA18NzN-5_tdn3pvxLTHqdXTQ5V6IQ57BM83GoxFoZiu_pmFuXZzFECOOq4JakhyuWApbFUBPxEoFaccR36w8TOvQZ3VCf_DLQZC_uB933DTGpL70s8w7zeU9WQMo2TWIWg1akiMWz4Quyfg-MytAOG-YTikxe1xrULIxmMcCD7CZq3cbm4Bt20EoZmBFBpwWcfp7RCQlaCQ87mHL8QU203X1reO2YNq51MWDNvynWmhZeBQF9cqjjcVxJa6gdaXkO4wdMLZP32UG3n0L442bIt1vCNjz6qT9AtkE1WEMGpKp-6cOQJRxEkR4R9V_uZZn2BhVuTyJQlVdGWoZ7qNvQ3f1Og2Bly_9xqr6CZ8IDZ2x3vlTmofBNJoOWDREkoXXBz3BduueamzFTQCretP6tw9CkUetI=w1027-h771-no
 

Markos

Well-Known Member
Site Donor
Messages
13,369
Reaction score
7,503
Location
Seattle, WA
Definitively sideways, also, I think there is a spacer between the back of grille and switch, maybe this has something to do with it:

Thanks Steve! I still need to pickup my buddy's face plate, but his is sideways also.
 

rsporsche

Moderator
Site Donor $$
Messages
10,685
Reaction score
3,712
Location
Atlanta, GA
oh ... i forgot to mention, my relay holders arrived yesterday. very nice 3d printing ... these should work great. thanks for doing this Mark!!! if you are in need of these type of relay holders, jump in and buy some of these ... you won't be sorry.
 

Markos

Well-Known Member
Site Donor
Messages
13,369
Reaction score
7,503
Location
Seattle, WA
oh ... i forgot to mention, my relay holders arrived yesterday. very nice 3d printing ... these should work great. thanks for doing this Mark!!! if you are in need of these type of relay holders, jump in and buy some of these ... you won't be sorry.

Very good! BTW, to remove the old wire terminals use a tiny screwdriver to compress the tabs from the top. Be sure to open them back up a bit before sticking them in the new relay base.
 

rsporsche

Moderator
Site Donor $$
Messages
10,685
Reaction score
3,712
Location
Atlanta, GA
i was thinking of buying new wire terminals ... i know that means i would have to work on the wiring harness more. will look at doing this both ways ... if the existing ones aren't in bad shape, then that would keep from shortening wires. the other way to look at it is that i will be rewiring the light circuits anyway.
 

Markos

Well-Known Member
Site Donor
Messages
13,369
Reaction score
7,503
Location
Seattle, WA
A brief update. Today I picked up the benchmark face plate. Kudos to those of you with a pristine factory face plate because I haven't witness one in person as of yet.

The revision that had me worried is very close. I have a few minor tweaks to make, but it could be run in lieu of a factory plate with no discernible difference when installed. The one change that needs to happen is the spacing on the switch holes. They are spaced apart properly but they actually need to move towards the radio about 3mm (you can see this below if you look closely). Interestingly enough this change will further reduce the clearance between the blower switch and the radio, but you guys are on the money with the sideways switch.

36602169402_b1236ec97b_b.jpg


Ignoring the single DIN hack job, it is evident that the fan switch on the e9 must be mounted sideways.

Note the clearance issues below:
36602169682_8d93e3470f_b.jpg


I mentioned earlier that the switch couldn't be mounted sideways due to clearance issues. The switch body is larger than the distance between the AC vents. A spacer was mentioned, but my fan switch wouldn't have any exposed threads if you spaced it back far enough to clear the backside of the vents. So this is what I find out - a picture is worth 1000 words.

35963401153_cf161f213f_b.jpg


Other than the post length, the switch body is identical, including the manufacturer's (behr?)part number:
35963583283_85c9847563_b.jpg


E3 Fan Switch:
64511358034

e9 Fan switch:

64511356020


As you can see, the threads are longer on the e9 switch, allowing you to space it out and rotate sideways. I was using an e3 switch, which is platform specific with no crossover. Both the e3 and e9 switch are NLA, but the e9 switch was used on the e12 and e21. It should be relatively easy for one to source!

Needless to say, I am one minor revision away from a production grade face plate. Lastly, I'm going
to stick with an non textured finish on the e9 face plate. This is another area where the e3 parts sent me
astray. The e9 plate is relatively smooth where the e3 plate has somewhat of a splatter finish. The vinyl print ends up having a a bit of a crosshatch texture. I will likely have the next plate tumbled to see if it helps smooth things out. It's an extra $3 or so to have your parts tumbled...
 
Last edited:

rsporsche

Moderator
Site Donor $$
Messages
10,685
Reaction score
3,712
Location
Atlanta, GA
for those of you with mangled ring nuts (under the switch knob) ... i just ordered new ones from W+N. they are 6.89 euro each ... but new is cool on something on the console. ... the panel is looking good Mark!
 

Markos

Well-Known Member
Site Donor
Messages
13,369
Reaction score
7,503
Location
Seattle, WA
for those of you with mangled ring nuts (under the switch knob) ... i just ordered new ones from W+N. they are 6.89 euro each ... but new is cool on something on the console. ... the panel is looking good Mark!

Thanks for the encouragement and the w&n tip Scott! It has been discussed somewhere on the forum before, but I can confirm with confidence. The AC temp and Fan switch have two different thread pitches. One is relatively fine and the other is coarse. Looking at my pics above I want to say that the fan switch is coarse and the temp switch is fine. One of them matches the blaupunkt knobs. I'll edit this post later for accuracy.

Edit: Per Chris, the fan switch is fine thread, and the temp switch is extra fine thread.

I confirmed the Blaupunkt threads match the fine threads found on the fan switch. Below is the fan switch 'bezel' on the radio post:
36617082842_0a3fb0d3e6_b.jpg
 
Last edited:

rsporsche

Moderator
Site Donor $$
Messages
10,685
Reaction score
3,712
Location
Atlanta, GA
hmmm ... W+N only offered one type. when i get them, i will figure out which one it fits. i may have one to sell if that is the case (maybe)
 

Markos

Well-Known Member
Site Donor
Messages
13,369
Reaction score
7,503
Location
Seattle, WA
hmmm ... W+N only offered one type. when i get them, i will figure out which one it fits. i may have one to sell if that is the case (maybe)

A snippet from the resident expert:

I shared this with John this morning, but as I get my A/C going for the first time, I never knew both the fan and temp switches need to be on to energize compressor and condenser fan. I had to replace my temp switch too but I had one that Murray gave me, funny part is thread pitch is different where the bezel mounts it to the panel. Correct size though.
 

HB Chris

Well-Known Member
Site Donor $$
Messages
19,418
Reaction score
8,759
Location
Huntington Beach, CA
The pitch is extra fine and originally I believe both are the same, the replacement temp switches that are available are SAE extra fine. And I had to enlarge the hole a bit too. My Blaupunkt bezels don't work on A/C controls.
 

Markos

Well-Known Member
Site Donor
Messages
13,369
Reaction score
7,503
Location
Seattle, WA
The pitch is extra fine and originally I believe both are the same, the replacement temp switches that are available are SAE extra fine. And I had to enlarge the hole a bit too. My Blaupunkt bezels don't work on A/C controls.

Fine and extra fine makes more sense, because they aren't really coarse. I'll check the threads on the radio to see which switch is a match. Not terribly helpful for the AC switches but it may work out well if the W&N bezels fit the blaupunkt radio.

I check with Don and confirmed that the fan switch should be sideways. I'm going to model the spacer right into the back of the face plate. I'll make it so you can easily snip it out if you want to use the original NLA bushing.
 

Markos

Well-Known Member
Site Donor
Messages
13,369
Reaction score
7,503
Location
Seattle, WA
Update:

The AC defroster vent is on the way to my modeler. It has a broken fin so it may be sacrificed for the cause. I hope to have a full printed version plus a repair kit. I may just start with the repair kit as it is cost effective and easier to model.

The face plate revisions have been submitted and should be ready for printing this week. I am confident that this is the final revision.

I sent the requirements for a four gauge panel as well. This is meant for cars that run the AC console sides with no AC. I've already talked to a laser cutter. I may have AC console sides made from laser cut MDF. I picked up a set of AC console sides and This is a good winter project. It really depends on the curvature of the console. I know from DQ's thread that the manual console sides are tapered.

Face Plate Revision Details:

36793401520_73df63dd05_b.jpg


36354162644_f8cfc9f8f0_b.jpg
 

Markos

Well-Known Member
Site Donor
Messages
13,369
Reaction score
7,503
Location
Seattle, WA
This is a prosumer grade SLS printer. This is the process that I am using to print most of my parts. I you are interested, the interview does a good job of explaining the process. It helps to understand how I can "float" a nylon washer above the face plate without using any support material to make it happen.


mark99

Well-Known Member
Site Donor
Messages
1,505
Reaction score
260
Location
Kirkland WA
Hi Mark,, BTW I tried the stone texture paint, in a way it does look better, the size of the texture, but the bits are too distinct, like bits of sand sitting on top of the surface
When I have a chance I will try a wet coat of something over the stone texture to see if that will blend the bumps in
 

Markos

Well-Known Member
Site Donor
Messages
13,369
Reaction score
7,503
Location
Seattle, WA
Hi Mark,, BTW I tried the stone texture paint, in a way it does look better, the size of the texture, but the bits are too distinct, like bits of sand sitting on top of the surface
When I have a chance I will try a wet coat of something over the stone texture to see if that will blend the bumps in

Thanks for the update Mark! I haven't tried the stone paint with semigloss over it. I kind of feel that the orange peel created by the rustoleum "hammered" paint is good enough.
 
Top