I did, failed to mention that. And sprayed cavity wax in the seams also.I'd be inclined to seam seal all those seams
Last edited:
I did, failed to mention that. And sprayed cavity wax in the seams also.I'd be inclined to seam seal all those seams
Wow! Super clean! What seam sealer did you use?when we stripped my engine compartment down + painted it, we used a self leveling seam sealer. you can see the version before paint (just primed). we did not put on the insulation.
View attachment 214784
I'll check mine, there are definitely cracks and I'll see if I can see Fjord or primer underneathI think there is just primer under those mats and they were painted after install. If they shrink you can see the primer. Unless I am wrong which is possible!
i have no idea seam sealer they used. they paint a lot of Porsche cars and do great work.Wow! Super clean! What seam sealer did you use?
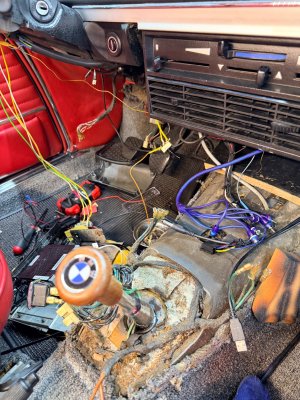
We need some pictures. It helps all of us feel better when we get to that point. I remember when I did much of the same and I sent a picture of the current state of the car to a friend who had just driven it a week earlier. When he had left I had said “I just want to work on some of the wiring…”. His response to my photo was “oh my lord!”Got the glove box and console out today. The PO had used some non-metric machine screw on part of the glove box spring arrangement (the part up under the area where the glove box latch is. So, that took about 20 minutes to get out with vise grips in my left hand while twisted around sitting on the floor (SMH...).
Turns out the window switch console is sort of falling apart. The wood at the back has come loose and the plywood is de-laminating. I think I'll just remake that whole thing from marine ply.. Console sides are OK, if not maybe a bit shabby. The glove box padding is de-laminating in places. And, super special, the hidden nut that holds the flat part of the dash tray to the car using a bolt from the under side, just pulled right through the wood (this is the flat tray part above the glove box). The bolt appears to be rusted to the nut, and the wood is so weak the nut just pulled right though. So there is some fun wood working ahead of me!
The wood for the dash is also discolored and de-laminated in the same area, which indicates some leakage at the windshield seal. Odd that there was absolutely no rust under the seal in that area.
There was a great deal of extraneous wiring, apparently associated with various aftermarket stereo installations over the past 53 years. It was with great satisfaction that I tossed all that, along with the crappy aftermarket cassette player in the trash bin. Looks like the console was butchered to hold a 1-DIN radio, so I'll have to decide what, if anything, to do about that (surprised that it is pot metal, and not plastic!).
Trying to bag and label everything as it comes off, and also photographing and labeling aIl the wires before I disconnected them. I removed the steering wheel to make room on the driver's side. I think my next move will be to remove the instrument cowl, and then try to remove the upper dash pad.
Some interesting quirks I have observed.. The fan and temp controls are ... unusual .... The temp control was not connected to anything, and the fan speed control was loose. Both seem to be odd electro-mechanical affairs. Very odd too that the wiper speed is controlled by a switch on the console. Seems like a strange place to put that...
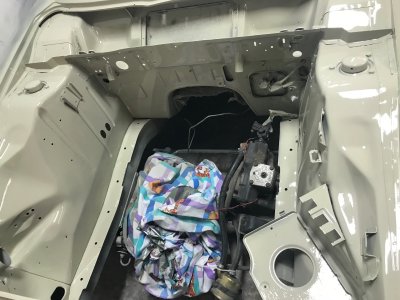
I also popped open the trunk, and realized that the PO had painted everything black. Right over the grey elephant skin.. The trunk is a hot mess.. No rust, but it will need to be completely redone. The cardboard panel at the back of the trunk is a warped mess with black spray painted vinyl over most of it.
Car is now looking VERY disassembled!
Yeah, I'll post pics tomorrow. I was beat from my unexpected yoga exercises both and out of the car.We need some pictures. It helps all of us feel better when we get to that point. I remember when I did much of the same and I sent a picture of the current state of the car to a friend who had just driven it a week earlier. When he had left I had said “I just want to work on some of the wiring…”. His response to my photo was “oh my lord!”
If you need any flocking supplies I have a pound of the flocking material and the duster that I don’t need. Happy to send them your way to redo to interior of the glovebox and fuse panel.
We need some pictures. It helps all of us feel better when we get to that point. I remember when I did much of the same and I sent a picture of the current state of the car to a friend who had just driven it a week earlier. When he had left I had said “I just want to work on some of the wiring…”. His response to my photo was “oh my lord!”
If you need any flocking supplies I have a pound of the flocking material and the duster that I don’t need. Happy to send them your way to redo to interior of the glovebox and fuse panel.
We’ve all been there! I would have nightmares that I would forget how to put it back together.We need some pictures. It helps all of us feel better when we get to that point. I remember when I did much of the same and I sent a picture of the current state of the car to a friend who had just driven it a week earlier. When he had left I had said “I just want to work on some of the wiring…”. His response to my photo was “oh my lord!”
If you need any flocking supplies I have a pound of the flocking material and the duster that I don’t need. Happy to send them your way to redo to interior of the glovebox and fuse panel.
My camera roll is filled with over 1000 pictures of various zoomed in portions of my E9. It’s alternatively the most boring and most critical set of photos I have! Reassembly is based on my ability to replicate where it started. Made all the more difficult when someone before me did it “not quite right”. Then I spend my time looking through photos here or the @HB Chris BaT listings to see what the engine is SUPPOSED to look likeWe’ve all been there! I would have nightmares that I would forget how to put it back together.
My great fear... Being unable to put this all back together again...My camera roll is filled with over 1000 pictures of various zoomed in portions of my E9. It’s alternatively the most boring and most critical set of photos I have! Reassembly is based on my ability to replicate where it started. Made all the more difficult when someone before me did it “not quite right”. Then I spend my time looking through photos here or the @HB Chris BaT listings to see what the engine is SUPPOSED to look like
So do the AL strips just peel off? How are they held on?Lower dash: remove Alu strips, find small Phillips head screws including one at each end.
That's when I call @sfdon on FaceTime and show him my engine and say "what's wrong with this picture?" It's like a twisted Where's Waldo or those things you used to do as a kid at the back of Highlights magazine at the doctor's office. He says "that doesn't belong there" and "that shouldn't have that connector" and so on. The Dog Whisperer of E9s.My great fear... Being unable to put this all back together again...
They have small pins on the back and fit into friction clips in the rail.So do the AL strips just peel off? How are they held on?
yup, it feels wrong, but you just work an end loose and it will pop off.They have small pins on the back and fit into friction clips in the rail.