72 3.0 CS 2240344 Restoration

Amazing!!! The ingenuity is phenomenal. I may have to make one of these for the day I decide on AC and have to remove my gauge panel

It is what we do...
Screenshot 2026-08-04 at 4.22.28 PM.png
 
Short update after a few weeks of crazy busy work (real work, not car stuff)...

Welded on and dressed the last two Garagistic rear camber and toe adjust brackets. Need to elongate the holes tomorrow.

Blasted the other front brake backing plate. Still not sure I will reuse these, but I am going to paint them just in case.

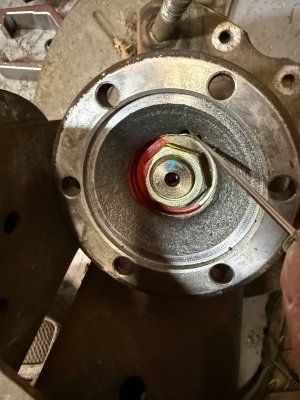
Dis assembled one of the the rear hubs. Once I removed the locking washer, the impact gun made pretty quick work of the nut. I used a puller to get the inner flange off. So now I am off to peruse the threads (primarily @eriknetherlands ) on this to determine how best to press out the stub axle. I suspect I am going to need an assortment of tubes for the press. These bearings were not tight, or loose, but definitely somewhat gummy feeling. Mostly I want to replace the backing plates, and the bearing seals, and I can powder coat the trailing arms together with the subframes next week.

I also picked up a rebuilt 3.45 LSD diff. I'll paint that tomorrow along with all the other cleaned up parts I have. Using Eastwood 2K epoxy satin on these , so I figure I'll set them all up on the paint rack (obviously not the diff), and spray them as a group.
 
Last edited:
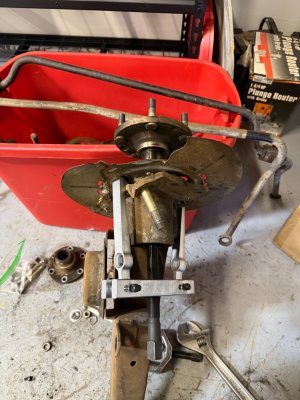
Well, that was an interesting morning. I managed to disassemble both rear hubs, but they came apart quite differently. On the first one I had to use a puller to get the stub axle out, and the inner bearing came out with it.
IMG_6437.jpg


IMG_6439.jpg
IMG_6440.jpg

IMG_6444.jpg


On the second one, the stub axle just fell out, leaving the bearings and seals in place. I had to use @eriknetherlands tapping technique to get the large bearing out ( tried a dead blow hammer to no avail. Switched to a metal hammer and finally got some traction on it). Once the big bearings were out I used a steel disk that turned out to be the perfect size to push the small bearing out using a long armed puller. Interesting note the puller gets VERY tight and then there is a loud snap as the bearing breaks free, and then it slowly glides out. I’ll use my press to reassemble them.
IMG_6448.jpg
IMG_6449.jpg
IMG_6450.jpg

I also used a really nice puller kit from Harbor Freight (never thought I would hear myself use "nice" in the same sentence as Harbor Freight.... Has numerous puller bars and arms with different lengths, disks, spring pins to change arms quickly, etc. Comes in a nice organized case too. worth every penny of $229. I used a smaller fixed ball joint puller to push out the rubber bushings. That was easy after all the bearing stuff.

IMG_6447.jpg
 

Attachments

  • IMG_6446.jpg
    IMG_6446.jpg
    507.9 KB · Views: 14
  • IMG_6437.jpg
    IMG_6437.jpg
    572.6 KB · Views: 14
Last edited:
This is a future project for me as I too want to blast and paint the rear backing plates when I rebuild the rear suspension. I am curious about both the dis-assembly process and the process for re-installing the bearings. The quick read that I gave the manual made it seem...involved...
 
This is a future project for me as I too want to blast and paint the rear backing plates when I rebuild the rear suspension. I am curious about both the dis-assembly process and the process for re-installing the bearings. The quick read that I gave the manual made it seem...involved...
It isn't THAT bad.. The first trick is to bend in that little bulge on the locking ring. If you don't do that, you will never get the nut loose. I used a Dewalt impact driver and a 30 mm socket to loosen the nut. Takes a few seconds before the big dog eats..

As I noted, in one case the stub axle just fell out. That was sort of easier, since then I used the puller and the disk to press out the other bearing. Getting the big bearing off the stub axle was a little challenging because the seal is inthe way. I just crushed the seal with the puller hooks and the bearing came out. You cannot reuse any of these bearings after removing the because you are generally pulling on the floating race, so the bearings will brinell.

@eriknetherlands describes the "tapping" method to pound out one bearing if they are both in the trailing arm. There is a spacer between them, so you have to slide it from side to side to get a purchase on the edge of the inner bearing race. I would not characterize my method with the hammer as “tapping" ;). You need to hit it pretty hard to get it moving. After that it is just a series of round robin taps...Be ready for the greasy lump to fall out the other end..

I am glad I did this. The backing plates are a mess, the bearing grease was a gelatinous waxy crud.. clearly done after 54 years...

I have a 12 ton press, so assembly should be fairly simple. although I suspect getting those rubber bushings back in will be a trick.

There is a spacer inside the setup. According to Don's mechanic Ed, it is important to use the same spacer on the same side. On mine the spacer was inboard (relative to the nut end of the axle) of the smaller (inboard) bearing. It is #6 in the RealOEM pic below.
Screenshot 2026-08-09 at 4.26.47 PM.png
 
Last edited:
It isn't THAT bad.. The first trick is to bend in that little bulge on the locking ring. If you don't do that, you will never get the nut loose. I used a Dewalt impact driver and a 30 mm socket to loosen the nut. Takes a few seconds before the big dog eats..

As I noted, in one case the stub axle just fell out. That was sort of easier, since then I used the puller and the disk to press out the other bearing. Getting the big bearing off the stub axle was a little challenging because the seal is inthe way. I just crushed the seal with the puller hooks and the bearing came out. You cannot reuse any of these bearings after removing the because eyouare generally pulling on the floating race, so the bearings will brinell.

@eriknetherlands describes the "tapping" method to pound out one bearing if they are both in the trailing arm. There is a space between them, so you have to slide it from side to side to get a purchase on the edge of the inner bearing race. I would not characterize my method with the hammer a "tapping" ;). You need other hit it pretty hard to get is moving, After that it is just a series of round robin taps...Be ready for the greasy lump to fall out the other end..

I am glad I did this. The backing lates are a mess, the bearing grease was a gelatinous waxy mess... clearly done after 54 years...

I have 12 ton press, so assembly should be fairly simple. although I suspect getting those rubber bushings back in will be a trick.
 
Thanks Scott, I will look forward to any updates on this topic as you begin to put it all back together!

I am hoping to start this as a winter project, but am fighting with my township about plans to add a third bay on the garage and that has to come first so the car will go back into offsite storage during the construction (If I am successful with a variance).
 
Lance - here's a question and a thought for you. would they allow you to build a standalone garage in the back yard? if so, say you will build it on the edge of the setback lines and it will be a 2 to 3 car garage and you will capture the garage as living space ... even if you have to dig stuff out to get back there. as an alternative, in the space where you were going to put the 3rd bay, make that a driveway and put the 3rd bay directly behind the other two (side entry) ... and then put up a canopy over the new driveway and open the existing garage up to the side as well to access the new driveway.

once they know how serious you are and when they gag about that proposal ... ask if it wouldn't be better for everybody if they can just let you expand 1 bay on to your garage. you can guess which one they would get less complaints about
 
Last edited:
Lance - here's a question and a thought for you. would they allow you to build a standalone garage in the back yard? if so, say you will build it on the edge of the setback lines and it will be a 2 to 3 car garage and you will capture the garage as living space ... even if you have to dig stuff out to get back there. as an alternative, in the space where you were going to put the 3rd bay, make that a driveway and put the 3rd bay directly behind the other two (side entry) ... and then put up a canopy over the new driveway and open the existing garage up to the side as well to access the new driveway.

once they know how serious you are and when they gag about that proposal ... ask if it wouldn't be better for everybody if they can just let you expand 1 bay on to your garage. you can guess which one they would get less complaints about
A Silicon Valley friend of mine was building a huge (20k SF) house out on his large property off coast highway. He had the architects make a model, and realized it looked huge ( because it is!). He had them remake it showing a tiny model of the house on a huge topo model of the property, and that’s the one he showed to the coastal commission. It’s all in creating the right perspective!
 
Thanks Scott, I will look forward to any updates on this topic as you begin to put it all back together!

I am hoping to start this as a winter project, but am fighting with my township about plans to add a third bay on the garage and that has to come first so the car will go back into offsite storage during the construction (If I am successful with a variance).
Not willing to do it on your back in the snow!? Wimp!!
 
Not willing to do it on your back in the snow!? Wimp!!
Ouch, that reminds me of the time I had a late afternoon appointment I couldn't miss and the coupler in the shift linkage on my '63 VW bus came apart. I had the new part, but no garage, it was on the street and it was 33° F and raining hard. I had to lay on the street, bathed in fridgid water and work my magic on the rusty fasteners with limited tools while my face was inches from the steel above me. I finished and went straight into the shower fully clothed to bring my body temp back up. Made the appointment on time.
 
Ouch, that reminds me of the time I had a late afternoon appointment I couldn't miss and the coupler in the shift linkage on my '63 VW bus came apart. I had the new part, but no garage, it was on the street and it was 33° F and raining hard. I had to lay on the street, bathed in fridgid water and work my magic on the rusty fasteners with limited tools while my face was inches from the steel above me. I finished and went straight into the shower fully clothed to bring my body temp back up. Made the appointment on time.
Oh man!! That’s bad!!
 
Not willing to do it on your back in the snow!? Wimp!!
when i was young, i changed a rear wheel bearing on my Bavaria - in the driveway lying down on ice in Dallas, TX. i didn't have a choice, the bearing was frozen and had to get changed so i could go to work - it was my daily driver.
 
We’ve all been in that position… thank goodness these things tend to happen when we are young… and bendable.

I’ve rebuilt a motor in a thunderstorm once with no cover… I’m sure that engine lasted a real long time … not. It worked for me for a while though.
 
Funny, I was thinking about the old days when I was putting my 5 speed in the coupe. I remembered pushing up my toploader 4-speed transmission from my chest into place in my Mustang as a teenager. I am grateful that I have a lift and a lot more equipment now as I know I no longer have the ability to do things the way I did back then.
 
Funny, I was thinking about the old days when I was putting my 5 speed in the coupe. I remembered pushing up my toploader 4-speed transmission from my chest into place in my Mustang as a teenager. I am grateful that I have a lift and a lot more equipment now as I know I no longer have the ability to do things the way I did back then.
Yeah, 20 years ago I was putting the Getrag 265 into my 635, and realized that if I dropped it, it would break both my arms.. Somehow I got that into the car solo, and unscathed.. Not doing that again though..
 
Back
Top