72 CSi rotisserie restoration

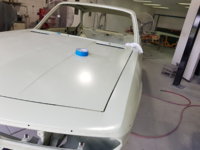
AT LAST....the car is off to the spray painters.......some 650 hrs of fabrication work :eek: now we have 250 to 300 hrs of hammering/blocking/spiralling and final spray.:D door gaps are perfect 5mm all round bonnet 3.5 mm and all panels line up nicely. photos of spray prep to come. Have started on console upholstery as we need to fit A/c to this car during engine installation. Going to use Autronics EM System.....but that's a month away yet.
 

Attachments

  • IMG_4591.JPG
    IMG_4591.JPG
    219.7 KB · Views: 523
  • IMG_4593.JPG
    IMG_4593.JPG
    233 KB · Views: 1,039
  • IMG_4595.JPG
    IMG_4595.JPG
    206.4 KB · Views: 539
  • IMG_4598.JPG
    IMG_4598.JPG
    210.6 KB · Views: 516
  • IMG_4602.JPG
    IMG_4602.JPG
    232 KB · Views: 501
  • IMG_4604.JPG
    IMG_4604.JPG
    250.4 KB · Views: 488
  • IMG_4611.JPG
    IMG_4611.JPG
    117.3 KB · Views: 514
  • IMG_4359.JPG
    IMG_4359.JPG
    53.2 KB · Views: 513
  • IMG_4359.JPG
    IMG_4359.JPG
    53.2 KB · Views: 526
  • IMG_4354.JPG
    IMG_4354.JPG
    87.6 KB · Views: 534
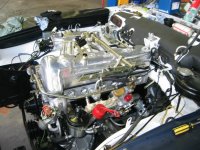
thank you gents. Marc are you referring to the engine or the Console switch plates. Engine was ceramically coated....will stay like that for ever. Did my 230SL benz 4 yrs ago and still the same . see Pic. The console switch plate I had chromed.
Dang I hope to be finished maybe March next year. Gazza.............I am closing in fast on you.............might pull up outside you house one day whilst your still working on your machine :D
 

Attachments

  • IMG_3499.JPG
    IMG_3499.JPG
    293.2 KB · Views: 490
  • IMG_3698.JPG
    IMG_3698.JPG
    236.1 KB · Views: 482
  • 1.jpg
    1.jpg
    385.5 KB · Views: 520
Thanks Wes....BTW did you buy that car from Nick Coetzee??? That rust in front fender....I would be taking the front fender off and see what's in behind. Also the sills did you go back to the inner sill.....you would be amazed as to what is living in there.

Yes I did.
In terms of the front fender we cut some inspection holes where the rust was and were then able to use a phone to view/record what was inside. Any rust we could see was cut out.
We also cut into the sills and did the same. Had to replace a section as it was pin holed with rust. There's pics on my build thread.
 
I have a question for all the learned E Nine ers out there. Under the Kharman body badge attached to LHS front inner door (see pic)........I have a number stamped there. Is that my body number??
Also the Kharman Badge has gone missing (may turn up in my parts) but that has 2 numbers on it from memory. I think one is the paint code...............can anybody clarify.
If I have lost this plate are they still available?? Thanks
 

Attachments

  • IMG_3991.JPG
    IMG_3991.JPG
    136.3 KB · Views: 456
I have a question for all the learned E Nine ers out there. Under the Kharman body badge attached to LHS front inner door (see pic)........I have a number stamped there. Is that my body number??
Also the Kharman Badge has gone missing (may turn up in my parts) but that has 2 numbers on it from memory. I think one is the paint code...............can anybody clarify.
If I have lost this plate are they still available?? Thanks

As far as I know, the number stamped behind the plate is a body number put there by Karmann, don't think you can get anything out of it.
The Karmann plate has the paint code stamped on it.
This is the closest reproduction that I know of:
https://www.cs-werk.de/cs-werk-bonn...alteil-nos-bmw-e9/16_1_bmw_e9_schild_karmann/
 
Tried my BBS RS Rims (9") 245/45 R16 tires on my mates E9 today.......as my car has not been painted yet and need to know if fenders needed modifying.....seems to be plenty of clearance and I think wheels camber in under load (am I correct in saying that???) or camber can be adjusted if need be. Should be - 2* Anyway here are some pics. BTW thanks again Gazza for using you machine as a template. Fronts are 7"
 

Attachments

  • IMG_3637.jpg
    IMG_3637.jpg
    69.5 KB · Views: 422
  • IMG_3635.jpg
    IMG_3635.jpg
    57.5 KB · Views: 412
  • IMG_3646.jpg
    IMG_3646.jpg
    53.9 KB · Views: 398
  • IMG_3647.jpg
    IMG_3647.jpg
    70.4 KB · Views: 425
Last edited:
No worries Pozza. In case anyone is wondering - we tilted the garage 90 degrees to make installation of the wheels on the studs easier.
Those wheels are so shiny I think I may now have permanent eye damage.
 
What is the offset on your wheels? Most use 7” (205/55-16 et11) in front, 9” is awfully wide. You will definitely hit your fender during a turn where there is a bump like a gutter or driveway. And my fenders were rolled, even with 15” wheels it would hit the fender when turning.
 
i totally agree with Chris. i had 7" wide - 16" w/ et 11 and 205 / 55 - 16 and caught a fender lip while turning - another time when i hit a speed bump going straight. i now have rolled fenders and decamber plates from Carl Nelson.

the pic of the tire sticking out from under the fender lip looks very scary (expensive fix) to me.
 
He has 7" wheels up front, with camber plates and rolled fenders it will be okay. I also think the rear will be okay with some lowering that adds negative camber + rolled fenders. At least I've seen several running the same 245/45r16 in the rear on coupes.
As stated, it's all about the ET of course, but it looks like it'll be fine.
 
I did mention 7" on front................ET +11 rear 9" ET +8......attached pic of German car (same set up) I spoke to owner.....no problems.:D
 

Attachments

  • 3.jpg
    3.jpg
    173 KB · Views: 403
We are in the spray painters now doing final fit up of bumpers/Grille/headlights/tailights etc etc including doors,bonnet & trunk lid with seals fitted so everything is perfect and making sure no body misalignment etc etc. 80% of body has been splined and blocked down (photos to come next post) Whilst doing some stitch welding to reinforce rear area........panel beater noticed small stress crack (probably from heat from welding) in RHS rear wheel tub.............upon cutting open wheel tub revealed some minor corrosion. Even after the entire car had been blasted there was no sign of pinholes.............worth noting you have to be so thorough in addressing rust in these cars. We decided to open up LHS and it was the same.
FINALLY got my teak dash finished....now ready to assemble.
 

Attachments

  • Filled Splined and Epoxied doors and body.jpg
    Filled Splined and Epoxied doors and body.jpg
    283.9 KB · Views: 367
  • Bonnet filled splined epoxied and prefitted with new rubbers.jpg
    Bonnet filled splined epoxied and prefitted with new rubbers.jpg
    230.3 KB · Views: 371
  • Inside Bonnet.jpg
    Inside Bonnet.jpg
    209.2 KB · Views: 346
  • RH Door Splined and blocked.jpg
    RH Door Splined and blocked.jpg
    178.7 KB · Views: 345
  • Trunk Lid  splined blocked and epoxied.jpg
    Trunk Lid splined blocked and epoxied.jpg
    146.7 KB · Views: 342
  • Trunk Lid  Finished item.jpg
    Trunk Lid Finished item.jpg
    235.8 KB · Views: 342
  • gaps are perfect with rubbers prefitted.jpg
    gaps are perfect with rubbers prefitted.jpg
    209.2 KB · Views: 357
  • Stress Crack after stitch welding.jpg
    Stress Crack after stitch welding.jpg
    306 KB · Views: 364
  • Cutaway  inner RHS rear wheel tub revealing  light corrosion.jpeg
    Cutaway inner RHS rear wheel tub revealing light corrosion.jpeg
    116 KB · Views: 366
  • RHS Inner rear wheel tub s blasted & treated.jpg
    RHS Inner rear wheel tub s blasted & treated.jpg
    217.4 KB · Views: 364
  • LHS Inner rear wheel tub 1 (2).jpg
    LHS Inner rear wheel tub 1 (2).jpg
    454.6 KB · Views: 358
  • 20190116_125515.jpg
    20190116_125515.jpg
    228.9 KB · Views: 365
  • 20190116_125523.jpg
    20190116_125523.jpg
    173.6 KB · Views: 357
  • Rear Seat area Reinforcing.jpg
    Rear Seat area Reinforcing.jpg
    149.6 KB · Views: 371
Back
Top