WOW!! Beautiful work!
You are using an out of date browser. It may not display this or other websites correctly.
You should upgrade or use an alternative browser.
You should upgrade or use an alternative browser.
72' Fjord CSI resto
- Thread starter Wladek
- Start date
-
- Tags
- restoration list
Wladek
Well-Known Member
Update time!
So, due i wasn't fully satisfied with results of the first flushing block cooling system flushing, i made second flush with phosphoric acid, this time block was soaking for ca. 48hours & after final water flushing, i can tell you that results where really great!
So then:
1. I flatten all cast iron burrs for better cooling fluid flow (water pump mount).


Flatten all burrs in oil channels


2. Cylinders rehoned


3. Engine block caps replaced


Some new engine hardware

And then, when i thought that block is fully cleaned, shiny, sharp edges inside & good to go with reassembly i decided to unscrew that big m34 cooling compartment screw, that is on the front wall near timing chain. And what i found there??? - NEXT WALL!!! And that after 48hours of soaking in acid!!!
It's view of first culinder wall.

Hammer & flat screwdriver didn't helped a lot, so i used 3Joule pneumatic hammer.
And it wasn't easy even for that machine!

After that i pulled out couple bigger peaces of something as below that is hard as rock. I think it was there even the day when car was leaving BMW factory, remains of casting molds.
Second side that is unvisible - was a little bit better, but not too much.
Before this job - i think cooling fluid flow in that part of block for one half of first cylinder was fully closed/blind.

Obstructed

So, due i wasn't fully satisfied with results of the first flushing block cooling system flushing, i made second flush with phosphoric acid, this time block was soaking for ca. 48hours & after final water flushing, i can tell you that results where really great!
So then:
1. I flatten all cast iron burrs for better cooling fluid flow (water pump mount).
Flatten all burrs in oil channels
2. Cylinders rehoned
3. Engine block caps replaced
Some new engine hardware
And then, when i thought that block is fully cleaned, shiny, sharp edges inside & good to go with reassembly i decided to unscrew that big m34 cooling compartment screw, that is on the front wall near timing chain. And what i found there??? - NEXT WALL!!! And that after 48hours of soaking in acid!!!
It's view of first culinder wall.
Hammer & flat screwdriver didn't helped a lot, so i used 3Joule pneumatic hammer.
And it wasn't easy even for that machine!
After that i pulled out couple bigger peaces of something as below that is hard as rock. I think it was there even the day when car was leaving BMW factory, remains of casting molds.
Second side that is unvisible - was a little bit better, but not too much.
Before this job - i think cooling fluid flow in that part of block for one half of first cylinder was fully closed/blind.
Obstructed
Last edited:
Wladek
Well-Known Member
New bearing in crankshaft

New sprocket

Crankshaft was nominal, but i made all needed measurements any way.
Main ca. 60mm (59,95-59,98mm)
Conrod ca. 48mm (47,97-47,99mm)


New bearings:

Main crank plastigauge measurements - all in specs, actual clearance is ca. 0,0017-0,002" (ca. 0,04-0,05mm). Book specs are ca. 0,002-0,003"


Reassembly:


And with final torquing - all f.cked up. One of the bolts cracked with 55nm of torque.

Luckily i was able to pulled out the cracked part, without any additional damages.

New sprocket
Crankshaft was nominal, but i made all needed measurements any way.
Main ca. 60mm (59,95-59,98mm)
Conrod ca. 48mm (47,97-47,99mm)
New bearings:
Main crank plastigauge measurements - all in specs, actual clearance is ca. 0,0017-0,002" (ca. 0,04-0,05mm). Book specs are ca. 0,002-0,003"
Reassembly:
And with final torquing - all f.cked up. One of the bolts cracked with 55nm of torque.
Luckily i was able to pulled out the cracked part, without any additional damages.
Last edited:
Wladek
Well-Known Member
Some lighter work
Windows gears cleaning & regreasing:

Finally assembled & tested

During zinc plating - they lost one of my heater box flap shafts, so i decided to fabricate 2x stainless instead of regular zinc plated.

Reassembled headlights wipers, after re-zinc plating & before painting.
Couple custom made rivets where needed, & all is good now.

Made "mirror-effect" powder coating of taillights reflection plates.

I liked the idea of Rob @teahead to leave brake calipers in yellow zinc-plated colour, so i just clear powder coat the calipers:


And finally re-assembled them:

Some zinc plating

Windows gears cleaning & regreasing:
Finally assembled & tested
During zinc plating - they lost one of my heater box flap shafts, so i decided to fabricate 2x stainless instead of regular zinc plated.
Reassembled headlights wipers, after re-zinc plating & before painting.
Couple custom made rivets where needed, & all is good now.
Made "mirror-effect" powder coating of taillights reflection plates.
I liked the idea of Rob @teahead to leave brake calipers in yellow zinc-plated colour, so i just clear powder coat the calipers:
And finally re-assembled them:
Some zinc plating
Last edited:
I am at a loss for words to describe your skill and patience! Amazing
Wladek
Well-Known Member
Thanks Steve")
Yes, patience is critical if you want to make all things proper way, sometimes i am lack of patience & need a little brake to calm down. Usually at this point, i start to make wholy different things to relieve the head.
The main problem with E9 parts, is that first impression about their condition - really doesn't matter. So many times i had parts that looked so well & in the end after blasting or plating they showed up a new not very attractive face; from other side i also had a lot of parts that looked not very promising, but in fact became very good cores.
p.s. when i have internal resistance or just don't want to do something with e9, i always repeat to myself "it won't do itself, it won't do itself" after 5x or more times of repeating, i am usually good to go futher.
Hi Wladek...........I am curious....do you own shares in Zn plating company or do you just love Zn plating as a hobby  looks great and I agree with your comment
"as i am making ultimate 70's car - why not improve the factory solution" I have taken the same attitude with my car. Actually I painted the air blower cover and the headlight access panels Turkis rather than black . Do you like the rear badge?
looks great and I agree with your comment "as i am making ultimate 70's car - why not improve the factory solution" I have taken the same attitude with my car. Actually I painted the air blower cover and the headlight access panels Turkis rather than black . Do you like the rear badge?
Attachments

Wladek
Well-Known Member
No, i do not own shares, this company owners are bunch of assholes. Every single time i give them new orders - they charge me more & more; in near future Zn plating will cost me more like Gold plating;do you own shares in Zn plating company or do you just love Zn plating as a hobby
Every single part that i received with my e9 from previous owner was so ugly, dirt & greasy, i was sort of disgusted because of that, so i decided that after my TLC this parts in their new life with me will be nice & shiny, so i just do my best.
I love your car, you made wonderful job with it, i wish mine in future was as good as your's.Actually I painted the air blower cover and the headlight access panels Turkis rather than black . Do you like the rear badge?
To be true - not many e9 restorations really impressed me, but yours is wholy different story, body work/paint job work was just amazing.
Due blower under that cover is black, i personally prefer black cover, so was sort of harmony between these two parts, but that doesn't mean, that turkis cover look bad, it also look nice.
Badge is cool - 3.5 under the hood - 3.5 on the boot, all match as it should.
Wladek
Well-Known Member
Some powder coating was made this week

Reassembled my wipers mechanism


Couple weeks back piston rings gaps adjusting was made, so was all in specs, all rings where grinded, measure couple times etc. etc.


This week received package from BMW with new main bearings bolts, washers etc., so was able to continue the work with engine block.

Main bearings where tightened (bearings gaps where checked above), so after final troque 60Nm i was able to check side play of cranckshaft - total was ca. 0,05mm (each side ca. 0,025mm)

All pistons where fully cleaned, all carbon deposits where removed, also from all gaps & then sligthly manually polished with metal polishing compound, so dirt does not stick to them so well in future.


New piston rings on:

Each ring gap was set ca. 120 degree to other, so oil leaks where minimal


Connecting rods torque 55Nm

All six conrod bearings gaps where ca. 0,025mm

And done - pistons seat right.

Reassembled my wipers mechanism
Couple weeks back piston rings gaps adjusting was made, so was all in specs, all rings where grinded, measure couple times etc. etc.
This week received package from BMW with new main bearings bolts, washers etc., so was able to continue the work with engine block.
Main bearings where tightened (bearings gaps where checked above), so after final troque 60Nm i was able to check side play of cranckshaft - total was ca. 0,05mm (each side ca. 0,025mm)
All pistons where fully cleaned, all carbon deposits where removed, also from all gaps & then sligthly manually polished with metal polishing compound, so dirt does not stick to them so well in future.
New piston rings on:
Each ring gap was set ca. 120 degree to other, so oil leaks where minimal
Connecting rods torque 55Nm
All six conrod bearings gaps where ca. 0,025mm
And done - pistons seat right.
great work mate..............never ending talent
Wladek
Well-Known Member
Thank you Guys for nice words, i appreciat it I wish i was a little bit closer to final work, but it's still long, long way to go.
I wish i was a little bit closer to final work, but it's still long, long way to go.i wish you alot of courage to assemble all this again
I hope you have a very good memory and/ or an extensive knowledge of E9s. Mine was totally disassembled when I bought it as a given up on project. It was only this forum, the blue manuals ( useless at times ), and having another E9 as a template that enabled me to get anywhere, as a novice.
I presume some of those plated parts will be painted?
Wladek
Well-Known Member
As for now i think i remember most things, but will see if i will still remember all this when the car will be back in assembly.I hope you have a very good memory and/ or an extensive knowledge of E9s.
All parts that where originally black or other colour - will be black or other colour & almost all that where originally bare Zn plated - will be bare Zn plated. I want to go stock colours.I presume some of those plated parts will be painted?
Last edited:
Wladek; how's you project progressing? love to see some more of your magnificent updates!
Wladek; how's you project progressing? love to see some more of your magnificent updates!
+1
Was just thinking of what you've been up to Wladek.
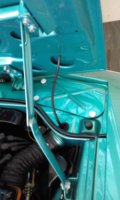
Interesting. I have a 72 Fjord CSL with the exact same center console brackets you show there but mine are black.
Edit: Amazing work BTW! Great details
Edit: Amazing work BTW! Great details
Hi there,
i have a problem with making photo's of my progress with e9, so i decided to create this thread, maybe that way i will be motivated little bit more.
Sorry at the beginning, but my thread might be not continuous & sometimes out of context, i will be just updating here my current progress;
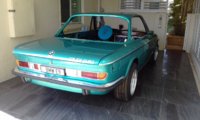
Couple words about my e9 - it is Fjord CSI from October 1972, came from Germany in 2015.
Currently car is completely disassembled (to every single part, almost to the last screw) - no body photo's update yet as i don't want you to watch such a beauty naked
Today received some parts from zinc plating:
1. some white zinc
View attachment 39271
2. some yellow zinc & lonely white zinc oil filter housing
View attachment 39272
Parts with matte colour - where sandblasted; while gloss - brushed with brass brush.
Next stage for most of this parts (not all) will powder coating
Last edited:
Wladek
Well-Known Member
Hey Guys,
thanks that you didn't forgot about me
yeah, it's been a while since my last post.
This year i am having some tough times with e9, tons o little things that normally noone will ever see, but unfortunately this thing charge my brain very effectively.
Sometimes, because of that i am/was discouraged, but something is happening...
So, to the updates...
Since last post i started with rebuilding my alternators (early 2x 45a & 1x55a) + 1x late 55a i purchased during the work.
All was disassembled, cases where glass beads blasted, all steel parts zinc plated, repainted, new bearings, all electrical parts changed on new ones (copper rings, brushes, diodes etc.) 55a early alt received even new rotor & stator (that aren't seen very often).
After final assembly & testing - all charge.
Wladek
Well-Known Member
Fully finished the metalwork of the doors
couldn't imagine how side mirrors can't be mounted on aluminium skins without bending them, so decided before final closure to make additional base plates that where later bonded with metal adhesive


Some brushing/sandpapering & degreasing before primering


Also before primering - decided to put some converter in gaps where rust later can be shown


primered with phosphoric epoxy


Before final bonding STP Aero damping mats - very lightweight, 3mm thick & half of weight of standard damping mat.

For bonding i used Teroson EP 5055 - superb product

Gaps filled with poliurethane & closed/rubber hammered


couldn't imagine how side mirrors can't be mounted on aluminium skins without bending them, so decided before final closure to make additional base plates that where later bonded with metal adhesive
Some brushing/sandpapering & degreasing before primering
Also before primering - decided to put some converter in gaps where rust later can be shown
primered with phosphoric epoxy
Before final bonding STP Aero damping mats - very lightweight, 3mm thick & half of weight of standard damping mat.
For bonding i used Teroson EP 5055 - superb product
Gaps filled with poliurethane & closed/rubber hammered
Wladek
Well-Known Member
Before final bonding of course i made door skins positioning with doors frames on the car, so was no later surprises (...probably will be anyway).


Closed areas where trated with Valvoline Tectyl


And final result


Closed areas where trated with Valvoline Tectyl
And final result
Last edited: