Bringing a '74 back up to her intended glory.

Bmachine

Well-Known Member
Site Donor $
Site Donor $$
Messages
3,525
Reaction score
1,779
Location
Northern California coast
Little tip... when embarking on a re-assembly project, print the schematic from realoem before starting the job. When there are multiple washers and spacers this can save you from some time consuming "Oops why do I have an extra washer left after I finished putting this back together?" discoveries.

As usual... Don't ask me how I know.
 

Attachments

  • file-50CA4D25-42F0-479E-AD5A-22F10A6AF2F2-1501-000001712D05FE34.jpg
    file-50CA4D25-42F0-479E-AD5A-22F10A6AF2F2-1501-000001712D05FE34.jpg
    206.3 KB · Views: 305

Markos

Well-Known Member
Site Donor
Messages
13,369
Reaction score
7,502
Location
Seattle, WA
Little tip... when embarking on a re-assembly project, print the schematic from realoem before starting the job. When there are multiple washers and spacers this can save you from some time consuming "Oops why do I have an extra washer left after I finished putting this back together?" discoveries.

As usual... Don't ask me how I know.

No doubt. I zip tie mine together in the proper order though. I have a lot of zip ties. :)
 

Peter Coomaraswamy

Well-Known Member
Site Donor $$
Messages
3,787
Reaction score
896
Location
Austin, TX
Keep rockin' Bo, I am loving this thread! Whenever possible I try to do one side at a time, that way I can see how the other went together. Besides driving it, this will be the most fun you have with your car :) I'm looking forward to putting the M90 block in my blue coupe and I'm also going to disassemble allot of other stuff since I know (after 4 or 5 rebuilds) that I can do a much better job in lots of areas. I have to say though that after all the suspension work and refreshing the car is a real pleasure to drive; it hums along at 80-85 mph as if she were a modern car. I'm putting in a more powerful engine and a new 5-speed because it takes too long to get to 80-85 mph. I will also be hitting up the forum for ideas on additional bracing. One thing I did notice on the modern BMW convertibles is how much bolt-on bracing they have under the car. I'm thinking that may be the way to go.
 

Bmachine

Well-Known Member
Site Donor $
Site Donor $$
Messages
3,525
Reaction score
1,779
Location
Northern California coast
While I wait for the turkey to cook, I run down to the garage and remove overspray from the PO on the center grille. (BTW, skinny grille w 5 slats on this '74).

I was wondering how to do that without scratching the polished metal. After trying chemicals and even sandpaper, steel wool ended up being the winner for this task.

Before and after:
 

Attachments

  • IMG_1515.jpg
    IMG_1515.jpg
    89.3 KB · Views: 331
  • IMG_1531.jpg
    IMG_1531.jpg
    102.7 KB · Views: 300
Last edited:

Markos

Well-Known Member
Site Donor
Messages
13,369
Reaction score
7,502
Location
Seattle, WA
Another black '74 grille with five slats.

If you use steel wool, make sure it's 0000. Brass wool
is better because the particles don't rust...
 

Bmachine

Well-Known Member
Site Donor $
Site Donor $$
Messages
3,525
Reaction score
1,779
Location
Northern California coast
I had a bit of time under the car this weekend. Finally was able to remove the exhaust and headers as well as the driveshaft.

Both gave me some trouble and I couldn't have done it without an impact wrench I finally bought on Amazon. Even though I have a compressor I bought an electric impact because the compressor is really noisy so I only use it for parts cleaning.

(Addendum: The big downside of the electric impact is that in order to house that big motor, it is very large in size and very heavy. Makes it hard to manipulate with one hand when crawling under the car.)

Amazon never ceases to amaze me. I ordered this wrench with impact sockets and extensions Friday night after dinner and it was delivered free Saturday afternoon. Insane.

I am hoping to be able to get the tranny out either this weekend or the next.
 

Attachments

  • file-77DA8539-0A39-4FD5-938C-40C57955F772-1902-000001A605DB0CCD.jpg
    file-77DA8539-0A39-4FD5-938C-40C57955F772-1902-000001A605DB0CCD.jpg
    110.1 KB · Views: 301
  • file-68B5DB01-4ABB-4A5D-B749-6B0505EE1102-1902-000001A6069CC1EF.jpg
    file-68B5DB01-4ABB-4A5D-B749-6B0505EE1102-1902-000001A6069CC1EF.jpg
    205.1 KB · Views: 316
Last edited:

Markos

Well-Known Member
Site Donor
Messages
13,369
Reaction score
7,502
Location
Seattle, WA
Cool update! Your last photo really highlights your passion for Amazon. I'm in the same camp, and it comes in very handing while parting out a car. I have enough A1 and A3 boxes to ship the car out in pieces. :)

Question: What did you use the impact wrench on? I was under the impression that there isn't enough space to use it on the driveshaft. Exhaust clamps?
 

Bmachine

Well-Known Member
Site Donor $
Site Donor $$
Messages
3,525
Reaction score
1,779
Location
Northern California coast
Thanks Mark. Impact was critical for the headers to downpipes (using 3 extensions) and for the guibo bolts. Although this wrench could not unlock those so I had to unlock using the breaker bar and considerable force. I was glad to have the 6 sided impact sockets for that as I always fear that the 12 siders could round the bolts when using a lot of torque.
 

Bmachine

Well-Known Member
Site Donor $
Site Donor $$
Messages
3,525
Reaction score
1,779
Location
Northern California coast
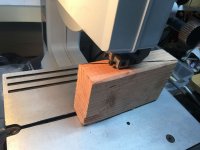
One of the additional challenges we weekend warriors are facing, on top of only having limited time (one day a week when I'm lucky), is that we also have to spend a lot of time making tools or devising different solutions to make up for the lack of a permanent setup.

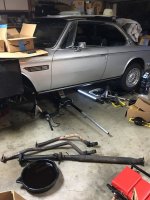
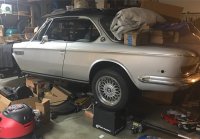
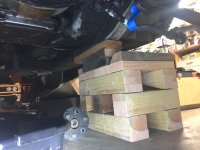
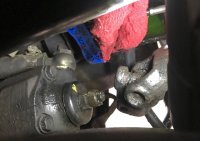
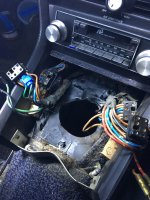
I have been spending the last couple of weekends preparing for a transmission conversion. In order to get as much working room as possible, I put the car on the highest settings of my jack stands, with a couple of 2x4s underneath them. Everytime I went under the car I kept thinking that since we are in earthquake country here it wouldn't take much for me to get flattened like a pancake if a decent one decided to happen at that time. On top of that I wasn't convinced there would be enough room to roll the slushbox out of there once it is on the transmission jack.

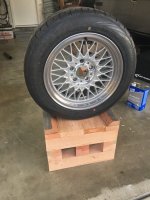
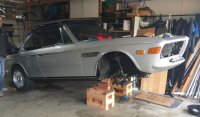
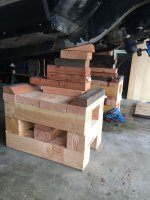
So I decided to work on a safer and also higher setup. One way to do that is to use the wheels as main support whenever possible. So I found these light weight wheel "cribs" which lift the wheel itself 12 inches off the ground. Kind of expensive at about $100 for two but, being made out of high density foam, they are super light easy to deal with. Since my rear wheels are still on the car, I bought one pair of those "Race Ramps Wheel Cribs" cribs for them.

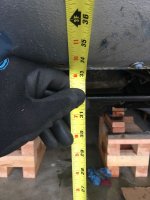
One bit of challenge is that when you jack the car up the wheels hang as low as they can on the unloaded suspension. So you have to jack the car up way higher than would seem safe, put several 2x4 on top of the jack stand so you can free up the floor jack to lift the half shaft until you can slide the crib under the wheel.
 

Attachments

  • file-5B710565-A976-4671-AF38-3301F3946AE0-5253-0000053DE10C583D.jpg
    file-5B710565-A976-4671-AF38-3301F3946AE0-5253-0000053DE10C583D.jpg
    101.4 KB · Views: 285
  • file-478455B8-78FB-472A-9FD9-34EEA8357607-5253-0000054FE3CC99AB.jpg
    file-478455B8-78FB-472A-9FD9-34EEA8357607-5253-0000054FE3CC99AB.jpg
    218 KB · Views: 257
  • file-BA39889F-88F5-4E33-84DF-627B051B0E6C-5253-0000054FE63A8EB3.jpg
    file-BA39889F-88F5-4E33-84DF-627B051B0E6C-5253-0000054FE63A8EB3.jpg
    168.8 KB · Views: 276
Last edited:

Bmachine

Well-Known Member
Site Donor $
Site Donor $$
Messages
3,525
Reaction score
1,779
Location
Northern California coast
However I couldn't use those cribs for the front because my hubs are out while I rejuvenate them and pack new bearings. So I decided to build a multi-use set out of wood. I did bit of internet research on the subject and I designed these which also have a 12inch height but can also be used as direct chassis support when the wheels are not on the car. One pair of wood "cribs" requires
- two 4x4x8
- one 2x6x8
- one 2x4x8
- one box of 4" deck screws
- one box of 2" deck screws.
About $40 in total.

With the car up on this setup I have between 1.5 and 2 feet of room under the car and it feels FAR safer than on the flimsy jack stands.
 

Attachments

  • file-C3FBCCFE-9C57-403F-8EAF-31586B747748-5253-0000053DE19AFE19.jpg
    file-C3FBCCFE-9C57-403F-8EAF-31586B747748-5253-0000053DE19AFE19.jpg
    129.3 KB · Views: 267
  • file-3F191B13-AD4B-49CB-A0C0-E89DBF044DF8-5253-0000053DE0A315C0.jpg
    file-3F191B13-AD4B-49CB-A0C0-E89DBF044DF8-5253-0000053DE0A315C0.jpg
    84 KB · Views: 319
  • file-8D0198D0-AE83-4750-8122-193BB4858F73-5253-0000053DE032C546.jpg
    file-8D0198D0-AE83-4750-8122-193BB4858F73-5253-0000053DE032C546.jpg
    111.3 KB · Views: 273
  • file-C7915587-0694-4F4F-A218-9B5B04319370-5253-0000054FE4B506C4.jpg
    file-C7915587-0694-4F4F-A218-9B5B04319370-5253-0000054FE4B506C4.jpg
    175.4 KB · Views: 271
Last edited:

Markos

Well-Known Member
Site Donor
Messages
13,369
Reaction score
7,502
Location
Seattle, WA
With the car up on this setup I have between 1.5 and 2 feet of room under the car and it feels FAR safer than on the flimsy jack stands.

Jenga! Jenga! :D

I think the first impression that people get when they see these is that they are unsafe. They look super stout though, and safer than jack stands IMO. There have been some bad jackstand horror stories in the past couple of years. One of mine is completely deformed at the base, I'm not sure what happened. Usually it's the cast parts that fail.

About two weeks ago I was passing by the 520 bridge construction in Seattle. They use wood blocks to support the concrete sections while they build the bridge. Small get wedged in there to get things level. It really struck me how strong wood can be.

I think I'll build a lift using wood from this place haha. I geek out everytime I visit. It's a great place to go if you want a 30' beam that is 18" square. :D

http://www.seconduse.com/inventory/categories/lumber
 

Stevehose

Well-Known Member
Site Donor $$
Messages
12,934
Reaction score
5,598
Location
Sarasota, FL
I did my 5 speed install with only jackstands at full height. I had some wood under front and back suspensions as a backup for jack failure. Nonetheless, it is stressful and claustrophobic under there on your back with your nose close to the car. The tranny can slide under the car sideways, then rotated up in place on the jack, so clearance isn't an issue.
 

Bmachine

Well-Known Member
Site Donor $
Site Donor $$
Messages
3,525
Reaction score
1,779
Location
Northern California coast
I've been away from the car for a long time because of 6 day work weeks. Movie industry is very much feast or famine. Right now we are going into the trough of the wave. The upside is that, after finishing my taxes, I get to go back to work on the car!

After doing a lot of reading on this site about options to remove the engine and tranny (after reading sfDon's description of separating an auto tranny from the motor under the car I was in no hurry to try it that way), I decided to follow Luis' and several others' suggestion to drop the subframe with everything included. It seems to be far less stressful and avoids the issue of ceiling clearance.

(Details here: http://www.e9coupe.com/forum/conversations/about-your-engine-removal-technique.42799/)

First thing to do was to turn the car around. We have a small two car garage. With the nose in first, there is no room in front to pull the whole subframe assembly out. So I need to have the nose facing outside. Called my buddy John Abelson and we took care of that first. Notice that since my wheel hub were still out being painted, I had to put the above mentioned wood jacks on the wheelies and pivot the car on those. Here is a little time lapse... We were barely able to squeeze it around the 90 degree turn mark.

 
Last edited:

Bmachine

Well-Known Member
Site Donor $
Site Donor $$
Messages
3,525
Reaction score
1,779
Location
Northern California coast
Then we worked on a system to get the recommended 33 inches / 84 cm height under the front valence to get the engine out. I really did not want to rely on jack stands for that so I used a version of my wooden stands. These are far more stable and give a much greater sense of safety under the car, especially here in earthquake country. In order to match the angle need to get the nose of the car high enough, I cut the last wood block at the right angle to match the frame rails.

In the end it all worked out really smoothly and the car feels really secure at the proper height.

Note that I have added some more chocking to the rear wheels since the photo was taken. That thing is going nowhere!
 

Attachments

  • IMG_1856 (1).jpg
    IMG_1856 (1).jpg
    123.9 KB · Views: 282
  • IMG_1858 (2).jpg
    IMG_1858 (2).jpg
    122.5 KB · Views: 275
  • IMG_1859 (1).jpg
    IMG_1859 (1).jpg
    130.8 KB · Views: 273
  • IMG_1860 (1).jpg
    IMG_1860 (1).jpg
    161.8 KB · Views: 263
Last edited:

Bmachine

Well-Known Member
Site Donor $
Site Donor $$
Messages
3,525
Reaction score
1,779
Location
Northern California coast
After that, I finally finished the wheel hubs. A few months ago I inserted longer studs at OCcoupe's shop and they had been waiting to get cleaned and refinished.
 

Attachments

  • IMG_1514.jpg
    IMG_1514.jpg
    172.3 KB · Views: 249
  • IMG_1834 (1).jpg
    IMG_1834 (1).jpg
    194.9 KB · Views: 260
  • IMG_1861 (2).jpg
    IMG_1861 (2).jpg
    177 KB · Views: 265

Bmachine

Well-Known Member
Site Donor $
Site Donor $$
Messages
3,525
Reaction score
1,779
Location
Northern California coast

Attachments

  • IMG_1846 (1).jpg
    IMG_1846 (1).jpg
    110.3 KB · Views: 255
  • IMG_1857 (1).jpg
    IMG_1857 (1).jpg
    107.9 KB · Views: 273
Last edited:

Bmachine

Well-Known Member
Site Donor $
Site Donor $$
Messages
3,525
Reaction score
1,779
Location
Northern California coast
I removed the carbs, fuel pump, and disconnected everything on both sides of the engine.

Should be ready to drop the whole thing on Saturday if the weather cooperates.
 

Attachments

  • IMG_1868.jpg
    IMG_1868.jpg
    171.8 KB · Views: 270

Bmachine

Well-Known Member
Site Donor $
Site Donor $$
Messages
3,525
Reaction score
1,779
Location
Northern California coast
A few highly symbolic moments... Finally!
 

Attachments

  • IMG_1873.jpg
    IMG_1873.jpg
    186.9 KB · Views: 311
  • IMG_1874.jpg
    IMG_1874.jpg
    165 KB · Views: 282
  • IMG_1875.jpg
    IMG_1875.jpg
    197.5 KB · Views: 284
  • IMG_1876.jpg
    IMG_1876.jpg
    127.9 KB · Views: 302
  • IMG_1877.jpg
    IMG_1877.jpg
    164 KB · Views: 297
Top