Fixing that little rust spot...

eriknetherlands

Moderator
Site Donor
Messages
2,696
Reaction score
1,927
Location
Netherlands, Eindhoven area
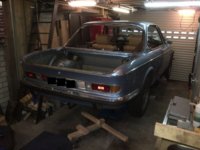
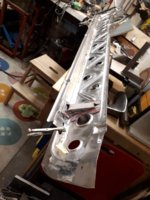
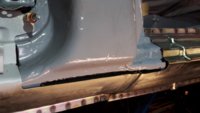
Taking a step back from my project, (which is hard if you can stand no further then 2 feet away from the car in my garage), I'm happy to see the rightside front and rear right floors are finished, and the sill is closed up again. All that's left to do is to weld the outer skins and fit the rocker covers. However I'm going to do that as a very last task, honing my welding skills until I feel confident enough, but I also want to do this having the doors in place to check the panel alignment. And as I welded half a roll cage temporarily in my car, the doors won't close until I cut the frame out again.
Which means I must fix the floors, sill, A & B-pillars and subframe mount on the left side before I'm able to remove the inner frame.

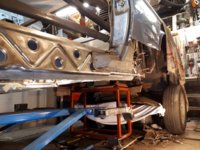
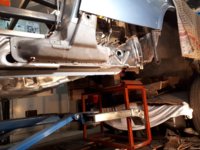
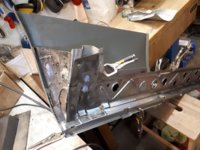
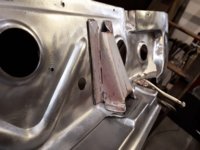
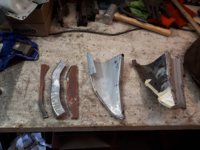
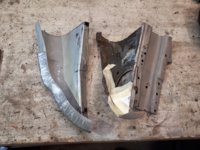
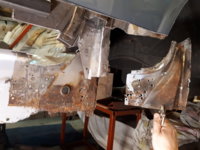
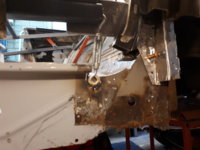
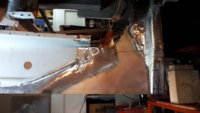
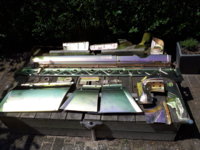
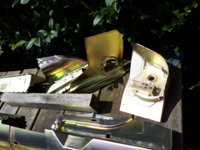
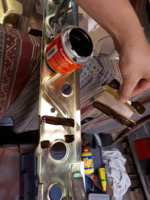
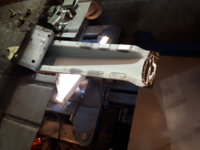
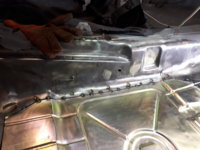
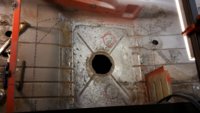
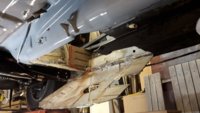
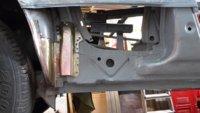
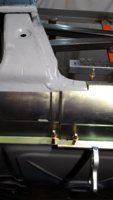
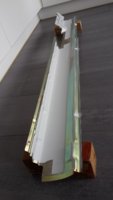
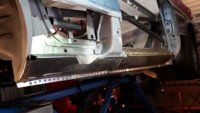
So I removed the rear axle (again) and chopped some metal and ended up with this:

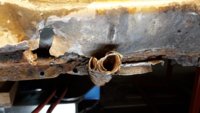
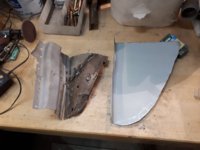
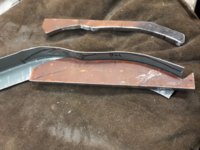
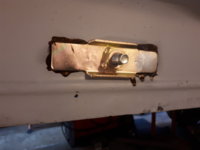
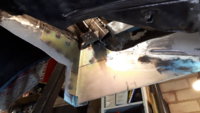
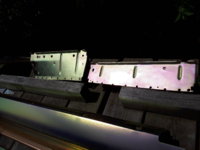
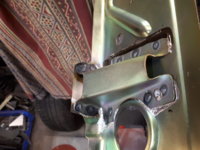
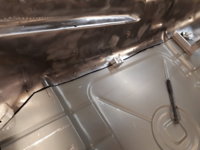
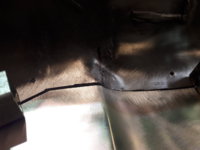
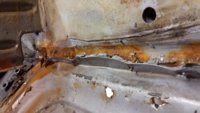
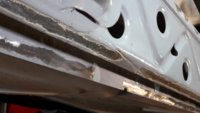
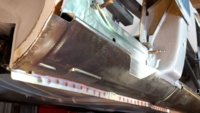
The rear floor has some punctures and rust holes near the sill, looks like it went wrong trying to lift the car at some point in it's life. The rectangular area around the drain plug is still quite good. (available for free should anyone want to replace just the drain plug area).

I'm replacing it entirely as I also want to fix all the rust that creeps up in the floor to sill joint.
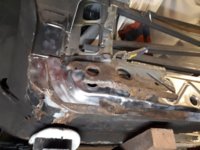
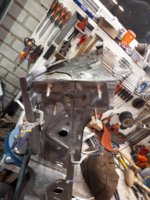
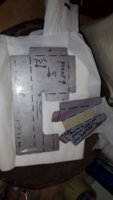
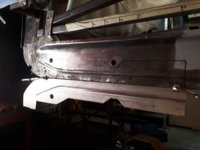
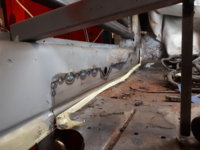
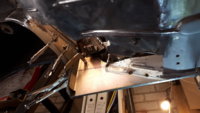
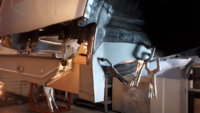
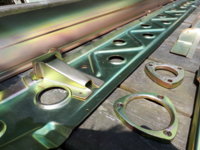
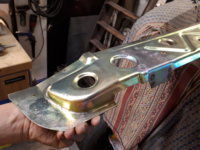
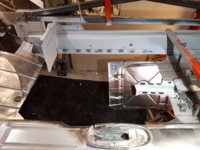
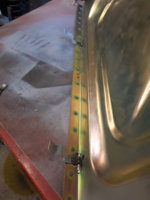
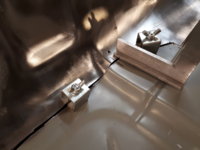
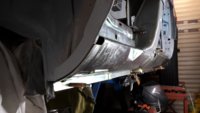
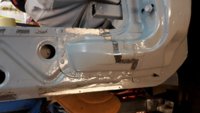
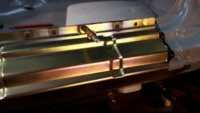
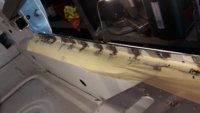
I carefully measured and drawn the shape of the W&N replacement part on the floor (solid black line) and drawn cut marks (dashed line) inside it. I took care not grinding into the frame rails. I want to keep them intact to use as a height reference when installing the new floor. The inside of the frame rails is actually really solid. Most of the brown stuff you see in the pic is old wax; some rust on the underside of the floor so it's good to replace it entirely.
 

Attachments

  • 20180120_120216 traced solid outline of w&N panel and dashed cut mark.jpg
    20180120_120216 traced solid outline of w&N panel and dashed cut mark.jpg
    211 KB · Views: 464
  • 20180120_123445 rear right floor cut out.jpg
    20180120_123445 rear right floor cut out.jpg
    204.7 KB · Views: 442
  • 20180120_123513 floor to sill joint rusting and floor holes showing.jpg
    20180120_123513 floor to sill joint rusting and floor holes showing.jpg
    189 KB · Views: 485
  • 20180120_124552 first look into frame rails - keeping it as height reference.jpg
    20180120_124552 first look into frame rails - keeping it as height reference.jpg
    204.2 KB · Views: 485
Last edited:

eriknetherlands

Moderator
Site Donor
Messages
2,696
Reaction score
1,927
Location
Netherlands, Eindhoven area
hmmm, screwing up the chronological order here by posting the above....
I never mentioned the best part of the E9 rust remedy; the outer sill installation using the technique from the orange CSL repaired by Miklos !

- last thing added was the wheel arch extension. I did not want to dig up 350 euro's for the whole wheel arch, so I made up this complex piece and had it zinced. It allows for spot welding it later on to the outer sill and outer skin panel. It's just one picture, so it may seem as if i just hammer it out over a beer/coffee/tea, but I'm not showing you the 6 prior attempts that ended in the trash can.
-The outer sill was modified to have 2 extra water drain holes in the rear. These are hidden by the decorative sill on the outside, but prevent water accumulation. Note that the intermediate sill forms a full running closed channel in the area under the rear quarter panel. Any water running getting between the intermediate sill and the outer sill stays there; so I created two new openings.
- the outer sill was zinced, to make sure the weld seams at the bottom remain as best as I can get them. These seams are THE most rust prone area's of our cars . The inside was painted prior to installation.
- the outer sill was welded in place using the same method as Miklos has done on the orange CSL; it is spot welded along it doorjamb and lower edge, but the original welds to the inner sill are replaced with structural Epoxy Glue (crashworthy type expensive stuff; Henkel Teroson EP5055). It leaves that seam untouched by heat from welding, and thus the rust coatings are not affected.
The spot welding was done using Europax weldprimer in between. It is a bitumen based compound mixed with copper and actually smells like fresh asphalt.

Prior to glueing, all surfaces need to be free from paint, oil & silicone, so all area's are belt sanded and wiped with an industrial cleaner.

Some pics to show all that....
 

Attachments

  • 20171122_123719 Wheel arch -made by hand, zinced and ready for welding.jpg
    20171122_123719 Wheel arch -made by hand, zinced and ready for welding.jpg
    180.3 KB · Views: 553
  • 20171210_170223 - trial fitting zinced outer sill.jpg
    20171210_170223 - trial fitting zinced outer sill.jpg
    169.8 KB · Views: 514
  • 20171210_170041 two new openings for water drain.jpg
    20171210_170041 two new openings for water drain.jpg
    163.5 KB · Views: 493
  • 20171217_121027 - painted inside; masking weld and glue area's.jpg
    20171217_121027 - painted inside; masking weld and glue area's.jpg
    134 KB · Views: 501
  • 20171222_223633 -glue and spot weld areas cleaned.jpg
    20171222_223633 -glue and spot weld areas cleaned.jpg
    159.4 KB · Views: 509
  • 20171222_223656 A-pillar area; ready for spot welding and glueing..jpg
    20171222_223656 A-pillar area; ready for spot welding and glueing..jpg
    166.6 KB · Views: 545
  • 20171222_224215 spotwelding primer.jpg
    20171222_224215 spotwelding primer.jpg
    266.9 KB · Views: 656
  • 20171222_224239 Henkel Teroson EP5055 structural adhesive.jpg
    20171222_224239 Henkel Teroson EP5055 structural adhesive.jpg
    204.5 KB · Views: 521
  • 20171222_233529 spotwelds and black epoxy glue in doorjamb to A-pillar.jpg
    20171222_233529 spotwelds and black epoxy glue in doorjamb to A-pillar.jpg
    141.9 KB · Views: 503
  • 20171223_003550 notice the brown Europax spotweldprimer along the wheel arch curve.jpg
    20171223_003550 notice the brown Europax spotweldprimer along the wheel arch curve.jpg
    197.5 KB · Views: 510
  • 20171223_003613 B-pillar; spotwelds along the bottom and black epoxy glue along the egde.jpg
    20171223_003613 B-pillar; spotwelds along the bottom and black epoxy glue along the egde.jpg
    147.5 KB · Views: 500
  • 20171223_005017 - kept original spot weld pattern door jamb-looking to A-pillar.jpg
    20171223_005017 - kept original spot weld pattern door jamb-looking to A-pillar.jpg
    147.8 KB · Views: 526
  • 20171223_005251 almost done, needs few MIG plug welds to replace the 2 cleco's.jpg
    20171223_005251 almost done, needs few MIG plug welds to replace the 2 cleco's.jpg
    196.8 KB · Views: 555

eriknetherlands

Moderator
Site Donor
Messages
2,696
Reaction score
1,927
Location
Netherlands, Eindhoven area
Good question Barry,
Indeed I get torn between wanting to drive and wanting to finish it to the best of my ability. Thing is; I enjoy to do things thoroughly, I'm just a precise guy. Some of it is coming from, well to be honest, fear. Fear that I mess something up and it starts rusting a week later. Or that my doors won't fit anymore. So I may go over the top sometimes. If it truly holds up to the next generation, than I'd be happy (there is zero intention to ever sell). I've enjoyed bicycles and mopeds when I was 16, but I've never done these type of things before.
I've always have been curious about technical stuff & wanting to learn how to do new things. Technical by education, but nowadays my day job involves too much desks, coffee, contracts and talking. So I bought a MIG device, a sandblasting cabinet, compressor, a small car lift and lately a heavy guage spot welder. Played around with the epoxy glue. Have just purchased stuff to lead load weld joints. Taking a course to learn to use a lathe & milling machine. Contemplating if I should outsource the painting or do it myself once it is done (if ever). (a 10K euro paintjob is beyond my budget; what other options exist?)
But indeed, I do miss the driving..... If I had a two car garage, there would definitely be rough 2002 touring or so.
 
Last edited:

dang

Administrator
Site Donor
Messages
4,247
Reaction score
3,262
Location
Rocklin, CA
This is one of the best documented restorations we've had on this site. Keep up the amazing work Erik!
 

StephenZ

Well-Known Member
Site Donor
Messages
317
Reaction score
125
Location
Cumming, GA
Very cool! I hear you about wanting to have more space. I did an old 1600 years ago and loved the process of completely tearing it down and redoing it. I say do the paint yourself. I've done a handful myself and I'm self taught (lots of questions asked and videos watched) and it's very rewarding to do it yourself and saves a TON of money. Prep is everything....the actual shooting isn't rocket science. It takes practice to get a nice finish, but not anything magical. Good luck!
The 1600 I shot in a tent at my first home...thankful there was no HOA there. The jeep I did at my new house and had to keep it hidden, but luckily I have a three car garage here...:) Pretty decent outcome and no formal painting education. go for it!
IMG_1064.jpg
IMG_6034 2.jpg
 

eriknetherlands

Moderator
Site Donor
Messages
2,696
Reaction score
1,927
Location
Netherlands, Eindhoven area
Having fixed the structural bits of the sill and floor on the right side, I have moved to the left side of the car.
I started by cutting the rear quarter panel, outer sill, front fender and A and B pillars.

Anyone ever wonder if why rust coloured rockers don't hold up to the forces when lifting the body with it?
Eventhough they are still solid enough not to poke a screwdriver through them ?

Well this is how rust slowly eats the metal; layer by layer. And what is left after 45+ years is paper thin metal that you can roll like a sardine can with a pair of pliers.
The pic shows the bottom seam of the left sill. You can just make out the rear left jack point on the right in the image.
 

Attachments

  • 20180121_232138 No need to drill out spot welds, just roll the outer sill.jpg
    20180121_232138 No need to drill out spot welds, just roll the outer sill.jpg
    239.4 KB · Views: 629
Last edited:

eriknetherlands

Moderator
Site Donor
Messages
2,696
Reaction score
1,927
Location
Netherlands, Eindhoven area
Just some pics of the progress on the left side of the car. I'm not going to cover it in as much detail as before, as it is generally same as the other side that is already done. The condition is more or less similar as to the right side.
Rust damage is confined to the lower A pillar, floor pans, rear wheel arch and subframe mounting points. The Lower B-pillar and frame rails are solid, as are the tunnel and seat frame supports.

The outer structural sill was replaced once before, but it had to be cut up to provide access. When they (PO) replaced it however, the intermediate sill was roughly ground clean, but only treated with wax. In some places I could still see shiny metal....but near the corners where it was in contact with water it was rusted through: holes large enough to put your finger through it. So I purchased new intermediate & outer sills from Walloth&Nesch, and also the new outer skin patch panels for front and rear wheel arch.

So most of the time I spend to rebuild the parts that I am not purchasing: the Lower A-pillar, the rear wheel arch and the rear subframe mounts. And there are also some smaller parts such as the connection pieces that link the front fender to the A-pillar (in the door jamb) and the rear wing to the B-pillar, in the door opening at the lock side.

1. First pic shows a section of the old intermediate sill positioned over the new one; its front bit is completely gone. Trial fiting the new sill to make sure it sits where it needs to sit. Notice that the intermediate sill has been modified to eliminate the little 'nose' that normall peeks out from under the lower A-pillar to prevent water entry. The floor, the inner sill and the little box that used to be there also need to be fixed later on....
2+3. Second and third pic show the lower B-pillar and last bit of the rear outer wheel well corner. The B-pillar was just sand blasted, it was perfectly fine apart from some surface rust. The wheel well corner was patched before, but rusted out a second time.....
Pic 4-5-6 show the panel that will replace the wheel well corner. As it is a complex 3D shape, I frequently need to check the shape of the original part (what's left of it) and trial fit the new panel inside the other panels where it needs to sit. Last picture (6) includes the outer skin, as that makes the location and shape a bit more recognisable.
It'll take me roughly 4 hours to shape just this one part to a level that I'm happy with it.
 

Attachments

  • 20180402 Front left A pillar Intermediate sill replacement.jpg
    20180402 Front left A pillar Intermediate sill replacement.jpg
    245.5 KB · Views: 477
  • 20180404_213916 New intermediate sill and cleaned Lower B-pillar.jpg
    20180404_213916 New intermediate sill and cleaned Lower B-pillar.jpg
    336.7 KB · Views: 454
  • 20180404_214003, ready to recreate rear wheel arch part, behind the black drain hose.jpg
    20180404_214003, ready to recreate rear wheel arch part, behind the black drain hose.jpg
    296.2 KB · Views: 437
  • 20180409_211142 fabrication of new rear wheel arch part.jpg
    20180409_211142 fabrication of new rear wheel arch part.jpg
    201.2 KB · Views: 478
  • 20180409_221310 Rear wheel arch part - old rusted and patched before-two layers even.jpg
    20180409_221310 Rear wheel arch part - old rusted and patched before-two layers even.jpg
    321.3 KB · Views: 433
  • 20180410_091217 internal view of rear left wheel arch to Intermediate Sill.jpg
    20180410_091217 internal view of rear left wheel arch to Intermediate Sill.jpg
    249.9 KB · Views: 467
Last edited:

Stan

Well-Known Member
Site Donor $$
Messages
6,996
Reaction score
1,526
Location
Newmarket, New Hampshire
Eric, your tail light order is number 35. Likely you will be in the next batch I receive (whenever that is). Do you want conventional array; clear backup lenses and amber turn signals, French style-amber turn signal and amber back up lights, or first generation, red turn signal lens and clear backup lenses?
 

eriknetherlands

Moderator
Site Donor
Messages
2,696
Reaction score
1,927
Location
Netherlands, Eindhoven area
Hi Stan, thanks for the heads-up.
I just checked quickly.
I have amber turn signals and clear back up lenses, so I think that classifies it as conventional.

In the meantime I have sourced various second hand, pitted frames. It will be the first time I will outsource some chroming work.
Does anyone have hints what to ask for at a chroming company?
 

Attachments

  • IMG-20120218-00064- small.jpg
    IMG-20120218-00064- small.jpg
    265.1 KB · Views: 428

mulberryworks

Mr. Fixity
Site Donor
Messages
1,243
Reaction score
612
Location
Jacksonville FL
I'm heartened to see that you are able to do such quality work in a garage that's even smaller than time. I also have a one car garage without much space though I have a higher ceiling so I've managed to put a low rise lift in it.

Keep up the excellent work! It's very educational to follow along.

Ian
 

eriknetherlands

Moderator
Site Donor
Messages
2,696
Reaction score
1,927
Location
Netherlands, Eindhoven area
One of the downsides is that there is hardly any room for the larger tools like blasting cabinet, bead roller and belt sander. To get the most out of the space, I only have these tools in versions that I can manhandle on the workbench. They all normally reside under the workbench, one into the other or stacked on top of each other. Quite a bit of time is spend moving stuff around, just to get that one tool on the workbench that I need that particular moment.

And just yesterday I borrowed a brake press to build some stuff. I'd be happy to buy one, but it's the space that limits, not my willingness to say goodbye to ~200 euro's. I put it to good use:
- the small box thing with no appearent function that is under the left front floor corner. And usually traps a lot of dirt. It was used during fabrication as a pick up point to haul the body through the Karmann factory; that's why they are there. I will be gluing it in place to avoid welding it to the floor. I hope it'll keep my rust proofing paint layers more intact.
- and a self invented jacking point reinforcement on the inside of the intermediate sill. Not that I ever will lift them by these points, but in the next 45 years someone might...
- and some pics of the rear wheel arch fabrication. I'll be building it from two parts to make the shaping much less complex. Making it from one steel piece it too difficult with my tools at hand. So it will be welded together, ground and zinc coated to make sure the weld seams don't rust.
 

Attachments

  • 20180411_224409 under left front floor factory pickup point.jpg
    20180411_224409 under left front floor factory pickup point.jpg
    130.5 KB · Views: 395
  • 20180411_220917_intermediate sill front jacking point reinforcement.jpg
    20180411_220917_intermediate sill front jacking point reinforcement.jpg
    250.6 KB · Views: 414
  • 20180411_220834 intermediate sill jacking point reinforcement.jpg
    20180411_220834 intermediate sill jacking point reinforcement.jpg
    214.7 KB · Views: 422
  • IMG-20180402-WA0003_resized.jpeg
    IMG-20180402-WA0003_resized.jpeg
    191.5 KB · Views: 417
  • 20180410_215148_resized.jpg
    20180410_215148_resized.jpg
    314.2 KB · Views: 425
  • 20180411_111211_resized.jpg
    20180411_111211_resized.jpg
    360.3 KB · Views: 391
  • 20180411_111241_resized.jpg
    20180411_111241_resized.jpg
    371.3 KB · Views: 389
Last edited:

eriknetherlands

Moderator
Site Donor
Messages
2,696
Reaction score
1,927
Location
Netherlands, Eindhoven area
I really need to update you guys....April since last post here.
But I progressing nevertheless!

Working on left sill, rear sub frame mount & and floor sections.
- replaced front bit of inner sill left side
- gently (slowly) welded to avoid distortion
- corner of sill to rear left wheel arch
- prior to removing the joint from inner sill to rear wheel arch, I welded in a tension device. After drilling out the spotwelds holding the sill to the rear wheel arch, they separated by about 3 mm. It was clearly visible, as the alignment hole made by (and for) the Cleco did not lineup anymore. I needed to get the sill and arch to line up again prior to welding in a new sill end section. fro this used tensioned the thread thingy.
- removed, cleaned and zinc-ed the belt anchor plate. some rust was between the panels.
- sill end patch made, zinc-ed as well. Note it has a flange extending (following) the wheel arch. This provides an extra stiff brace for the rearinforcement that is welded later on here holding the large rear subframe bolt.
- fixed the inner left wheel arch. This is the bottom part that takes quite a beating from the road debris. Also it has some nasty (water trapping) joint lines.
- finaly the sill and wheel well all welded up.

Next up are the other bits that hold the rear axle reinforcement & rear floor sections
 

Attachments

  • 20180426_215609.jpg
    20180426_215609.jpg
    209.7 KB · Views: 321
  • 20180428_205541.jpg
    20180428_205541.jpg
    241.8 KB · Views: 301
  • 20180501_222350.jpg
    20180501_222350.jpg
    295.7 KB · Views: 302
  • 20180615_122617.jpg
    20180615_122617.jpg
    218.9 KB · Views: 317
  • 20180615_131309.jpg
    20180615_131309.jpg
    133.5 KB · Views: 307
  • 20181012_131440.jpg
    20181012_131440.jpg
    221.9 KB · Views: 300
  • 20181012_224501.jpg
    20181012_224501.jpg
    190 KB · Views: 301
  • 20181011_155754.jpg
    20181011_155754.jpg
    188.6 KB · Views: 318
  • 20181012_224753.jpg
    20181012_224753.jpg
    192.5 KB · Views: 314

eriknetherlands

Moderator
Site Donor
Messages
2,696
Reaction score
1,927
Location
Netherlands, Eindhoven area
In previous post you may have already spotted some very fresh looking parts; I have choosen to zinc treat all that I could.
Creates some good shiny pictures.

Big advantage is that you can spot weld zinc treated metal, having an (extra) corrosion resistance inside seams. Second rust barrier is the Europax weld primer (smells like asphalt..)
 

Attachments

  • 20180525_132130.jpg
    20180525_132130.jpg
    485.5 KB · Views: 294
  • 20180525_132213.jpg
    20180525_132213.jpg
    397.7 KB · Views: 302
  • 20180525_132231.jpg
    20180525_132231.jpg
    339.9 KB · Views: 288
  • 20180525_132234.jpg
    20180525_132234.jpg
    219.3 KB · Views: 288
  • 20180525_132243.jpg
    20180525_132243.jpg
    397.5 KB · Views: 283
  • 20180525_211528.jpg
    20180525_211528.jpg
    340.3 KB · Views: 271
  • 20180525_212140.jpg
    20180525_212140.jpg
    275.7 KB · Views: 286
  • 20180525_212159.jpg
    20180525_212159.jpg
    266.4 KB · Views: 290

eriknetherlands

Moderator
Site Donor
Messages
2,696
Reaction score
1,927
Location
Netherlands, Eindhoven area
- chopped out the rear floor.
- prepped welding area for new panel
- newly made cable harness tabs
- spot welded the cable harness tabs + fake spot welds made on the visible (interior) side of the floor. The actual welding was made from inside the sill with plug welds for strength.
- the W&N floor isn't perfect; quite some lines don't match so some shaping is needed. Where the floor meets the tunnel there are 2 ridges marked by the black line; front and rear. I choose to reshape the tunnel side.
- this was the best possible fit (left side, under the rear seat)
- line fixed by shaping the tunnel.
- and left rear floor tacked in place
 

Attachments

  • 20180623_221142.jpg
    20180623_221142.jpg
    297.1 KB · Views: 288
  • 20180623_221201.jpg
    20180623_221201.jpg
    218.3 KB · Views: 295
  • 20180615_125333.jpg
    20180615_125333.jpg
    281.3 KB · Views: 292
  • 20180615_125734.jpg
    20180615_125734.jpg
    227.6 KB · Views: 292
  • 20180324_224457.jpg
    20180324_224457.jpg
    196.7 KB · Views: 346
  • 20180324_224529.jpg
    20180324_224529.jpg
    231.1 KB · Views: 319
  • 20180623_211208.jpg
    20180623_211208.jpg
    229.7 KB · Views: 276
  • 20180623_233725.jpg
    20180623_233725.jpg
    274.5 KB · Views: 313
Last edited:

autokunst

Well-Known Member
Site Donor $$
Messages
3,605
Reaction score
2,618
Location
Milwaukee, WI
Hi Erik,
I love your updates, and especially how you explain what you did and why you did it that way. Always a learning experience and an inspiration!
Say, how well does new primer and paint stick to the plated parts? I know there are at least some situations where it is very difficult to get paint to stick to zinc based coatings.
Keep up the great work!
 

eriknetherlands

Moderator
Site Donor
Messages
2,696
Reaction score
1,927
Location
Netherlands, Eindhoven area
Thanks for the moral support. It sure helps.

I give the zinc a light rub with one of these 3m scotch brite pads. It gives just a little structure for the paint to mechanically lock into. Then oil free compressed air, and finally a wipe with specific pre-paint -no brain dissolver grade- degreaser.
 

Gransin

Well-Known Member
Site Donor
Messages
1,528
Reaction score
1,271
Location
Vasa, Finland
It's been said before, but your attention to detail is just so wonderful to see, really nice work Erik!
 

Willem Tell

Well-Known Member
Site Donor $
Messages
340
Reaction score
315
Location
Zug, Switzerland
Eric, I just read your blog from start to finish... unbelievable work and attention to detail, great problem-solving, etc... Just remarkable!
 
Top