Getting this 3.0CSi back on the road

Gransin

Well-Known Member
Site Donor
Messages
1,529
Reaction score
1,272
Location
Vasa, Finland
This is looking great. After you get the wiring done everything else will seem easy in comparison.

Have you considered adding a third relay for the low-beam headlights while you have the wiring all apart? This is a great safety upgrade and makes for stronger lighting.

Thank you! Still a bit worried about the interior and especially the dash, everything needs to be redone but hopefully it will all fit back where it belongs. I was at the beginning of the project planning to leave the dash and interior as-is, and take on that later after being able to drive the car for a while, but it would be stupid not to do it while the windscreen is out.

About the third relay, this harness is actually from a -74 or newer US-spec 3.0CS from the beginning, as it had cables for carburetors and side markers tucked up under the old tape (now removed). So it actually had the third relay before.
The thing is that some previous owner had put 4xH4 headlights on the car which means that all four lights was lighted on low-beam and high-beam.
The result was that the low-beam relay + plastic socket had almost melted, and with our summers here in Finland (sun almost never sets) we figured that the car will not often be driven in dark conditions, so the third relay was left out of the harness. And for those who like orginality, this is how the car was delivered from the factory ;)

But thanks for your thought Sven!

Cheers,
 

Gransin

Well-Known Member
Site Donor
Messages
1,529
Reaction score
1,272
Location
Vasa, Finland
it looks very beautifully done, congratulations

i have only one question, why dont you first place the deadening/sound absorbing materials ?

regards

Thanks DeQ!

That's simply because I have not yet decided how to approach that, how much to put, where, and what kind/brand. I'm not aiming to get a really silent/smooth drive out of the car, I have my daily for that but I understand I will have to put something to not get that tin-can experience. Doors, under rear side window, roof, floor. Do any of you drive without sound-deadening on the firewall?

Input would be great!

Cheers,
 

Gransin

Well-Known Member
Site Donor
Messages
1,529
Reaction score
1,272
Location
Vasa, Finland
Like stated above, if anyone have any input about the sound-deadening, it would be great to hear your experiances. I know there are lots of others here who have restored e9:s.

There is not very much progress on the car right now as we're waiting for the weather to change and allow us to be outside and lift in the engine and tranny. I have also sent my wood to our member Bela22, and he is making good progress on the pieces and he is reveneering them in Zebra Wood, so I'm really waiting to see the finished result.
But it's always fun too see a couple of pictures in an update, so I can share a couple of pictures of some small stuff I've bought.

But first a pic before wood got dismantled and sent out to Hungary:

Screen Shot 2017-09-02 at 22.26.51.png


Managed to find new old H1 Bosch lights:

Screen Shot 2017-09-02 at 22.27.10.png


Screen Shot 2017-09-02 at 22.27.17.png


And bought some panels and grilles from Scott/rsporsche, big thanks to him!

Screen Shot 2017-09-02 at 22.27.24.png


Screen Shot 2017-09-02 at 22.27.35.png


And to match the new wood I also cleaned the insides of my gauges, turned out like new.

Screen Shot 2017-09-02 at 22.27.46.png


Screen Shot 2017-09-02 at 22.27.58.png
 
Last edited:

rsporsche

Moderator
Site Donor $$
Messages
10,676
Reaction score
3,700
Location
Atlanta, GA
Robert,

glad the panels and grilles made it without damage - i was worried about that
thanks
scott
 

Gransin

Well-Known Member
Site Donor
Messages
1,529
Reaction score
1,272
Location
Vasa, Finland
So after two and a half years the engine has found its way back into the car!

Started with installing new bolts for the flywheel, put on the new clutch and testfitted the gearbox to the engine before installing the engine in the car.

Screen Shot 2017-09-02 at 22.34.15.png


I also put on some heat-shielding on the body where the downpipes goes.

Screen Shot 2017-09-02 at 22.34.26.png


Did not get any pictures of the process of lifting in the engine as we where quite busy with doing just that, but overall it went in pretty well without any scrathes or mishaps. Anyway it's always a little (or much) nerv-wrecking to have the engine dangling over the nose of the car.

Here it is:

Screen Shot 2017-09-02 at 22.34.33.png


Screen Shot 2017-09-02 at 22.34.41.png


Screen Shot 2017-09-02 at 22.34.49.png


Then we pushed out the car while taking out the engine-lift from the garage, the weather was wonderful outside.

Screen Shot 2017-09-02 at 22.34.57.png


Screen Shot 2017-09-02 at 22.35.04.png


Then we continued with installing the gearbox, lucky us we testfitted the gearbox on the engine while the engine was still out of the car, because it didn't quite want to slip on there. But now the second time under the car it went almost too well, don't think it took us more than 5mins to crawl under the car, lift it and bolt it to the engine. After that we also installed the prop-shaft so now the whole driveline is installed! :)

Only pic I got from under the car:

Screen Shot 2017-09-02 at 22.35.13.png


And there it is, finally back in the car.

Screen Shot 2017-09-02 at 22.35.27.png


Screen Shot 2017-09-02 at 22.35.35.png


Screen Shot 2017-09-02 at 22.35.42.png


Cheers,
 
Last edited:

Gransin

Well-Known Member
Site Donor
Messages
1,529
Reaction score
1,272
Location
Vasa, Finland
There was a problem when trying to install the new W&N ss exhaust system, the downpipes pointed both too much downwards and to the passenger side of the car. We were sure that the flanges of the downpipe were wrongly welded onto the pipes, causing them to not fit. I contacted W&N and they were happy send out new ones to me, if I returned the old ones, even if it was almost 3 years since I bought it!

But, I got the new pipes a couple of days later and still, same problem. It was at that moment we realised that the manifolds I have probably aren't "the older model". Duh. They were on the car when I bought it and it had never even crossed my mind that they might not be stock e9.

So I contacted W&N again and admitted my mistake but they were very understanding and I didn't have to pay any shipping. That's great service!

How it looked with the "newer model manifolds" and downpipes, as you can see, not even close.

Screen Shot 2017-09-02 at 22.39.11.png


1 706 277 was the partnumber on the ones that did not fit.

Screen Shot 2017-09-02 at 22.39.18.png


With a bit of luck we were able to find the correct manifolds not far from home.

Screen Shot 2017-09-02 at 22.39.30.png


1 250 603 is the number on the correct ones, sandblasted them before new paint and new bolts.

Screen Shot 2017-09-02 at 22.39.40.png


Here you can see the difference between them.
277 on the left and 603 on the right

Screen Shot 2017-09-02 at 22.39.53.png


Screen Shot 2017-09-02 at 22.40.08.png


After that they got new heat-paint and new bolts.

Screen Shot 2017-09-02 at 22.40.28.png


That's better! And a big thanks to sfdon for steering me in the right direction when I was searching for manifolds that fitted correctly.

Screen Shot 2017-09-02 at 22.40.37.png


Screen Shot 2017-09-02 at 22.40.45.png


Screen Shot 2017-09-02 at 22.40.53.png


A couple of pictures of the progress in the engine compartment, the engine electrical harness is in place but still some questionmarks because it is an L-jet and not totally plug and play. Some previous owner really hacked it together when they swapped out the D-jet, but I think it will become a pretty clean and nice install once it's done.

Clutch and brake-lines are bleeded and is functional and shows no leakage.
Also got the hub to crankshaft nut tightened to 440Nm so that we can continue to fit the fan and radiator.

Screen Shot 2017-09-02 at 22.41.08.png


Screen Shot 2017-09-02 at 22.41.17.png


Screen Shot 2017-09-02 at 22.41.27.png


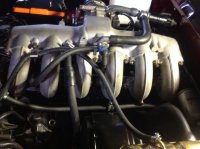
603 manifolds in place:

Screen Shot 2017-09-02 at 22.41.37.png


I've actually never used a torque wrench for tightening hub to crankshaft nuts before, as not many have such wrenches lying around that are able to torque over 400Nm, so I've just been using the technique; "tighten them as much as possible and then a bit more." And that has been working so far, but had the chance of borrowing a really big one this time so why not!

Had to pull quite hard to achieve 440Nm even if the wrench is that long.

Screen Shot 2017-09-02 at 22.41.45.png


Gear stick in place and feels nice and firm with new bushings.

Screen Shot 2017-09-02 at 22.41.52.png


I've also got a picture of the new wood from Bela, I don't think I could be more happy with the result, I sent him a couple of pictures and had a discussion with him about of how I wanted it to look, and he really hit spot on! Can't wait for them to get home so I can see them IRL.

But first, this is how it looked when I shipped the wood to him:

Screen Shot 2017-09-02 at 22.42.00.png


And after a couple of weeks in Belas hands:

Screen Shot 2017-09-02 at 22.42.11.png


Cheers,
 
Last edited:

Gransin

Well-Known Member
Site Donor
Messages
1,529
Reaction score
1,272
Location
Vasa, Finland
Thank you all!

Today was a big milestone in this project, we were able to start the engine for the first time, and also take the car for a short test drive! And everything seems to work as it should. :)

Here is a video:

Screen Shot 2017-09-02 at 22.49.15.png


Cheers,
 
Last edited:

Philippe db

Well-Known Member
Messages
726
Reaction score
205
Location
Belgium
Not simply a car but a work of art.

I hope that soon you'll enjoy the final result of all this hard work.

Big congrats on what you already accomplished.
 

Gransin

Well-Known Member
Site Donor
Messages
1,529
Reaction score
1,272
Location
Vasa, Finland
Thanks to both of you!

There has been some steps forward, the L-jet airbox has found its way in there, but the box is not painted yet. Other than that we have testfitted almost everything (still some parts to testfit but they have not yet arrived) before the car goes to the paint-shop. The car should be painted in June or July so really looking forward to that!

A couple of shots of the engine bay:

Screen Shot 2017-09-02 at 22.50.37.png


Screen Shot 2017-09-02 at 22.50.45.png


Today we started with moving my car to another garage closer to the paint-shop where it will just sit and wait for the painter to call and say it's time for paint. And it will also sit in that garage after paint until september-october just to let the paint cure before we will start to assemble the car over the next winter.

On the trailer:

Screen Shot 2017-09-02 at 22.50.53.png


Screen Shot 2017-09-02 at 22.51.03.png


The reason why it can't stay in my fathers garage over the summer is because after we had moved my car earlier today, he went and got his own vintage BMW:smile:
He's been searching for a project 02 for a longer period, but they are usually so rusty and in bad shape. And then there are the more expensive ones that are restored at some point, but still not restored correctly. More like restored just to keep them on the road a couple of years longer.
But then all of a sudden there was a very non-descriptive ad for a 1600-2 -1967 up for sale locally, we went and looked at it, and it was in an unbelieveable condition with full documentation since new! So my father knew this was the car he had to have and today he got it home, here are some pics:

Screen Shot 2017-09-02 at 22.51.11.png


Screen Shot 2017-09-02 at 22.51.21.png


Screen Shot 2017-09-02 at 22.51.30.png


Screen Shot 2017-09-02 at 22.51.36.png


Screen Shot 2017-09-02 at 22.51.43.png


Screen Shot 2017-09-02 at 22.51.50.png


Screen Shot 2017-09-02 at 22.51.57.png


Screen Shot 2017-09-02 at 22.52.03.png


Screen Shot 2017-09-02 at 22.52.09.png


Screen Shot 2017-09-02 at 22.52.21.png


Screen Shot 2017-09-02 at 22.52.32.png


Screen Shot 2017-09-02 at 22.52.39.png


And as a bonus, the guy who sold the 1600-2 also had a nice 3.0CS in his garage, and a restored MG MGB:

Screen Shot 2017-09-02 at 22.52.49.png


Screen Shot 2017-09-02 at 22.52.57.png


Cheers,
 
Last edited:

sfdon

Well-Known Member
Site Donor
Site Donor $$
Messages
8,232
Reaction score
4,575
Location
sfbay area
Do you need a cap for your brake reservoir? One with electrical contacts.
And a water hose from radiator to expansion tank with metal holding clip
 

Attachments

  • image.jpg
    image.jpg
    31.8 KB · Views: 262

Gransin

Well-Known Member
Site Donor
Messages
1,529
Reaction score
1,272
Location
Vasa, Finland
Thanks Don! And sharp eyes you have ;)

We decided to delete the brakefluid warning, this car will after all be babied and checking the fluid level will always be on the checklist.

The thing about the hose holding clip is that my intake is from an e12, and doesn't have the threaded hole for the bolt that holds the clip. We could drill and tap as the intakes are casted the same way, but those are smaller things I can refine over our long winters later when the car is in running condition.

But thanks for pointing out, I appreciate that, there are soo many details that are easy to miss! And if you have a holding clip for sale, I'll gladly buy it from you so I have it available later when I need it!

Cheers,
 

Gransin

Well-Known Member
Site Donor
Messages
1,529
Reaction score
1,272
Location
Vasa, Finland
So the summer went by, and no actual progress on the car itself. But I've not just been sitting around.
I have been searching for and buying alot of parts, all new rubber/gaskets for the car (still missing some odd rubbers that seems to be NLA). All new glass. I've almost been able to get every part for the dash, everything needed to be replaced.. Still searching for a grabrail in very good condition. New headliner, some new chrome trim, paid up for a pair of near perfect taillights, csl-style front airdam and alot of other small parts.

I have been waiting for the paintshop to have the time to paint my car since May, and finally it was transported there about a week ago! It will take a while for them to finish it because they can't go 100% on a big project like this.

Not working on the car left me with some extra spare time and since me and my girlfriend just bought our own house, I decided it was time to build a garage so I have a place to keep the car at when it is finished, and room for some new projects over time. Not sure if anyone is interested but I can share some pictures of that because an update without any pictures is boring.

Nice barn, but to make room for the garage it had to go.

Screen Shot 2017-09-02 at 22.56.49.png


Screen Shot 2017-09-02 at 22.57.02.png


Screen Shot 2017-09-02 at 22.57.10.png


With the barn gone it was time to start digging.

Screen Shot 2017-09-02 at 22.57.19.png


Screen Shot 2017-09-02 at 22.57.26.png


Screen Shot 2017-09-02 at 22.57.33.png


Screen Shot 2017-09-02 at 22.57.56.png


Screen Shot 2017-09-02 at 22.58.58.png


Screen Shot 2017-09-02 at 22.59.09.png


Screen Shot 2017-09-02 at 22.59.16.png


Putting out the form for the slab.

Screen Shot 2017-09-02 at 22.59.23.png


Form complete.

Screen Shot 2017-09-02 at 22.59.31.png


Then put plastic and rebar into the form.

Screen Shot 2017-09-02 at 22.59.38.png


Time for some concrete work.

Screen Shot 2017-09-02 at 22.59.46.png


And done.

Screen Shot 2017-09-02 at 22.59.52.png
 
Last edited:

Gransin

Well-Known Member
Site Donor
Messages
1,529
Reaction score
1,272
Location
Vasa, Finland
Just noticed that this new forum format only allows for 20pics/post so here is the rest:


Forms removed.

Screen Shot 2017-09-02 at 23.03.42.png


And then I started building the "base", not sure if that is the correct word for it.

Screen Shot 2017-09-02 at 23.03.52.png


Screen Shot 2017-09-02 at 23.04.01.png


Screen Shot 2017-09-02 at 23.04.11.png


Completed.

Screen Shot 2017-09-02 at 23.04.18.png


Then time for some insulation and filling around the foundation.

Screen Shot 2017-09-02 at 23.04.26.png


Screen Shot 2017-09-02 at 23.04.36.png


Screen Shot 2017-09-02 at 23.04.46.png


Screen Shot 2017-09-02 at 23.04.57.png


Then I hired two cunstruction guys to come and put up walls and roof, they built it on site and took them 36hours/each to do it. Damn they work fast.

Screen Shot 2017-09-02 at 23.05.05.png


Screen Shot 2017-09-02 at 23.05.14.png


Screen Shot 2017-09-02 at 23.05.23.png


Screen Shot 2017-09-02 at 23.05.30.png


Screen Shot 2017-09-02 at 23.05.37.png


And this is where I'm at now, waiting for the roof panels to show up.

Screen Shot 2017-09-02 at 23.05.47.png


This is what it will look like later, not exactly, but this was the original plan.
1070sqft and 10ft ceiling height, will allow me to put in a small two pillar lift, have been thinking about the maxjax but we'll see.

Screen Shot 2017-09-02 at 23.05.54.png


Evidence that the car has been moved to the paint shop:

Screen Shot 2017-09-02 at 23.06.03.png


That's all for now!

Cheers,
 
Last edited:
Top