My 1974 Inka S38B35 project

x_atlas0

Well-Known Member
Messages
1,796
Reaction score
137
Location
Clarkston, MI
The original intake manifold can fit if you switch to a 2002tii brake booster, as it has a smaller diameter. At least, that's what aaerach did and it seemed to fit. You could also adjust the engine angle a bit.
 

xjan99

Well-Known Member
Messages
138
Reaction score
195
Location
Estonia, EU
The original intake manifold can fit if you switch to a 2002tii brake booster, as it has a smaller diameter. At least, that's what aaerach did and it seemed to fit. You could also adjust the engine angle a bit.
Yeah, I have read about that option, but many also say they do not like the brake feel with the 2002tii booster. So we are going a bit different route there.
 

x_atlas0

Well-Known Member
Messages
1,796
Reaction score
137
Location
Clarkston, MI
Yeah, I have read about that option, but many also say they do not like the brake feel with the 2002tii booster. So we are going a bit different route there.
Really? I haven't heard about that before. I've been driving it with the tii booster for ~15 years, but I never drove it with the original booster in place. Brake engagement is good, bite point is high, and pressure can be modulated well, but it does require a bit more stroke.
 

xjan99

Well-Known Member
Messages
138
Reaction score
195
Location
Estonia, EU
Progress update for January..

A lot of time was spent fabricating the tilt-slide mechanisms for the front seats. I must check the head-room now and see if it is satisfactory or should we redesign the original seat attacments to lower the seating position.
IMG_20230117_093930.jpg


IMG_20230117_095831.jpg


IMG_20230120_140643.jpg


And adding-testing more parts under the hood. The S38 coolant radiator works well ofcourse with the right hoses.
IMG_20230124_074533.jpg


IMG_20230124_104450.jpg


IMG_20230124_104503.jpg


Next up was testing the drive shaft. It does not fit as needed, so it was cleaned and sent off to a speciality shop to be lengthened ca. 30mm and also balanced.
IMG_20230124_141234.jpg


IMG_20230124_141258.jpg


IMG_20230124_152907.jpg


Looking at the steering rack pump brackets on M30 and S38, we decided to go with the S38 bracket and ordered a M5 steering pump
IMG_20230125_133217.jpg


Next up, the new sill covers were tested and made to fit perfect.
IMG_20230126_111957.jpg


And new mirrors attached:

IMG_20230126_141459.jpg


IMG_20230126_143824.jpg


We also set the car on wheels. Although on some lowering springs it sits way higher than I like so most probably we will order coilovers from Germany. But... ain't it a beauty already :)?
IMG_20230130_140548.jpg


Most of the work on the body is done, so we are going to move along to refurbishing the axle parts etc soon. New bushings, brake calipers, etc all ordered.

We also have an idea to develop a more contemporary AC solution which would work with the regular heater box ;)
 

day66

Well-Known Member
Messages
247
Reaction score
227
Location
Manchester, UK
Great progress and interesting to see the bumper/spoiler set up - I was thinking of something very similar for mine, so it's great to see how it looks in the metal.
 

Candia4441

Well-Known Member
Site Donor $
Site Donor $$
Messages
911
Reaction score
310
Location
California
Great progress and interesting to see the bumper/spoiler set up - I was thinking of something very similar for mine, so it's great to see how it looks in the metal.
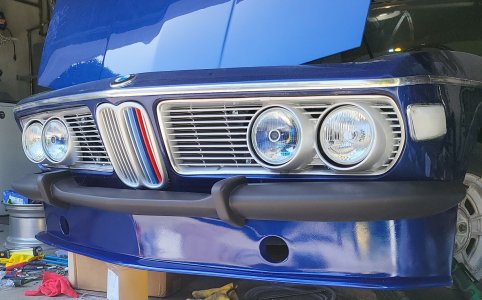
Hello, If you want to use a bumper I think you should buy a fiberglass bumper from "Alberto" it is very light and you can paint any color you want, I did the same check the picture
 

Attachments

  • 20220503_154105.jpg
    20220503_154105.jpg
    395.7 KB · Views: 95

xjan99

Well-Known Member
Messages
138
Reaction score
195
Location
Estonia, EU
My first thought was also to use a fiberglass one, easier to modify. But the strength of the sturdy metal bumper is something else in case of...
 

xjan99

Well-Known Member
Messages
138
Reaction score
195
Location
Estonia, EU
Update for work done in February, total hours spent so far: 1344h

A lot of parts arrived from W&N again, mostly related to axels.
IMG_20230223_142133.jpg


IMG_20230223_142242.jpg


And also camber/toe kits from Ireland Engineering:
IMG_20230223_142402.jpg


which we installed together with reinforcing the subframe too:
IMG_20230228_154638.jpg


Ready for paint:
IMG_20230302_141047.jpg


These got dismantled and
IMG_20230301_074708.jpg


cleaned
IMG_20230301_085753.jpg


IMG_20230301_133249.jpg


Next, we opened up and drained the diff
IMG_20230301_110708.jpg


Cleaned from the outside:
IMG_20230302_103412.jpg


And although we were happy to confirm, it is a 40% LSD, it is not usable and needs repairs...
IMG_20230302_151312.jpg


IMG_20230302_151319.jpg


IMG_20230302_151352.jpg
 

xjan99

Well-Known Member
Messages
138
Reaction score
195
Location
Estonia, EU
Update for March. 90h spent, mostly on drivetrain parts - refurb, coat, paint... not much to say, so just enjoy the process in the pics

IMG_20230306_082108.jpg


IMG_20230306_083415.jpg


IMG_20230306_095721.jpg


IMG_20230306_095728.jpg


IMG_20230306_112743.jpg


IMG_20230306_112754.jpg


IMG_20230306_131535.jpg


IMG_20230309_095903.jpg


IMG_20230309_111544.jpg


IMG_20230309_135211.jpg


IMG_20230310_074242.jpg


And we decided to reinforce these bits too, yes:
IMG_20230313_151244.jpg


IMG_20230313_152038.jpg


IMG_20230314_104330.jpg


IMG_20230314_104337.jpg


Driveshaft, with the new corrected length and fully refurbished parts ready for paint
IMG_20230315_064740.jpg


IMG_20230315_073912.jpg


IMG_20230315_073921.jpg


IMG_20230315_075431.jpg


IMG_20230316_092131.jpg


IMG_20230316_110807.jpg


IMG_20230316_114256.jpg


IMG_20230324_103501.jpg


IMG_20230324_105945.jpg


IMG_20230327_085116.jpg


But more interesting part is.... after testfitting the seats as-they-were, I was not happy about the sitting height. The CSL seats are very narrow too, so even with my skinny ass and 184cm (6'2"?), only a mere 1 cm (1/2 inch) between my head and the to-be headliner (yes, I also have a sunroof). We discussed different option and this is what we ended up with - a complete revision of the seat attachment that also provides more rigidity for the whole body. Passenger side to follow suite.

IMG_20230329_091547.jpg


IMG_20230329_145727.jpg


IMG_20230330_084331.jpg


IMG_20230330_142526.jpg


IMG_20230330_142553.jpg


IMG_20230330_142810.jpg


IMG_20230330_143250.jpg


IMG_20230330_143305.jpg
 

xjan99

Well-Known Member
Messages
138
Reaction score
195
Location
Estonia, EU
Moving on, here is what happened in April. Not much, with only 39h spent, but still...

So passenger side seat attachment was redone too, just like on the driver's side.
IMG_20230410_101252.jpg


IMG_20230417_100807.jpg


Then it was time to sort, clean and wire polish some bolts/nuts/washers, mainly related to axles.
IMG_20230424_085457.jpg


IMG_20230425_082531.jpg


IMG_20230425_101114.jpg


And by now, these are also freshly coated. This is a nut-and-bolt resto(mod) after all, you know :)
IMG_20230504_080634.jpg


Mailman delivered a package too. We 3D scanned, 3D printed a test part and sent the drawings off to China for CNC work. A new part was made there for the diff LSD unit. The old, the test piece and the new:
IMG_20230502_151403.jpg


IMG_20230502_151341.jpg


It fits!
IMG_20230502_151620.jpg


On to assemble the rear axle and LSD now. Front struts were sent off to Mr. Raab in Germany who will return a fresh set of KW coilovers in a few weeks.
 

xjan99

Well-Known Member
Messages
138
Reaction score
195
Location
Estonia, EU
Summer came and this meant I was too busy with other stuff to even write an update. Here is a quick overview of what was done in May and June. Total hours spent so far: 1600h. And if you are wondering on costs accumulated (car, engine, work and parts), it is way past 6 figures already some time ago...

On to assemble the differential:
IMG_20230508_083921.jpg


IMG_20230508_085041.jpg


IMG_20230508_140545.jpg


IMG_20230508_152339.jpg


And reassemble the rear axle:
IMG_20230509_100805.jpg


IMG_20230510_114738.jpg


IMG_20230510_114808.jpg


IMG_20230510_114825.jpg


IMG_20230510_114835.jpg


Next, the last bits of the body had to be tackled, the roof and sunroof frame had a lot of bondo, dents and rust...
IMG_20230601_143846.jpg


IMG_20230601_143907.jpg


IMG_20230609_084435.jpg


IMG_20230609_094701.jpg


IMG_20230609_111815.jpg


IMG_20230609_113347.jpg


IMG_20230615_141138.jpg


The foam they used between roof and sunroof frame is the main culprit, why these cars' roofs rust from inside out. Water gets trapped in the foam and result is a new roof skin is needed.
IMG_20230609_111851.jpg


And it was not perfectly straight (hence the bondo)
IMG_20230620_113213.jpg


Nor did the gaps satisfy us here also, so we remedied these
IMG_20230621_100548.jpg


IMG_20230621_103258.jpg


IMG_20230622_083111.jpg


IMG_20230622_102835.jpg


IMG_20230626_100529.jpg


IMG_20230626_134350.jpg


IMG_20230626_135357.jpg


And now the sunroof frame is fixed so it is glued back, no more nasty rust coming from the foam
IMG_20230627_112702.jpg


There was also a bit of work needed around the rear glass area
IMG_20230627_100414.jpg


IMG_20230627_111856.jpg


IMG_20230627_112718.jpg


And we also had to fill the parcel shelf speaker holes:
IMG_20230627_133847.jpg


IMG_20230628_113649.jpg


IMG_20230629_104704.jpg


IMG_20230629_112520.jpg


All in all, we can now say the metal work has ended, pretty much... 99% I think :), as there are still some fabrication work needed for air filter box, steering pump brackets etcetc

IMG_20230609_080746.jpg
 
Last edited:

xjan99

Well-Known Member
Messages
138
Reaction score
195
Location
Estonia, EU
A few slow months, but hopefully picking up speed again. Stuff done in the meantime is here:

First, we needed to customize the steering rack pump mounts
IMG_20230717_075720.jpg


IMG_20230717_085105.jpg


IMG_20230717_085141.jpg


IMG_20230717_104943.jpg


IMG_20230717_105008.jpg


IMG_20230717_105112.jpg


And as we are nearing completion on the body, we needed a new rig to be able to tip the car on the side too
IMG_20230720_094125.jpg


IMG_20230720_094448.jpg


IMG_20230720_094635.jpg


IMG_20230720_094836.jpg


Some more parts from W&N got sandblasted, primered and test-fitted too
IMG_20230727_102709.jpg


IMG_20230727_103351.jpg


New mounts underneath the car were made. Each and every corner we touch, we find rust so need to fabricate and repair to be "better than new":
IMG_20231113_085747.jpg


IMG_20231113_093202.jpg


IMG_20231114_094151.jpg


IMG_20231114_101838.jpg


IMG_20231114_101855.jpg


IMG_20231114_102344.jpg


IMG_20231114_150012.jpg


IMG_20231115_073431.jpg


And some reinforcements added too:
IMG_20231116_111131.jpg


IMG_20231116_111145.jpg


IMG_20231116_131532.jpg


Next up, engine removed and on to the new dolly
IMG_20231113_104151.jpg


IMG_20231115_135601.jpg


Next we still need some fabrication work done related to the body harness and AC (will be custom and all new) and also we will start with refinishing the underside and inside of the car until the paint shop is able to accommodate us.
 
Last edited:

x_atlas0

Well-Known Member
Messages
1,796
Reaction score
137
Location
Clarkston, MI
Yeah, I'd like to see more about that too. Is the evap core very small, or did you relocate some of the internals? I'm in the middle of doing something similar so it would be interesting to compare notes.
 

xjan99

Well-Known Member
Messages
138
Reaction score
195
Location
Estonia, EU
@AC questions - all in due time

In january, ~60h was spent cleaning and degreasing, then filling cavities with epoxy primer, a bit of filler/sanding too + covering the body shell with epoxy primer then. Doors, hood, trunk etc to follow and by that time these will be done, the main body shell has cured enough to tackle the next steps - seam sealing.

IMG_20240110_080436.jpg


IMG_20240110_083512.jpg


IMG_20240110_111300.jpg


IMG_20240110_135914.jpg


IMG_20240110_135923.jpg


IMG_20240110_135936.jpg


IMG_20240112_104553.jpg


IMG_20240112_104526.jpg


IMG_20240112_104540 (1).jpg


IMG_20240112_121601.jpg


IMG_20240112_121617.jpg


IMG_20240112_121636.jpg


IMG_20240112_121553.jpg


IMG_20240201_073140.jpg


IMG_20240201_073159.jpg
 
Last edited:
Top