Prep for 3.5 Megasquirt

Markos

Well-Known Member
Site Donor
Messages
13,369
Reaction score
7,502
Location
Seattle, WA
Wow that is perfect Sven! I was just speaking with someone about this earlier this morning. I was thinking of the same location. He recommended the frame rail right below the cold air opening on the nose. I liked your option because you could also use an S38 plug wire cover.

Where did you mount your driver? Did you use a quad spark? I'm thinking of using a Bosch 211 ignitor. It's pretty small and would probably fit well right underneath the coil. I don't think I'll have enough room to for COP's with the washer tank (which has an extra pump on it).


Edit: Also, what is that plug going into the upper timing cover? It looks custom.
 

Sven

Well-Known Member
Site Donor $
Messages
1,145
Reaction score
110
Location
Seattle
Quad spark is mounted under the air intake tube along with a few AC relays.

CAM position sensor installed into the upper timing cover for sequential fuel injection (as opposed to batch).
 

Markos

Well-Known Member
Site Donor
Messages
13,369
Reaction score
7,502
Location
Seattle, WA
Quad spark is mounted under the air intake tube along with a few AC relays.

CAM position sensor installed into the upper timing cover for sequential fuel injection (as opposed to batch).

Oooooooh. Now we are getting serious. I can't justify that for myself. Neither ECU (microsquirt or speeduino) that I'm considering will support it.
 

Belgiumbarry

Well-Known Member
Messages
1,618
Reaction score
1,116
Location
Belgium
Sven, we also wondered were to mount the coil pack.... yours is quite original as distributor "looking".
I assume they withstand the engine vibration .... but isn't this a hot spot on the exhaust side ??
 

Sven

Well-Known Member
Site Donor $
Messages
1,145
Reaction score
110
Location
Seattle
It is not that close to the exhaust. The shields help. The old distributor could handle the heat. The AC hoses are even closer to the exhaust. I think about the only place I would not mount it is on the inner fender wall on the exhaust side (unless you had it up high).
 

Peter Coomaraswamy

Well-Known Member
Site Donor $$
Messages
3,787
Reaction score
896
Location
Austin, TX
Hi Chris, can you post a picture of the tool, I have one that doesn't work well so I figured if you have the same style it may not help-BUT if you have a "proper" one, then by all means!
 

Peter Coomaraswamy

Well-Known Member
Site Donor $$
Messages
3,787
Reaction score
896
Location
Austin, TX
Hi Folks, need a little help. Has anyone installed the rear diff mount strengthening kit (2-piece) from Carl @ LJI and do you have any pictures? Carl was kind enough to text me some but they were a little unclear so if anyone has done this please send me any tips, pics, or information. With the help of a forum member I was able to get a 3.25 LSD from a CSL which I'll be loading in the old gal soon :)

Work on the beast is picking up so I'll have some more pictures soon-
Thanks
 

Sven

Well-Known Member
Site Donor $
Messages
1,145
Reaction score
110
Location
Seattle
Peter - I just happen to have a few photos of the diff reinforcement pieces. I am not sure if it helps. I did have to modify it quite a bit for it to fit (in this case a 74 CS).

IMG_0862.jpg
IMG_0863.jpg
IMG_0864.jpg
 

Peter Coomaraswamy

Well-Known Member
Site Donor $$
Messages
3,787
Reaction score
896
Location
Austin, TX
Also, has anyone used a purely electric cooling fan? I have precious little room now so any tried and true recommendations would be most appreciated!!
 

Peter Coomaraswamy

Well-Known Member
Site Donor $$
Messages
3,787
Reaction score
896
Location
Austin, TX
Sven, thanks, that's exactly what I needed, I know I'll have to fiddle with it a bit but at least I can see how everything is placed.

Peter
 

Peter Coomaraswamy

Well-Known Member
Site Donor $$
Messages
3,787
Reaction score
896
Location
Austin, TX
So, it kind of fits with the "Prep" for megasquirt in that I'm trying to accomplish two main tasks, first getting a significantly more powerful engine installed and at the same time adding some additional bracing to handle the power. Also rebuilding any components that were not done properly the first time. All this while watching Drew (our space-walking e9'r) do the first 6 hour repair on the ISS- Makes working on an e9 child's play! My welding is not pretty but I think it's strong enough so below is a picture of the differential brace from underneath.
brace1.JPG
 

Peter Coomaraswamy

Well-Known Member
Site Donor $$
Messages
3,787
Reaction score
896
Location
Austin, TX
Looking for a couple parts, I'll post in the parts section but as I'm going through this thing it may help to keep the project in one place as well. Please excuse my redundancy...

I need the chrome nut and washer for both sides of the cowl for the windshield wipers... AND the all important ducts that always break! :-(
parts1.JPG
parts2.JPG
 

Ohmess

I wanna DRIVE!
Site Donor $
Messages
4,833
Reaction score
2,639
Location
Aiken, SC
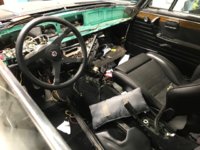
Hi Peter -- I changed my e39 over to an all electric fan about ten years ago, using a SPAL fan that runs off a coolant temperature switch. No problems, even with my driving, the V8 and the oppressive heat and humidity of the DC swamp area.

In addition, I changed that tiny little fan BMW put into the front of our cars to go with the a/c to a 14" SPAL fan. Because this fan is on the bumper side of the radiator, it needs to be a "pusher" fan. You need a puller fan for normal cooling on the engine side of the radiator.

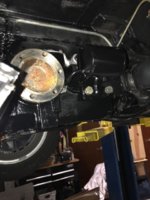
The supplemental pusher fan in my e9 that goes on whenever the a/c is on is also wired to an 85 degree Celcius switch that I installed into the bung in my radiator near the lower radiator hose. In theory, this switches on the supplemental fan in the event my engine gets to 85 degrees C and the a/c is not on. (I'm not sure I have ever actually needed this). If I remember correctly, you bought your radiator from Don at the same time I bought mine, and they both came from the same supplier. If I have this right, you could install a switch in that same location and use it to operate a puller fan as your main cooling fan. This would leave the supplemental fan to go on whenever your a/c is on, which is the normal operation of our cars. The circuit to run your main engine cooling fan like this is would be a very simple electric circuit, with a flying fuse behind the headlights like the circuit for the a/c fan and a relay that engages the fan whenever the switch in the radiator is engaged. You could either run switched power through the radiator switch, in which case the fan shuts off when the car shuts off, or run unswitched in which case the fan will continue to run even after you shut off the car until the coolant cools down. My SAAB used to do this and I thought it was rather neat that the car continued to cool itself down even after I shut it off. You might have to research whether 85 degress C is the right temperature; I know there is more than one BMW switch that fits in that location so there are a couple of different temperatures to choose from.
 

Peter Coomaraswamy

Well-Known Member
Site Donor $$
Messages
3,787
Reaction score
896
Location
Austin, TX
Funny how a small little project like a new engine and Mega squirt can grow into a total rebuild :-(

To catch up on this thread, I received my 3.25 LSD from the talented Chris Ohmes a couple weeks ago and it has been installed and the rear sub frame and all it's pieces are now in their place. I then removed the rear driver-side seat and will be doing what I can to speed up the window action along with refinishing the wood and tidying things up. I ran the battery cable from the trunk through the interior which is why I removed the rear pieces to begin with. because the trunk pieces were in excellent condition with the gray elephant skin I decided to make new pieces to allow for the battery relocation, so this is where I'm at;
 

Attachments

  • trunk1.jpg
    trunk1.jpg
    250.8 KB · Views: 174
  • trunk3.jpg
    trunk3.jpg
    212.1 KB · Views: 161
  • trunk4.jpg
    trunk4.jpg
    198.9 KB · Views: 168
  • trunk5.jpg
    trunk5.jpg
    201.8 KB · Views: 169
  • interior mess1.jpg
    interior mess1.jpg
    108.9 KB · Views: 203
  • csldiff2.jpg
    csldiff2.jpg
    64.2 KB · Views: 175
Top