Absolutely impressive!!! Well done incredible to watch this transform!
You are using an out of date browser. It may not display this or other websites correctly.
You should upgrade or use an alternative browser.
You should upgrade or use an alternative browser.
Swedish 1973 3.0 CS restoration
- Thread starter ellac
- Start date
-
- Tags
- restoration list
What an amazing transformation. You have a talent, and great courage. Results are inspiring! I wonder, when you are at work, sitting at that desk, do you find yourself making lists of what you need to pick up on the way home, for the evening shift in the garage?
Thanks for all the nice comments , greatly appriciated !
Im not a wizard with the computer so please excuse me on the comments.
@Barry.b : The E9 is by far the one with most rust and complex (stupid..) construction..
@Keshav & eriknetherland : The Petri steeringwheel was sold early in the restoration to help me finance all sheetmetal , as I wrote earlier my budget was /is not unlimited..
@bluecoupe30! : Cars and restorations are (unfortuntly?) allways on my mind , its good to go to sleep knowing that I made some sort of result in the garage.
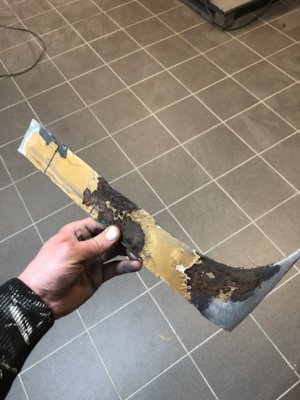
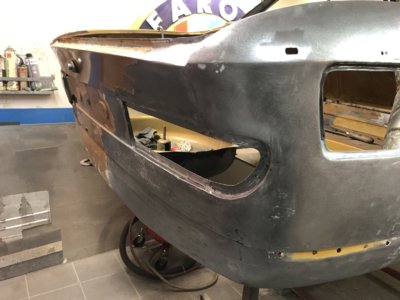
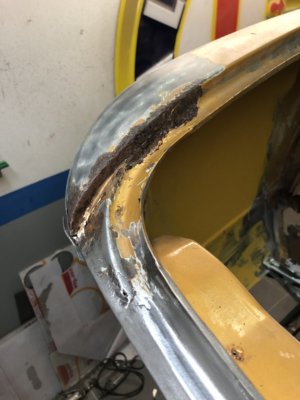
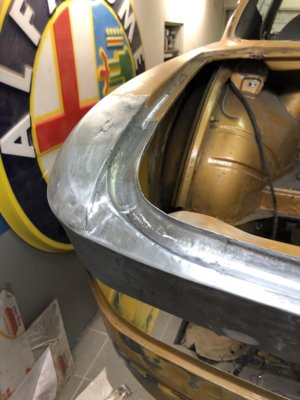
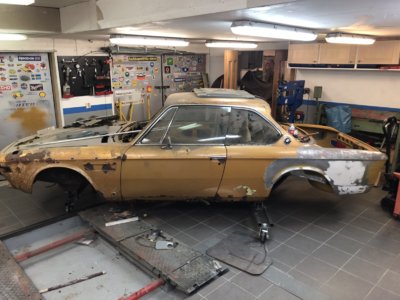
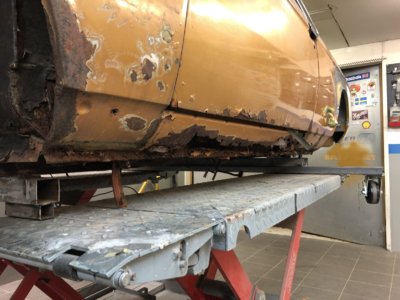
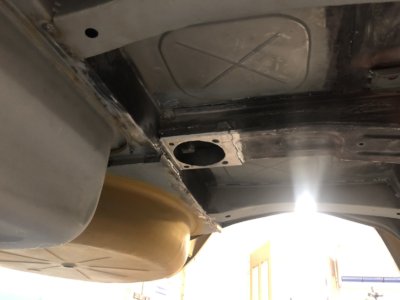
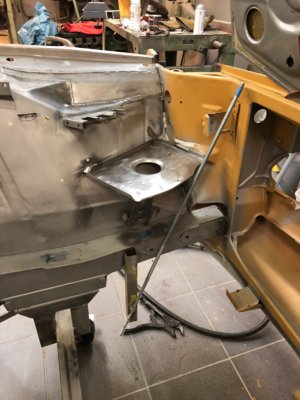
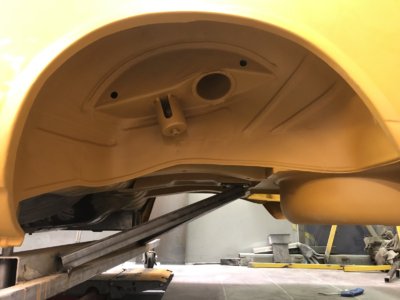
I continue with more pictures , not sure what to write really , rust rust rust..
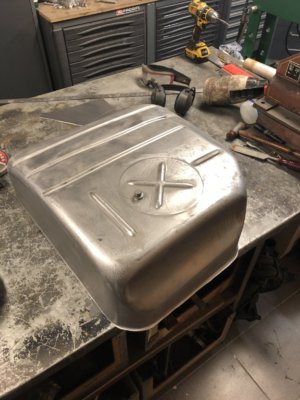
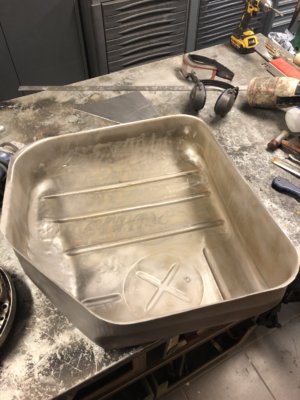
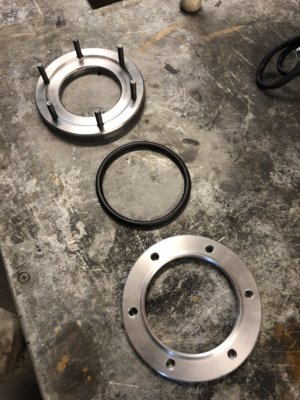
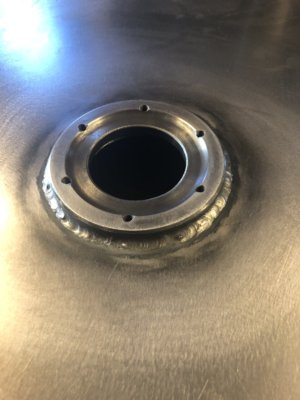
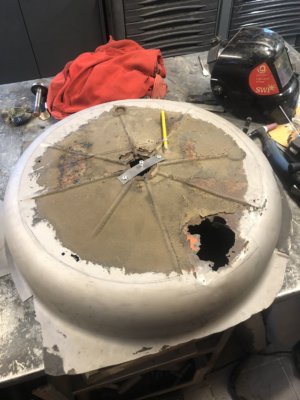
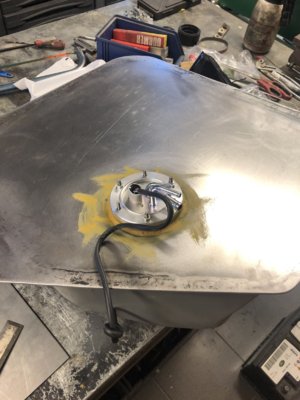
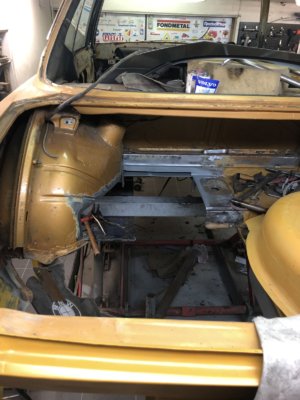
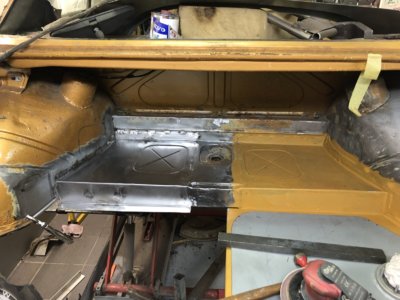
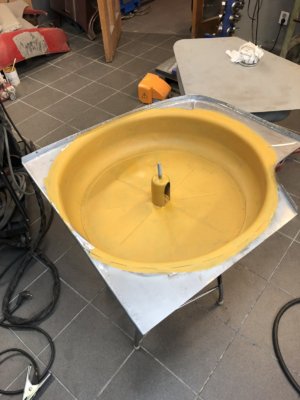
I try to salvage all that is possible , repaired the sparewheelwell (spelling?) and the fueltank . The fueltank was hevily modified and a aftermarket in-tank pump was added.
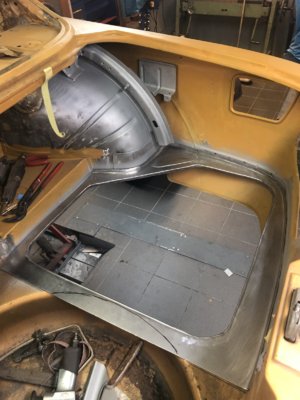
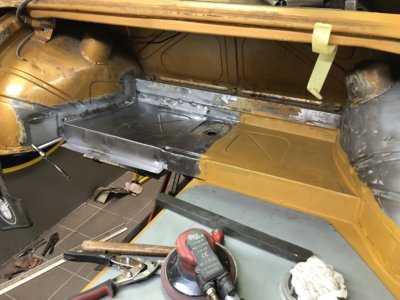
New floor in the boot .
I try to salvage all that is possible , repaired the sparewheelwell (spelling?) and the fueltank . The fueltank was hevily modified and a aftermarket in-tank pump was added.
New floor in the boot .
Attachments
-
 IMG_2290.JPG264.3 KB · Views: 556
 -
 IMG_2291.JPG233.9 KB · Views: 491
 -
 IMG_2292.JPG210.1 KB · Views: 592
 -
 IMG_2313.JPG228.4 KB · Views: 495
 -
 IMG_2314.JPG274 KB · Views: 446
 -
 IMG_2343.JPG239.3 KB · Views: 455
 -
 IMG_2368.JPG286.1 KB · Views: 447
 -
 IMG_2369.JPG255 KB · Views: 451
 -
 IMG_2370.JPG202.1 KB · Views: 446
 -
 IMG_2381.JPG233 KB · Views: 473
 -
 IMG_2397.JPG322.4 KB · Views: 479
 -
 IMG_2398.JPG303.8 KB · Views: 461
 -
 IMG_2431.JPG433.1 KB · Views: 479
 -
 IMG_2434.JPG242.4 KB · Views: 439
 -
 IMG_2903.JPG278.9 KB · Views: 475
 -
 IMG_2905.JPG286.9 KB · Views: 428
 -
 IMG_2964.JPG298.5 KB · Views: 440
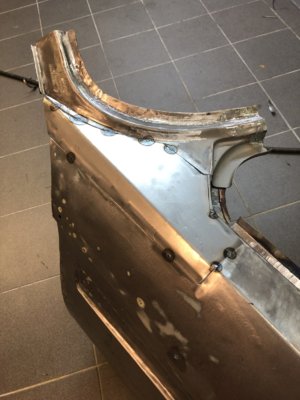
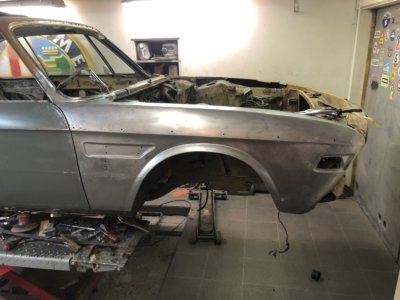
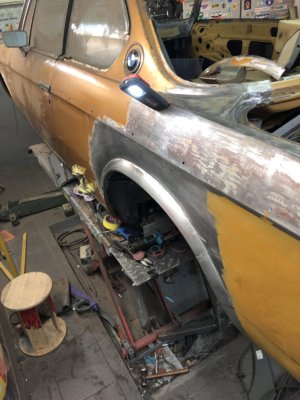
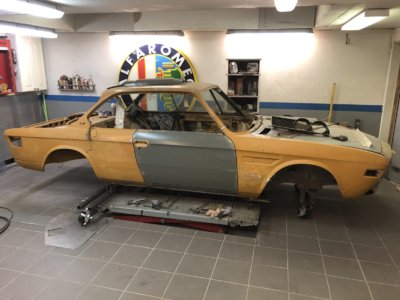
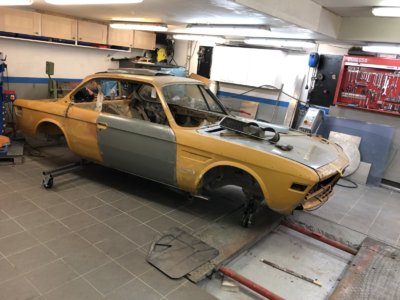
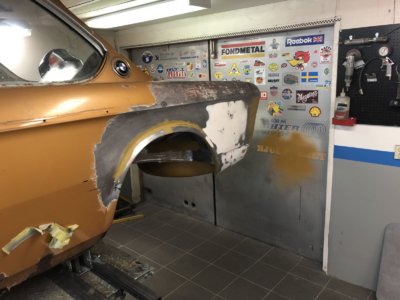
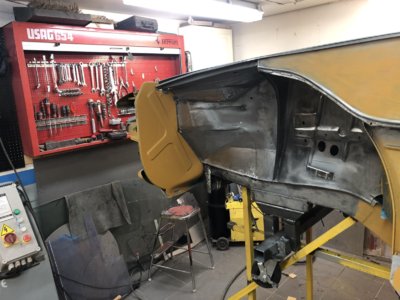
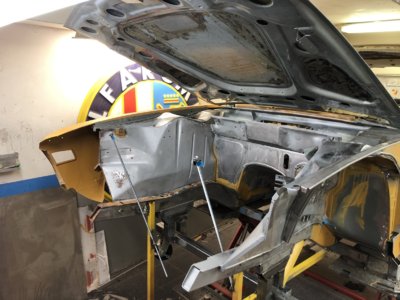
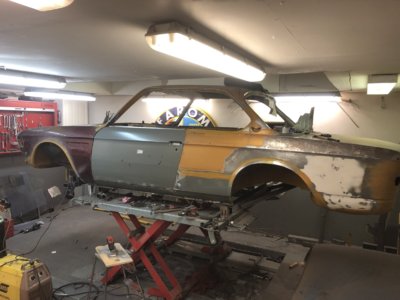
Raparing the front fender , door testfitted and repairs to the rear fender. Epoxi-primer on parts of the car.
Attachments
I love watching this car come back to life.
Should keep it Ceylon like the phoenix rising from the ashes!!
Should keep it Ceylon like the phoenix rising from the ashes!!
Excellent work!
Surprised though that you didn't blast the shell first before welding all the patches.
Surprised though that you didn't blast the shell first before welding all the patches.
Thanks again for the comments!
@teahead , reason for not blasting ahead was mostly the fact that I was afriad it would not survive and it would be much harder to replicate and understand the original construction . The remaining rusty pieces was great help in the "puzzle" back together.
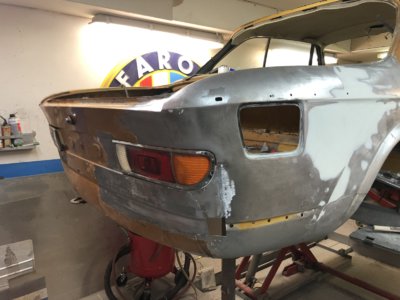
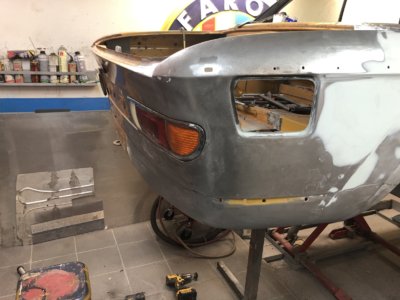
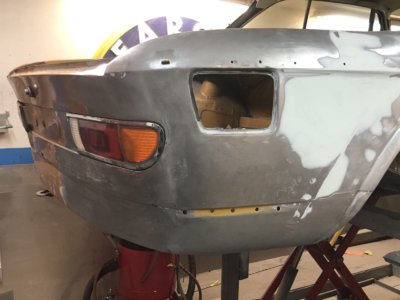
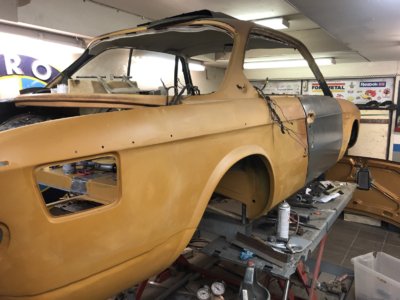
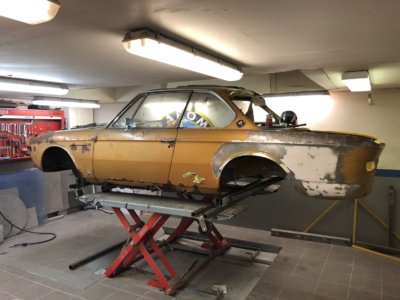
More pictures. "Finished" the right side and started on the left side. Rear trunk more or less finished. Left wheelarch much better than the right so only the inner and outer arch had to be renewed.
@teahead , reason for not blasting ahead was mostly the fact that I was afriad it would not survive and it would be much harder to replicate and understand the original construction . The remaining rusty pieces was great help in the "puzzle" back together.
More pictures. "Finished" the right side and started on the left side. Rear trunk more or less finished. Left wheelarch much better than the right so only the inner and outer arch had to be renewed.
Attachments
-
 IMG_3375.JPG286.2 KB · Views: 462
 -
 IMG_3376.JPG291.6 KB · Views: 445
 -
 IMG_3419.JPG302.8 KB · Views: 431
 -
 IMG_3420.JPG290.6 KB · Views: 441
 -
 IMG_3491.JPG270.9 KB · Views: 466
 -
 IMG_3517.JPG325.5 KB · Views: 411
 -
 IMG_3521.JPG254 KB · Views: 449
 -
 IMG_3552.JPG241.9 KB · Views: 409
 -
 IMG_3554.JPG298 KB · Views: 419
 -
 IMG_3555.JPG290.7 KB · Views: 412
 -
 IMG_3558.JPG250.6 KB · Views: 456
 -
 IMG_3559.JPG272.3 KB · Views: 399
 -
 IMG_3561.JPG262 KB · Views: 407
 -
 IMG_3562.JPG201.2 KB · Views: 449
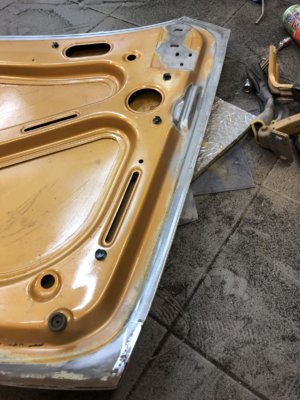
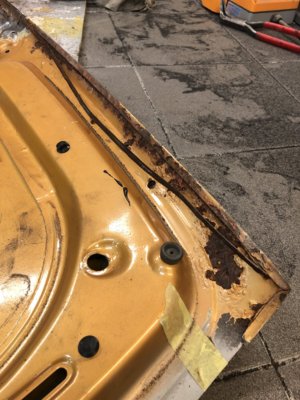
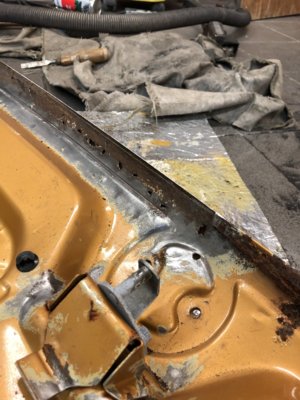
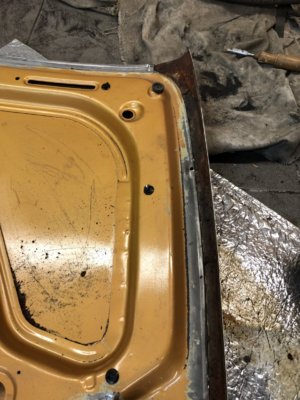
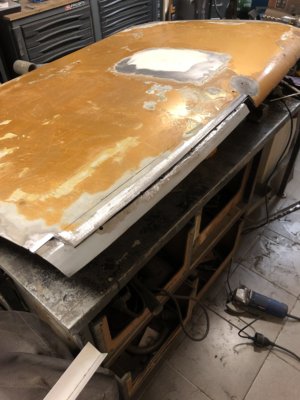
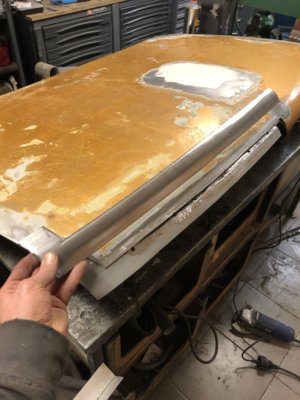
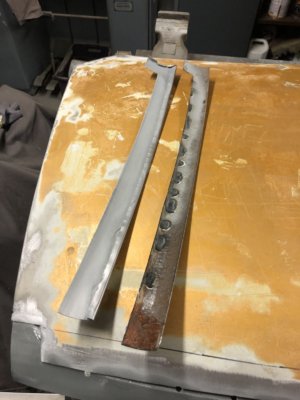
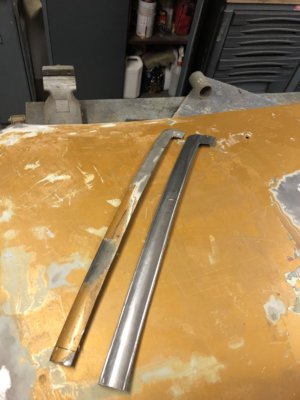
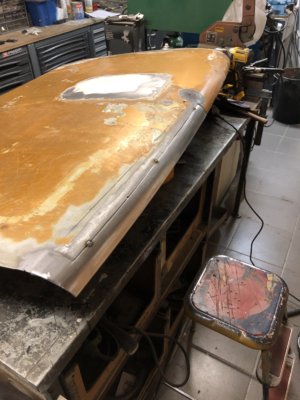
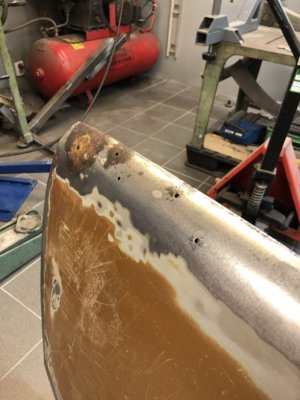
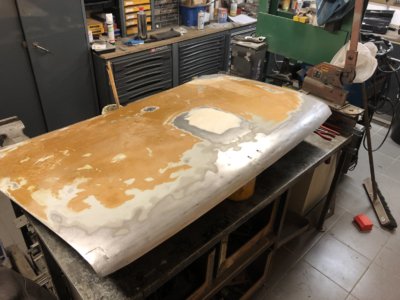
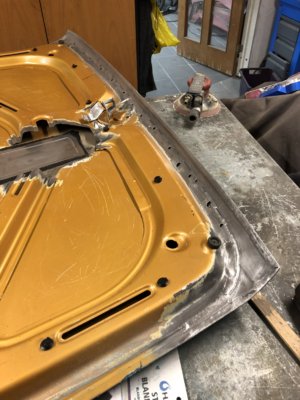
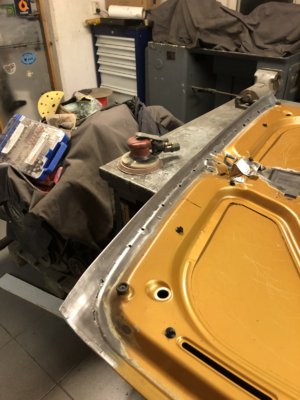
My rear trunklid was in a pretty poor state but I could not find a better one and decided to try to salvage it , allot of work , both inner and outer rear sections fabricated.
Attachments
-
 IMG_3585.JPG410.1 KB · Views: 395
 -
 IMG_3586.JPG433.1 KB · Views: 434
 -
 IMG_3587.JPG367.9 KB · Views: 423
 -
 IMG_3588.JPG353 KB · Views: 405
 -
 IMG_3589.JPG431.4 KB · Views: 382
 -
 IMG_3590.JPG395.8 KB · Views: 403
 -
 IMG_3591.JPG335.2 KB · Views: 364
 -
 IMG_3594.JPG382.6 KB · Views: 367
 -
 IMG_3602.JPG302.9 KB · Views: 377
 -
 IMG_3603.JPG278.1 KB · Views: 386
 -
 IMG_3604.JPG236.1 KB · Views: 365
 -
 IMG_3605.JPG231.9 KB · Views: 454
 -
 IMG_3607.JPG297.4 KB · Views: 429
 -
 IMG_3625.JPG246.1 KB · Views: 383
 -
 IMG_3627.JPG250 KB · Views: 424
 -
 IMG_3630.JPG260.5 KB · Views: 375
 -
 IMG_3650.JPG278.2 KB · Views: 398
 -
 IMG_3653.JPG315.3 KB · Views: 413
 -
 IMG_3654.JPG270.3 KB · Views: 408
Not sure if Sweden has the facilities, but if you have a shell when you're done, does Sweden have an acid dipping service and 2nd dip in galvanize (whch then you'd follow up w/epoxy coat)?
We have that here in the Pacific NW (both in Portland and Vancouver, BC Canada) that would be ideal for any E9 to have done.
We have that here in the Pacific NW (both in Portland and Vancouver, BC Canada) that would be ideal for any E9 to have done.
Tomedian
Member
All this fast progress is not sittng well with my conscience! Ace work.I continue with more pictures , not sure what to write really , rust rust rust..
I try to salvage all that is possible , repaired the sparewheelwell (spelling?) and the fueltank . The fueltank was hevily modified and a aftermarket in-tank pump was added.
New floor in the boot .
Not sure if Sweden has the facilities, but if you have a shell when you're done, does Sweden have an acid dipping service and 2nd dip in galvanize (whch then you'd follow up w/epoxy coat)?
We have that here in the Pacific NW (both in Portland and Vancouver, BC Canada) that would be ideal for any E9 to have done.
That would have been great but I have not found nor of theese options in Sweden , probably due to legislation. I know Norway has an acid dipping faciclity but transport etc makes this to difficult.
Will have to treat it with epoxy and waxoil or similair instead.
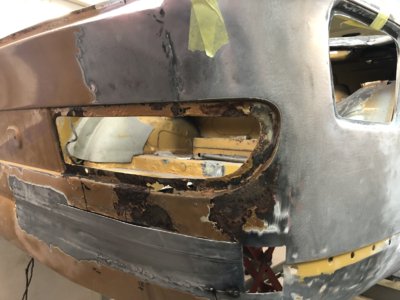
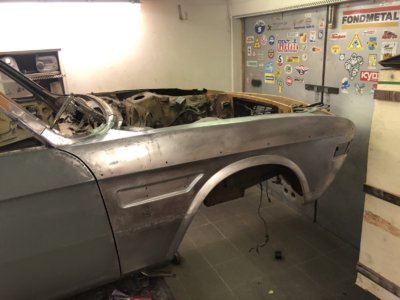
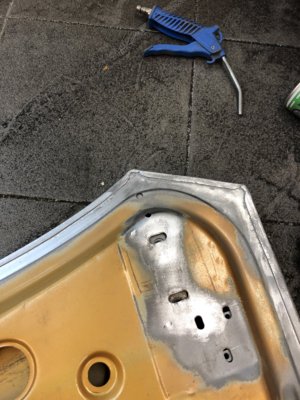
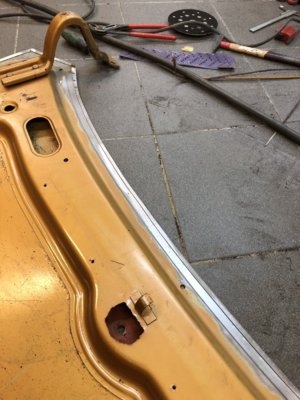
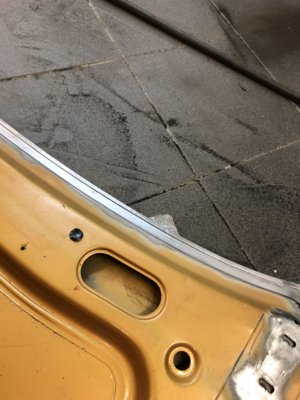
So , right side "done" , lets continue on the left side ,
Attachments
-
![IMG_3671[1].JPG](/forum/data/attachments/121/121963-fb45515b4e8c0f67a1c781ec43254f2f.jpg?hash=-0VRW06MD2) IMG_3671[1].JPG368.8 KB · Views: 367
IMG_3671[1].JPG368.8 KB · Views: 367 -
![IMG_3672[1].JPG](/forum/data/attachments/121/121964-6bef8e112e0cdfe3e6890c1619f4bcbd.jpg?hash=a--OES4M3-) IMG_3672[1].JPG354.4 KB · Views: 411
IMG_3672[1].JPG354.4 KB · Views: 411 -
![IMG_3674[1].JPG](/forum/data/attachments/121/121965-0615a15a8a2a3a2bdeaaa02a1314b6b5.jpg?hash=BhWhWooqOi) IMG_3674[1].JPG357.3 KB · Views: 360
IMG_3674[1].JPG357.3 KB · Views: 360 -
![IMG_3677[1].JPG](/forum/data/attachments/121/121966-5aaf2b2cb6626ac2387885f47aa58d90.jpg?hash=Wq8rLLZias) IMG_3677[1].JPG375 KB · Views: 338
IMG_3677[1].JPG375 KB · Views: 338 -
![IMG_3712[1].JPG](/forum/data/attachments/121/121967-184dafabb8d5dc395818601fa6c340b6.jpg?hash=GE2vq7jV3D) IMG_3712[1].JPG320.6 KB · Views: 341
IMG_3712[1].JPG320.6 KB · Views: 341 -
![IMG_3743[1].JPG](/forum/data/attachments/121/121968-0469d7353e76da798e6f94fe6b76450c.jpg?hash=BGnXNT522n) IMG_3743[1].JPG308.9 KB · Views: 346
IMG_3743[1].JPG308.9 KB · Views: 346 -
![IMG_3765[1].JPG](/forum/data/attachments/121/121969-cd9149b659cd5beafb2fcf9d7cff9d42.jpg?hash=zZFJtlnNW-) IMG_3765[1].JPG340.6 KB · Views: 381
IMG_3765[1].JPG340.6 KB · Views: 381 -
![IMG_3692[1].JPG](/forum/data/attachments/121/121970-de38e89480827715b713f5afd2d8db72.jpg?hash=3jjolICCdx) IMG_3692[1].JPG344.4 KB · Views: 359
IMG_3692[1].JPG344.4 KB · Views: 359 -
![IMG_3771[1].JPG](/forum/data/attachments/121/121971-848ed27ee632146ac554d0d57bd881f1.jpg?hash=hI7SfuYyFG) IMG_3771[1].JPG331.5 KB · Views: 391
IMG_3771[1].JPG331.5 KB · Views: 391
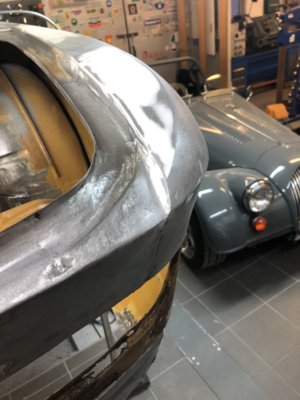
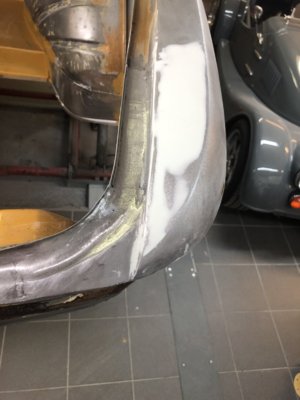
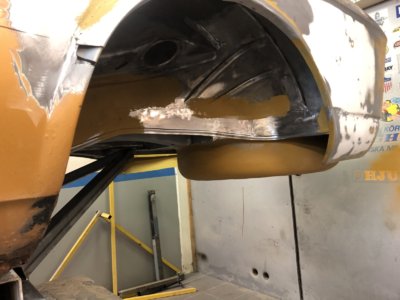
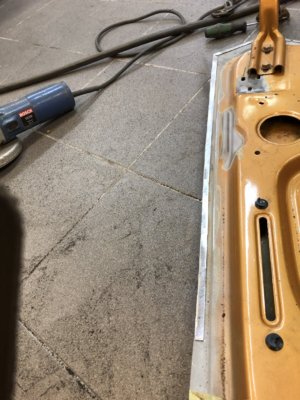
Work goes on , left front wheelhouse gets some attention
Attachments
-
![IMG_3801[1].JPG](/forum/data/attachments/121/121972-1006175fcf133ccccaa7c193eb05177c.jpg?hash=EAYXX88TPM) IMG_3801[1].JPG408.9 KB · Views: 345
IMG_3801[1].JPG408.9 KB · Views: 345 -
![IMG_3809[1].JPG](/forum/data/attachments/121/121973-c039bb01a2cfde637a1f70de8074c542.jpg?hash=wDm7AaLP3m) IMG_3809[1].JPG348.8 KB · Views: 333
IMG_3809[1].JPG348.8 KB · Views: 333 -
![IMG_3800[1].JPG](/forum/data/attachments/121/121974-3b2d7d6c5058d442b3e10ad5d351ac59.jpg?hash=Oy19bFBY1E) IMG_3800[1].JPG340.9 KB · Views: 403
IMG_3800[1].JPG340.9 KB · Views: 403 -
![IMG_3848[1].JPG](/forum/data/attachments/121/121975-dc466ebeec1427545ed01b74526e9cb3.jpg?hash=3EZuvuwUJ1) IMG_3848[1].JPG323.9 KB · Views: 359
IMG_3848[1].JPG323.9 KB · Views: 359 -
![IMG_3856[1].JPG](/forum/data/attachments/121/121976-1a76bf9b9572c6b082d62665c4376fa2.jpg?hash=Gna_m5Vyxr) IMG_3856[1].JPG312.1 KB · Views: 330
IMG_3856[1].JPG312.1 KB · Views: 330 -
![IMG_3881[1].JPG](/forum/data/attachments/121/121977-66777a642861bdc64e8a2962ea978e42.jpg?hash=Znd6ZChhvc) IMG_3881[1].JPG300.5 KB · Views: 357
IMG_3881[1].JPG300.5 KB · Views: 357 -
![IMG_3907[1].JPG](/forum/data/attachments/121/121978-7616795b90302f03fdb273518d169760.jpg?hash=dhZ5W5AwLw) IMG_3907[1].JPG345.9 KB · Views: 370
IMG_3907[1].JPG345.9 KB · Views: 370 -
![IMG_3951[1].JPG](/forum/data/attachments/121/121979-87fcf032cde549fb8a717ad1622a85af.jpg?hash=h_zwMs3lSf) IMG_3951[1].JPG369.2 KB · Views: 390
IMG_3951[1].JPG369.2 KB · Views: 390 -
![IMG_3953[1].JPG](/forum/data/attachments/121/121980-5e8a24decd7ed667a2d4ded2e9475f16.jpg?hash=Xook3s1-1m) IMG_3953[1].JPG273.8 KB · Views: 340
IMG_3953[1].JPG273.8 KB · Views: 340 -
![IMG_3980[1].JPG](/forum/data/attachments/121/121981-0b4f5e4442feff304c2596e64040ad4b.jpg?hash=C09eREL-_z) IMG_3980[1].JPG280.4 KB · Views: 388
IMG_3980[1].JPG280.4 KB · Views: 388 -
![IMG_3983[1].JPG](/forum/data/attachments/121/121982-547b6087e27c84ea49fb69ef0269f2ec.jpg?hash=VHtgh-J8hO) IMG_3983[1].JPG442.8 KB · Views: 387
IMG_3983[1].JPG442.8 KB · Views: 387
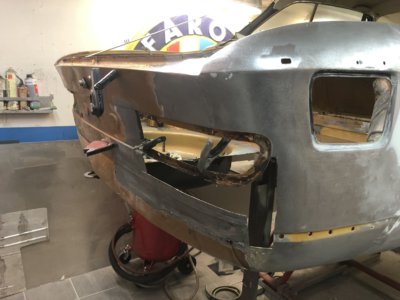
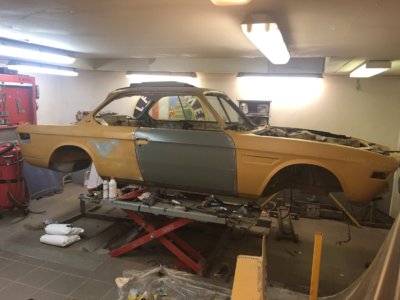
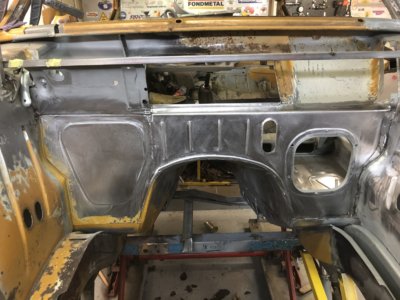
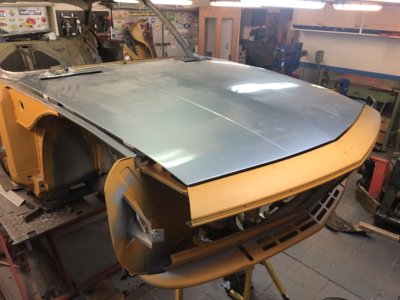
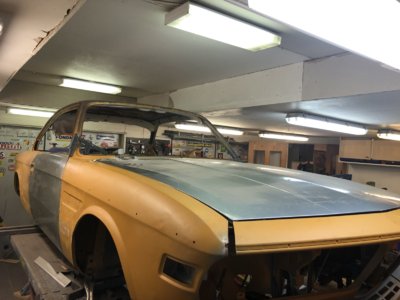
New floors get put in , new framerailextension , new gearbox mount , bought a "new" roof , had to fabricate a new firewall and got the "new" front nose back from blasting.
Attachments
-
![IMG_4011[1].JPG](/forum/data/attachments/121/121983-8bfefcc5d49ac85be3c3cacd622e6c53.jpg?hash=i_78xdSayF) IMG_4011[1].JPG356.7 KB · Views: 368
IMG_4011[1].JPG356.7 KB · Views: 368 -
![IMG_4013[1].JPG](/forum/data/attachments/121/121984-7ab12ad9d5277fc01d0b5cbc5ef8fe42.jpg?hash=erEq2dUnf8) IMG_4013[1].JPG217.6 KB · Views: 409
IMG_4013[1].JPG217.6 KB · Views: 409 -
![IMG_4021[1].JPG](/forum/data/attachments/121/121985-d69fd95bbc5ea76149287e505c801169.jpg?hash=1p_ZW7xep2) IMG_4021[1].JPG385.8 KB · Views: 357
IMG_4021[1].JPG385.8 KB · Views: 357 -
![IMG_4034[1].JPG](/forum/data/attachments/121/121986-6d9856877b282a88f04e74ee701c67df.jpg?hash=bZhWh3soKo) IMG_4034[1].JPG350.8 KB · Views: 422
IMG_4034[1].JPG350.8 KB · Views: 422 -
![IMG_4035[1].JPG](/forum/data/attachments/121/121987-c9069c92272ca45003450333aef9568e.jpg?hash=yQackicspF) IMG_4035[1].JPG326 KB · Views: 406
IMG_4035[1].JPG326 KB · Views: 406 -
![IMG_4050[1].JPG](/forum/data/attachments/121/121988-bb8d73979c1892afe111ef6527a1bdc2.jpg?hash=u41zl5wYkq) IMG_4050[1].JPG301.3 KB · Views: 382
IMG_4050[1].JPG301.3 KB · Views: 382 -
![IMG_4070[1].JPG](/forum/data/attachments/121/121989-0ce0a0e53e290f581954e1daf015765f.jpg?hash=DOCg5T4pD1) IMG_4070[1].JPG233.5 KB · Views: 399
IMG_4070[1].JPG233.5 KB · Views: 399 -
![IMG_4096[1].JPG](/forum/data/attachments/121/121990-d8f3527cf30cb9e38c92d306f736c9af.jpg?hash=2PNSfPMMue) IMG_4096[1].JPG133.7 KB · Views: 327
IMG_4096[1].JPG133.7 KB · Views: 327 -
![IMG_4163[1].JPG](/forum/data/attachments/121/121991-900256e71493e6b6b0385a55167090b2.jpg?hash=kAJW5xST5r) IMG_4163[1].JPG360.2 KB · Views: 363
IMG_4163[1].JPG360.2 KB · Views: 363 -
![IMG_4165[1].JPG](/forum/data/attachments/121/121992-8eea022258cee5c623e93ce8fd55390b.jpg?hash=juoCIljO5c) IMG_4165[1].JPG235 KB · Views: 371
IMG_4165[1].JPG235 KB · Views: 371 -
![IMG_4168[1].JPG](/forum/data/attachments/121/121993-b93095c38c4b685a1c0562699837e7d7.jpg?hash=uTCVw4xLaF) IMG_4168[1].JPG309.5 KB · Views: 370
IMG_4168[1].JPG309.5 KB · Views: 370 -
![IMG_4192[1].JPG](/forum/data/attachments/121/121994-774babffdafbd2a63ee57b4a71b8d6f3.jpg?hash=d0ur_9r70q) IMG_4192[1].JPG292.2 KB · Views: 335
IMG_4192[1].JPG292.2 KB · Views: 335 -
![IMG_4196[1].JPG](/forum/data/attachments/121/121995-94ca05e40a5fdee2277401167de16267.jpg?hash=lMoF5Apf3u) IMG_4196[1].JPG527.6 KB · Views: 365
IMG_4196[1].JPG527.6 KB · Views: 365 -
![IMG_4190[1].JPG](/forum/data/attachments/121/121996-6224518fc8eb8c306ce7dedf4b2a0e03.jpg?hash=YiRRj8jrjD) IMG_4190[1].JPG291.7 KB · Views: 359
IMG_4190[1].JPG291.7 KB · Views: 359 -
![IMG_4191[1].JPG](/forum/data/attachments/121/121997-350ab9782f6065e81ae19c6f2e75615e.jpg?hash=NQq5eC9gZe) IMG_4191[1].JPG323.2 KB · Views: 410
IMG_4191[1].JPG323.2 KB · Views: 410
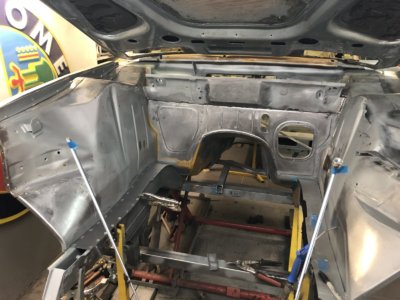
Work continues . Finished the firewall and also had to almost re-make the uppersection due to rust damages also. Mocked upp the new front end and welded that in .
More or less finished the enginebay.
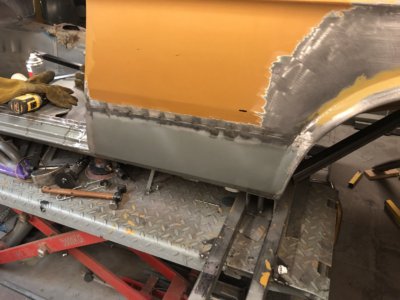
Welded the lower section og the left rear fender .
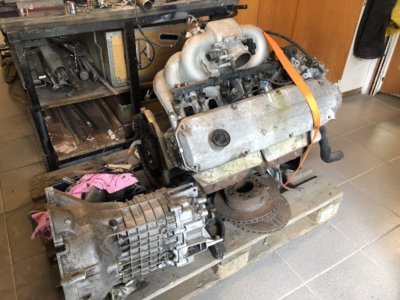
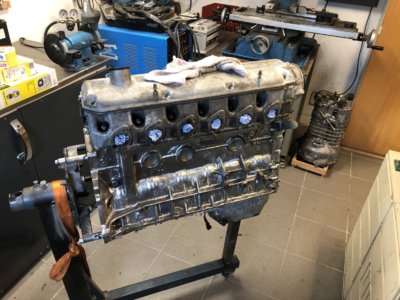
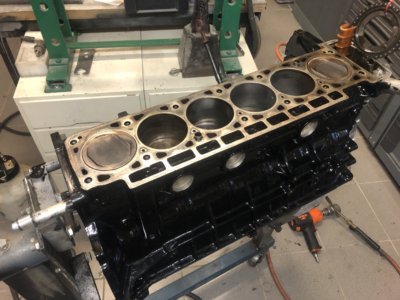
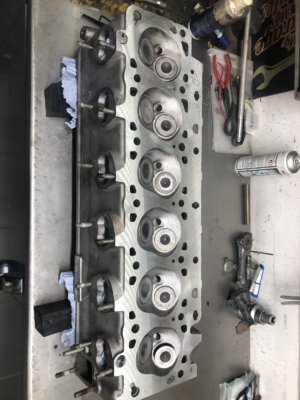
Started tearing down the M30B35 that I plan to use , had som issues with the block (moe on that later) but at least finshed the cylinderhead.
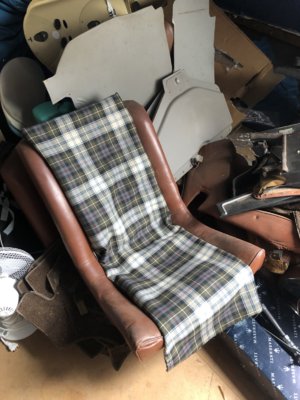
I also placed an order for 5 meters of Porsche fabric that will be used in the centers of the seats (outer sections will be re-done in original conaqscolored vinyl)
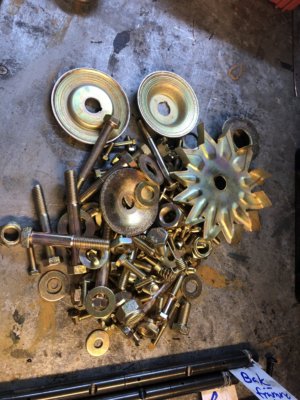
Sent of 15 kg of screws washer, brackets etc to have it re-plated.
More or less finished the enginebay.
Welded the lower section og the left rear fender .
Started tearing down the M30B35 that I plan to use , had som issues with the block (moe on that later) but at least finshed the cylinderhead.
I also placed an order for 5 meters of Porsche fabric that will be used in the centers of the seats (outer sections will be re-done in original conaqscolored vinyl)
Sent of 15 kg of screws washer, brackets etc to have it re-plated.
Attachments
-
 IMG_4199.JPG318.1 KB · Views: 344
 -
 IMG_4210.JPG475.9 KB · Views: 388
 -
 IMG_4300.JPG243.4 KB · Views: 344
 -
 IMG_4302.JPG207.5 KB · Views: 327
 -
 IMG_4307.JPG297.4 KB · Views: 368
 -
 IMG_4315.JPG301.6 KB · Views: 363
 -
 IMG_4333.JPG306.5 KB · Views: 379
 -
 IMG_4433.JPG255.1 KB · Views: 335
 -
 IMG_4503.JPG230.1 KB · Views: 349
 -
 IMG_4575.JPG333.1 KB · Views: 343
 -
 IMG_4581.JPG397.3 KB · Views: 421
 -
 IMG_4599.JPG366.2 KB · Views: 376
 -
 IMG_4624.JPG305 KB · Views: 335
 -
 IMG_4872.JPG464.8 KB · Views: 347
 -
 IMG_4922.JPG329.2 KB · Views: 323
 -
 IMG_4931.JPG344 KB · Views: 379
Belgiumbarry
Well-Known Member
amazing courage & work !
day66
Well-Known Member
definitely - makes me realise how lucky i've been with mine!
A few more pictures.
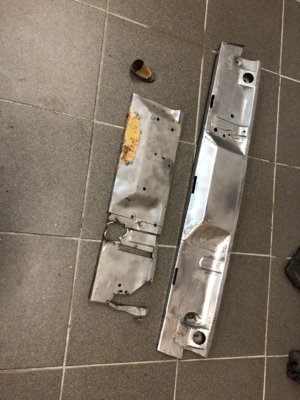
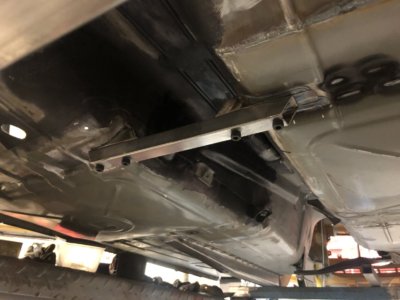
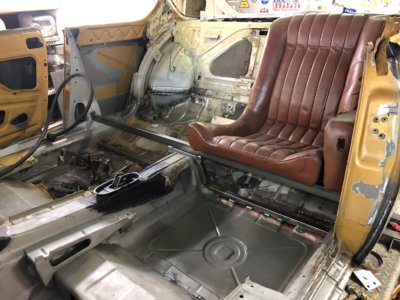
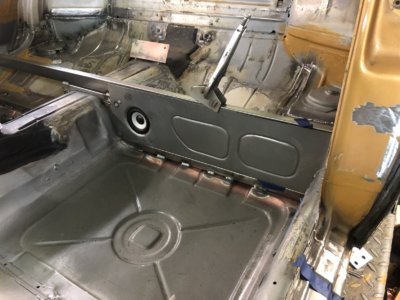
During floor repairs i removed the flimsy panel that the rear seat bench rests on . Instead of putting it back I made a more structual re-inforcement with square pipe and a removable link on the underside to be able to fit the propshaft (or more easy at least?) . Figured I could use the space to put two speakers in also.
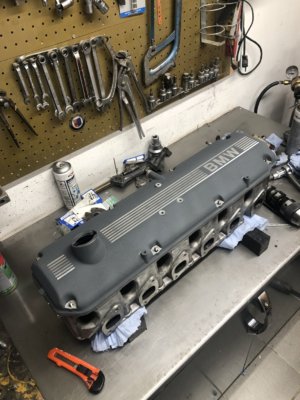
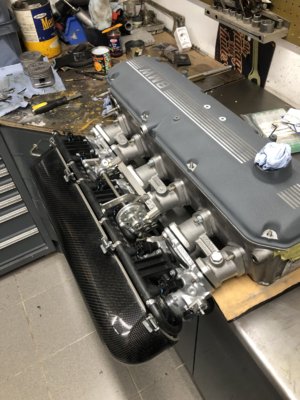
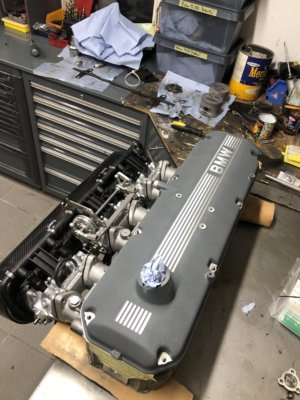
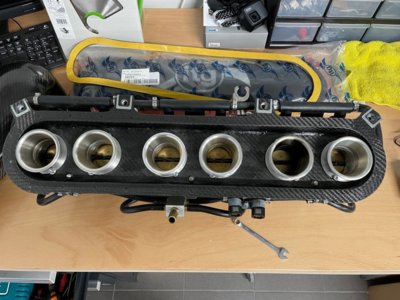
Cylinderhead finished and I bought an ITB kit with a carbonfibre airbox . Welded a re-inforcement to the diff bushing attachement also.
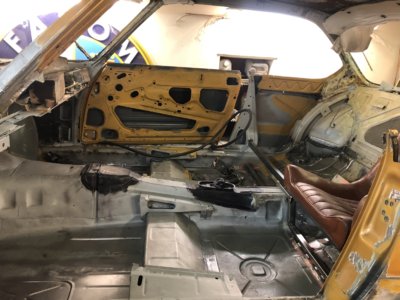
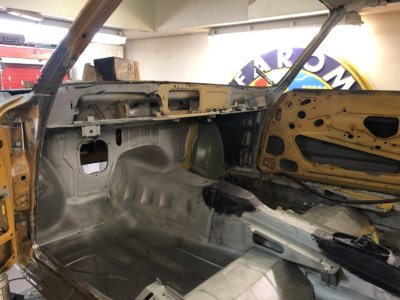
Ny batterytray in place and rear wheelhouses finished and got a coat of epoxi primer.
During floor repairs i removed the flimsy panel that the rear seat bench rests on . Instead of putting it back I made a more structual re-inforcement with square pipe and a removable link on the underside to be able to fit the propshaft (or more easy at least?) . Figured I could use the space to put two speakers in also.
Cylinderhead finished and I bought an ITB kit with a carbonfibre airbox . Welded a re-inforcement to the diff bushing attachement also.
Ny batterytray in place and rear wheelhouses finished and got a coat of epoxi primer.
Attachments
-
 IMG_5014.JPG217.4 KB · Views: 327
 -
 IMG_5031.JPG330.3 KB · Views: 349
 -
 IMG_5034.JPG298.7 KB · Views: 390
 -
 IMG_5035.JPG279.8 KB · Views: 333
 -
 IMG_5037.JPG247.6 KB · Views: 353
 -
 IMG_5039.JPG299.9 KB · Views: 408
 -
 IMG_5049.JPG385 KB · Views: 355
 -
 IMG_5050.JPG359.3 KB · Views: 329
 -
 IMG_5052.JPG192.5 KB · Views: 388
 -
 IMG_5088.JPG153.3 KB · Views: 341
 -
 IMG_5240.JPG312.8 KB · Views: 340
 -
 IMG_5242.JPG173.4 KB · Views: 376
Belgiumbarry
Well-Known Member
in a pic i see your Morgan project !
This is ours, already for many years our favorit summer car . Did a 10 days "rally" with it in Scotland ( 2016) , the Pyrenees. (2018) and even a regularity rally in the Vosges ( France) when the coupe was down with clutch . It's a '89 Plus 4 with the Rover M16 engine , and of course red
That is for sure a keeper !